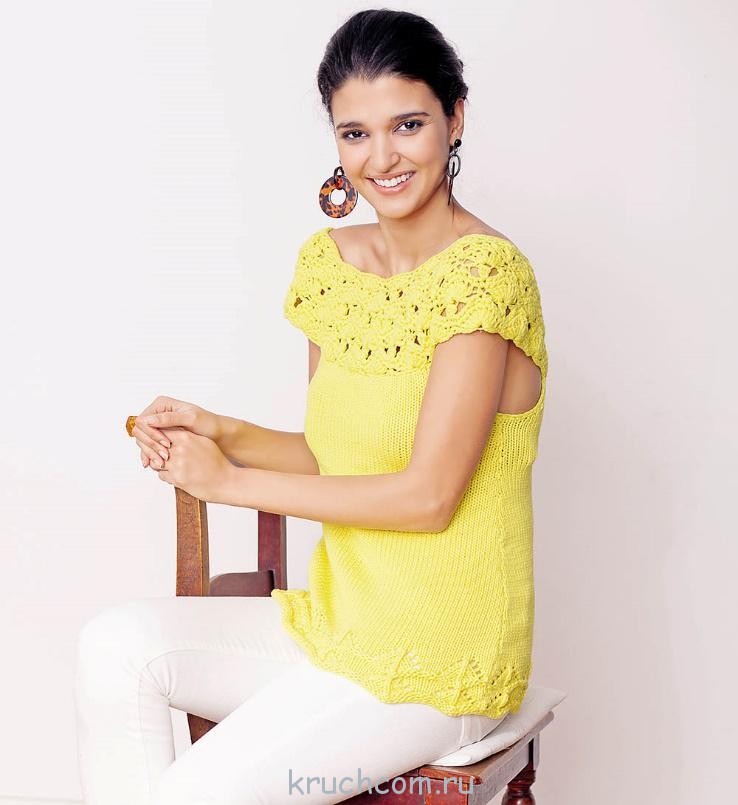
In this post, I want to cover some of the points of crocheting a yoke. This cut element is fraught with opportunities for creating a huge variety of beautiful dress styles.
Here I describe how to knit a yoke in a children's dress; for the adult version, in most models, it is necessary to build patterns and knit according to them!
What are the main types of coquette in knitted products.
1. Square yoke.
2. Round yoke.
3. Classic yoke.
The most frequently asked questions: 1 how many loops to dial for knitting a neckline; 2 how to determine the height of the yoke; 3 why when knitting a yoke, the sleeves are wide; 4. how to separate the loops so that a "beveled" shoulder is obtained in a square yoke; 5 how to knit a classic yoke without a pattern.
I will try to answer these questions. There are many schemes and descriptions of various dresses on the Internet, and when we are just learning to knit it is not always clear "where does that come from")
It seems to me that it is much more important to give a fishing rod and teach how to fish than to treat this fish once)
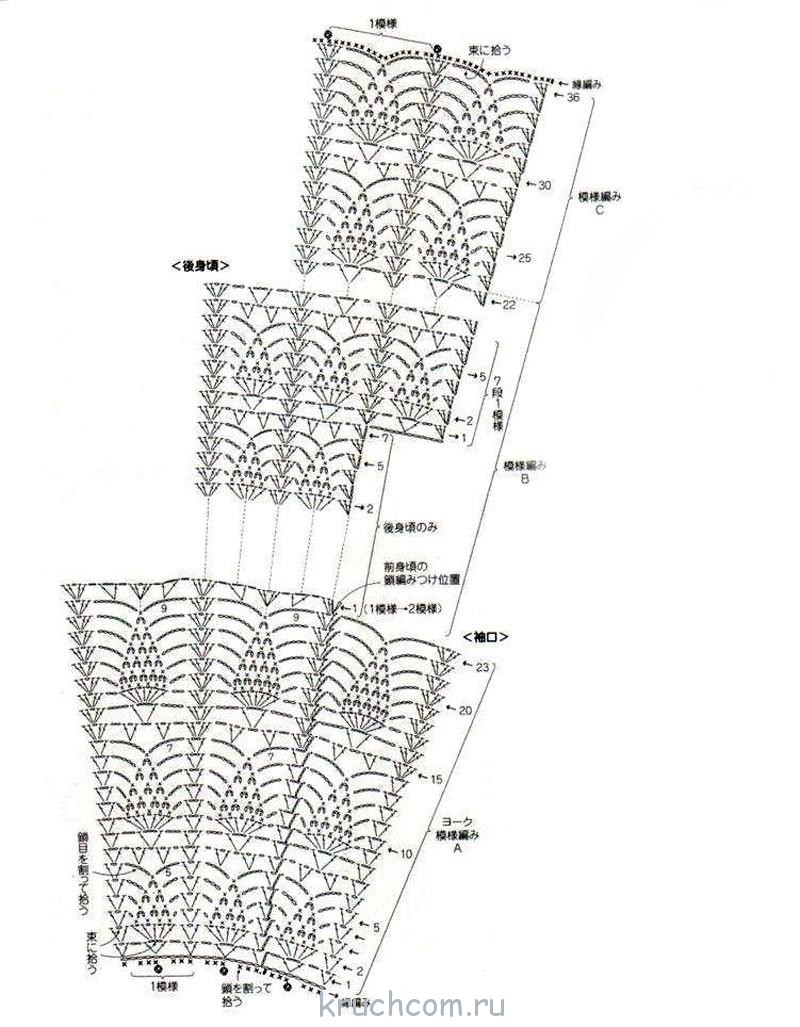
Yokes can be knitted from top to bottom and then start knitting the skirt of the dress. Or, on the contrary, the hem is first knitted, and then the yoke is tied up.
From top to bottom, square yokes with a raglan sleeve and round yokes are most often knitted.
Let's take a closer look at the example of a square yoke with a raglan sleeve.
Knitting of any thing begins with taking measurements, selecting patterns and calculating the knitting density.
To knit a yoke from top to bottom, it is necessary to take a measurement of the Neck circumference (OBSH) of the chest circumference (OG).
Determined the knitting density: 3ssn = 1 cm.
We collect a chain of air loops (VP).
If you plan to have a yoke with a neckline almost under the very neck, then the length of the typesetting row of the chain of air loops is equal to OBW + 2 (1) cm. Since in this version the neck girth is less than the head girth, in order to easily put on the dress on the back (or a shelf, depending on the idea, I will describe the back), a cutout is made for the fastener.
If you decide to make a yoke without a fastener, then the length of the typesetting row is equal to the circumference of the head plus 2-3 cm.
Neck circumference = 25 cm + 2 cm = 27 cm
27cm * 3ssn = 81 loops.
We knit ssn in rotary rows, and at the beginning of the row, the first ssn will always replace 3 VP lifts.
After the typesetting row is connected, it is necessary to calculate the number of loops for the back, front and sleeves.
Classic version: subtract 4 loops for raglan lines from the total number of loops. Divide the remaining number of loops by 3.
1/3-on the shelf;
1/3 on the back;
1/3 for both sleeves.
Since we will have a fastener on the back, the number of loops on the back should be a multiple of 2.
81-4 = 77 stitches
77/3 = 25.66 loops fractional number
How do we proceed?
We will leave 27 loops on the shelf;
On the back 26 loops;
And 24 loops for sleeves, 12 loops for each.
Check: 27 + 26 + 12 + 12 = 77 stitches
There are a lot of knitting patterns for square yokes on the Internet, so here I explain only the principle.
If you divide the loops in this way, you get a square yoke with a "beveled" shoulder fig. 1.1.
The second variant of separation for a yoke with straight shoulders Fig 2.1.
From the total number of loops, subtract 4 loops for raglan lines.
Divide the remaining number of loops by 4.
1/4 per spike;
1/4 on the shelf;
1/4 for sleeves.
81-4 = 77 stitches
77/4 = 19.25 stitches
Taking into account that there is a fastener on the back, the number of loops db is a multiple of 2.
20 back loops;
19 loops right sleeve;
19 loops shelf;
19 loops left sleeve;
When calculating and distributing the loops, it is always necessary to take into account the pattern rapport, if the yoke is knitted with it.
Also in this version, I left 4 loops on the raglan line (1 for each line), but based on the idea, this line can be knitted with a pattern, and then this factor should be taken into account.
The next question that arises for beginners is: how long do you need to knit a yoke?
This refers to how high along the armhole line.
For knitting products with raglan sleeves, the average values of the length of raglan lines (in figures 2.1,2.2,2.3) I highlighted them in gray.
Size (height in cm) Up to 80 86-92 98-104 110 116 122
Raglan line length (cm) 13 14 15 16 17 18
These measurements are average and also depend on the dress model.
A more accurate value for the height of the armhole can be calculated using the formula:
Where the POG is the half-girth of the chest.
I add up to a year (up to a height of 80 cm) 5-6 cm.
In our example
PHG = 52: 2 = 26 cm
26: 4 + 5 = 11.5 cm
In this figure, the armhole line is highlighted in red.
We considered 2 options:
Or we focus on the length of the raglan line;
Or we calculate the height of the armhole.
Having tied this part of the yoke to the desired height, we close the knitting in a circle, and,
Very often, beginners have a question:
"I knit to the right height, but the sleeves are too wide."
We proceed as follows:
We knit to the desired sleeve width, then we divide the knitting and continue to knit the yoke in rotary rows.

Then we divide the knitting and knit the shelf separately, making increments along the raglan line at the beginning and at the end of the row. And, in the same way, we knit the back.
We don't knit sleeves anymore.
Having tied the yoke to the desired height, we close the knitting in a circle.

Do not forget that we close the yoke in a circle along the chest line. Accordingly, the total number of loops at this stage should be the length of the chest circumference plus 2-3 cm.
In our example
52cm + 3cm = 55cm
55cm * 3ssn = 165 stitches.
At this point, we add the missing loops under the armholes.
For example, we have 66 loops on the shelf, 70 loops on the back
67 + 70 = 137 stitches
155-137 = 18 stitches
This means that under each armhole we will need to tie a chain of 9 VP (18: 2).
These numbers are conditional
The round yoke is knitted in the same way.
On an aspen it is very well and easily disassembled how to knit it
We calculate the length of the neck in the same way as in a square yoke.
We make the increments evenly, in each row or in accordance with the pattern of the pattern.
The classic yoke is most often knitted from the bottom up, from the hip line, waist or from the chest line.
In this diagram, conditional numbers, they depend on the size (that is, on the values of the measurements taken).
To knit a classic yoke, you need to build a pattern.
The pattern is necessary in order to know how much and in what way to make reductions along the line of the armhole, at what height to start making out the necklines, etc.
If you do not know how to do this (build patterns), then you can focus on a knitted sleeveless T-shirt, which now fits the child well.
Girl with early age you need to accustom yourself to the concept of beauty. A thread and a crochet hook in skilled hands will work wonders. This tool is intended not just for knitting, but for creating lace that can turn a baby into a real princess. Need a tight dress? It also allows you to knit a large number crochet and thick woolen threads.
Perhaps not the easiest option, but the fastest in execution is a crochet summer dress for a girl. It is best to take cotton threads for work due to their hygroscopicity. Although cotton, unlike flax, warms, openwork knitting will create the necessary "ventilation" for the child's body.


Scheme and description
The simplest dress can be made from motives. The beauty of this model is that it can be tied in length as the child grows. It is advisable to initially knit the product wide, with a large neck, so that the adored princess does not quickly grow out of it. The straight silhouette of the dress will allow the use of square motifs. The simplest of them begins to knit with a ring of eight air loops. For greater density, the circle is tied with single crochets. Do not forget about the lifting loops in each row. In the third row, columns with air loops alternate. From two loops we knit double crochets, then five stitches, again two double crochets, then five stitches, etc. You should get a square outline.


Next, we knit in a checkerboard pattern: where there were air loops, we knit the columns. First two, then skip the loop, making a chain of five air loops over it to form an angle. From the two remaining air loops of the lower row we knit two columns, etc. If you need to make a "bridge" from air loops not at the corner, then you can dial two or three - so that the motif is flat. You can make anything from such motifs of different colors: a vest, a dress, a T-shirt.
Crochet dresses for girls - schemes and description
A more complex dress is knitted on a yoke that is close to the body. The skirt with this style diverges with a flounce. A special pattern is chosen for it, for example, a fan pattern, which can be easily increased from the top to the bottom of the product. As a rule, the yoke is made tight, and the skirt is airy. But you can make a yoke in the form of a cape, which is unusually beautiful. Along the edge of the yoke and skirt, it is good to arrange with the same teeth.
Crochet yoke
You can crochet different yokes - round and square. You can really beat each option in your own way, so that it looks advantageous.
Example in pictures
You can see samples of yokes in the pictures below. The name of the variant of the yoke "square" is not entirely correct, since this detail is most often rectangular. A round yoke is often an oval. It all depends on the style baby dress.


How to knit
It is convenient to start a round yoke from the neckline, since its size is initially known. We collect a chain of air loops of the required length. We begin to knit double crochets from every second loop, alternating them with air loops. In order for the yoke to increase from the center, in the next rows you need to knit two single crochet from one loop, alternating them with air loops. After a couple of rows, the number of air loops between paired columns can be increased to two or three. The length of the yoke depends on what should come out of it short sleeves summer dress.


The square yoke forms the "Kare" collar. It is not necessary to add loops in it along the entire length of knitting, but in the corners. In reality, the product turns out to be rectangular: there is a smaller side on the shoulders, a large side on the back and front.
Crochet sundress for girls
Cope with work on a sundress is even easier, since the product can be made on straps. It is enough to tie a cone or cylinder with an openwork pattern, so that later you can attach straps to it.
Example in pictures


Sundress styles are different. The lower part of the product can consist of some flounces, frills, ruffles. The upper one is made more modest, it is a smooth canvas with or without an openwork pattern. Conical models can be openwork from top to bottom. Sometimes the pattern fades into the background giving an advantage to the color. Sundresses made of colored motifs or with multi-colored rows look especially expressive.
Knitting pattern


It is interesting to get a sundress with alternating motives and openwork fabric. We choose floral square shapes for the motives. They are knitted from the center, where a round flower or an eight-pointed star is made, which are tied in the shape of a square with a pair of rows of columns. A strip is sewn from such motifs. Similarly, we knit motifs of a different color and collect them in a strip. Between these stripes, you can tie the canvas with a monotonous pattern, choosing either a transitional shade from one motif to another, or a contrasting color with both.
The children's dress "Zefirka", or "Zephyr", has become popular with mothers. It is not at all necessary to knit it with threads of cream or white color: babies are sometimes such "patches"! The secret of the dress is that it is knitted with a yoke and continues with a single canvas, as one piece. And the sleeves and hem do not require special tying, because the pattern creates a pretty edging.
Example in pictures


There are many successful works where a single-color or multi-colored yarn was taken. The pattern is embossed, fan type. Experienced knitters, even looking at the finished work, will understand how this ornament is made.
How to knit

The neckline is tied with a chain of air loops to the required length. A lifting chain of 3 air loops is tied from it, and then double crochets through two loops. And between these columns, three air loops are performed. Next, a row of single crochet stitches from each loop is knitted for density so that the neck is not loose. Next, you need to form a fan pattern. It starts like this: skip the loop, from the next we knit one double crochet, a couple of air loops and again a double crochet. It turns out a kind of checkmarks. Next, embossed (front) columns are knitted, and between them there are bridges made of air loops. A fan, or shell, is knitted from these bridges. All knitting goes with similar patterns. The dress expands towards the bottom due to a gradual change in the length of the bridges and the number of columns in the shells.
Crochet baby dresses - beautiful patterns
A wide variety of patterns on the Internet is a great help for young mothers who have time to knit. When the baby is not very capricious, she gives her mother the opportunity to knit, in gratitude she is transformed into a little queen. Where to begin? Since the creation of the kryzhma - the baptismal dress.
Christening dress for baby crochet
You can do the same "Marshmallow": the child will be in a dress like an angel. It will turn out very nicely if you pull a white silk ribbon through the openings of the laces, tying bows. Those who know how to make patterns well should try to depict an Orthodox cross, knit an angel.

Snowflakes will be the motives for such a dress. To achieve naturalness, you need to find patterns of hexagonal motifs, because snowflakes in nature look like this. Unlike square motives, the hexagons are interconnected, so you need to have a good idea of how to crochet a one-piece dress for a girl from them.

All kinds of knitted daisies are invented by needlewomen! If the flower is voluminous, then it is better to place it in the form of an ornament on the bodice of the dress. You can also put small bulging daisies around the waist.

Such products are available in summer and winter versions. For summer clothes, the yoke can be knitted, and the bottom of the dress can be linen or cotton. And vice versa, the yoke can be made as smooth as possible from the fabric, the bottom can be tied with an openwork pattern. A cover is required for such a dress. Woven pieces with knitted trim look great.


Warm dress for girls crochet
This warm dress for a girl is crocheted of woolen threads. Such clothes can be assembled from multi-colored motifs, only they need to be made from thick yarn. The pattern should be chosen so that it has as few empty spaces as possible. If you want to give a corrugated structure to some parts of the product, you need to perform english gum crochet. It not so much stretches as it puffs up, creating corrugations.
A warm dress must have sleeves. This shaped piece can be made in a raglan pattern, which is much easier for beginners. Knitting begins from the neck according to the square yoke pattern. Further, there is a division into sleeves, front, back panel.
If you need to knit individual sleeves, it is better to find a diagram on the Internet or prepare a pattern by taking a measurement from the child. Make a knitting plan and make sleeves. Next, they will have to be knitted into the bodice of the dress.
How to knit a beautiful children's dress for a little fashionista if you are just learning the basics of knitting? Here you will be helped by photos and video lessons(mk) from the best masters on the net and their step-by-step explanation of the whole process with the most valuable comments. For beginner craftswomen, experienced ladies advise starting with the most simple models, so do not immediately tackle knitting complex sundresses.
Crochet baby dresses with patterns - master class for beginners
It's never too late to start learning to knit, especially if you love making pleasant surprises for your family. And today you can learn it for free!
How to knit a simple summer dress
A step-by-step lesson for craftswomen with little experience simple outfit for a one-year-old child for the warm season, when the sun warms.
The model is made for little girls 8-12 months old, fastens on the back. The skirt is knitted with a transverse detail.
Materials: 2 skeins of Linha Camila Fashion yarn (cotton, 100 g / 500 m.) Cream color, green yarn remnants, hook 1.75 mm, needle, 65 cm. Satin ribbon 5 mm. Cream wide, 42 beads yellow color., 6 buttons.
Description
Skirt: knits with a cross piece. Cast on a chain of stitches 31 cm long. Alternate single crochets and single crochets according to scheme 1, perform shortened rows according to scheme 1. In this way, knit 152 rows (or 15 repetitions) - that is, up to a height of 49 cm. Short side ( belt) and 81 cm long side (hem). Finish the job.
Yoke: along the line of the belt, dial knit 112 tbsp. b / n (1 column for 1 row). Divide the back and front.
Knit according to pattern 2. 1/2 back: knit over the first 28 stitches. Continue knitting according to the pattern - 15 rows (including the already knitted first row). Perform decreases for the neck according to the scheme - 5 rows. Continue knitting until row 17 of the pattern. Repeat the rapport until the 25th row of the work. Finish the work. Repeat for the other half of the backrest mirrored.
Front: knit over center 56 stitches. Continue to knit according to the pattern - 12 rows (including the already knitted first row). In the 13th row, leave the central 18 columns for the neckline, knit the sides separately, making decreases for the neckline according to the pattern, to the height of the back. Finish the job.
Assembly: sew shoulders.
Strapping:
1. Along the cut on the back and the neckline, knit 1 row with single crochet columns. Distribute 6 holes for buttons along the left side of the back: the first along the edge of the neck of the back, the last 9 cm above the bottom of the dress, the rest between them. Knit the second row of single crochet stitches, (1 v / p., Skip 1 stitch, st.b / n in the next stitch) - for each hole. Knit the third row of single crochet stitches. Finish the job.
2. Tie a row of single crochets along the bottom of the dress.
3. Tie each armhole according to scheme 2.
Decorations: if you don't know how to decorate, tie 14 floral motifs and 14 leaves according to the pattern. Attach 3 beads in the center to each gorgeous flower, sew on a leaf, attach to the dress according to the scheme. Tie a ribbon in a bow in the center of the front.
Crochet baby dress (diagram and description) for 2-3 years.
Quite simple, but elegant openwork product with ruffles for the summer. You can add a belt and bead decor.
Materials: Nako Estiva yarn (50% cotton, 50% bamboo, 100 g / 375 m.) - 1 skein of white and 1 skein of beige, hook 2.5 mm.
Description
Back: with a beige thread, dial a chain of air loops 45 cm long, knit a net according to scheme 3. At a height of 22 cm, knit 1-6 rows of frills according to scheme 2 (hem of a dress). Connect the thread to the dialed chain (to the top edge), knit 1-6 rows of frills. Repeat 2 more ruffle sections between the top and bottom sections. Connect a white thread to the dialed chain, knit the back yoke according to scheme 1. When the yoke height is 13 cm, decrease 2 groups of V-columns for armholes on each side. At a height of 46 cm, subtract the central 7 groups of V-columns for the neckline. Knit sides separately. Finish the job at a height of 47 cm.
Front: start as a backrest. When the height of the yoke is 20 cm, subtract the central 3 groups of V-columns for the neckline. Knit the sides separately, continuing to subtract 3 columns (not groups, but columns!) - 2 times, 2 columns - 1 time. Finish the job at a height of 47 cm.
Assembly: sew sides from bottom to armholes, sew shoulders. Neck strapping: tie a trace around the neck with a beige thread. way: * 4 tbsp. s / n from one loop, skip 1 cm, repeat from * in a circle, finish connecting. column. Tie the armholes in the same way.
Crochet baby dress (video in Russian)
A video tutorial is easier for someone, so we have put together for you interesting master classes on YouTube for creating a crochet baby dress.
Idea with a round yoke for a girl of 3 months
This model can be suitable for christenings (as a decoration, look at a satin belt that looks beautiful with openwork patterns).
I would like to note that the yoke for a children's dress is crocheted, taking into account that the neck should stretch very well.
So, we knit a beautiful pink dress with Svetlana Bersanova.
Combined fabric and motifs (model from Chinese masters)
The fabric and the beautiful lace trim in combination look very original. The trim of the hem completed the ensemble, so this outfit can even be tried on for graduation in the garden.
Red robe with pineapples
This dress also looks good in white, which adds elegance.
Marshmallow with raglan sleeves
The most interesting can be found in the blogs "Mamochkin's Channel", and we drew attention to the outfit "Zephyr" for girls 2-3 years old.
Great amount knitted patterns women's and children's clothing (dresses, blouses, tops, sundresses) includes such structural element like a flirt. It means the upper part of the product, which differs from the main part of the canvas in pattern or color. In addition to the aesthetic role, it greatly facilitates knitting of any model, as it knits in a circle, automatically eliminating the need to knit the neckline and the line of the armholes.
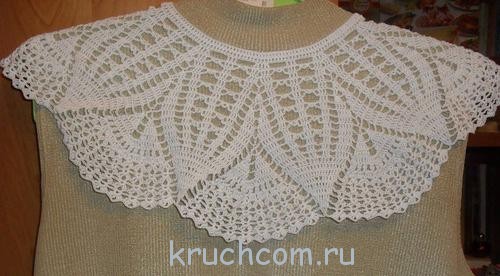
The yoke is that element of clothing modeling, which conceals the broadest possibilities for creating exclusive items of women's wardrobe - it gives uniqueness and charm to crocheted products. The yoke is often used by needlewomen in the design of dresses, sweaters, cardigans and vests, crocheted... It looks no less interesting as an addition to knitted clothing models - yoke laces are able to transform and decorate even a long-forgotten, but so beloved previously sundress or jumper! Moreover, a coquette with openwork edges can also act as an independent wardrobe item, in particular, decorate female image as an elegant collar necklace.
A round yoke is a classic of crochet needlework, which many craftswomen are not averse to practicing, especially those who are just learning how to crochet. The yoke can be knitted with a solid fabric or detachable, if you plan to knit a product with a fastener.

There are two main options for crocheting a round yoke:
- from the neck down, i.e. first, the yoke itself is knitted and all further knitting is built on its lower edge, from which the sleeves, back and front of the product continue;
- from armpit up in the transverse direction, i.e. the yoke is knitted from the final row of the back and / or front part of the product (it can be performed with a fastener in the front, on the back or with a single piece).
In any case, a round yoke must be knitted in strict accordance with the pattern provided for the model, because in order to obtain a part of an ideally correct shape, it is necessary to strictly follow the principles of expanding the canvas. At the same time, work on crocheted yokes does not require a needlewoman high level skills, even a beginner in knitting can easily cope with them. For those who like to experiment and create their own models, we offer five crochet round yoke models with detailed diagrams and step by step instructions on their implementation.
Legend:
- VP - air loop;
- RWY - VP lift;
- RLS or Art. b / n - single crochet;
- SSN or Art. s / n - double crochet;
- PS - half-column;
- OL - prev. row;
- SS - connecting column.
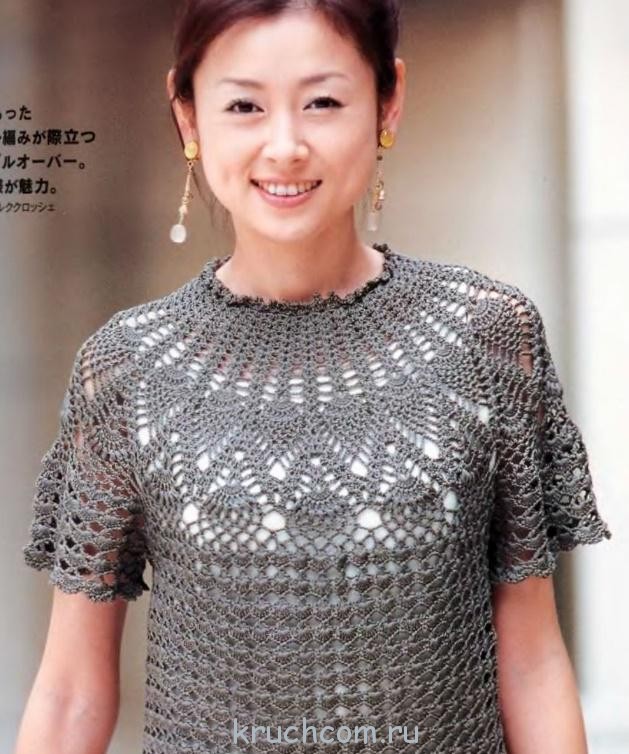
A graceful yoke made in the pineapple pattern

The “pineapple pattern” loved by many continues to conquer the hearts of needlewomen - the process of knitting it cannot be called super-complicated, and the results are pleasing with incredible beauty. Crocheted pineapples look gorgeous on yokes, moreover, it is convenient to connect any other knitting designed for making the back and front of the product (openwork, fillets, motifs) to the end of such a pattern. We propose to consider step by step the stages of knitting a yoke "in pineapple" with a single piece.
The element schema looks like this:
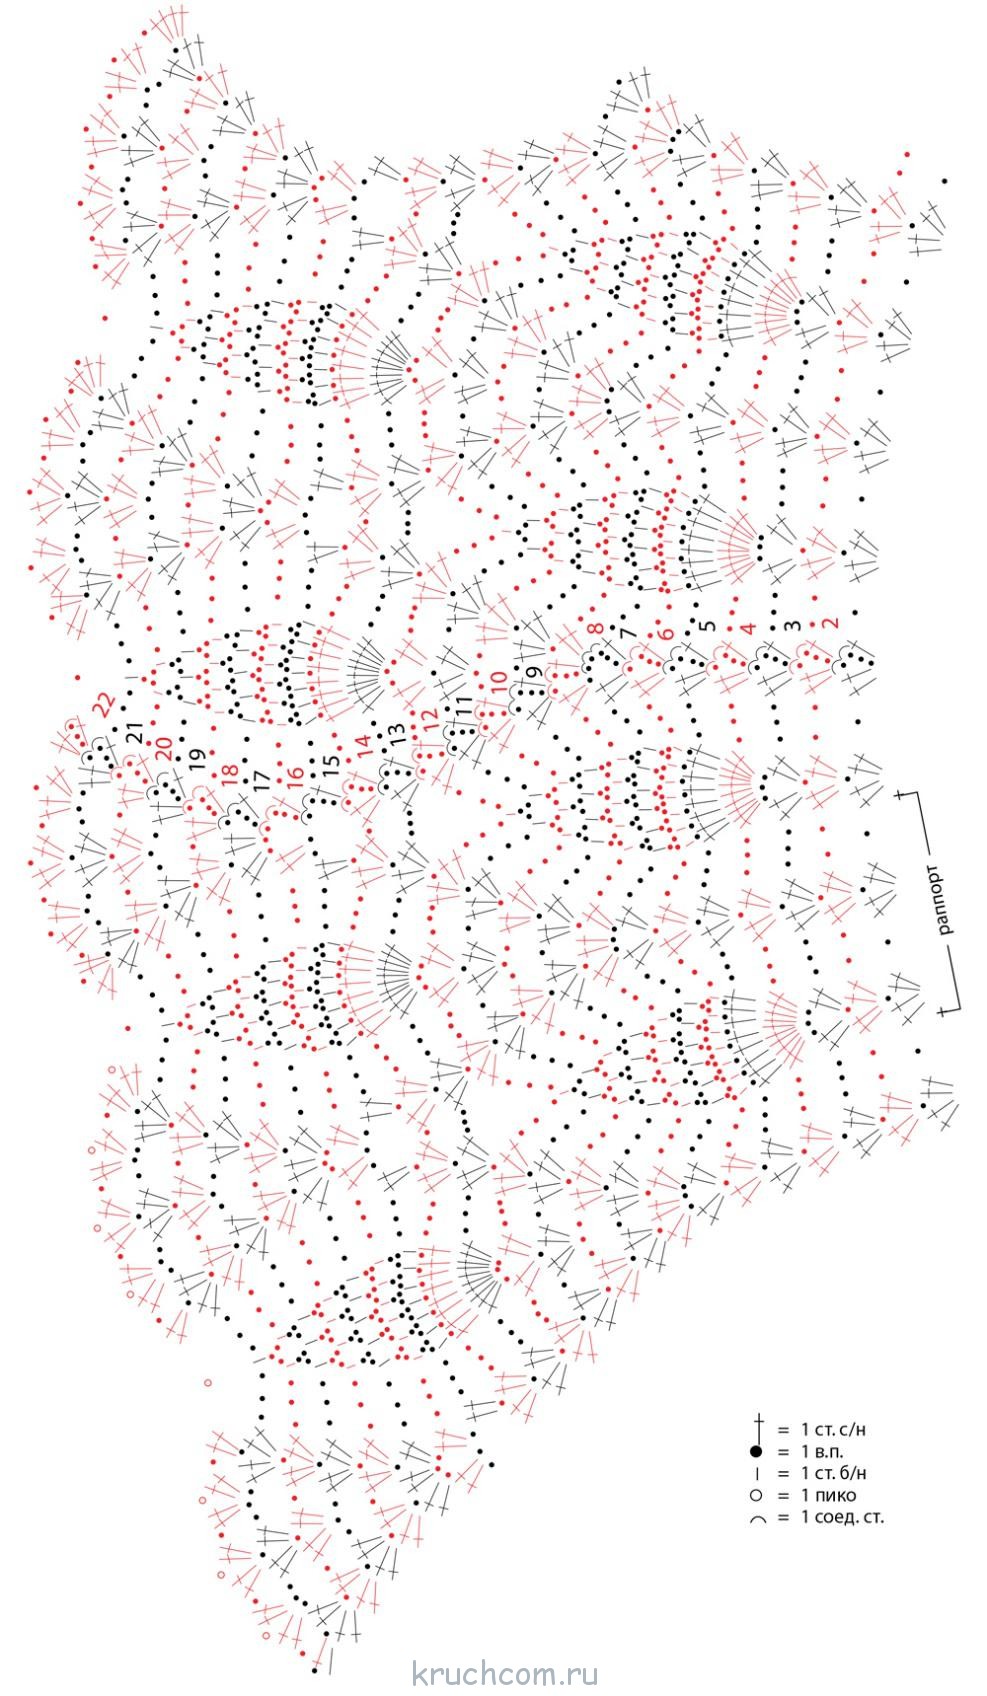
Completing of the work
Knitting is carried out in a circular manner, according to the principle "from the neck". We knit a base-chain from 160 VP, we close it in a circle with the help of the SS.
Row number 1: 4 VP, 2 PRS in the next. VP, then rapports to the end of the row: skip 3 VP and perform 2 CCHs in the next. VP, + 1 VP, in the next. we knit a loop 2 CCH + 1 VP. We end the row by skipping 3 VP, then knit 1 CCH in the same loop as the first VP of the row, close the SS row in the third VP from the beginning of the row. We continue to work in a circle with a pattern according to the yoke scheme.
We knit until the length of the yoke is 20 cm. In the penultimate row of the element, we divide the loops for knitting the back, front and sleeves.
Round yoke with openwork pattern
Such a yoke is especially relevant for summer dresses and tops, because with its help you can close several knitting moves at once - it plays the role of both straps and sleeves of the product. All that remains to be done after the yoke is ready is to sew or tie it to the main fabric of the blouse, sundress, dress.
Knitting pattern for a yoke pattern:
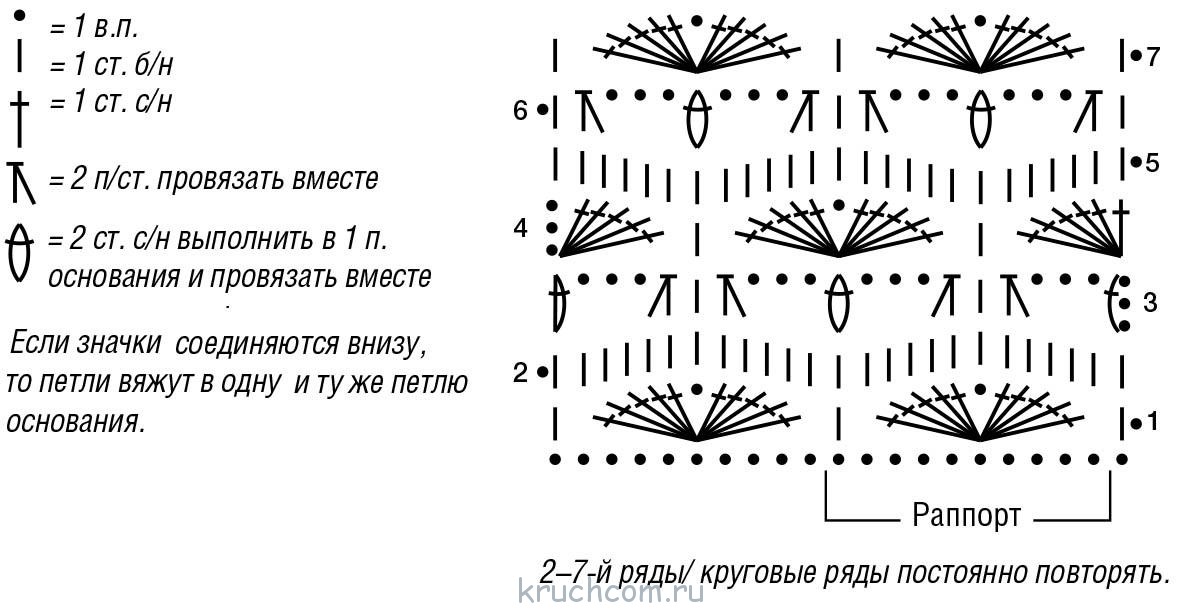
The yoke is knitted in circular rows, with an openwork pattern according to the scheme.
The basis is a chain of 160 VP, closed in a SS ring.
Each roundabout begins with the 1st runway (not a column w / n) or 3 airspaces for one CCH, and ends with one SS to the upper runway. The reports from the s / n columns, alternating with the VP, are repeated constantly, from the 2nd to the 7th circular row.
At the same time, tying openwork pattern, do not forget to perform the following subtractions:
Row number 4: in each CCH group we knit not 10, but only 8 s / n columns.
Rows No. 5-6: evenly reduce the number of RLS and VP.
Row number 7: in each CCH group we knit not 8, but only 6 s / n columns.
Rows No. 8-9: evenly reduce the number of RLS and VP.
Row number 10: in each CCH group we knit not 6, but only 4 s / n columns.
Row number 11: evenly reduce the number of RLS.
After 11 circular rows, the width of the fabric should be approximately 12-14 cm (depending on the "span" of knitting and yarn), we finish knitting SS. We use a ready-made yoke to decorate the desired model of clothing.
Original floral yoke

The embossed yoke of floral motifs is one of the favorites among knitters. With the proper skill, making it will not be difficult, while it truly decorates any knitted items like a king!
The fabric of the yoke is based on knitting interconnected floral motifs. We start knitting from the center of the floral motif: we collect the base from 5 VP, we close it in a circle with the help of the SS.
We knit in a circle:
Row number 1: grabbing the end of the thread, we knit by the ring from VP 1 RLS, then we knit with rapports: 3 VP + 1 RLS, you should get 4 arches from VP.
Row number 2: for each arch from the VP we knit 1 PRS + 1 PS + 4 PRS + 1 PS + 1 PRS, in total we get 4 petals of the future flower.
Row number 3: we take the hook behind the back wall of the loop, we knit 2 VP (thus we reach the middle of the lower side of the first petal), knit with rapports in the middle of the petal: in the center of 4 CCH PR we knit 1 RLS into the arch from the VP of the first row + 5 VP, in total, you should get 4 arches of air loops.
Row number 4: we knit for each arch of 5 VPs 1 PRS + 1 PS + 6 PRS + 1 PS + 1 PRS, as a result we get 4 petals.
Row number 5: we take the hook behind the back wall of the loop, knit 2 VP (thus we reach the middle of the first petal), knit with rapports in the middle of the petal: in the center of 6 CCH PR we knit 1 RLS into the arch from the VP of the third row + 4 VP, repeat like this to the end of the row, we close the SS in the RLS of the first petal from the beginning of the row (it turned out 4 chains from the VP).
Row number 6: we knit for each arch from the VP for 1 PRS + 1 PS + 2 SSN + 5 VP for the "corner" + 2 SSN + 1 PS + 1 SBN. We finish the SS in the initial RLS, we get 4 petals with 4 "corners".
We connect the connected flowers to each other in the "corners" with the help of the SS in the center of such a corner and in the middle of the arch of 5 VP. For the first top row of the yoke, you need about 20-25 of these colors (depending on the size of the future model of clothing). We collect them in a ring, fasten the SS. Then we carry out the desired number of similar rows of flowers, connect them together with a crochet hook. Sew the finished yoke to the previously knitted top or sundress.
Playful yoke under the throat


To decorate a knitted product with such a yoke, you need to knit from the armpit up in the transverse direction, i.e. from bottom to top, knitting a yoke from the last row of the finished canvas.
Row number 1 continues knitting in a circular fashion, we start from the right armhole (immediately knit with rapports 15 times: 3 VP + 1 CCH in the first VP of the chain + 1 PS in the second PS PR from the hook), on the back we knit 46 PS in the next. 46 PS PR, we finish with the left armhole (15 repeating combinations: 3 VP + 1 SSN in the first VP of the chain + 1 PS in the second PS PR from the hook), we knit the front part of the yoke with the 70th PS in 70 PS PR.
Row number 2: right armhole (15 rapports: 2 PS in the next arch of 3 VP PR from the hook), on the back we knit 46 PS in the next. 46 PS PR, left armhole (15 rapports: 2 PS in the next arch of 3 VP PR from the hook), the front part - 70 PS in 70 PS PR. There should be 180 PS in total.
Rows №№3-5: we knit in a circle PS.
Row number 6: change the color of the yarn, knit PS.
Rows No. 7-10: knit PS.
Row number 11 and all the trail. we knit odd rows with rapports to the end of the row: 5 PS in the next. 5 PS PR, 2 unfinished PS, united by one vertex, we knit into 2 PS PR.
Row number 12 and all subsequent even rows: knit with half columns. Row number 20 knit 86 PS in the next. 86 PS PR.
We knit rows №№21-34 straight. SS. Cut the thread.
Tying the yoke with a frill: attach the yarn to row 6 (the same color).
Row number 1: 5 VP (3 runways + 2 VP), rapports to the end of the row: 1 PRS in the next. PS PR + 2 VP. SS.
Row number 2: 3 runways, 4 CCHs in the arch of 2 VP PR, rapports to the end of the row: 5 CCHs in the next. arch of 2 VP PR from the hook. SS. The coquette is ready!
Translucent thin yoke for a sundress


The yoke model is quite narrow, so it can serve as straps for summer sundress... Her laces will look perfect in lace tops, marine tunic capes, as well as light dresses. Let's start knitting.
The yoke is all-knitted, crocheted in a circular manner.
We collect a chain of 180 VP, we close it in the SS ring.
Row number 1: 4 VP + 179 С2Н in the next. 179 base-chain VI. SS.
Row number 2: 4 runways + 2 unfinished С2Н, united by one vertex into the first runway + 3 VP + 1 С2Н in the same runway, then we knit 60 rapports: 3 unfinished С2Н with one vertex we knit into the third С2Н ПР from the hook + 3 VP + 1 С2Н in the same С2Н PR. SS.
Row number 3: 4 runways + 3 С2Н in the arch of 3 VP PR, then - 60 rapports: 4 С2Н in the next. arch of 3 VP PR from the hook. SS. In total, you should get 240 С2Н. Divide the yoke into 4 parts (2 sleeves, back and front of the product), continue knitting a sundress.
Sources of inspiration in the form of knitting patterns for round yokes
Variations on the theme of round yokes are simply inexhaustible, choose any and get creative!
Openwork yoke with fastener


Bright variation on the theme of "pineapple" coquette


Round yoke with triangular motifs


Air yoke for a summer top

Snow-white yoke-collar

Original yoke for a children's dress


Warm yoke for a spring-autumn sleeveless jacket


Coquette from openwork motifs


Yoke-cape


One-piece yoke under the throat

Video master classes on crocheting round yokes
Children's sundress

4 skeins (50 g) of white yarn and 1 skein (50 g) of blue Hook No. 3 (1.25 mm), 2 meters each of blue and white ribbons for ties, 8 buttons.
Used hinges:
V. p. - air loop, half-columns, single crochet, double crochet, * pico * - 3 air loops and half-column in the first loop (I don't know how it is called correctly in Russian ... I write * pico *)
TOP OF DRESS (Molde 01)
Cast on the required number of loops with white thread. Make 3 rows (back and forth) of double crochets. (not forgetting to make the indicated additives for the edging * 2 double crochets, 1 VP, 2 double crochets *) Continue to knit 8 rows with double crochets, forming in front of the product.
Knit two halves of the back separately with crochet stitches.
SKIRT DRESS
Knit with white thread according to pattern A in front and back together in circular rows, ending each row with a half-column. Repeat the first three rows 7 more times. Finish row 34, cut off the white thread and attach the blue thread, continue the diagram for two more rows and cut the blue thread. Attach the white thread again and continue the pattern to row 46. Cut off.
COLLAR (Molde 02) left side
With a blue thread, make 3 vp. and then knit in double crochet (using the air loops of the upper part of our product). Knit back and forth, making the necessary additions for the edging * 2 double crochet, 1 VP, 2 double crochet *. Tie 10 rows. Tie the 11th row with a white thread, go back to the blue thread and tie a row of single crochets. Cut the thread. With white nikta, tie a row * pico * according to scheme D.
Also tie and right side.
Sew on 6 buttons in the front, in the places where the loops are increased.
On the back of the product, knit 8 rows of single crochets on each side. Sew on 2 buttons on the left side.
Tie 4 rows of single crochet across the hand recesses. Tie ribbons in front.
based on materials http://vse-sama.ru/forum/index.php
Sundress for baby (3-6 months)

It took: "Opal" yarn (470 m in 1 skein); hook number 2.5.
One skein of such yarn is enough for 1 sundress and tops.
The sarafan scheme is very simple.
1st row: we collect 45 air. loops.
2nd, 3rd, 4th rows: 15 tbsp. with a crochet + 1 air. loop, then again 15 tbsp. with a crochet + 1 air. loop and another 15 tbsp. with a crochet. It turns out a chain with two holes.
5th row: in each loop we knit 4 tbsp. with a crochet - you get a lush ruffle. At the end of the ruffle, I cut the thread.
And I begin to knit a skirt: I tied the thread to the loop that is under the hole (we knitted them in 1, 2, 3 and 4 rows after 15 double crochet loops) and knit 2 tbsp in one loop. with a crochet to the next hole. So we continue to knit rows 15 - 16. The first shelf is ready.

Now we knit the second shelf and sew both halves. And for beauty, you can sew graceful lace to the hem of the sarafan. And one more thing: do not forget to sew 2 buttons on one strap and two on the other.
sundress for baby


Dress for baby


Dress with round yoke crochet

Age: 4-5 years old
You will need: 250 g of Alpina "HOLLY" yarn (100% cotton; 200 m / 50 g) white; hook number 2.5.
Yoke pattern: knit according to the pattern.
Openwork pattern: knit according to the pattern.
Harness: knit according to the pattern.
Knitting density: 20 tbsp. s / n x 12 p. = 10 x 10 cm, crocheted No. 2.5 with an openwork pattern with a thread in 2 additions.
Work description
All-knitted back (yoke) and front (yoke): cast on a chain from 120 century. n. and close in a circle with a connection. Art.
1st row: 12 in. n. (3 v. n. rise + 9 v. n.), 1 tbsp. s / n in the 3rd century n. base chains from the hook, 11 tbsp. s / n in the next 11 c. n. base of the chain from the hook, * 1 tbsp. s / n in the next st. s / n of the previous row from the hook, 9 in. n., 1 tbsp. s / n in the 3rd century n. base chains from the hook, 11 tbsp. s / n in the next 11 c. n. base of the chain from the hook *, repeat from * to * 8 times, 10 times in total. Finish the row with a connector. Art.
2nd row: 8 in. n. (3 v. n. rise + 5 v. n.), 1 tbsp. b / n in the arch from the 9th century p. of the previous row from the hook, 5 in. n., 1 tbsp. s / n in the 2nd st. s / n of the previous row from the hook, 9 tbsp. s / n in the next 9 st. s / n of the previous row from the hook, * 1 tbsp. s / n in the next st. s / n of the previous row from the hook, 5 in. n., 1 tbsp. b / n into the next arch from the 9th century. p. of the previous row from the hook, 5 in. n., 1 tbsp. s / n in the 2nd st. s / n of the previous row from the hook, 9 tbsp. s / n in the next 9 st. s / n of the previous row from the hook *, repeat from * to * 8 times, 10 times in total. Finish the row with a connector. Art.
Next, continue to knit according to the yoke pattern for the 17th row inclusive. Finish each row with a connector. Art. 18th p. divide the work as follows: 2 rapports - right sleeve, 3 rapports - back, 2 rapports - left sleeve, 3 rapports - before.
Solid knitted back (lower part) and front (lower part): close the front and back in a circle and knit 12 r. in a circle according to the openwork pattern. To expand the lower part from the 25th p. perform increments of 1 tbsp. s / n according to the scheme of the openwork pattern, then in each 2nd p. 5 times 1 tbsp. s / n. From the 30th p. knit 23 p. according to the pattern of the yoke pattern. In the 52nd p. finish work. Cut the thread.
Finishing: Tie the neckline, armhole lines and bottom of the dress in a circle according to the tying scheme from the 1st to the 2nd row inclusive. Finish each row with a connector. Art.
Belt: dial a chain from to. p. about 1 m long, make brushes at the ends. Thread the finished belt through the holes along the waist line.
Knitting pattern, pattern and symbols:


Dress on the yoke


Dress - First Celebration


Princess dress


Girly dress


Beach dress


Children's dressing gown with ties


Dress for baby


Dress and shorts

MATERIALS
180 g of thin white acrylic yarn, 1.5 m of white nylon tape, beads and 3 white buttons; hook number 2.5 and 3.
LOOP TYPES
Air loop (c. P.): In p. Insert a hook, put a thread on it and stretch through p.
Column without crochet (st. B / n): insert the hook into the item of the chain or the bottom p. and pull out a new stitches, grab the thread and knit 2 sts on the hook in one go.
Half-column with crochet (half-crochet): make a crochet on the hook, insert the hook into the chain and pull out a new point, knit 3 points on the hook in one step.
Column with 2 yarns (st. With 2 / n): make 2 yarns on the hook, insert the hook into the chain sts and pull out a new stitch, knit 4 stitches on the hook in pairs in 3 steps.
Embossed column with a crochet, front (relief st. s / n, persons.): knit st. s / n, bypassing st. s / n of the lower river. from persons. sides to out. side. Embossed column with crochet, purl (embossed st. S / n, purl.): Knit st. s / n, bypassing st. s / n of the lower river. from out. sides to persons. side.
Fantasy pattern: according to scheme 1.
Elastic band: according to scheme 2.

DENSITY OF KNITTING 10cm = 21 p.

WORK DESCRIPTION
Dress Coquette - Crochet number 3 to dial a chain from 99 century. p. and knit half. s / n. After 2 p. continue knitting the first 22 sts for the left shelf of the back. After 10 cm, finish knitting. Also knit the last 22 sts for the right back shelf. For the front, knit central 45 p. Half-st. s / n, leaving 5 points for the armholes on both sides. After 5 cm from the beginning of the armholes, close the central 9 points for the neckline, on both sides of them in each p. 2 sts and 3 times 1 st each. Finish knitting at a total height of 11 cm.
Skirt - Along the free edge of the initial chain of the yoke, lift a p. And knit with a pattern according to scheme 1, repeating from 2nd to 4th p. 1 more time, then tie 2 times 5th and
6th p. and continue repeating the 7th and 8th p. After 16 cm from the beginning of knitting a skirt, knit 1 p. Art. b / nor finish knitting.
Sleeves - Crochet number 3 to dial a chain from 29 century. p. and knit half. s / n, adding on both sides in each 3rd p. 7 times 1 st. = 43 sts. Finish knitting at a total height of 17 cm.
ASSEMBLY
Sew and sew the sleeves into the armholes.
Crochet No. 2.5 to tie back shelves and neckline 2 r. Art. b / n, performing on the right shelf of the back in the 2nd p. 3 holes for buttons (3 sts, skip 1 st). Make 2 flowers from beads and sew them to the front (see photo).
Sew on buttons. Pass the nylon tape along the transition line of the patterns. Ready product moisten and let it dry.
WORK DESCRIPTION
Panties
Back detail
Crochet number 3 to dial a chain from 51 century. p. and knit with a raised elastic band according to scheme 2. After 2 cm, continue knitting half. s / n for 14 cm. Then postpone knitting of the first and last 16 p., knit central 19 p., subtracting from both sides in each p. 5 times 1 p. = 9 p.
Finish knitting at a total height of 22 cm.
Front Piece - Knit like back piece.
ASSEMBLY: Execute side seams... Tie the bottom edge, not including the edge of the crotch, 1 p. Art. s / n and 2 p. embossed elastic band according to scheme 2. Perform a step seam. Thread the nylon tape through the gum loops (see photo). Run 2 bead flowers and sew on. Moisten the finished product and let it dry.
Dress for girls
Age: 12-18 months
Materials:
- 160 g of white acrylic yarn;
- 2 m of a white satin ribbon 0.5 cm wide, 50 cm of a pink 1 cm wide satin ribbon, 1 m of a white 5 cm wide ribbon;
- small pearl beads;
- hook No. 3.5
Air loop (c. P.): In p. Insert a hook, put a thread on it and stretch it through p. Column without crochet (st. B / n): insert the hook into p. Chains or lower r. and pull out a new stitches, grab the thread and knit 2 sts on the hook in one go.
Column with a crochet (st. S / n): make a crochet on the hook, insert it into the chain and pull out a new st., Knit 3 sts on the hook in pairs in 2 steps.
Connecting column (joining st.): Insert the hook into the stitches of the chain, grab the thread and pull it through the stitches of the chain and stitches on the hook.
Fantasy pattern: according to the scheme.
Knitting density: 10 cm = 16 tbsp. b / n. 10 cm = 23 sts of the pattern.
Work description
Yoke: start knitting from the neckline. Dial a chain of 60 c. p. and knit st. b / n, evenly adding in 1, 3, 6, 9, 12, 15, 18, 21 and 24th p. 16 p. = 204 p. Then, having marked with a thread of a contrasting color, distribute p. trail. way: 28 sts for each back shelf, 46 sts for each sleeve and 56 sts for the front.
Combine the loops of the front and back shelves, typing between them for the armholes of the chain from 5 in. p. each = 122 p. and putting aside the knitting of the sleeves.
Continue knitting in a circle, closing each p. conn. Art. and completing the required number in. n. lifting. 1st p .: all st. b / n, evenly adding 29 p. = 151 p. 2nd p.: * 2 tbsp. s / n, 1 v. p., repeat from * to the end of the p., evenly adding 30 p. = 181 p. Starting from the 3rd p. knit with a pattern according to the scheme.
After 35 cm, finish knitting.
Sleeves: continue knitting 46 sts of each sleeve with a pattern according to the pattern in a circle, lifting 5 sts of each armhole = 51 sts, closing each p. conn. Art. and completing the required number in. n. lifting. After 21 cm, tie 7 p. Art. b / n, evenly subtracting in the 1st, 3rd and 5th p. 8 p. = 27 p., and finish knitting.
Assembly: tie back shelves 2 p. Art. b / n, evenly performing in the 2nd p. on the right shelf there are 3 holes for buttons (skip 2 points of the bottom p., 2 points). Sew on buttons. Moisten the finished product and let it dry. Make a flower from a 1 cm wide ribbon.
From a ribbon 0.5 cm wide, make 4 buds and sew them on the yoke (see figure).
Sew pearl beads near the flowers as leaves.
Gather one edge of the braid and sew it as a collar along the edge of the neckline, under the 1st p. Art. b / n. Pass a 1 cm wide satin ribbon through the holes under the yoke.

Dress and booties No. 8


Pink dress


Dress and jacket


Green sarafan
Set "patterns for delicate creatures"


Orange sundress

The size of the knitted sundress: 28-30 (height 99-104 cm).
You will need: 80 g of "Yarn Art JEANS" yarn (55% cotton, 45% acrylic, 160 m / 50 g) orange; 80 g of ALIZE Flamenco Firfir melange ribbon yarn (100% acrylic, 20 m / 50 g) of yellow-red-orange shades; 100 g cotton yarn in yellow; hook number 3.
Basic patterns: rows of st / n; " sirloin"According to scheme 1; openwork elements according to schemes 3 and 4.
Performance. The main yarn in the product is orange Yarn Art JEANS.
The product consists of several parts: the lower part (skirt) and the upper part of the front and back.
Bottom detail: with the main yarn, dial a chain from 136 in. etc., close it into a ring and knit with an even cloth, distributing the loops as follows: 40 sts along cx. 1 (side part); 26 st / n (before); 40 p. On cx. 1 (side) and 30 st / n (back). Finish the work at a height of 19 cm from the typesetting edge. Tie the top of the product - 2 p. st / n, bottom of the product - 1st p. st / n.
Top detail.
Back (make a pattern of the part in life size): cotton yarn of yellow color, tie the element along the cx. 4, lay it out on the pattern. Fill the space around the element with the main yarn in rows of st / n according to cx. 2.
Before: with yellow yarn, tie the element along the cx. 3.
1. Tie the upper part of the front of the 1st p. Art. b / n, hem it to the bottom part. On the left shoulder, perform 7 "loops" - * st. b / n, arch from 3 century. p. * (from * to * repeat 7 times).
Sew the upper back.
Sew right shoulder seam.
Connect the front and back under the armholes with chains from to. NS.
With the main yarn, knit two lacing - chains from v. p. 80 cm and 50 cm long (decorate the ends of the lacing with elements according to cx. 5, decorating them with ribbon yarn - see the photo) and thread the long one into the transition row between the lower and upper parts of the product, the short one - lace up the left shoulder seam.
On the side parts of the lower part with ALIZE Flamenco Firfir ribbon yarn, hem the frills, gathering the ribbon to form a ruffle (see photo). Sew the same yarn along the neckline of the front.


A lace dress for your lovely little angel is perfect for hot summer days.
Size: bust 58 cm, product length 59 cm.
You will need: 200 g of thin cotton yarn, hook number 15, 170 cm of silk ribbon 0.5 cm wide.
Knitting density: 22 cells wide and 20 rows high ~ 10 cm x 10 cm.
PATTERNS
Pattern - "main": 1 tbsp. with n. and 2 air p., drawings according to the scheme.
Arch pattern:
1st p .: 4 tbsp. b / n. into the cells of the previous row.
2nd p .: 1 tbsp. b / n. and 5 air. item in every 3rd st. b / n. At the end of the row, knit 2 air. n., 1 tbsp. with n.
3rd-19th p.: Knit like 2nd p., Only single crochet knit into arches.
20th p.: Knit 5 tbsp in each arch. b / n.
Finishing pattern: 1st p .: 3 tbsp. b / n. into each arch. 2nd p .: 1 tbsp. b / n. above the middle st. b / n., then repeat everything.
Frill:
1st p .: 2 air p., 1 st. with n., 2 air. n., 1 tbsp. with n., 2 air. n., 1 tbsp. with n., then repeat everything.
2nd p .: knit columns over the posts, 2 air. NS.
The rest of the rows: as the 2nd row, but the number of air. p., increase by 1 loop.
PERFORMANCE TECHNIQUE
TOP OF THE DRESS
Front and back: knit with a single fabric until the armholes are formed. Start work from the waist line. Cast on 130 times 3 air sts., Knit 8 rows with the main pattern, then knit according to pattern 1. After 6 rows in the middle of the front, complete the pattern according to pattern 2.
After the 21st row, to form the armholes of the sleeves, close 6 cells, then 2 more times, 1 cell each. In the middle of the front, after the 30th row, close 17 cells, then further subtract 1 cell 6 times. Start the formation of the neckline on the back after the 39th row. Knit shoulders up to a height of 26 cm.
SKIRT
Knit from the waist line. After the 20th row of the main pattern, knit 18 rows of pattern 1. In the first row, add in such a way as to get 176 cells (tie 4 cells in 3 arches). Then knit 17 rows with an "arch" pattern, in the second row, reduce the number of arches to 140 (in the last row, knit single crochet). Then knit 27 rows with pattern 2, in the first row there should be 180 cells. Then knit a 5-row frill.
Assembly: perform shoulder seams, tie the neckline with a finishing pattern. Tie a frill of 7 rows along the armhole and bottom edge, knit only single crochet over 12 cells of the previous row. Pull a silk ribbon on the belt.


Red dress
Bright fancy dress crocheted for girls, simple top and openwork fluffy skirt go together as well as the two contrasting colors red and white.
Size 92-10-4
You will need: 250 g of red and 50 g of white yarn (100% mercerized cotton, 240 mx 50 g), 5 pearl buttons.

Description of knitting dress:
In order to avoid mistakes in work and to knit a product of the desired size and shape, make a pattern (Fig. 5) of the parts, taking into account individual characteristics shapes, then knit the pattern with the front satin stitch. Calculate the loops using the pattern and patterns. Knitting starts from the waist to the top. For this, type a chain from VP, the length of which is equal to the waist circumference + 1.5 cm for the fastener (smell) and knit C1H. After 8 cm from the typesetting edge for sleeves on both sides of the side lines, cast on chains of 45 VP. Continue the work, shaping the raglan by decrements in 4 places according to the scheme 5. The next step is to carry out the skirt. Start knitting from the edge of the yoke, wrap around the clasp (1.5 cm). First, the base mesh is knitted according to scheme 5, then shuttlecocks are tied to the mesh with a pattern according to scheme 5 a, alternately changing the color of the yarn. Decorate the edge of the plank with RLS with red yarn. Tie 3 VP arches under the buttonhole.


Pink dress.
A delicate pink dress for a girl is crocheted, a simple openwork zig-zag pattern is selected for knitting the main fabric, flowers are tied as decoration. You will need: yarn (100% cotton) - 400 g pink, hook number 2, 3 buttons.

Attention! Before starting knitting, make a full-size dress pattern.

Knit the main fabric with a zig-zag pattern according to scheme 1.
Description of knitting dress:
Knit the front and back panels of the dress from the bottom up in accordance with the pattern. Determine the number of decreases in each wedge, which are performed simultaneously in all wedges (in the diagram, the decreases are shown in the 3rd row). Make a cutout for the armhole and neckline, referring to the pattern. Steam off the finished product, make side seams, a seam on one shoulder. Sew on the buttons on the second shoulder on one side, and on the other, complete the hinged loops (chains from air.).
Tie the neckline st. b / n, armholes - as follows: * Art. b / n, 2 st. s / n, 1 tbsp. s / 2n, 2 tbsp. s / n, st. b / n *, repeat * - *. Tie 7-8 roses according to scheme 2 (each rose consists of 4 tiers). Sew flowers along the bottom of the dress, as shown in the photo.


Sundress
Openwork sundress crocheted for the girl; a pattern with leaves is selected for the skirt. A sundress can be worn under a blouse or a T-shirt. Height 128-132
You will need: 300 g of yarn (70% mercerized cotton, 30% viscose, 350 m / 100 g); hook number 2.5; broad satin ribbon, flower bead, some white threads, knitted fabric for lining, white sewing 2 clothes hooks.
Diagram: colored part, p. 32.
Knitting density: 19 p. X 8 p. - 10 x 10 cm.
Description of knitting a sundress: for a skirt, knit a chain of 120 air. p. (chain length - hip girth) and close in a ring. Knit from top to bottom 5 circular rows of Art. s / n. and continue with a pattern according to scheme 1 (= 8 rapports). From the inlaid edge of the skirt, knit up the bodice of the dress with a pattern according to scheme 22 (= 20 rapports). After 17 cm, divide the knitting into 4 equal parts (5 rapports each) and knit each part separately. To form the toe, decrease on both sides in each row 5 times for 1 point and 3 times for 2 points, finish the work.
Assembly: along the upper edge of the bodice, tie 1 row of st. b / n. Run 4 strips-straps: on a chain of air loops, tie 6 rows of st. b / n. Sew the straps to the fore and back toes. For belt loops, tie 2 chains of air loops, 6 cm each, and sew them on the sides. Stretch the ribbon-belt. Sew a cover from a knitted fabric, sew along the edge with sewing. Sew the cover under the skirt. Tie a flower from white threads with a pattern according to scheme 3 and decorate the center of the flower with a bead, sew the flower to the toe of the bodice.


Sundress dress
A universal crocheted sundress dress for a girl of 9-10 years old can be knitted from woolen yarn and worn with a blouse in a cool time, or knitted from cotton yarn and worn in the summer with a top.
For 9-10 years
You will need: yarn (49% wool, 51% acrylic, 490 m / 100 g) - 500 g beige, the rest of the coral yarn, hook number 2, beads 2 pcs.

Attention! Make a life-size pattern for a sundress on thick paper, comparing the suggested sizes with the measurements taken on the figure.

Description of knitting a sundress:
Back: knit according to pattern 1 from bottom to top, making decreases and additions, taking into account the pattern. Leave a 6 cm slit at the top for fastening
Before: knit similarly to the back, but without the slit for the fastener. The bodice is knitted with a single fabric, the seam will be on the back.
With crochet # 3, dial 153 air. n. + 3 air. lifting, knit with a pattern according to scheme 1. At a height of 12 cm, divide the work and then knit each part separately: knit 10 cm = 29 points (first half of the back) to a height of 11 cm. Then leave 5 cm = 15 points untied for armholes and knit the next 22 cm = 65 p. (front piece) 11 cm high.Then skip the words 5 cm (15 p.)
for the second armhole and knit the next 10 cm = 29 sts for the second half of the back with a height of 11 cm.Then again combine all the parts, dialing 15 sts above the armholes = 153 sts, knit 2 cm.
Next, start knitting the lapel along the neckline, it should be slightly wider than the bodice. To do this, crochet No. 3.5 with pattern 1 for another 7 cm.
Knit the hem starting from the bottom edge with a crochet No. 3.5 with a pattern according to scheme 2, 21 rows high, evenly performing additions.
Assembly: sew a seam on the back of the bodice, sew in a zipper. Tie 3 frills along the hem of the dress according to the scheme 3, 10 rows high: tie the first frill along the line of the bodice and hem, the second and third at 7 cm intervals. b / n. Pull a golden ribbon along the lapel of the neckline. For a bow, dial a chain of 20 air. n. + 3 air. p. lifting, knit 18 rows of st. s / n. Attach the bow at the lapel with tape.
