If you have already tried all the previous options, then it’s time to do unusual craft from old CDs. You probably have a dozen unnecessary disks lying around that you would hate to throw away and no longer need to use. Their finest hour has come! Use your imagination, take note of our master classes and go ahead to create new masterpieces!
Let's start with, perhaps, the simplest thing - decorating an old disk with ordinary stained glass paint. In terms of production, this craft is quite simple, but you can’t tell from the outside. You will need stained glass paints and imagination. You can draw both abstract ornaments or mandalas, and real plot paintings. By the way, if you don’t have stained glass paints, a regular marker will do just fine. You can download templates for drawing mandalas from the link below.
It will be a little more difficult New Year's craft made of disks, decorated with appliqués. The simplest option is an applique made of colored paper.

If your children love the animated film “Smeshariki,” then it’s time to use their old CDs to make their favorite characters. All you need is to find out from your child which character he likes best, cut out Smesharik templates from paper and glue them onto the disk. Smeshariki's New Year's craft is ready! You can draw templates for the application yourself, or you can download them from us for all the cartoon characters.

#4 Christmas tree decoration from old CDs: DIY Christmas crafts from CDs
From an ordinary disk you can make a rather unusual Christmas tree toy that looks like a ball, only this ball is flat. To make such a craft you will need: an old disk, dark acrylic paint (if not, gouache will do), a pencil and a fountain pen or a flat-head screwdriver.

If there are a lot of disks, then you may well think about creating a New Year's garland. With the right lighting, the garland will shimmer with all the colors of the rainbow, reminiscent of snow glistening in the sun. By the way, such a garland makes the house warm and sunny!

There aren't enough disks for the New Year's garland, but do you like the idea? See more ideas:
The perfectly round shape is perfect for snowmen. The technique for making snowmen from disks may be different, but you should be satisfied with the result. By the way, such a craft is quite suitable for a competition for school or kindergarten.

Want to make your own disco ball for decoration? Then you will need a blank for the ball (plastic, glass, foam), an old disk, scissors and glue.

Want more ideas Christmas balls? Then look:
You will need: an old CD, pine cones, glue, an aluminum candle stand, beads, glitter or varnish for decoration.

On a regular disc you can recreate New Year's landscapes using the decoupage technique. The disc decoupage process is standard, the result is amazing!

If, in addition to old disks, there are pieces of felt lying around the house, then you can make these cool snowmen. Well, will any of the guests guess that it is based on an ordinary unnecessary disk?

See more ideas New Year's decorations from felt:
A great idea for a New Year's craft from old CDs would be to decorate an ordinary mirror or photo frame. The disk needs to be cut into pieces, and then the surface should be decorated with these pieces. You can keep it for yourself, or you can do it original gift someone close to you.

If you were once a big fan of CDs, and everyone was, now is the time to give them a second life. What good are discs that just sit on a shelf collecting dust? You can now find the song or movie you need on the Internet. But to do it unusual Christmas tree only once a year!

Still thinking about what to give your friend for New Year? Best gift one that is made by hand. Give to a loved one bracelet self made, which she will definitely appreciate! Well, if you have already chosen a gift for your friend, you can keep this decoration for yourself!

If you want to new year party shine the most dazzlingly, then it’s time to think about New Year's outfit. You can decorate a regular collar with pieces of an unnecessary disk. Looks very cool!

An owl would be a great idea for a New Year's craft made from old CDs. To create a night guard, you can use pieces of felt, colored paper, several disks and other improvised materials. Turn on your imagination and start creating.


Help us improve: if you notice an error, select a fragment and click Ctrl+Enter.
Every person wants to quickly decorate the Christmas tree in their home on the eve of the New Year. But often this activity does not end with preparation for the celebration. In schools and kindergartens, children are given tasks to make decorations for the city Christmas tree. Therefore, in this article we will make Christmas decorations with your own hands on a street Christmas tree.
Beautiful and large Christmas tree toys
Santa Claus from a bottle.
How many crafts can be made from plastic bottles? The answer here is simple - a lot. New Year is the holiday when bottles become the basis for creativity. For the first craft you will need a 5 liter bottle. It is painted with red paint. While the paint is drying, you need to prepare the plastic spoons. Handles are cut off from them.
To make the face of Santa Claus, you should use white paint. Her facial features are outlined, and her beard is formed using spoons. They are glued to the bottle with super glue. Spoons are glued as sides. They also make mittens from them. For additional decoration use shiny tinsel.

Airplanes made from plastic containers.
It is worth noting that plastic containers for shampoos and cleaning products should not be thrown away. Having your own imagination, you can make something interesting out of it. And the airplane will become such a toy. Initially, plastic containers are covered with strips of colored paper, and then wings are attached to the toy. Now you just need to attach a string so that the toy can be hung.

Christmas tree toys made of cotton wool.
This article will tell you how to make Christmas decorations for your outdoor Christmas tree. For example, they can be made from cotton wool and now we will tell you how to do this. So:
Initially, they make a frame for the toy. It will be created from wire.
After this, take the cotton wool that you have prepared. Mittens and felt boots are made from the material.
To make the body you will need a little bit of paper. It is glued to the frame, and then cotton wool is glued to a layer of paper.
After this, they begin to create the head. Foam is used for this. They also use paints to paint it and give it color.
And the hat and braid are made from cotton wool. As a result, everything will look not only beautiful, but also impressive. Use glitter to make your toy's clothes even more beautiful.

Christmas tree decorations made of glue and thread.
An ordinary thread can turn into a real work of art. But here there is no imagination and necessary materials there is no way around it. Use balloons of different sizes, as well as glue. If you explain the process of work, then even a child can succeed. So:
Glue is poured into the vessel, and the thread itself is lowered into this vessel. If you use a thick thread, your craft will be voluminous. Accordingly, it will take longer to dry. The ball is wrapped with this thread and then allowed to dry. The balloon is then pierced to create a beautiful piece. Now you can spray paint it and then attach the loop to it.

Volumetric ball.
Today we are making large New Year's toys for the street tree. It is worth noting that handy materials can be used for such toys. For example, such material may be ordinary disks. There are probably a lot of them in every house. So, for this craft, you will have to cut several unnecessary disks into pieces.
A foam ball is used as a base. Next, each piece is attached to the base with a glue gun. Don't forget to make a loop for hanging.

Clock-house for the Christmas tree.
If you need a large Christmas tree decoration for your street Christmas tree, then our article is ready to present you with a lot of interesting things. The next toy will be interesting because it looks three-dimensional and beautiful. Several materials are used to make this craft:
- A couple of ceiling tiles
- Scissors, pencil and ruler,
- Rectangular box
- Colored and food foil,
- Candies and small toys for decoration,
- Braid and nail polish,
- Glue moment.

Progress:
Initially, take the ceiling tiles and place the box on them. Using a pencil, draw a house on the tile. Then measure the sides and prepare blanks for the side walls. Blanks will be required for: walls, roof and floor.
All the parts are cut out and large elements are covered with food foil. For small parts, colored foil is used.
The box is glued to the back and front walls of the house. A hole is cut in the upper part and a braid is threaded through them. The ends of the braid are then sewn together. You will get a loop. It is tucked into a box.
Now all parts of the house are connected and then glued together. Foil yellow color paste over the round watch dial. It's cut out of ceiling tiles. Afterwards it can be glued to the toy in this form.
Round candies must be painted with varnish. It should dry on them. Afterwards they are glued onto the dial instead of numbers. The roof of the house is decorated with small toys. And then the product can be sent to a competition or a Christmas tree.
Candy for the Christmas tree.
Each christmas tree cannot imagine its existence without traditional decoration - candy. Indeed, this craft is the simplest Christmas tree decoration. This requires cardboard that is rolled into a cylinder. Then the item you have obtained is wrapped in bright fabric. Beads and tinsel are used for decoration.

Toy gift.
The next simple toy is a gift toy. It requires a simple box that is packed wrapping paper. To prevent your toy from getting damaged, it is covered with cellophane. For more more decoration A bright and large bow is glued to the box.

Big star.
Here are some ideas for Christmas decorations for your outdoor tree. They are usually performed from different materials. The Christmas tree star is made from simple branches. But first you need to find suitable ones, then they are cut to the required length, and then folded in the shape of an asterisk. The structure is tied with wire, and then additionally fragile areas are coated with silicone. To decorate the craft, sprinkle it artificial snow. Also use cones for decoration.

Snowman.
If you work hard, you will get a wonderful toy. You will need polystyrene foam, preferably dark in color. To make a beautiful figure, use a stencil. Snowman cut out stationery knife. What's the best way to decorate a snowman? acrylic paints. All that remains is to make a hole and the toy will be ready.

Big ball.
If there is a competition on the topic New Year's toy for a street Christmas tree, then in our article we have collected the best specimens for you. To make a ball, take a foam base and attach it to it using glue. Pine cones. To decorate the composition, you can also attach bright berries to the ball.

Let's sum it up
Of course, this is a small part of the crafts. But here are only the most interesting ones. They will certainly take their rightful place on the Christmas tree or at the competition.
DIY Christmas tree made from disks - interesting view creativity for children and adults. Old CDs that have been gathering dust on a shelf for a long time will now have a new new life, becoming bright decoration your house in front New Year holidays. They can also be used to create original Christmas tree decorations, balls, snowflakes and garlands using the latest technology And complex materials. It will be interesting for children to create using cotton pads, because they have already worked with them in kindergarten, when they made winter applications.
CDs have not been popular storage media for several years now, because films and music can be found on the Internet and recorded on a flash drive, but do not rush to throw them away, because they can become excellent material for home creativity. If you are preparing for a New Year's party, where there will be loud music and fun, then collect all the old CDs at home, as well as borrow from friends, and place a large triangle on one of the walls of the room - a fantastic Christmas tree. It will sparkle everything with party lights and set a special mood for the entire holiday.
DIY Christmas tree made from disks
DIY Christmas tree made from disks- this is a present for your programmer friend; such decoration can be placed on the office desk. Such a gift will also please the musician, the main thing is not to spoil the discs with his favorite music.
Today, old and unnecessary CDs are in every home; if 5-6 years ago they were in demand, now at home there are heaps of CDs with films, music and programs that we have not used for a long time. Increasingly, unnecessary LEDs end up in landfills, but creative people do not throw away unnecessary materials, but look for suitable ideas for creativity, to breathe new life into them.
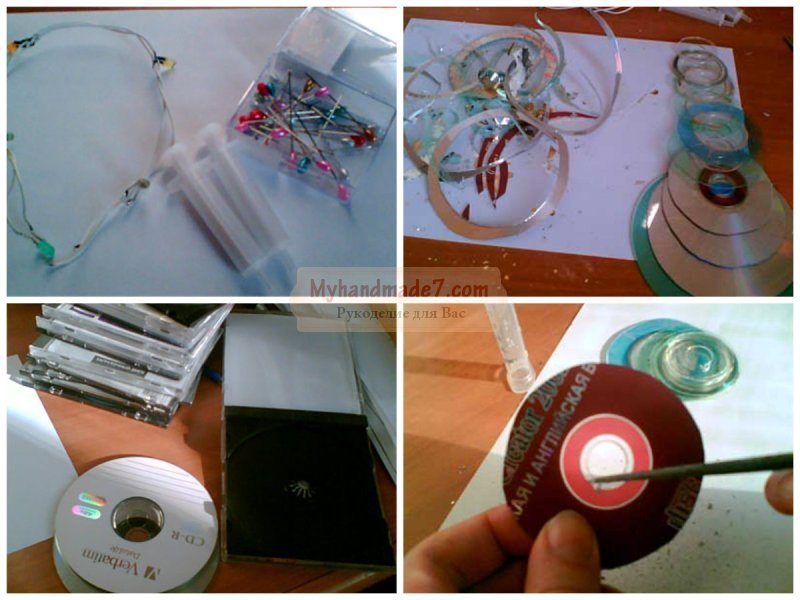
LEDs with a shiny surface are an ideal option for creation and crafts; they themselves are bright and immediately catch the eye, so they do not require special decoration or decoration. But in in this case we will make a real New Year's souvenir and decorate it with an LED garland; for it we will need five LEDs, which will be connected in parallel, and batteries to power them. We recommend using a 4.5V square battery or replacing it with two 1.5V AA batteries connected in series. You may need the help of one of the men who understands electricity.
We will use two 5 ml syringes as a base. For a pyramid imitating a Christmas tree, we will take 10 SD, since the Christmas tree should consist of ten circles with a successively decreasing radius. Each next circle should be one centimeter smaller than the previous one. To cut an even circle, it is advisable to first draw a contour with a pencil on the side where the drawing is applied on the SD, although even if your circle did not turn out perfect, this will not be noticeable in the final version of the craft.
Since we will also be threading the wire for the garland, we need to cut a groove in each LED that would fit two wires.
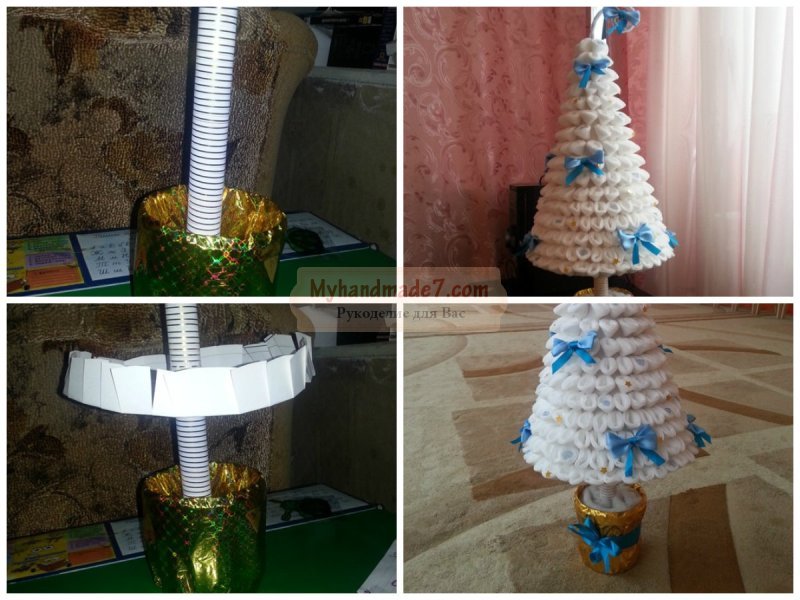
The easiest option for creating a base is to use plastic syringes. The piston can be removed immediately; they are not needed for this. We put the first largest circle on the base syringe, and pass the garland through the central hole and secure it in the groove. Now under the lower LED we should have two wires left from the garland. To secure the position of the lower disk, you need to secure it with a stationery needle. You need to pierce the plastic body of the syringe almost right next to the CD. Thus, we will fix each next layer Christmas trees made from disks with your own hands, photo process will help you complete the craft.
DIY Christmas tree made from disks
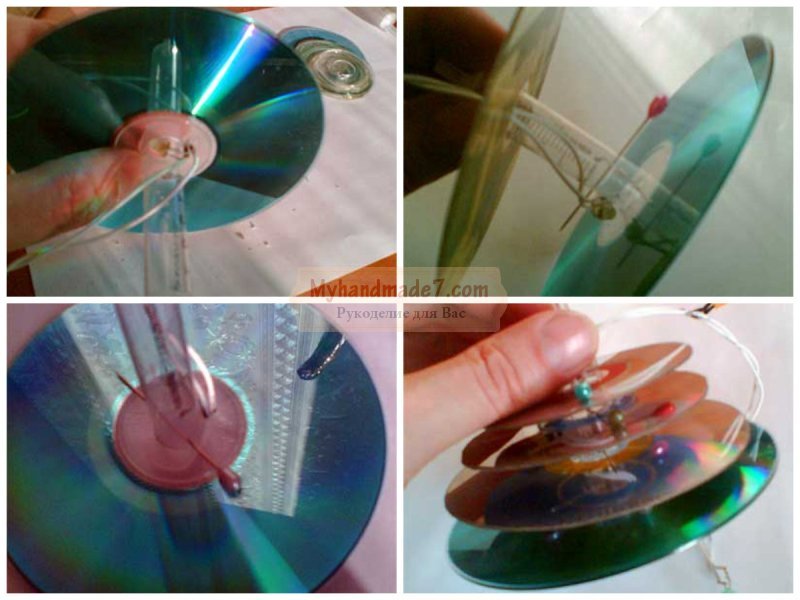
We continue to consider step-by-step master class, how to make a Christmas tree from disks with your own hands: we will attach the subsequent LEDs, now securing them on both sides (bottom and top), while piercing them in opposite directions so that the heads of the pins are located randomly along the base, because they will also serve as a kind of decoration.
For the next SD, you first need to prepare a place: pierce the base with a pin, stepping back about one centimeter from the previous one. Then place the disk on the base and secure it with a pin at the top. When fixing the next layer, do not forget about the garland, which must be passed into the groove.
When the base of the first syringe runs out, put the second one on top and continue to thread the CD onto it. And the tip of the upper syringe must also be inserted with a pin, this will be our peak.
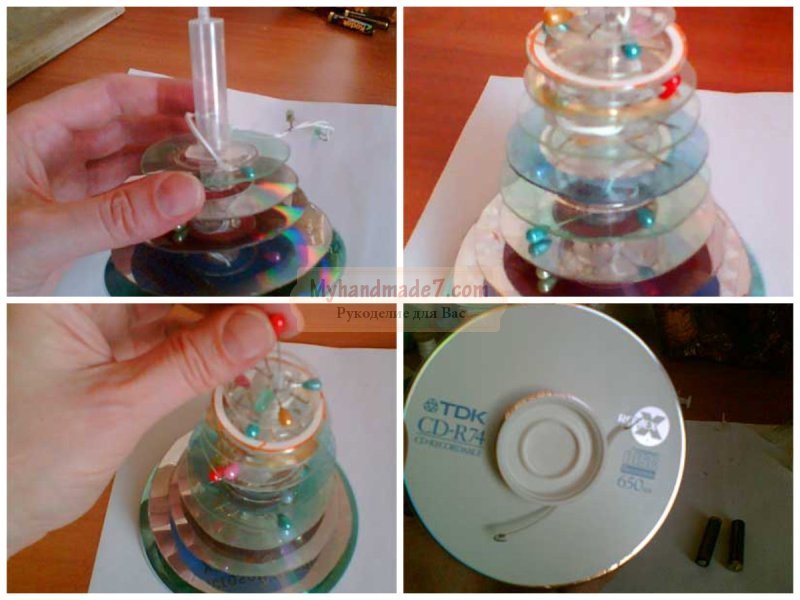
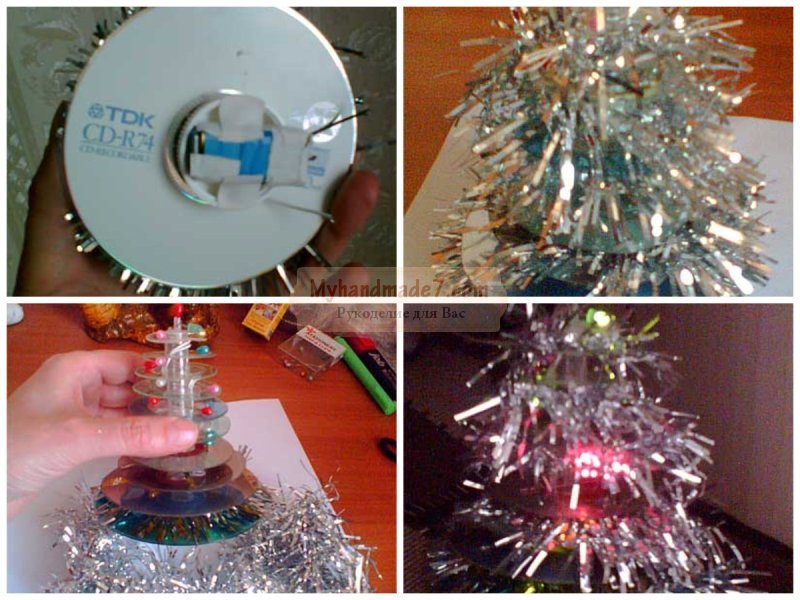
Now you need to design a stand where you can place the batteries. You can use a bottle cap from a shampoo or medicine bottle as a stand.
You can decorate the Christmas tree with tinsel, which will fill the space between the layers. It is advisable to choose tinsel that is not too fluffy; if necessary, long hairs can be trimmed with scissors. After decorating, the Christmas tree should not lose its cone-shaped shape.
In the end, all that remains is to connect the ends of the garland wires with the poles of our battery, and you will see how our DIY Christmas tree made from CDs, master class helped to complete it, will light up and become a bright decoration of the office desk. You may connect the poles incorrectly, so if the Christmas tree does not light up the first time, the poles should be changed.
DIY Christmas tree decorations made from disks
You can do DIY Christmas tree decorations made from CDs in isothread technique. This technique allows you to create various patterns on the surface (in this case, we will use the round surface of the disk as the basis). To create a pattern, you can use silk threads, wool, floss or regular sewing threads.
In addition to the old CD, we will also need scissors, a needle, a ruler and a compass. The drawing must first be drawn on paper: circle the round base of the disk. You need to put dots on the drawing, which will then be used to create a pattern. Our template needs to be cut out and transferred to the surface of the disk.
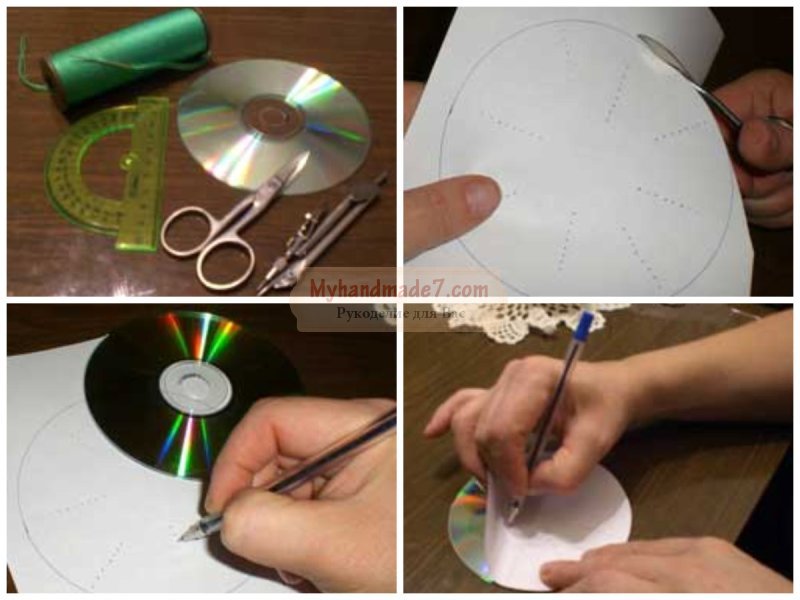
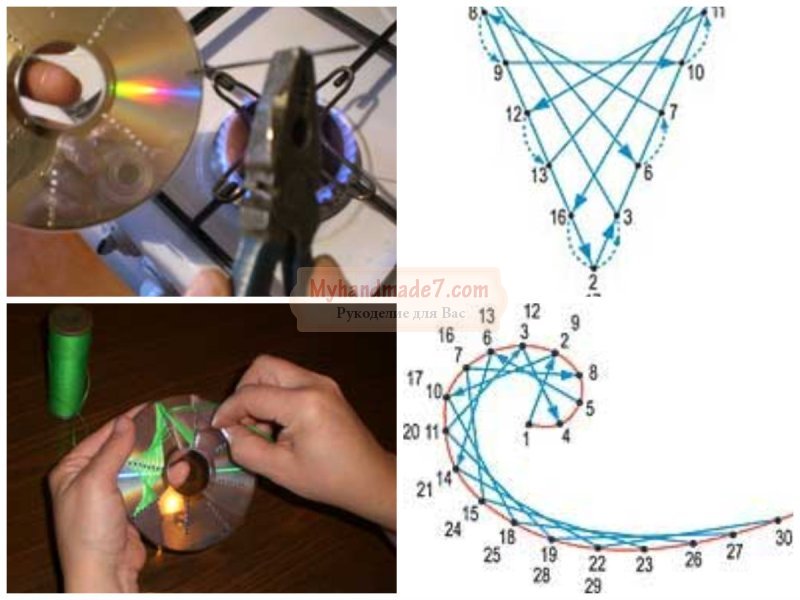
Holes should be made in the CD according to the template. To do this, we will need a thick needle, which we will heat over the fire and make holes with it. Since the needle will become completely hot when heated, you can hold it with pliers.
Next, you need to insert a thread into the needle and start creating an original pattern, and you can find some patterns in our master class. Experienced craftswomen who have been working in the filament technique for a long time can come up with various patterns on their own. Using the isothread technique, you can combine various shapes: circles, triangles, ovals and diamonds; different colors of threads, overlapping each other, create fancy patterns.
Using this principle, you can make a snowflake on an LED base, but first the circle must be divided into 5-6 sectors, and a symmetrical pattern must be drawn for each ray.
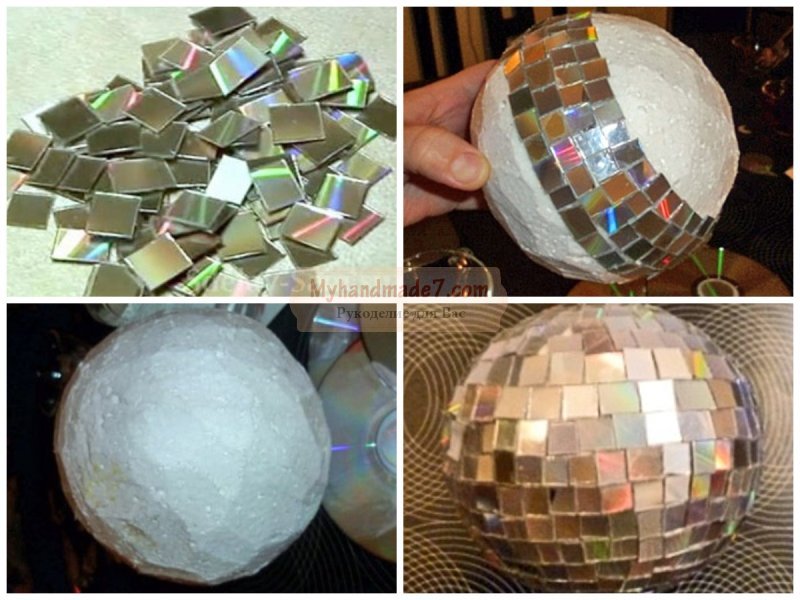
There is nothing easier than doing it in the “Disco” style; with such toys you can decorate a tree that stands on the street, and they will play with bright reflections in the light of street lamps.
For such a ball we will need a foam round base and thermal glue that will reliably glue the elements. The CD must be cut with scissors into small squares, which must then be glued to the base. We will glue the first row in the middle, placing the shiny squares close to each other. Then you need to glue them in a checkerboard pattern until the surface of the base is completely filled. On one side you need to make a loop so that the ball can be hung on a tree branch.
DIY Christmas tree: crafts made from cotton pads
Now let's look at other materials to create an original New Year's decor, we have already done it, and now we will get it beautiful DIY Christmas tree - craft from cotton pads . This type of creativity will be interesting to children and experienced needlewomen.
As a result, we will get a lush Christmas tree, shrouded in white flakes of snow, and for this craft we only need a sheet of whatman paper, glue and a pack of cotton pads.
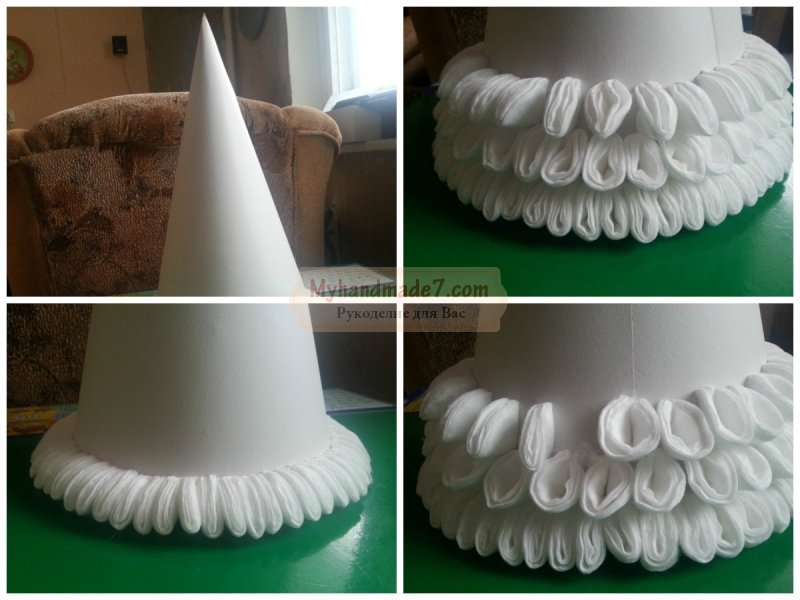
Not difficult at all make your own Christmas tree from cotton pads: the main element will be a disk folded in four (in half, and then in half again, and fixed at the very tip with a stapler), and the base will be paper cone. Depending on what size you have chosen for your craft, you will need to make a cone. A small base can be made from a sheet of cardboard, but for a large cone you will need whatman paper. A sheet of paper must be rolled into a “bundle”, the joints glued together and the excess part cut off from the bottom.
It is necessary to glue the cotton elements from the very bottom, placing them as far as possible closer friend to friend. At the very end of the craft, we will give each element volume by straightening it. Next, you need to glue the next row and so move to the very top of the cone.
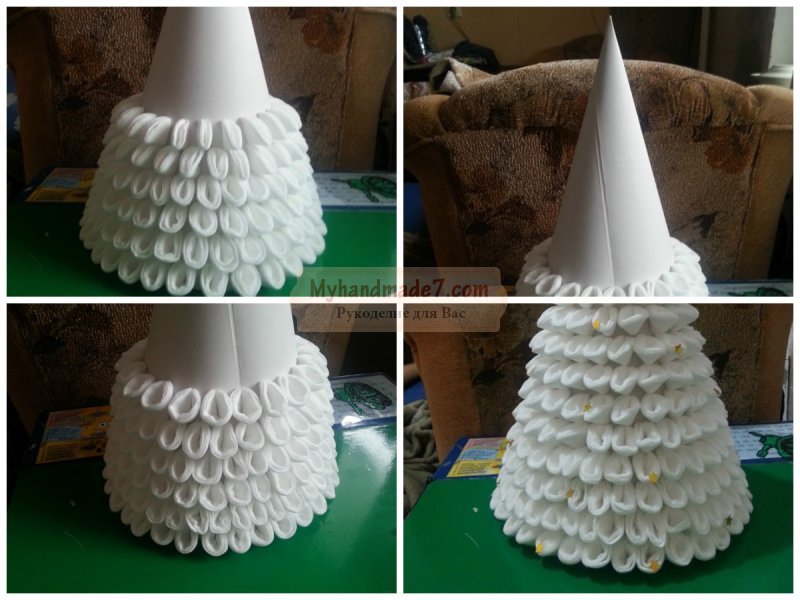
Don’t forget to also decorate our beauty, for example, you can decorate the edges with sparkles: coat the edges with PVA glue and sprinkle with sparkles. Glue beads or artificial pearls.
For our tree we also need to come up with a decorative pot and trunk, as for any topiary, so that Christmas tree do it yourself from cotton pads took center stage in the holiday decor.
DIY Christmas tree made from cotton pads
DIY Christmas tree made from cotton pads- This is also a simple application for a preschool child. It is very simple to do; you need three disks, from which you can use scissors to cut out three triangular elements of different sizes, and then glue them onto a cardboard base.
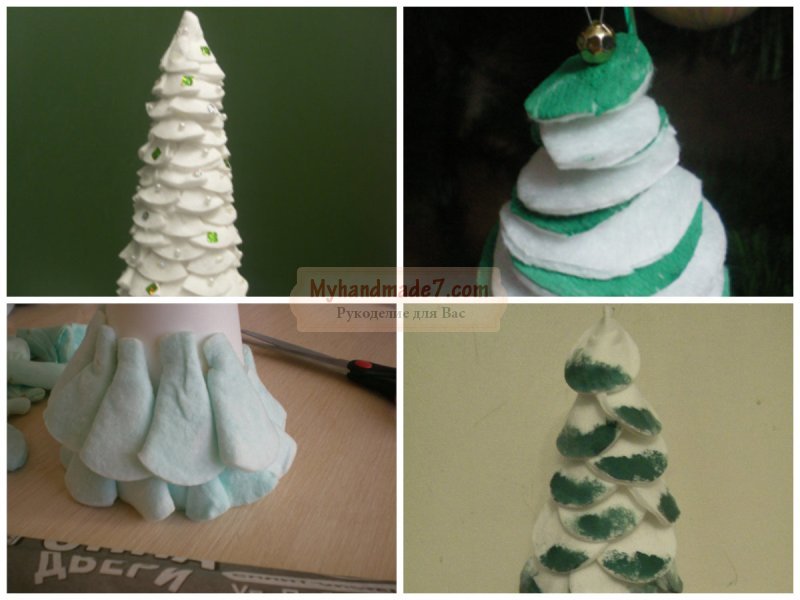
There's more you can do fluffy Christmas tree on a cone-shaped base, but this time the elements are created slightly differently. This craft is somewhat reminiscent of the cutting technique, known to every child from an early age, when he makes appliqués using napkins. The essence of trimming comes down to the fact that only the center of each element is glued to the base, and its edges “look” upward, creating the volume of the craft. In this case, each subsequent element must be glued as close as possible to the previous one so that the edges do not fall apart.
Surely, every woman knows what cotton pads are. However, it is worth recalling that cotton pads are a product made from pressed cotton wool. These elements are used in the cosmetic field. Cotton pads can have not only round shape, but also rectangular. In this article it’s worth talking about what kind of crafts from disks you can make for the New Year. You will like our ideas and you will be happy to make something wonderful for the New Year theme.
Craft ideas from cotton pads
Angels - Christmas tree toy.
In order to make angels you will need: a couple of cotton pads, a bead, thread and elements for decoration.

Progress:
- The disk is divided into a couple of parts and a bead is rolled into one part. Then, using a thread, the angel's wings are formed.
- The second disk folds into a triangle. It is glued to the wings using glue.
- At the next stage, all that remains is to decorate the angels. In this case, sequins or other decorations are used.
- Then you need to glue a loop or toothpick to the toy.

Santa Claus is another Christmas tree toy.
A beautiful Santa Claus is easy to make. In this case, use a plastic spoon, red yarn, buttons or beads for the eyes, and of course, the cotton pads themselves.

- So, you should make a beard from one cotton pad. To do this, glue one disk together and cut its edges with scissors. Using a red marker, draw a mouth for our Santa.
- Then coat a plastic spoon with glue and wrap red yarn around it. You need to wrap the handle tightly. However, the tip of the spoon is not wrapped. Santa Claus' beard is glued to it. On the opposite side of the spoon, all that remains is to draw a smile and glue on the eyes.


Christmas balls made from cotton pads.
Some New Year's crafts made from CDs look wonderful. Moreover, making them is not only simple, but also pleasant. To create an original ball that looks like a snowball, use 15 pieces. The work also uses a stapler and a beautiful satin ribbon red for the loop.
Progress:
- So, each disk is folded in half, and then in half again. For reliability, the discs are fastened with thread or a stapler.
- The finished triangle blanks are strung on a strong white thread. Then you need to form a neat snowball, which should be round.
- All that remains is to sew on a bright ribbon and decorate your Christmas tree with the finished ball.

Christmas tree toy - flower.
Cotton pads are suitable for creating very beautiful Christmas tree decorations. To make them you will need: cotton pads and a stapler. It is also recommended to prepare a variety of decorative items. These can be buttons, beads, as well as sparkles and tinsel.
Progress:
- It is worth forming petals from each cotton pad. Each disc is folded into a triangle. The workpiece is fixed using a needle and thread. You need 7 such petals for each flower.
- 2 cotton pads must be folded together. After which the petals are fixed between them. A stapler is used in this work.
- You can decorate the finished product at your discretion.

Garland of cotton pads.
For quick and easy home interior decoration or kindergarten you can use a garland, which can be created simply from cotton pads. To create, you will need a strong white thread, onto which cotton pads are strung with a basting stitch. The finished threads are hung in the place where they are needed.

Christmas tree made of disks.
A beautiful craft made from cotton pads on New Year's days can transform absolutely any interior. A miniature Christmas tree made of cotton pads is an excellent decoration for any interior.
Creating a Christmas tree is very easy. First of all, a cone is made from whatman paper.
Using hot glue, cotton pads are glued to this cone. In this case, it is necessary to form triangles from cotton pads.
The finished Christmas tree is decorated with beads or other decoration elements.

New Year's wreath.
If you decide to decorate your home with something unusual, then to create such crafts it is recommended to use the most simple materials, which can be cotton pads.
For the wreath, first of all, the base is prepared. Form a ring of rubber or foam. If there are no such materials, then a ring can be formed from newspapers, which are rolled up and a ring is formed from them.
Elements made from cotton pads are glued to the finished workpiece. These elements are easy to make. The cotton pad is rolled up into a ball. Then the second and third disks are wound on it. The result will be a rose. A bead is attached or sewn into the center of such a bag.
These elements are glued to the base of the wreath. They should be placed as close to each other as possible. And in between it’s worth decorating with beads. Can complement the finished composition beautiful bow from satin.

A simple craft for kids.
Kids also want to take part in creating something interesting. And cotton pads will be an excellent material for creativity. For the craft, prepare:
- Colored paper and cotton pads,
- Glue and scissors
- Colored cardboard and marker.
Progress:
- One cotton pad should be cut in a circle. It should be smaller in size than others. This piece will be the snowman's head.
- To create eyes and buttons for a snowman, use colored paper. Circles are cut out of it and glued to the product. You can also draw circles with a marker.
- A hat, nose and scarf are cut out of colored paper.
- The cardboard sheet is folded in half. This is a blank for a postcard. Then two cotton pads are glued to the workpiece. Then they glue on: a nose, a hat and a scarf.

On a note! This snowman can be glued to film and then glued to the window.

Santa Claus under the Christmas tree.
An interesting New Year's craft made from disks, which was created with your own hands and is incredibly beautiful. To create it you may need:
- Cotton pads and a jar of glue;
- Red gouache and scissors;
- Powder and brush;
- Black pencil.
Progress:
- The glue bottle should be covered with discs.
- It is also worth forming the head of Santa Claus from the disks. Separate the cotton pad into 2 parts and fold it several times. The element is glued to the place of the hands. You can also make a hat for your grandfather from the disks. Then paint the product with red gouache.
- The craft should dry. Then use cotton pads to make a beard and mustache separately. Glue everything to grandpa. Draw eyes with a black pencil and a mouth with red. Cheeks should be treated with powder. The collar and sleeve are glued on top of the fur coat.

Finally
As you can see, any New Year's craft made from disks, created with your own hands, is very original. In addition, it is very easy to decorate absolutely any interior with such products. Creating such crafts is the best pastime for everyone. Therefore, you should try your hand.