The symbol of the New Year is a fir tree with lights and balls. Did you know that balls can be made from threads, felt, sequins, discs, and even with a citrus scent? Decoupage technique can update even the most ordinary-looking toy. About ideas that you did not even know about, further in the article with a detailed description.
Basic moments
Absolutely any materials are suitable for needlework:
As a basis, you can take a foam sphere or a simple christmas ball ik made of plastic without decorations. We bring to your attention several master classes on making Christmas balls. They can not only decorate the Christmas tree, but also create a festive interior in the house.
Christmas balls made of threads
Balls made of threads look very gentle and impressive, casting a festive and romantic mood.
For work you will need:
- round Balloon hic;
- PVA glue;
- thick threads (light shades);
- needle;
- scissors.
Operating procedure
Inflate to match the desired size of the future toy. We tie it tightly so that it does not go down ahead of time. We massage with our hands, giving it the correct round shape.
We pass the edge of the thread into the eye of the needle, from which we will make the decoration. We pierce the plastic bottle with glue with a needle and thread it through. The thread, passing through the bubble, will be evenly covered with PVA, which eliminates the need to additionally open all the threads with glue.
It is better to use PVA glue undiluted, otherwise the ball will not keep the desired shape.
Now we pull the thread through the glue and at the same time wind it in different directions, as if we were winding the threads into a ball. We turn the ball intensively in our hands, trying to tightly wind the thread. In the place where the air is tied, we slightly reduce the tension.
We wind the thread to the desired density. Cut the thread, and form a loop at the tip. We leave the workpiece in a dry warm place until the glue is completely dry. You can speed up the drying process by using a hair dryer.
When it becomes completely dry, pierce it and gently pull it out.
We tie a thread or decorative ribbon to the loop and decorate the Christmas tree.
Optionally, you can add sparkles, beads, sequins or other decor to the toy made of threads. A composition of several different diameters looks especially beautiful.
From newspaper tubes
Quite a simple but time consuming manufacturing method.
For work you will need:
- foam blank ball;
- polymer glue;
- old newspapers;
- scissors;
- decor elements (beads, sequins, ribbons).
Operating procedure
The most time-consuming stage is the twisting of flagella from old newspapers. We try to twist the harnesses tightly. If you need a long tourniquet, then glue several short ones together.
In the center of the workpiece we attach the end of the flagellum... Now we begin to lay the tube tightly, securing each new turn with polymer glue. The end of the tube is also securely fixed with a glue gun.
As such, the product can be used to decorate festive decorations. Or you can go ahead and paint it with spray paints in any color, cover it with sparkles, beads, ribbons, etc.
Christmas decorations made of felt
In winter, you always want warmth and comfort, so felt are perfect for decorating your home for the New Year.
For work you will need:
- felt in two colors;
- foam ball;
- cardboard;
- pencil;
- scissors;
- decorative tape;
- pins-nails.
Operating procedure
First you need to draw and cut out two identical templates of a simple flower with five petals from cardboard. Only one template should be slightly smaller.
We apply the pattern to the felt, draw a pencil around the contour. We make large blanks from one color, and smaller ones from another. Depending on the diameter, we need from 20 pieces of blanks of each color.
Now we fold the patterns in pairs, placing the petals in a checkerboard pattern. Cut off about 10 centimeters of a thin decorative tape, glue its edges to the foam blank, forming a loop. Now tightly to each other, bending the top of the petals, attach each flower to the foam in the center with carnations.
The result is bright and soft.
From sequins
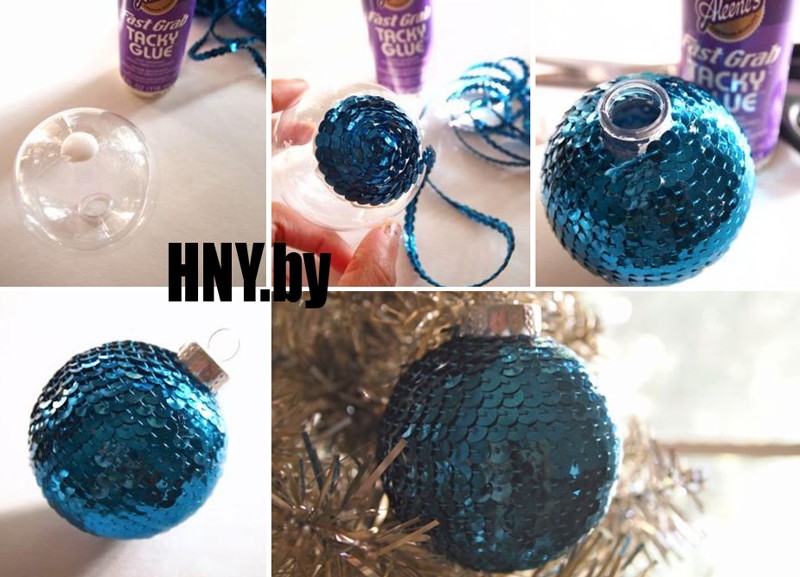
A truly festive sparkling ball can be made from sequins. This decorative material has a wide range. Sequins come in different sizes, shapes and colors.
Large sequins can be glued to any, without convex drawings with a glue gun. We apply glue to the ball itself, sequentially gluing sequins in a circle in a checkerboard pattern.
Try to block the holes for fastening on the sequins so that they are not visible on the finished toy.
For working with small sequins, the usual one will not work, but you will need a special foam blank of the required diameter. In the center of each sequin there are holes through which we will attach the sequins to the workpiece with special studs.
By combining various forms and sequin colors, you can create the most bizarre patterns. Your imagination or little helpers will tell you the design options.
The main thing is to fasten the sequins close to each other so that the white base does not show through (it is imperative to provide and fix the loop fastener).
Another option for decorating balls is sequin ribbons. We also glue them with hot glue, carefully placing the turns with a little overlap so that there are no gaps. You can make it solid or alternate turns of several colors.
A bow made of a beautiful iridescent ribbon will look beautiful at the base of the mount. The product will add charm, glued on top of a decorative beaded or twisted cord.
Decoupage technique
Festive ones made using decoupage technique look very elegant and cute. The technique is very simple, but it requires precision.
For work you will need:
Operating procedure
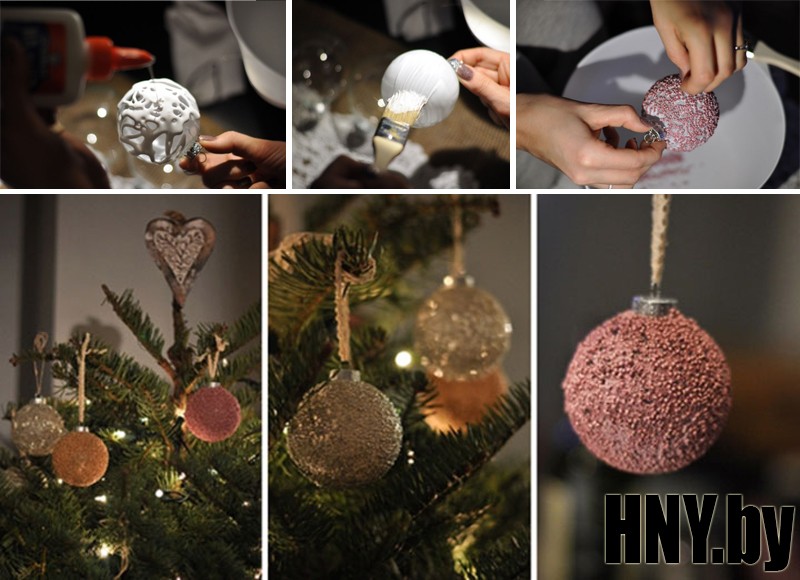
First you need to paint. Pour some white paint into the container, remove the top cap and start covering the surface with paint with a sponge. We put the finished one on a skewer and leave it to dry, putting the structure in a glass.
In order not to throw away paint residues, you can make several balls at once. The pattern can be matched with different new year characters: gnomes, fairies, Santa Claus and Snow Maiden, angels, deer, etc.
With an interval of 1 hour, apply two more layers of paint to completely cover the color of the base. While the paint is drying, we are preparing napkins for decoupage. We iron them with an iron, unfold. Carefully tear off the necessary fragments with drawings on the napkin, remove the thin top layer with the image.
Pour a little PVA into a small container, dilute it with water in a 1: 1 ratio. We apply one of the fragments to the ball, we begin to glue it with a fan brush, starting from the center to the edges of the picture. We try to smooth out all the wrinkles to get a flat surface. Thus, we glue all the desired fragments on the ball, moving in a circle.
Ready to dry completely, put on hats with strings. We open with acrylic glossy transparent varnish in 3-4 layers. While still wet, the varnish can be sprinkled with sparkles for extra shine.
From CDs
If damaged or no longer needed DVDs are lying around at home, they can be successfully used to prepare for the New Year.
For work you will need:
- transparent ball on the Christmas tree;
- hot glue;
- scissors;
- satin ribbon or a piece of brocade;
- old disks.
Operating procedure
Cut the discs into small pieces of different shapes with scissors.
We take a transparent Christmas tree ball, apply a drop of glue, glue a piece of the disc on this place with the iridescent side outward. Thus, we create a mosaic of iridescent pieces, leaving small gaps between them.
Remove the hat, push a piece of brocade or a piece of bright satin ribbon through the hole inside the ball, put the hat back in place, hang the ball on the tree.
There is another way to use old discs for decorating Christmas tree decorations. V In this case, a crumb of discs is used.
To obtain crumbs, grind the disks cut into pieces in an old unnecessary blender, sift through a sieve. The shine will be sifted, and all the plastic will remain in the sieve.
Now we coat the round blank with glue, dip it with its entire surface in the resulting shine. After the glue has dried, brush off all excess gloss with a brush.
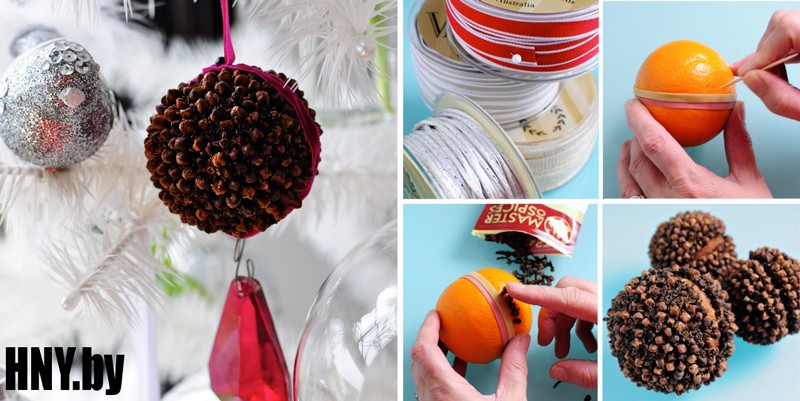
With citrus and clove aromas
Each holiday is accompanied by some kind of aroma. New Year- this is the smell of citrus, pine needles and mulled wine with cloves and cinnamon. To maintain the atmosphere, it is imperative to hang fragrant balls from dried oranges or lemons on the Christmas tree.
True, such jewelry will last no more than one season, and for next year will have to make new scented balls.
For work you will need:
- orange (lemon);
- toothpick;
- cloves and cinnamon sticks;
- ribbon;
- wide elastic band.
Operating procedure
We put an elastic band on the citrus so that it tightly wraps around the fruit. Now we make holes with a toothpick where we will attach the carnation buds. Now we loosely insert a carnation bud into each hole we make.

Guys, we put our soul into the site. Thank you for
that you discover this beauty. Thanks for the inspiration and the goosebumps.
Join us at Facebook and In contact with
Many people notice that the older they get, the more difficult it is to re-experience that magical feeling of a fairy tale and miracle that always came to us in childhood on New Year's Eve.
But we are in site sure - Christmas mood you will not be long in coming if you make one of these wonderful decorations for your home and Christmas tree with your own hands. Almost all, with the exception of two or three, do not require much time and any special materials - they can be made in half an hour from what is at hand.
Thread sprockets
A wreath of balls and an old hanger
In just half an hour, you can make a colorful wreath by buying a couple of sets of inexpensive balls. Blogger Jennifer, the author of this article, recommends unbending an old hanger, but if you don't have one, a piece of sturdy wire is perfect.
- You will need: a pair of sets of balls (20-25 balls of different colors and sizes), a wire hanger or wire, fir branches, braid or ready-made decoration for decorating a wreath.
Snowflake tablecloth
A delicate and surprisingly festive tablecloth will turn out from snowflakes, on which we have stuffed our hands since childhood. You can sit down and cut snowflakes with the whole family, and then lay them out on the table and fasten them with small pieces of tape. A great solution for receiving guests or just dining with your family during the holidays.
Multi-colored beanies
The cutest colored hats can be made from leftover yarn, which can be used to make a garland for a Christmas tree or to decorate a wall. Or hang them on a window or a chandelier on different levels... Children over the age of five will do just fine too. simple decoration... See details.
- You will need: sleeve toilet paper for rings (or regular cardboard or thick paper), scissors, colorful yarn and a good mood.
Lamp "Snowy City"
For this charming lamp, you need to measure a piece of paper around the circumference of the can with a small margin (to glue it together), depict and cut out the simplest city or forest landscape. Wrap around the jar, and put a candle inside.
- You will need: a jar, thick paper of any color, you can white, any candle. Alternatively, you can coat the top of the can with "falling snow" using a special "snow" spray that is sold in hobby stores.
Balloons with photos
A great idea for decorating a Christmas tree or for a gift to relatives and friends. The photo must be rolled up into a tube so that it goes into the hole in the ball, and then straighten it with a wooden stick or tweezers. Small black and white rectangular shots will do, and you can also cut out a photo to fit a ball or silhouette (like with a cat in the snow).
- You will need: plastic or glass balls, photographs, various sundries to fill the ball - tinsel, garlands, coarse salt (for snow).
Christmas lamps
And this miracle is a matter of five minutes. It is enough to collect balls, fir branches, cones and put them in a transparent vase (or a pretty jar) and supplement with glowing garlands.
Embers
Glowing garlands hidden among cones, branches and pine paws create the effect of embers smoldering in the fireplace or a cozy fire. They even seem to give off a fever. For this purpose, a basket that has been lying on the balcony for a hundred years, a nice bucket or, for example, a wicker container for small things from Ikea, will do. Everything else (except for the garland, of course) you will find in the park.
Floating candles
A very simple decoration for New Year's table or for a cozy evening with friends in new year holidays- composition with candles floating in a vessel with water, cranberries and pine twigs. You can use cones, orange circles, fresh flowers and leaves from a flower shop - whatever your fantasy tells you. And as a candlestick - deep plates, vases, jars, glasses, as long as they are transparent.
Snowman on the fridge or door
Children will definitely be delighted with this - quickly, fun and very simple, because even a three-year-old can handle cutting out large parts. It is enough to cut the circles, nose and scarf out of self-adhesive paper, wrapping paper or colored cardboard and attach them to regular or double-sided tape.
Snowflakes on the window
An interesting use for a glue gun lying around. In order to glue these snowflakes to the glass, it is enough to lightly press them to the surface. For details, see our video.
- You will need: a stencil with a snowflake drawn with a black marker, tracing paper (parchment, baking paper), a glue gun and a little patience.
Christmas trees-sweets
Bright Christmas trees can be built with kids for children's party or decorate with them festive table... Cut triangles out of colored paper or cardboard, tape them to a toothpick, and stick the resulting Christmas trees into the candy.
- You will need: Hershey's Kisses or any other truffle candies, toothpicks, scotch tape, colored paper or cardboard with a picture.
Garland with pictures and drawings
New Year, Christmas - warm, family holidays. And it will come in handy with photographs, children's drawings, pictures. The easiest way to secure them is with clothespins, which can be decorated with hearts or snowflakes.
Origami star
Painted spoons
Ordinary metal spoons or wooden cooking spoons turn into interesting New Year decorations using acrylic paints. This idea will surely appeal to children. If you bend the handle of the metal spoons, you can hang them on the tree. And wooden spoons will look great in the kitchen or in a bouquet with spruce branches.
Sock snowman

The first Christmas balls appeared in Germany in the 18th century. In those days, they were decorated with apples and hand-made decor, but 1848 turned out to be a barren year, glassblowers urgently made the first apples from glass, and the local population liked them. Thus, they gradually supplanted natural jewelry and artificial. But time does not stand still, and now everything is returning to. Handmade may not be perfect, but the soul is put into it, and nothing can replace the warmth of the products made. Today in this review of the site we will tell and show several master classes how unusual it is to decorate Christmas balls on your own.
| Illustration | Description of action |
 | Make a square out of a sheet of A4 white paper, fold it in half with a triangle, the edges of which bend in such a way that you get a square again. |
 | Unscrew the edges and smooth out the center. |
 | Bend the tops of the protruding triangles, and then their edges inward, so that the figure again takes the shape of a square. Roll up the workpiece in the form of a cone and glue the sides with tape. For one flower, you will need 5 blanks. |
 | Connect the two blanks with tape, first along the upper edge, then below. Fasten all the parts together in the same way. |
 | In this technique, collect 10 flowers from paper of different shades. |
 | Glue the flower petals one by one with double-sided tape. You can use a stapler or PVA glue. |


Beautiful felt decorations for Christmas balls
Needlewomen fell in love with soft for a long time. It is convenient to work with the material, it does not crumble, it lends itself easily to drapery, and bright colors can be chosen for any holiday.
How to make felt roses to decorate Christmas balls
Pre-prepare different colors, a blank of a foam ball, scissors and a set of safety pins with beads. The order of work is as follows.
- Glue the decorative loop-loop to the workpiece.
- Prepare circles from felt, then cut in a spiral with a thickness of no more than 1 cm.
- Fold the snail-shaped strip and secure the base with a thread. You can take a ribbon of two shades and roll it together, you get a more voluminous and colorful flower.
- Make blanks from different colors.
- Secure to the Styrofoam ball with safety pins.

It is interesting! You can make multi-colored felt blanks, put 2-3 pieces on top of each other and connect them with a safety pin.

Soft felt Christmas tree decorations
For manufacturing, we need felt, a little padding polyester or any type of padding, rhinestones, a decorative ribbon and a needle with thread.
Work description.
- Cut 2 circles out of felt.
- Glue rhinestones or any decor on the front side of both parts.
- Connect the two circles together and sew with a buttonhole seam around the perimeter. Shortly before the end of the work, put a synthetic winterizer inside and sew a loop.

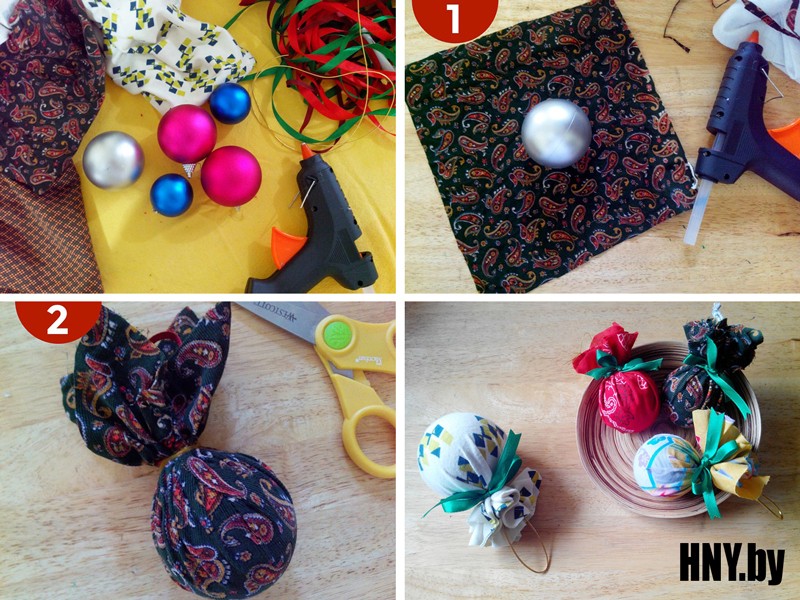
How to make a Christmas ball with fabric decor
They look mesmerizing, decorated with fabric. They can be made in general and in any color scheme.
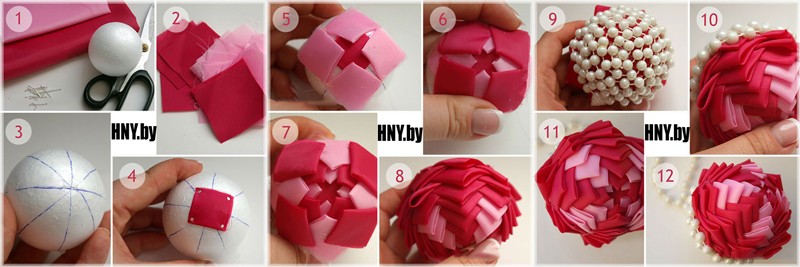
Master class for decorating Christmas balls with ribbons
Before you make a New Year's ball with your own hands, you need to prepare:
- satin ribbons from 2 cm wide in two colors;
- glue gun;
- decor from beads or rhinestones;
- foam ball;
- decorative cord for the eyelet.
Let's consider decorating in more detail.
| Illustration | Description of action |
 | Cut the ribbons into squares. Apply a little glue to the top of the ball and glue one element. |
 | Fold a triangle from a square of the second color, then bend it in half and fix the edges with a drop of glue. Make several of these blanks. |
 | Apply glue to the long side of the triangle and glue it to the corner of the square with an angle to its middle. Glue 3 more elements in the same way to completely cover the square. |
 | Glue the next row of triangles with corners to the center of the ball. |
 | Burn the edges a little with a lighter so that they do not bloom. |
 | Further, all rows are glued in the same way. We alternate pink and blue. |
 | Glue one square of blue color on the bottom of the toy and fasten the triangles almost to the end. |
 | Take a pink ribbon 15 cm long, singe the edges and sew along the edge with a needle and red thread. |
 | Assemble the bow, secure the edges and glue it to the base. |
 | Glue a special mount or a satin decorative loop to the top. |
In more detail, the master class can be viewed in the video:


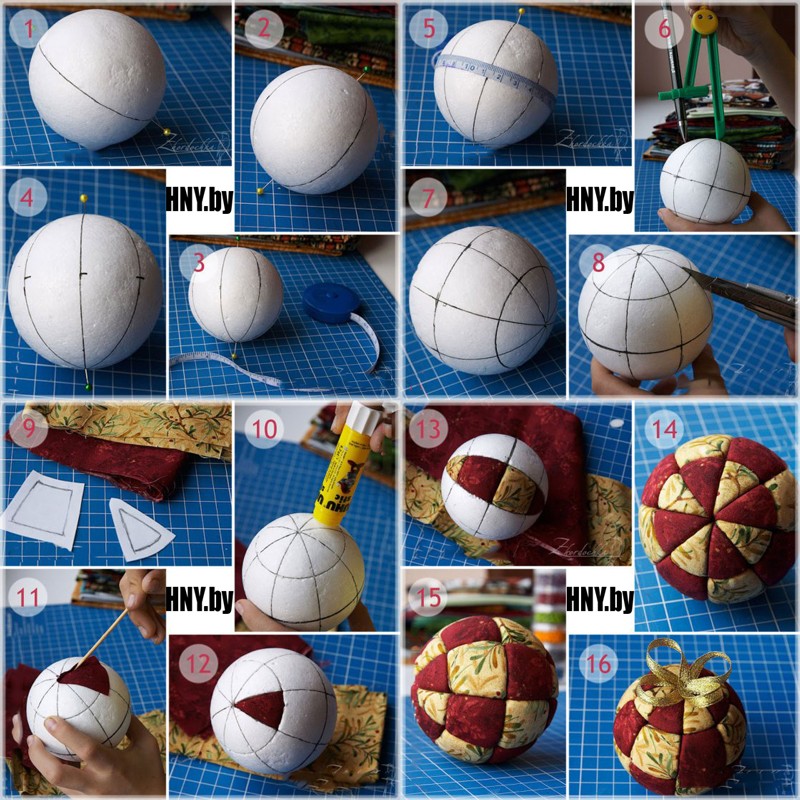
DIY decoration of Christmas balls using the patchwork or kinusayga technique
There are two ways to decorate Christmas balls:
- pre-sew a blank from the scraps;
- decorate the ball without using a needle.
More simple and interesting idea- performance in the kinusaiga technique. By this principle, you can create whole ones not only for the New Year. For work we need:
- foam blank;
- pieces of fabric;
- glue stick;
- thick darning needle, awl or stack needle;
- decor.
The order of work is as follows.
| Illustration | Description of action |
 | Make markings on the foam blank and cut the lines with a clerical knife. |
 | Apply glue to one section of the workpiece, attach a piece of fabric and use a thick needle to embed the edges inward. |
 | Cut off excess fabric. |
 | Gently tuck all edges of the fabric inward. Process the entire workpiece in the same way. |
More details about this technique can be found in the video:
Additionally, you can decorate the New Year's ball with ribbons, beads and rhinestones, as well as perform more complex patterns


How to decorate Christmas balls with hand embroidery
Looks beautiful and unusual as a decoration for Christmas balls. To do this, it must be done on a prepared fabric or canvas, and then cut and glued to the workpiece. The rest of the surface must be decorated with a suitable material. You can embroider several pictures separately for each side of the toy, and then glue them on the foam, then complete the decoration with rhinestones, sequins or beads.


Master classes on unusual decoration of Christmas balls
You can use not quite familiar objects to decorate Christmas balls. The result is a completely unique product that will not leave anyone indifferent.
How beautiful you can decorate Christmas balls with your own hands using cords and beads
Christmas balls decorated with beads look very nice. To do this, you can disassemble an old necklace or buy items from. In addition, we need a foam blank.
Option 1
String the beads on a cord and glue the whole ball with them. A selection of different shades will look beautiful.
Option 2
String the beads onto safety pins and attach them to the workpiece. Repeat the same actions until the ball is completely closed. Finish with a loop for fastening.


Buttons, coins and pasta for an unusual decor of Christmas balls
Christmas balls, decorated or buttons, look unique on the tree. The buttons can be matched in different colors and sizes, which makes the jewelry more unusual.
It is interesting! You can replace the buttons with pasta or coins. First, it is necessary to wrap the workpiece with foil so that the base does not shine through. Additionally, the entire ball can be painted with spray paint, covered with glue and applied with glitter powder.


Fabulous patterns of threads and beads for decorating Christmas balls
Christmas balls can be used not only to decorate the Christmas tree, but also as a decoration element. For work, we need PVA glue, threads and decorative braid. You can also decorate an old Christmas tree toy in this way, which over time began to look unpresentable.
The order of work is as follows.
- Inflate the ball, coat it completely with glue.
- Wrap it in random order with threads, then coat it again with glue.
- After the glue dries, pierce the balloon and gently pull it out through any hole.


Beading a New Year's ball is a painstaking task that requires professional skills. You can simply string the beads on the fishing line in a certain order and glue them to the base. Experienced people use complex schemes to create a real masterpiece, which, if desired, you can always figure it out on your own.


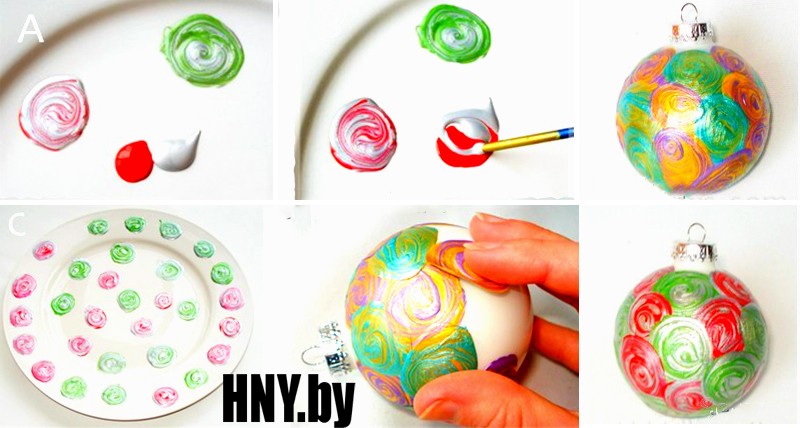
Magic painting of Christmas tree balls
Another option for decorating Christmas balls is decorative. You can draw whatever you want, and additionally the balls are decorated with shiny powder, semolina or sequins.
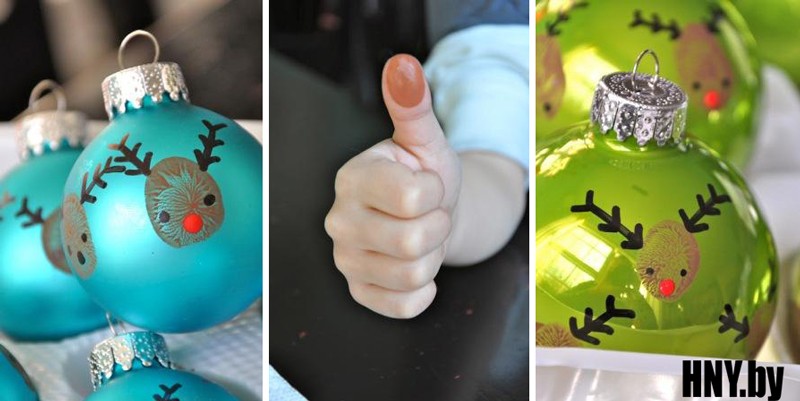
Creativity for the little ones: handprints and fingerprints on balls
Even kids will like such creativity, and you can make a decoration in game form... For work, you need to prepare the ball, first degrease it. You will also need acrylic paints and fine brushes. Here a large field for imagination appears.
Today, on store shelves, you can find a huge number of a wide variety of Christmas tree decorations, so it will not be difficult to turn an ordinary Christmas tree into a real festive beauty. However, New Year is a special day! Day when old year remains behind, and new adventures, new events, new victories await ahead. But after all, the old year did not pass without leaving a trace, warm memories, bright events, your personal victories and achievements remained from it. It would not be bad to remember the passing year for many years. And you can do this with the help of a DIY Christmas ball. Each time you decorate a Christmas tree, you will get Christmas balls out of the box, and with them remembering the past.
Making Christmas balls with your own hands is quite simple: for this you need inspiration, a desire to create and a little perseverance. We have prepared for you 15 DIY master classes for making Christmas balls.
To make such a ball, you will need: a simple glass or plastic ball, old CDs, scissors, tape, glue.
# 2 Christmas ball with fingerprints. We decorate Christmas balls in an original and simple way
To make such a masterpiece, you will need: a glass or plastic ball without a pattern, paints (watercolor, gouache, acrylic), felt-tip pens or markers, brushes.

# 3 Christmas ball made of paper tubes. Manufacturing master class
To make a New Year's ball from paper tubes, you will need: a foam or plastic ball, glue, thin paper, threads.

# 4 Christmas ball made of sequins. Step-by-step master class
To make a New Year's ball from sequins, you will need: a foam, plastic or glass ball, a ribbon with sequins, glue.
# 5 Do-it-yourself fragrant Christmas ball
New Year is a holiday of smells! Why not add some flavor to your Christmas tree? To make such a ball, you will need: an orange, lemon or any other citrus fruit, ribbons, a wide elastic band, a toothpick, New Year's spices (cinnamon, cloves, etc.).
# 6 New Year's ball from old newspapers
Christmas balls decorated with old newspapers look very original. To do this, you will need: a foam or plastic ball, newspapers, glue, masking tape, thread, paints, felt-tip pens or a gel pen.

# 7 Christmas ball decorated with felt. We make decorations for the Christmas tree with our own hands
To create an original Christmas ball, you can use pieces of felt or other fabric. To create such a ball, you will need: a ball (plastic or foam), felt or other fabric of several colors, glue, thread, scissors.

To make a New Year's ball from fabric, you will need: a foam ball, fabric of several colors, safety pins (a lot!), Beads, scissors, glue.
# 9 Christmas ball made of patches
If you want to make an original New Year's ball with your own hands, then pay attention to the patchwork ball. To do this, you will need: a foam ball, a stationery knife, fabric of different colors, a felt-tip pen, a tape measure, glue, safety pins, a wooden skewer or a toothpick.
# 10 DIY Christmas ball made of threads
The New Year's ball made of threads is incredibly popular among needlewomen. To make it, you will need: a balloon, threads, PVA glue.

# 11 Christmas ball decorated with stained glass paints
Excellent Christmas decoration can be done with stained glass paints. To create such a ball, you will need: a glass or plastic ball, stained glass paints. You can do it in several ways: draw directly on the ball or make preliminary blanks, and then glue them onto the ball.
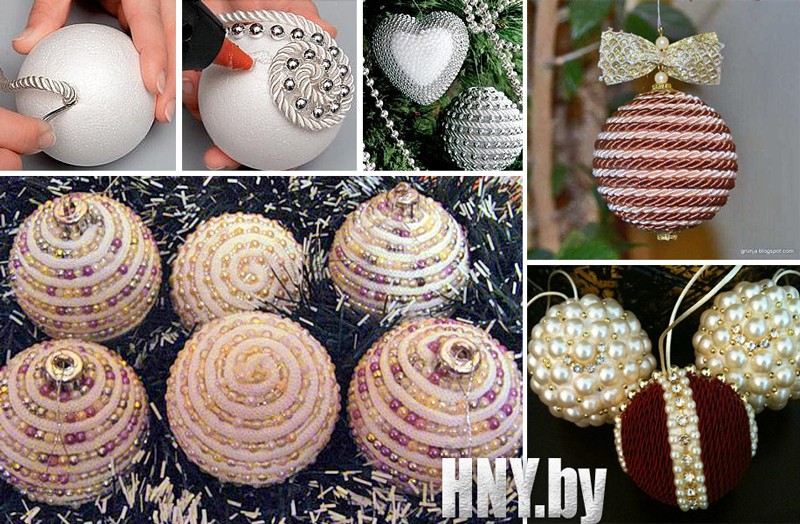
# 12 Christmas ball made of cord and beads. Do-it-yourself Christmas balls
To make such a New Year's ball, you will need: a foam or plastic ball, cord, beads, glue.
# 13 Button Christmas ball. Decorating a Christmas tree with children
Even the smallest residents of the house will be able to make a New Year's ball from buttons. For such a craft, you will need: a foam ball, multi-colored buttons, glue, thread.

# 14 Christmas ball with beads
Balls decorated with beads look very nice on the Christmas tree. You can decorate the ball with beads from the outside or from the inside. Which of the ways to choose is up to you, but we, for our part, will notice that the external decoration may crumble after a while. In any case, you will need: a plastic or glass ball, glue, beads.
# 15 Decorating a Christmas ball with cloth or paper
If there is very little time left, and you really want to decorate the balls, you can use a very simple and original technique: decorating the ball with wrapping paper or fabric.
# 16 DIY Christmas balls using decoupage technique
If you want to make a truly unique New Year's ball, then it's time to master decoupage. To make a New Year's ball, decoupage you will need: a plastic ball, themed napkins, white acrylic paint, PVA glue, acrylic varnish for decoupage; fan-shaped brush, foam sponge, sequins for decoration.

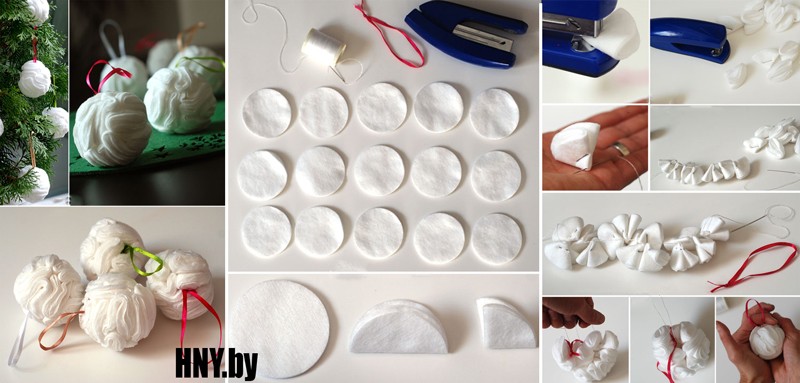
# 17 DIY Christmas balls from cotton pads
An excellent option for a New Year's ball would be a toy made from ordinary cotton pads... To make it you will need: cotton pads, stapler, needle, thread, tape.
We will send the material to you by e-mail
New Year, New Year is coming to visit us ... And very soon the landscape outside the window will delight with snow, the frost will pinch the cheeks, and the Christmas tree in the house will expect a decent decoration. We will not consider the assortment finished products, but we will create something fabulous, amazing and original.!
The most accessible material: how to make a paper Christmas ball with your own hands
Initially, toys for the Christmas tree were made by glass blowers, but today, thanks to a large number of different materials, a New Year's miracle decoration can be made at home on your own. The paper industry offers different types products: velvet paper, waxed, glossy, corrugated, colored. People with a creative approach took advantage of such a convenient material, and the world saw origami balls, Christmas tree toys made of corrugated roses, and much more.
Delicate balls for the New Year: we create from corrugated paper
Balls on a Christmas tree made of corrugated paper are made by both adults and children. Soft paper is easy to curl and form. Color palette allows you to make a decoration that looks perfect indoors or on a Christmas tree.

If you make several different-sized balls with floral decoration, then the Christmas tree will be decorated in the same style.

| Illustration | Description of action |
|---|---|
 | Let's prepare corrugated paper any color, a ruler, scissors and a heat gun. |
 | From the paper you need to cut off several strips about 0.8-1 cm wide. Each strip should be twisted around its axis. |
 | We get several long flagella. On the tip of one we apply a drop of hot glue and begin to roll the flagellum around ourselves in different directions. |
 | We continue to wrap the resulting ball with a tourniquet. |
 | As soon as one tourniquet ends, we fix it with a drop of hot glue and attach a new tourniquet to the ball. Work continues until the toy reaches the desired size. |
 | In this way, you can get a lot beautiful jewelry different color. |
Advice! To make the mood completely New Year's, you can grease the balls with PVA glue and sprinkle with glitter.
Balls from paper tubes
Christmas paper balls can be made as described above, but only from ordinary newspaper tubes. This decor is used even after the New Year - there will be no need to hide beauty in a distant box.
| Illustration | Description of action |
|---|---|
 | We cut strips about 5 cm wide from newspapers. long knitting needle and PVA glue. |
 | We begin to wrap the strip around the knitting needles so that there is an acute angle between them. As soon as we reach almost the end (without bringing 2 cm), we coat the remaining triangle of paper with a drop of glue, wrap it up and hold it with our fingers for a few seconds. We carefully remove the knitting needle from the tube and start making the next one. |
 | Dip the finished tubes one by one in paint or wood stain of a suitable shade. Colored straws are best placed on a sieve. |
 | First, we fold the tube into a ring and fix the bagel with hot glue - it will be faster this way. We wrap the resulting ring in random order. Gradually, our ball grows and becomes the size we need. |
Balls made of paper flowers, patterns and music strips
We will learn how to make a DIY Christmas ball using blanks from paper flowers. There are two options for getting a lot of floral elements: purchasing a curly hole punch in the form of a flower or using a cardboard template. The second method promises a lot of time and effort, but if you do it with the whole family, then the minus turns into a significant plus.


Origami and kusudama balls
Not everyone has a relationship with origami, but when else can you show patience if not for a holiday that promises miracles? We gather our will into a fist and get down to a very interesting activity - we turn paper into a voluminous toy. The kusudama technique is difficult and requires perseverance, but admire the results you can achieve!


It is not easy to add such beauty, and, probably, the first time, the graceful ball may not work. It is better to try first to collect it from newspapers, and only then try your hand at colored paper. We offer several schemes for assembling such a decoration.

You can start by assembling one element. As soon as such an origami flower appears in your hands, you will want to make them again and again.


Related article:
How to make a Christmas wreath with your own hands: history and tradition of origin, a master class on creating, from what to make the basis for a product (newspaper, cardboard, insulation for pipes), decorating a New Year's wreath with various materials - read the publication.
Working with felt: how to make Christmas balls with your own hands
How to make Christmas balls if you have a lot of felt of different colors? We select suitable floss threads, take a needle, scissors, a little padding polyester and a good mood.
Balls with flowers made of felt
Children will also be able to build a beautiful ball: it requires a foam base and a lot of tailor's pins.

Balls with felt applique
Felt is easy to cut, easily stitched by hand, requires almost no effort: a miracle, not a material. We take a cardboard circle-template, apply it to the felt and cut out two identical circles.

Sew the circles together with a buttonhole seam with bright threads, but leave room for stuffing. After the ball has grown and looks like an ornament, the seam is finished to the end.
How to make a Christmas ball out of fabric
Woven material presented great variety and a lot of this splendor can be used to decorate your Christmas tree ornaments. Ribbons, satin pieces, linen cuts, even floss threads - everything goes into action.
Balls for the new year from ribbons: master class
Ribbons are cheap, there is a wide selection, and the work does not require special skills.
| Illustration | Description of action |
|---|---|
 | We prepare two types of satin ribbons, tiny carnations and a foam round base. Cut the ribbons into equal pieces (2.5 × 6 cm) and one square. We take 1 largest piece and place it on the base, securing it with studs from each corner. |
 | In the center we glue the decor (bead, half-bead, rhinestone) |
 | We work with segments of a different color. |
 | Fold a piece of a different color into a triangle. |
 | We apply the triangle with the front side as in the photo and fasten it with studs in the corners. |
 | We do this three more times. There is a small distance between the triangles. |
 | Having done this one row, we begin the next. |
 | We alternate colors side by side to the very end or to the middle of the toy. In the second case, the pattern of triangles is carried out with back side expanding it towards the middle. Glued in the center satin ribbon, which is tied with a bow. |

Patchwork or kinusaiga: shreds and New Year
Christmas decorations from balls can be decorated using the patchwork or kinusayga technique. Patchwork is patchwork, and kinusaiga is almost the same, but it is based on foam, and there is no need for seams.


The final result depends on the material chosen. The phrase is simple, but when faced with the need to create beautiful craft, many people get lost. We will show you how to choose original decor and surprise everyone in the coming New Year.
Beads, beads
Beads and seed beads will be a stunning decoration for balls on a Christmas tree for home decor. There are several ways to create interesting design using such a material: depending on the chosen one, you will need a fishing line, thread or a thermal gun.


Acting according to bead weaving patterns, they get a non-standard decorative Christmas tree toy

Sequins will add brightness and shine to the tree. Their cost is not particularly high, they are attached to the ball with glue


Buttons and pasta
The button decor will appeal to children: the bright buttons are easily glued with ceiling tile adhesive and do not require painting. Although, if you wish, you can paint the entire toy at once from a spray can.


How else can you decorate Christmas balls on a Christmas tree: ideas with fingerprints, stained glass paints, salt
If you do not deny yourself the manifestations of fantasy and imagination, then a look or thought will surely find non-trivial ways to decorate New Year's toys.

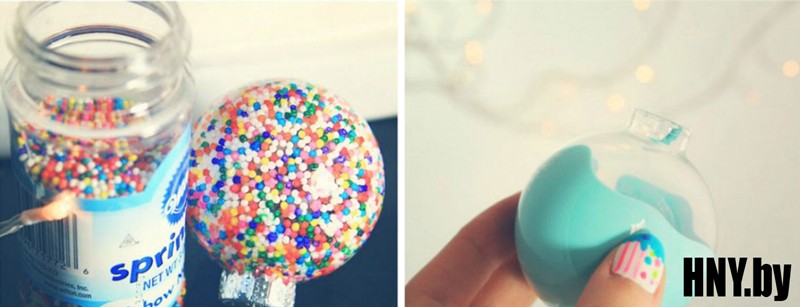
A Christmas ball with snow is obtained if the base is thickly coated with PVA glue and rolled in salt and sparkles. The second method is white acrylic paint: it is applied with a sponge to the toy.


How to do it yourself decoupage balloons for the New Year
Decoupage technique gathers more and more lovers of fine sophisticated decor. The product requires a base ball, beautiful christmas napkin, PVA glue.
We take a toy and smear it with PVA. We tear off a piece from the napkin and put it on the ball. With a brush we straighten the passage, avoiding irregularities and breaks.
