Easter is the main Christian holiday of spring. Recipes for Easter baking, Easter cakes, Easter basket decorations, and Easter eggs have long been passed down from generation to generation.
And if earlier eggs were colored in broth onion peel, oak leaves, today there are many more options for decorating eggs. One of them is decoration with beads.
Using various techniques beadwork, which I will demonstrate in this master class, you can create an exclusive Easter decor.
I would like to show you several options for decorating Easter eggs with beads, from the simplest to the most complex.
First you need to do preparatory work. You can take a raw egg for braiding, having rid it of its contents, or you can take a boiled one, but it is best to take a wooden blank (such an egg, your beaded masterpiece, will last a long time and will delight you and those around you).
Options for decorating Easter eggs with beads:
- Pasting.
This is the easiest way to decorate eggs, without requiring special effort. Necessary:
- egg blank;
- epoxy adhesive;
- pencil;
- multi-colored beads and beads.
First, we draw a sketch of the future ornament on the blank. Then we apply glue to the parts that need to be filled and begin gluing the beads in accordance with the pattern.
 Here are examples of folk motifs laid out with beads:

 Eggs can be decorated not only with beads, but also with sequins. They can be used to decorate a pysanka in the shape of a goldfish like this:
 A couple more ways to decorate an Easter egg with sequins.
This is the simplest one
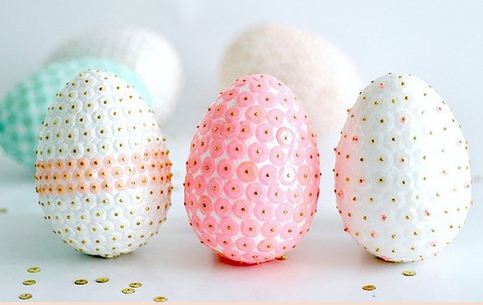 And another option is more magnificent.
 We need:
- a blank egg made of polystyrene foam or foam rubber;
- sequins in the shape of flowers;
- colored pins;
- glue moment.
We pierce the sequin with a pin - this will be our flower.
 We begin to insert such blanks into the egg. To strengthen the tip of the pin, you can coat it with glue.
 We pass over the entire surface of the egg, leaving no voids.
 Ready
Ready

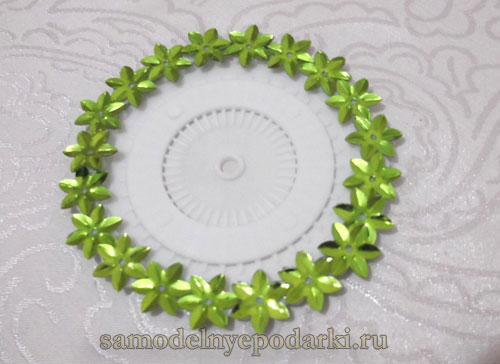
Now let's start making the stand. A pin mold will be useful for this. Glue green sequins along its edge.
 This is how it should work out.
 Glue our egg to the base - and our Easter miracle is ready!
 1.
Weaving an Easter egg with a beaded mesh
1.
Weaving an Easter egg with a beaded mesh
The technology of braiding an egg with a beaded mesh is that the egg itself has a streamlined shape, so the braiding is carried out in several stages. The egg itself is conventionally divided into 3 parts: a central belt (2) and two poles (1, 3). First the belt is braided, and then the poles.
 Visual demonstration. Let's prepare:
- wooden blank;
- beads;
- nylon thread, needle.
We braid the belt with a mesh, according to this diagram:
 Beginning of mesh weaving
 turn
turn
 We tighten the thread and weave according to the diagram
 We measure the mesh to the required length so that it completely encircles the width of the egg.
 Place the mesh on the workpiece and connect its edges.
The tradition of painting hard-boiled chicken eggs for Easter goes back centuries. To celebrate the day when Jesus Christ resurrected, Christians decorate festive table and give each other decorated eggs, perceiving them as a symbol of new life, goodness, grace, prosperity, prosperity. A wonderful gift to the main thing Orthodox holiday can be handmade Easter eggs made from beads.
Pasting eggs with beads
Those who have never done beadwork will have to be patient and learn the skill from the beginning. Or choose a simpler option for decorating Easter eggs with beads - the pasting method.


- The second option for decorating Easter eggs with your own hands is to glue ready-made beaded baubles. Baubles can consist of one thread or be complex bead chains.
The beaded thread in one row is simply wrapped around an egg that has been pre-lubricated with glue. You can start pasting either from the end or from the middle of the egg. The main thing is to secure and glue the end of the thread well.


If the bauble is wide, when closed, its diameter should exactly match the diameter of the egg at its widest part. The strip with the finished pattern is put on and glued firmly to the shell in the middle of the egg. Next, from the “belt” to the tapering ends, glue the egg with single beads or glue long single-row bead threads.
- A more complex way to decorate Easter eggs is beading.
The technique of braiding eggs with beaded mesh or canvas can be different. The choice of pattern and theme of needlework is limited only by the imagination and skill of the craftswoman. But in any case, such symbolic souvenirs look great, festive and very elegant.
A simple egg braiding pattern for beginner craftswomen - video tutorial
Material and accessories
Before you start crafting, you need to purchase materials for making beaded Easter eggs. They are the same regardless of the beading technique chosen. To work on this craft you will need:
- Egg-shaped blanks.
- Beads and beads of different colors and sizes.
- Glue.
- Needles for attaching and collecting beads into a pattern.
- Thin nylon threads or fishing line.
Plastic or wooden blanks are usually used as a blank, which are sold in stores selling accessories for needlework, embroidery, and beading.
To make a beaded Easter egg, you can use a whole shell from a real egg:
- To do this, the contents of a raw egg are blown out through tiny holes made in the ends.
- The shell is “strengthened” by pasting it with pieces of soft paper (newspaper, napkins) using the papier-mâché technique.
The blank can be made entirely of papier-mâché, giving it the shape of an egg. For convenience, its base is made flat so that the “egg” is stable. For beauty and aesthetics, layers of dried paper are leveled with fine-grained sandpaper and coated with acrylic paint.


Technique for weaving a diamond-shaped mesh of beads
A fairly simple weaving method that you can master in short time. Even a novice needlewoman can braid an Easter egg with a diamond-shaped mesh.
Step-by-step instruction:

There is another way to weave a tapering mesh. The set of beads continues to be made in 3 pieces, but the needle is threaded through the rhombus, skipping the adjacent one. When braiding the end of the egg, you don’t have to stick to the pattern, but connect the beads in any order.
Using the same principle, the second part of the egg is braided with a diamond-shaped mesh. Weaving the last bead into the pattern, make a fixing knot, cut the thread and hide it.


Double-sided weaving technique
A method ideal for those who are just learning beading. This technique - double-sided weaving or hand weaving - is most often chosen by even experienced craftswomen to decorate an Easter egg with beads.
Step-by-step instruction:
The easiest way to learn is with beads of two contrasting colors. Some weave even rows, others odd rows. The first 2 rows are woven like this:

The described technology is used to weave a belt that wraps the widest part of the egg. The size of the strip is determined depending on the height and width of the workpiece. On average, the height of the belt takes 10 rows. The length is equal to the circumference of the workpiece along the widest central part.

The hand weaving technique is suitable not only for decorating Easter eggs. Using a similar scheme, you can create beautiful decor for any other crafts and souvenirs. For example, do decorative easter made of beads, which can be used to decorate the interior or presented as a gift to friends, relatives, and colleagues.


Mosaic beadwork
A very simple method of mosaic weaving is perfect for beginners. The fabric is woven without a pattern; there is no need to calculate how many beads will be needed for the entire braid of the egg. It is enough to prepare beads of selected shades, thin fishing line and a needle.
If this is your first experience making crafts from beads, you should not opt for complex multi-color patterns. It is enough to limit yourself to a few pastel shades.
Mosaic beadwork for decorating an Easter egg is performed in the following sequence: 
To make it easier for our readers to master the handmade technique, in this publication we offer patterns for weaving eggs with beads. Since weaving eggs with beads can be done in several ways, this article will discuss the two most popular methods.
Materials required for work:
craft glue;
beads (preferably Czech, they are of higher quality);
foam egg preparations;
beading needles;
Shells from chicken egg. The contents must be removed by puncturing one hole at the top and bottom. The empty shell should dry well. To prevent the base from cracking during operation, it should be filled with molten paraffin. The workpiece is painted to match the beads or in a contrasting color.
Master classes on weaving eggs from beads
MK No. 1
MK No. 2
Bead eggs step by step description
This is a method for beginners, it is called “double-sided weaving”. This method can be used to braid not only eggs, but also other shapes. For even and odd rows you need to take beads of two colors.
Two beads are strung on a fishing line and a needle is inserted into the first.
Again two beads, but now the needle enters the third.
In this technique you need to weave a chain whose length is equal to the circumference of our workpiece.
To complete the chain, you need to connect the last bead with the second, and the penultimate bead with the first.
To secure, we pass the fishing line through 4 beads of the first row and out into the second row.
We string the bead and insert the needle into the place from which we just came out.
We insert the needle into the next bead of the previous row, string a new one and continue until the end of the row.
Where the base narrows, the number of beads in the row will have to be reduced.
Weaving a new product always starts from the middle and continues in both directions. If you start working from the top or bottom, there is no guarantee that the beaded cover will fit perfectly on the workpiece.
Video tutorial on weaving Easter eggs from beads
Knitting eggs with beads without a pattern
It is impossible to accurately calculate how many beads will be needed to braid one egg, so the material must be purchased with a reserve. The next technique is called “mosaic”. The work begins not from the center, as in the previous case, but from the bottom.
First we make the flower. There is a central bead surrounded by six similar ones that look like petals. To make it easier to separate one row from another, they can be made from beads of a different color.
In the second row, the beads are located between the beads of the first. In the third row, the quantity should be increased, for which two beads are inserted between the elements of the second row. Make sure the pattern is correct. All flowers must be complete. Following these recommendations, we braid the workpiece to the very top. The same technique is used to weave an egg with lilies of the valley from beads.
If the egg is intended as an interior decoration, it should have a stand. The stand is a flat circle made of beads, which is fixed to the base using super glue. Eggs woven from beads will take their rightful place in any interior; they are also good as a gift on the occasion of Easter.
Several example circuits


On the eve of the great holiday of Easter, I would like to invite you to make Easter eggs from beads. Such traditional gifts in the form of eggs, which are prepared for the celebration, are considered amulets and symbols of grace.
This beautiful handmade craft should definitely take a special place on the Easter table, not to mention what an original and memorable gift it is for your loved ones and friends.
 One of the easiest ways to braid eggs is the hand weaving technique. Its weaving patterns are quite simple to learn, but labor-intensive to implement in practice. According to this process, the entire egg is covered with beads, which need to be woven in one by one. But thanks to this method, the beads lie in neat lines one on top of the other. You can create very different patterns on such a fabric, but for beginners it will be easiest to master braiding eggs from multi-colored beads woven in rows.
So, before we start braiding and the master class, let's figure out what materials and tools we need to prepare for this:
- beads No. 1 in suitable shades (in this version, yellow (ZB), orange (ORB), green (ZB), pink (RB) and violet (FB) tones are used);
- wooden blank in the shape of an egg;
- nylon thread;
- needle.
Start the weaving process with a thread one meter long. At the moment when it starts to end, secure it among the beads by making a zigzag through a couple of lines. Take a new one and also weave it into the fabric among the beads.
At the first stage of weaving, it is necessary to make a kind of belt, which consists of beads, two rows long. Further, subsequent ones will gradually be woven into these lines.
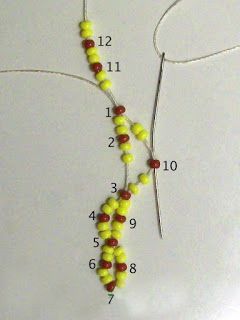
Let's get to work and begin beading and a master class. We string two ORB and two reinforced concrete on a thread. We move them to a distance of ten centimeters from the tip of the thread (where the needle is not involved). We number the beads in our minds: the first two orange ones are the first and second ones, respectively. The next two yellow ones are the third and fourth (as in the photo).
 Now, you need to thread the needle through the first and second beads, by inserting the needle from the free tip of the thread, as in the photo.
 Thread tightens and beads yellow color lie on top of the orange ones, that is, above the first - the fourth, above the second - the third.
 We string the following ones, one ORB and one reinforced concrete, respectively, these will be numbers five and six. The needle is threaded into the reinforced concrete (third), and then into the ORB (second and fifth). We tighten the weaving. The beads that were collected last are placed next to the previous ones. The orange bead is in the bottom row, the yellow one is in the top row.
In a similar way, we continue the weaving process by adding beads two at a time, gradually weaving them to the beads that were previously collected from the edge. The thread is brought out into the final string of orange beads. Let's see how this process happens in the photo.
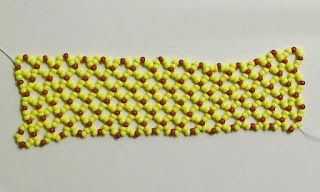
 According to this scheme, we need to make a belt with a length equal to the length of the middle circumference of the selected eggs for braiding.
 Next step. The master class moves on to connecting the ends of the belt. We thread the needle through the initial bead (ORB) number one. After this, we go to the reinforced concrete, which is located above (the fourth bead), then to the reinforced concrete, located on the edge at the opposite tip of the belt and then to two ORBs, which are located on the edge (this is the final ORB among the entire set and the first). We tighten the weaving and get a closed circle, which consists of two bead lines.
Since the initial line consists of orange beads, in continuing the braiding it is necessary to bring the thread to the top through the reinforced concrete. Thus, the subsequent third line is placed above the line of yellow beads.
 At this point, the master class completes the initial stage of beading.
 Let's move on to the second, which is to add bead lines while maintaining the number of beads in it. This action will allow you to expand the belt to the desired width and be able to clasp the middle part of the prepared eggs for braiding.
All weaving at this level can take place both without the use of an egg (periodically trying on the woven part of the product) and on the workpiece itself.
The braiding pattern is as follows: we string the bead for the next row and thread the needle in the opposite direction through the bead in the previous line, on top of which the new bead is located. Next, we pass the needle through the collected beads again. As a result, we managed to weave this detail to the one that corresponds to it in the bottom row. The photo shows this process in detail.
We add the following beads, passing the needle at the beginning in the opposite direction through the bead in the previous row, on top of which the typed one is located, and then directly into it.
We braid the beads until the end of the row.
Having completed new line, you need to do the stitching in a circle through all the beads with your own hands, so that you can pull them together. This way we will get a very dense braiding of eggs.
In a similar way, you need to weave the fourth, fifth and subsequent rows.
The number of lines required for braiding at this stage is determined by the size of the selected eggs and the caliber of the prepared beads. The resulting canvas in the form of a belt should fit closely to the middle part of the egg and on either side reach the narrowing point of the product. In this master class there were eleven similar rows.
At the next, third stage, you need to braid the top of the workpiece with your own hands. Here, in each line, the amount of base material is reduced.
The weaving pattern is similar to that used earlier at the previous stage. The braiding begins in the usual way, by weaving beads one by one over the corresponding bead in the previous row. In the place where you need to cut the beads, you need to string one and go with a needle in two in the previous row.
Having made the reduction of one thing, we resume the braiding and begin to weave the bead one by one on top of the corresponding bead of the previous line to the place where the reduction will have to be made again.
 This weaving process must be carried out on the egg itself in order to be able to accurately determine for yourself the amount of material needed to shorten the row. This number of beads can be determined according to the prevailing circumstances. We assume that on one side, the row made can fit closely to the egg, and on the second, so that there are no voids. IN in this case in the initial row we go through nine beads in the usual way, then we weave one on top of two. Thus, for eleven pieces in the previous line there should be ten - dialed in a new one. In subsequent lines the contraction occurs faster.
Having completed the row, you need to make ring stitching through all the beads with your own hands. As a result of such actions, we will obtain a dense braiding structure of the eggs.
The end of the top can be completely different. When the final row comes out of five or six pieces of the main material, it is possible to weave only one bead inside it. In this master class, the final row of green beads consists of nine beads, so three small-caliber beads are woven into it.
Having finished weaving the first top, the next step is to braid another one according to the same scheme of actions. We focus your attention on the fact that the independent end of the first thread, which comes from the initial belt (ten centimeters in length), must be hidden by weaving it among the beads. And to resume weaving, use a new segment.

This completes the master class, the beaded Easter egg is ready. Thus, by changing the color of the base material, you can make very beautiful crafts for the Easter holiday, which will be useful to you for decorating the Easter table or as memorable gifts To happy holiday for friends and family.
Patterns for braiding Easter eggs
For more experienced needlewomen, we offer weaving patterns that will help you make Easter eggs from beads with a variety of patterns.
We invite you to consider interesting option with beautiful floral patterns for braiding Easter eggs.


Such patterns are intended mainly for embroidery; accordingly, their size is too large for use on ordinary wooden blanks. We advise you to use large wooden or plastic parts for work, as well as Czech-made beads (they have a smaller caliber than Chinese ones).
The braiding technique is also hand weaving.
So, a workpiece and a design you like are selected for work. Before you begin, you need to calculate the length and width of the belt and, if necessary, adjust the pattern. According to color palette in the picture, you need to select beads and start the process.

Afterwards, the weaving of the lower and upper parts begins and the decrease in rows is carried out symmetrically, when necessary.
Having chosen a plastic blank of two parts, secure them with tape, since if it falls, it may open under the braiding made.


You can make a special string for the Easter egg and insert an interesting thin rope or twine into the gap on the top of the plastic element. This must be done before the upper and lower parts of the product are braided.
 Such crafts made from high-quality beads look expensive and resemble sparkling jewelry. If you are interested in this interesting handicraft How to create Easter eggs from beads, we recommend that you first study several master classes on video clips, the authors of which will help you figure out how to give one of the most important symbols of Easter a stunning beaded frame with your own hands.
Video: How to make Easter eggs from beads
Lent has only just begun, but now it’s worth thinking about Easter decorations. Moreover, the best of them are those made by hand. The tradition of giving Easter eggs made of beads has existed for a very long time, and now it has begun to be revived again. Let us make something similar to this beauty.
Materials and tools

- Egg preparation (preferably foam, here size 6*4 cm)
- Iron-on sticker with icon
- Beads of different colors (depending on the pattern you choose)
- Beads
- Fishing line or nylon thread (depending on what you like to weave with) 0.15 mm thick
- Bead needles
- Pins
- Weaving pattern
- And also inspiration, patience and good mood)
Master class on how to braid an Easter egg with your own hands
First you need to apply a sticker. To do this, put it on the egg and lower it into boiling water (it’s convenient to use a spoon with holes for this) - the sticker will tightly cover your workpiece.

It is best that the sticker matches the color of the workpiece (if it is foam plastic, then it is white), otherwise the design on the back will be visible through the gaps between the beads, and this does not look very aesthetically pleasing. If you couldn't find such a sticker, don't despair! Cut out the face from the iron-on sticker and attach it to the egg using acrylic varnish.

On the left the thermal sticker is glued around the egg, on the right - only the front face is glued
Instead of thermal stickers, you can take stickers that stick with an adhesive layer: such stickers are always sold in stores before Easter.
So, the first step has been taken. And now the fun part begins: beading an Easter egg.
First we make a “belt”. It is simply woven with a “mesh” of 3 beads (it can be on one needle, it can be on two - whichever is more convenient for you). Just first you need to decide on the pattern. You can first draw it on paper or use a ready-made diagram, for example, this one:

Fasten the fishing line (nylon thread) to the first bead (it is then cut off) and collect 16 more pieces according to your design.

Then we pull the fishing line through the ninth bead so that you get a loop. Then we weave as shown in the diagram.


We determine the length of the belt by eye, trying it on the egg along its length, from tip to tip.

When the required length is obtained, we close the belt into a ring and put it on the workpiece.

If the workpiece is foam plastic, then you can secure the belt with pins so that it does not slip.

And then we weave as if we were braiding a cabochon, using beads of different sizes. We work until the face is beautifully bordered. For edging, you can take gold-colored beads.