Views: 0
A stylish belt is considered an essential attribute in the wardrobe of women and men. In addition to its main function - to hold the trousers tightly, it also emphasizes the waist, complementing the created image.
There are a huge number of them:
- from suede;
- rag;
- leather;
- wide;
- narrow;
- monotonous;
- multi-colored;
- with classic buckle;
- designer and so on.
In clothing stores or at the clothing market, you can buy whatever you like, if your financial condition allows you to do so. But often having one belt in your wardrobe is not enough: you need at least one for each coat, trousers, etc. And this is a big expense that not everyone can afford. To get out of this unpleasant situation, there are two options: either get a bunch of credits for purchases or make a leather belt with your own hands. The second option is more suitable.
Waist measurement
The first thing you need to know is the size of the future belt. The simplest way To do this, take an old belt and attach it to the workpiece and make notes everywhere. In this article we will do everything from scratch. To do this, you need to take measurements of your hip circumference at the location of the belt. Be sure to write down the received data.
 My tools
 To make a belt you will need some tools. In our case, the following were used:
- hole puncher;
- skiver;
- roller razor;
- cutter (or regular scissors);
- ruler;
- special tool for cutting edges.
A long piece of durable buckle leather will be enough for your material.
 Carefully cut the strip
 Now you need to cut a strip on the prepared skin. To ensure everything turns out smooth and beautiful, use a ruler. When choosing the length, you should make a certain margin. For example, if the waist circumference is 75 centimeters, then the length of the belt should be about 100 cm. Trim off the excess skin.
 What kind of cutter do I use?
 Make a perpendicular cut at each end - this will simplify your further work.
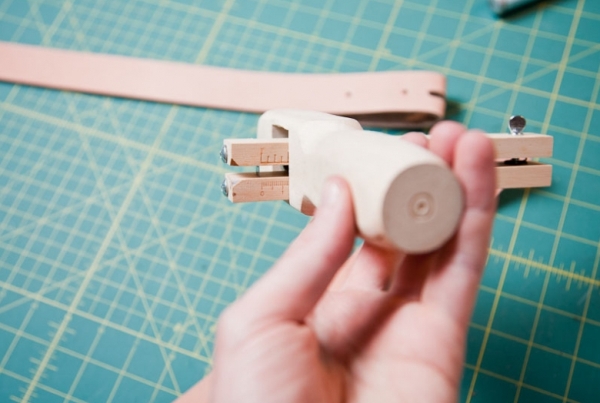
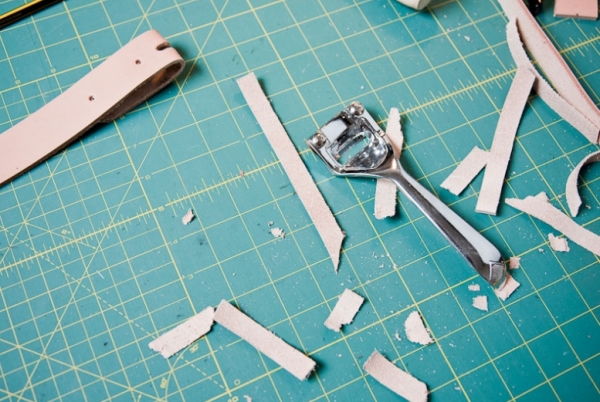
 The choice of width depends on your taste
 On your belt cutter, first set the thickness bulge so that 8/9 of the leather will go through it. Then set the width as you wish.
 The quieter you go, the further you'll get
 Press a straight strip of leather against the cutter and slowly feed it through. Make sure that the skin is pressed evenly against the plane of the cutter. As the skin comes out the other end of the cutter, grab it with your free hand and help it come out. Do this carefully, because if you move too quickly, you risk damaging the belt.
 Buckle Attachment Kit
 I exposed my hardware set. On the left are the collapsible rivets and on the right is the buckle.
 Marking the holes
 Now that the strip of leather has been cut out, it's time to make marks for the holes. The easiest option is to use an old belt as an example.
 Mark the old belt
  How it happened
 This is how the holes were made
 Don't overdo it with punches
  My desktop
 Punch all the holes all the way through and form the end of the tail.
 What should the tail look like?
 In order to make a tail, you need to trim the corners (as indicated in the photo).
 We are cleaning up
 Clean thoroughly with a razor. There is another way - a grinding machine, but this way you will not be able to achieve the required smoothness.
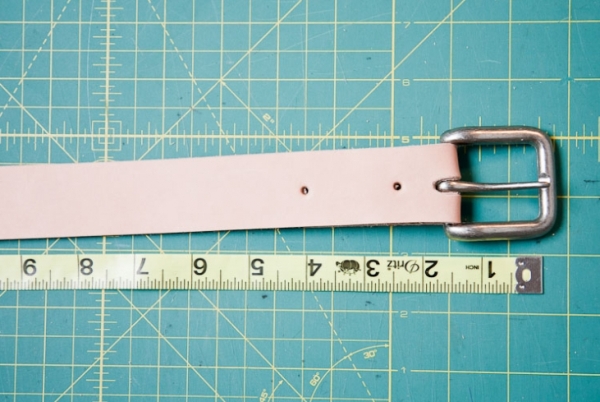 You need to start measuring from the buckle
 Fold the end of the belt with the buckle in front of you. Now you can measure the actual length of the belt. Start at the tip of the buckle.
 There must be a reserve
 Leave 7-8 extra centimeters of margin.
 What do I use for piercings?
 These holes require a slightly larger diameter (9/64).
 This requires male strength
 Punch these holes.
 Additional holes
 Make two extra holes for upcoming holidays.
 Marking the tail of the belt
 Make a mark about 10 centimeters outside the last hole. This will be the top of the belt.
 The hammer can also be iron
 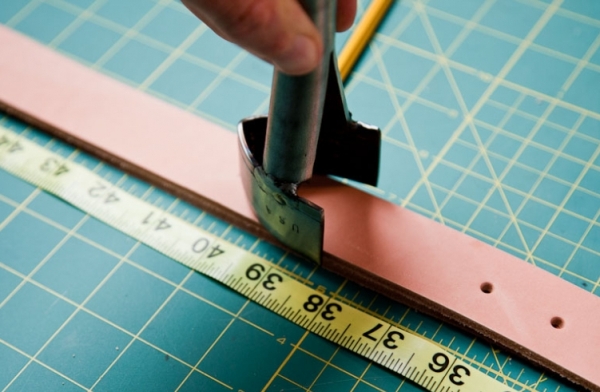 Special corner for the tail
 I use a special punch to cut out the end of the belt. However, this can be done much easier with a razor or scissors.
 Don't forget about the outline
 Every time when making a belt, almost everyone forgets to cut out the outline. In order to do this, you need to adjust the cutter to 3 centimeters.
 Let's start making a loop
  How to clean it
 The ribbon loop should be cut in such a way that it can easily wrap the belt across and secure it. Cut the skin in half.
 Completion of stripping
  Don't go wrong with the length of the loop
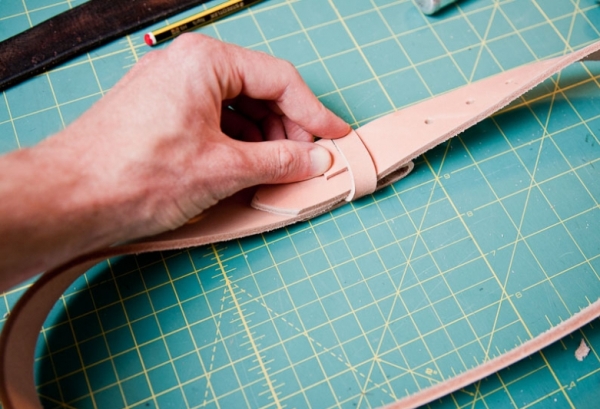
 To find out the correct length for your belt loop, insert it like in the picture above.
 Make a mark
 Then make a mark.
 The hole should be a little smaller
 Rivet the belt for durability. But it can also be sewn, although with intensive use it may tear.
 It's better to use a sponge
 Once the belt has been cut, the next step is to give it a softer, more sophisticated look. First, lightly moisten the entire length.
 Make a bevel along the edges
 Then run the leather tool along the entire length of the belt. This should be done at an angle of 45 degrees.
 Impacts should be moderate
  What is needed for processing
 It's time for coloring. It is advisable to use dyes on natural basis. Environment will love you, just like your skin.
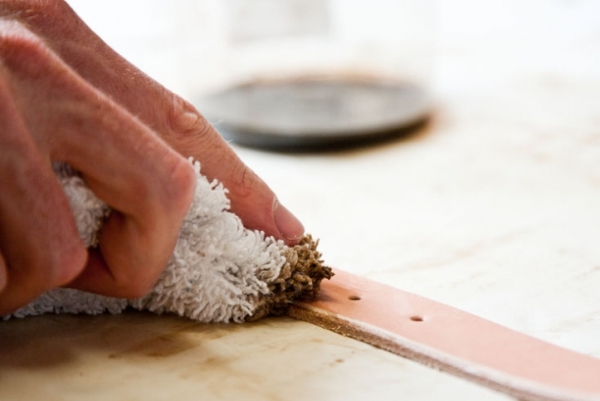 The mixture is applied in an even layer
 Rub the sides of the waistband with dye. IN in this case I use my own dye from water and walnut husks.
 A women's hairdryer is an ideal tool for drying nail polish.
 To speed up the drying process, use a hair dryer.
 Processing oil
 Use olive oil to improve the appearance of the skin. Without oil, it becomes dry and tough.
 Applying vegetable oil
 Apply everything in a neat and even layer. In this case, there is no need to rush.
 Appearance of the belt after oil treatment
 Olive oil darkens the skin, so keep that in mind.
 Waxing
  Now we need to get rid of the excess
 Remove any beeswax from the belt holes.
 Side brush
 To make the edges look good, they need to be polished and combed down. Use natural adraganth.
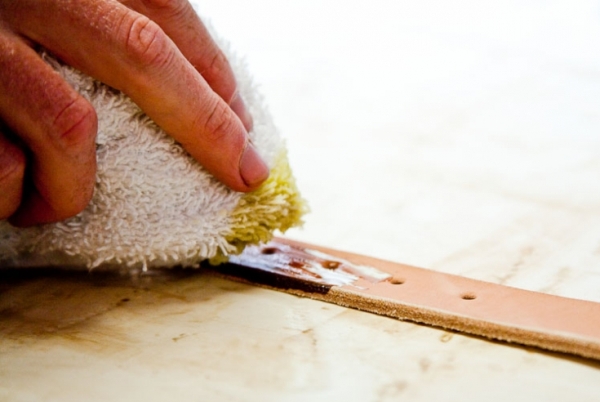
 Adragant application
 Apply a thin layer along the edges of the tape.
 Grinding machine
 My other assistant in this work is a hand wood polisher.
 Sanding the sides of the belt
 This tool is not necessary, but it will give you the perfect polish for your DIY leather belt. The figure clearly shows how this process occurs.
 What should happen
 As you can see, the edges of the belt are combed and shine in the sunlight. This is exactly what needs to be achieved.
 My arsenal
 Above is my range.
 Installation of rivets
 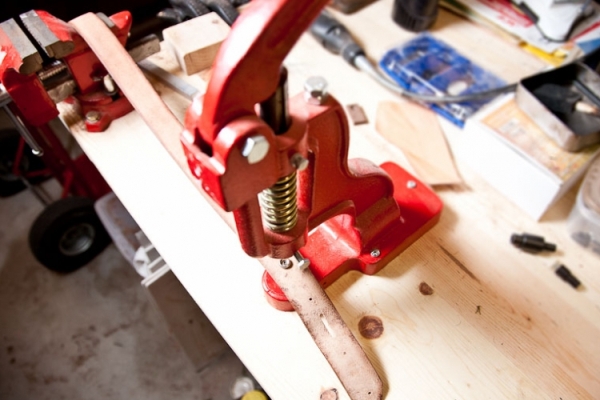 Rivet Tool
 Now you have to install all the rivets. This can be done manually, but after prolonged work your hands get very tired. Or maybe it's a special machine.
 What we got
 Ah, there is nothing more beautiful than shiny silver on a brown belt.
 A loop
 Don't forget the belt loop. Micro rivets are used for it.
 DIY leather belt
 And there you have it, a classic leather belt.
 The game is worth the candle!
 Online boutique
Handmade belts
How handmade belts are made
What kind of leather are belts made from?
Leather for belts or belt leather differs from other types of leather, primarily in terms of manufacturing technology, as well as in terms of intended purpose, since belts must first of all have high strength. The main thing when making a belt is properly processed leather, everything else is a matter of experience and technique.
Making a belt strip from crocodile skin
It is considered the most valuable exotic animal skin on the market. It is used by such design stars as Hermes, Louis Vuitton, Givenchy, Chanel, Burberry, Versace, Prado, Valentino.
The crocodile leather belt strip is cut only directly from the skins of crocodiles. This is not pressed leather, of which a lot is now produced. leather accessories. When working with crocodile skin, success is determined primarily by many years of experience. There are not so many masters in our entire country who master this art. There are only one or two such masters in St. Petersburg, and there are more than enough of them in the entire metropolis. It takes years of experience to master cutting, sewing or finishing techniques. various types exotic leathers
The body, tail and paws of crocodiles are covered with the legendary crocodile skin, because of which the crocodile was almost exterminated.
Crocodile skin consists of large, regular-shaped horny scutes located on the back and abdomen in regular rows. The dorsal scutes of crocodile skin bear longitudinal ridges, but in the inner layer of the skin (corium) under the horny scutes of the outer layer on the back, and in some species of crocodiles on the belly, bone plates (osteoderms) develop. The osteoderms are firmly connected to the horny scutes, forming a shell that well protects the crocodile's body.
It is especially chic to have boots made of crocodile skin, handbag, wallet or belt. Today, the technology of dressing and dyeing crocodile skin makes it possible to make products from it that are unique in shape and color and pleasing to the eye. The high quality and durability of crocodile leather will make your purchase desirable and enjoyable.
In ancient times, it was believed that by pulling on the skin of a killed animal, a person acquired its strength and magical abilities. Perhaps it is the subconscious echoes of these beliefs that drive the person who decorates the interior of his car with crocodile skin. However, there is a more pragmatic explanation. The skin of these reptiles has a number of qualities that place it above the skin of other animals; it is flexible, but at the same time extremely durable, wear-resistant and, of course, rare and, as a result, expensive. And of course, he is exotic appearance alligator skin seems to be created in order to attract the eye.
There are many species of the order of crocodiles, both freshwater and saltwater, living in different parts of the globe. Each species of crocodile (Crocodile, Caiman, Alligator, Gavial and others) has a unique pattern of skin projections at the base of the back of the head.
When cutting parts, only the crocodile itself determines the direction of movement of the cutter, as craftsmen call a sharp flat blade for cutting leather. When working with crocodile skin, it is necessary to take into account not only cutting, but also how the scales are combined with each other, so that the emphasis is placed on the most beautiful fragments of the product. Most distinguishing feature crocodile skin - pores on the plates. On each plate, the crocodile has a special hair that helps it feel the world around it with its skin. When the skin is dressed, the hair disappears, but a tiny pore remains on each plate, which can be seen up close. The belly plates of the alligator and crocodile are smooth and flexible. They dye well because the dye penetrates the skin evenly. The crocodile's plates have a clearer square pattern, the alligator's pattern is not as smooth and irregularly shaped plates are often found. However, alligator skin is smoother.
After the cutting process is completed, the leather is further smoothed to give it maximum softness.
But before the belt strip is cut out, the crocodile skin undergoes complex processing. First, the crocodile skin is completely placed in plastic bag in order to prevent contamination of crocodile meat, which is also a commercial product. WITH inside skins remove remaining meat and fat, and also remove dust and sand. This process is performed using high pressure water. After this, the shade-dried skin is ready for salting, which is done in order to preserve the skin from damage by microorganisms. When the skin is salted (this process takes up to 60 days), it is dried (for another 2 days) and bleached several times, after which the skin acquires a neutral white color. The crocodile skin is then chrome plated for softness and subjected to a tanning process. Tanned with synthetic substances for coloring in light colors or vegetable oils to give the skin a beige color.
The next stage is softening the leather with special fats and oils, after which it is dried for 2 weeks and finally dyed. But this is not the end. After dyeing, the leather is stretched and dried again, then glazed and dried again. And only after that it is finally either glazed to give it a shine (the so-called glossy treatment) or a matte treatment is applied.
The leather prepared in this way is measured at its widest point, since the calculation of the cost of crocodile leather depends directly on the width of the leather. Their high cost is determined precisely by the length of the piece of leather - the longer the crocodile’s body, the higher the value of the leather. In fact, the price of crocodile leather depends on three parameters: the size of the skin, the presence or absence of defects, and the quality of tanning and coloring. The size of a crocodile skin is determined not by decimeters, but by a special unit - shoulder width (belly). The price is indicated for 1 centimeter according to belly. This method of determining the size of the skin is used only for crocodile skin.
But the quality of leather is assessed not only by size, but also by the pattern of crocodile scales on the skin. Each species of crocodile has a unique pattern of skin projections at the base of the back of the head. They are valued precisely for their uniformity, for the uniform pattern of outgrowths and scales. Even if there are some defects in the leather pattern, this attracts customers even more and is valued very highly, as they emphasize the natural and “wild” character of the product.
The checked, dressed and measured leather is rolled up, folding the legs and sides of the leather inward, and placed in cardboard or plastic boxes, covered with burlap. Crocodile skin will be stored in a cool room until it is sold.
Nowadays, crocodile skin comes into all forms of fashion, including being used in making accessories such as stylish leather belts, fashionable women's bags, stylish wallets, purses and briefcases. There are models of jackets, boots and boots made of crocodile skin on the market. Our design studio always carefully selects the most beautiful, light and flexible leathers that exist on world markets.
All crocodiles, the skin of which is used to make accessories, are raised on crocodile farms in full compliance with the Washington Convention for the Protection of Fauna. This International Convention, commonly known as CITES or the Washington Convention, regulates the conservation of endangered species of flora and fauna and ensures that international production does not harm species of wild flora and fauna that may be used for industry.
Our design studio purchases and uses collectible reptile skin from the world's most famous Fashion Houses. You can be sure that products made from such leather are unique and one-piece.
Making a belt strip from snake skin
In preparing snake skin for tanning and dyeing, bleaching is often used to remove blemishes, markings, and minor scratches and damage that occurred before the snake shed its skin for a new one. After bleaching, skin treatment follows. There are four ways to process snake skin, and belt strips and other python skin products look different depending on the processing method. After processing using any of the four methods, you can begin cutting the leather. When cutting snake skin to make a belt strip, two types of skin incisions are practiced - the dorsal and ventral incision.
Type of snake skin processing "Trapper"
In this method, the skin is processed minimally. It practically does not lend itself to any technological modifications. Therefore, the pattern on the skin takes on a soft shade and becomes a little blurry. Every centimeter of a snake's skin is unique and sharply individual. The "Silent" belt is made of dorsal cut python skin treated with a trapper.
Processing type "Indio"
This method involves intensive coloring of the skin, giving a wide variety of bright, rich, slightly predatory colors.
Processing type "Millennium"
Millennium is a special skin coloring technology. It was developed by Italian tanners who achieved extreme softness of the leather, but also extreme density and wear resistance with a faded pastel color with golden veins.
Treatment type "Bleached skin"
This is a special treatment that makes the leather softer and more natural in appearance while maintaining the texture of the leather, although in the process of processing using this technology, the leather loses its characteristic pattern due to the disappearance of the iridescence of snake-colored natural colors. The skin becomes a uniform color - either cream or white, but this makes bleached skin quite unusual and attractive.
Making a belt strip from cowhide
 Belt leather was originally used to produce driving belts for various machines, which were called pulleys. Nowadays, belt leather is the only type of leather that is used to produce accessories that retain their shape without the need for a frame. This is smooth to the touch, dense, rather thick and hard, most often bovine, calf or cowhide leather, obtained in the most common and cost-effective way. chrome tanning. Its distinctive feature is high density collagen and low fat fiber content. This gives belt leather special strength and low stretchability.
Leather made from cattle hides is considered one of the most valuable due to its high strength and elasticity. This category includes the leather of calves, cows, bulls and buffaloes. The epidermis layer in cattle skins is quite thin, consisting of two parts - the papillary layer and the reticular layer. The papillary layer is much thinner than the reticular layer. The fibers of the thick mesh layer have a large angle of inclination.
The interweaving of the fibers of the mesh layer is dense, which makes the cowhide or cowhide stretch taut. The fat content of cattle hides is low. The hair follicles are located parallel to the surface of the skin of the skin and reach only the mesh layer, and the sweat glands only break through the layer in some places. Therefore, among all types of leather, leather made from cattle hides is the most durable and valuable. The thin fibers forming the papillary layer give a beautiful measure. Mereya is the name given to the pattern on the front surface of the tanned leather.
To cut out a belt strip, as well as for bracelet strips, our workshop uses cattle leather - bovine or cowhide, preferably from the back part of the skin, since it is the most valuable and high-quality for a belt strip. But we also try to use more often the skin of young calves, which is tanned, finished and dyed under our strict control in the EU countries.
The skin of a young calf, still living on its mother's milk, is the most valuable skin. It is called opoek. The fibers of the leather are thin, elastic, with a dense weave of fibers. The hair of a calf is thicker, thinner and more beautiful than that of an adult animal, since the hair of cattle does not grow during life, but only intensifies. Calf leather turns out soft, full, with a beautiful grain.
Our studio only offers genuine leather high-quality workmanship. Black classic smooth skin goes to the belts by default. This is the most discreet classic option, which is suitable for men and women who prefer a strict, sophisticated style in clothing and accessories. Brown skin, especially vintage, looks especially good in vintage versions. It is indispensable for casual style and is great in any combination and with any wardrobe. Below are the bovine leather color options for your choice.
Making belt buckles
 But for a belt, not only the belt strip is important, but also the accessories, namely, and above all, the buckle. In our studio, buckles are made according to the author's drawings. The buckle is the main decoration of the belt, and it can be of any shape and decoration options.
Any buckle or overlay begins its life in the hands of a professional waxer, who creates it from wax over several weeks according to the designer’s drawing. All models are made only by hand! After the model is made, a metal mold is made from it, from which a buckle is cast either from steel or from jewelry bronze - at the request of the customer.
If the customer wishes, after casting and processing, our buckles go through the stage of applying silver and gold using the galvanic deposition method. This allows you to apply 10-15 microns of pure silver and 24 carats of 999 gold to the surface. On this moment this is the most effective way. If you need to make a combined buckle or overlay, then a manual method of applying gold is used, like with an artist’s brush, which requires special skills.
A belt is an important accessory for both women and men. male image. It will decorate both formal trousers and an evening skirt. But an indicator of good taste and sense of style will not be an ordinary belt, but a leather belt. It’s difficult to do it yourself, but the result is worth it. After all, such a thing will be truly unique, and therefore priceless.
Briefly about how to make a leather belt with your own hands
A very unusual and impressive belt made of vegetable tanned leather. You can superimpose a drawing on it, which is initially printed on a printer and then transferred to tracing paper. This material is relatively durable and can be used more than once. If you draw on the glossy side, the image will turn out three-dimensional, although this is not an easy job.
When embossing, you should never wet the entire belt with water; only the part that is currently being worked on should be wet. Any small stamps you have on hand will be suitable for the background. After the embossing is done, the belt should be left to dry for at least a day.
Where the skin will bend, it needs to be made twice as thin. The same goes for where the buckle attaches.
Product processing
Before you start painting, you need to punch holes and sequentially process the ends. First with a hammer hammer, then sandpaper, and then with saddle soap. After the product has dried, it is coated with bone oil in one layer. Thanks to it, the belt will become softer and acquire a “light tan” shade.
To make the drawing seem brighter, it would be good to paint it with contrasting paint. After the paint has dried, the belt is once again treated with oil and after that with a finish.
Lastly, holes are made with a punch and treated with oil.
Simple Leather Belt
Before you sew a leather belt with your own hands, you need to prepare the materials. You don't need that many of them.

- Leather tape.
- Dublerin or any other lining fabric.
- Pattern paper or regular tracing paper.
- Adhesive suitable for leather.
- Threads and needles.
- Iron.
Colored leather belts are always in trend, so you can experiment with shades. A bright leather belt will ideally highlight your waist and complement your look. It is quite possible to make such an accessory with your own hands.
Manufacturing technology
First you need to measure your waist. Add another ten centimeters to the resulting centimeters so that the belt is not flush. Next we move on to the pattern, which should be twice as long as the planned length finished product. The width can be anything, but it’s worth remembering that the pattern requires an allowance on both sides. It is better that it is about two centimeters. If the belt should be ordinary, then the pattern will look like a simple, even ribbon. The edges can be either straight or rounded.
Now the leather is attached to the pattern, this can be done using pins and needles. Next you need to cut it out. It is almost impossible to do this with ordinary scissors. Of course, it would be ideal to purchase a furrier’s knife for this, but if this is not possible, then you can use a scalpel or, as a last resort, a new razor blade.
Belt assembly
The dublerin is also cut using the same pattern. Only here it is necessary to leave without allowances. Clearly in the shape of the belt. After this, the lining fabric must be applied with the sticky side to the skin and ironed. In order for these two parts to stick together well, you need to wait until the workpiece has cooled completely.
The allowances that remain on the leather part are carefully folded inside out and fixed with special glue.

After this, the workpiece is bent in half and secured with pins. Now it needs to be stitched up. To do this, you must either have a special sewing machine or purchase certain needles for a universal device. You can use decorative stitching, but don’t forget what is most valued handmade. Although making leather belts with your own hands is hard work.
Belt finishing
It's just a matter of fittings. This refers to the buckle and various decorations. Although you can fasten the belt with buttons, hooks and even buttons and loops. And in some cases even lace is suitable as decor. It all depends on the flight of fancy. So it’s quite possible to make any leather belt with your own hands. You don't have to be a master to do this.
Tip: to make an ordinary buckle more interesting, you can tie it with multi-colored threads, cover it with bright fabric, or simply cover it with braid.
Can be produced cleanly female belt made of leather with your own hands. It's not that difficult. Need to cook narrow tape flexible leather, high-quality scissors and a standard sewing kit.
We remove unnecessary things
You need to decide how long and wide the belt will be and cut off unnecessary parts. Since the belt will not be on a buckle, but tied on beautiful bow, then, accordingly, the leather tape should not cover the entire waist. It’s better to remove ten centimeters from each edge. It would not hurt to overcast the edges of the belt using sewing machine.
Preparing tapes
There will be ribbons on both ends of the belt. And you need to immediately decide on their length. This determines what the bow will be like. It is worth noting that a beautiful lush decoration is obtained with a ribbon length of sixty centimeters. The fabrics need to be folded crosswise in half, and then their width should be slightly wider than the strip of leather. This is a reserve for allowances. That is, there should be two strips of the same length on the table, the width of which is twice as large as the main belt. Now these pieces of fabric need to be folded in half lengthwise with the wrong side facing out and the edge stitched.

Next, using a pencil or other device, turn out the ribbons. To make the edges look finished, you need to make a small seam, stepping back a couple of centimeters from the edge with which the tape will be attached to the skin. All that remains is to stitch the fabric to the main belt. And that’s it, the wonderful accessory for your evening look is ready. Making such a leather belt with your own hands is not at all difficult.
Types of weaving
When you see woven leather products, it takes your breath away. They look quite elegant and expensive. It seems that in order to make such a thing you need to be a real master. Is it so? Is it possible to make a woven leather belt with your own hands? The answer is yes. It’s very possible, you just need to be patient.
Today we will look at the two most popular and least complicated weaving methods.
This requires a long strip of leather. Without touching the edges, you need to divide it into three narrow strips. We fix one of the ends that remains intact on the work table. We pull the lower end well, and then we pass the first tape - the strip - between the second and third.

The first tape should lie on the second, and then it is pulled between the second and third. We throw the third ribbon over the first, and the second over the third. The tip of the weaving must be pulled back again and again passed between the second and third ribbon. And so on until you reach its logical conclusion. The diagram below will help you understand how to do this.

If the belt is purely feminine, then it would not be a bad idea to decorate it with beads or rhinestones. A decorative buckle won't spoil the look either. But if a man will wear the belt, then it is better not to add any details to such weaving at all. Otherwise, it may look clumsy and tasteless.
A very useful method. It is widely used in the east. In this way, you can weave not only a leather belt with your own hands, but also a horse harness or a handle for a bag, for example. This is not a simple weave; it can be used to firmly connect two leather bands without using metal clamps.

First you need to prepare two long strips of leather. It is better that they are not too wide. Using a blunt awl, mark the edges of the slots.
For this weaving there are two important secret:
- The distance between the slots should be equal to the width of the strip divided by two.
- The first tape has one more slots.
In order to make slits, it is most convenient to use a chisel. Using the same tool you can sharpen the edges of the ribbons.
IN left hand you need to take the strip that has more slots. Moreover, the hand should have the edge on which there are no holes. The nearest slot needs to be widened; you can use a screwdriver for this. The short tip of the second strip must be inserted into this hole so that the slots are at the bottom.
The short end of the second strip is attached to the side of the first strip. Then the procedure is repeated in reverse: now the first tape is passed into the nearest slot of the second tape. And from the bottom up. And according to this principle until the end. The bottom band must be passed through the top band at all times.
It is believed that one of the best products Snake skin is produced in Indonesia, where leather factories and special snake slaughterhouses are located. One of them is located in the province of West Java, in the village of Kapetakan. The slaughterhouse sells not only leather, but also meat, which is considered a cure for skin diseases and asthma, as well as a potency enhancer.
These are still live snakes for now, but will soon be turned into delicacies for restaurants and handbags/shoes for luxury snakeskin lovers.
Snakeskin factories purchase hundreds of meters of leather every month, from which the factory produces bags that cost from $15 to $30, depending on the size. But first you need to skin the snake.
Or cut carcasses that will soon go into the oven.
Then these carcasses are washed a little.
After that, they are folded into such rolls. Looks colorful.
Snake rolls are carefully placed on a baking sheet.
And they go into the oven.
The removed skin dries for some time.
The leather then goes into the dyehouse.
After the dyed leather dries, it goes to the sewing workshop.
Here they make bags from it.
Or shoes.

If you like to show off in a new python skin jacket, or imposingly place a shiny zebra skin handbag on the table, then you are a potential client of the Momo factory. What is the difference between this enterprise and thousands of other tanneries? The fact that you can go into the workshop and act up right among those scribbling sewing machines. Point your finger at dusty aquariums, choosing a victim of your fantasies. You can do everything here. Just pay.
Dozens of sewing machines fill the hot air with machine-gun trills. 
Every square centimeter of space is occupied. There are no smoke breaks - demanding customers are often not ready to wait more than two days for an order. 
And these deadlines are met. Today they take your measurements, and the day after tomorrow you can pick up your order. 
Uncomplicated warehouse. It is only at first glance that it seems that chaos reigns here. The main thing is not beauty, but the ability to find the right piece of leather in the shortest possible period of time. 
Like? No? 
Perhaps one of these would be suitable? 
There are no air conditioners. The room is open to drafts and is blown through by dozens of fans. 
Finished products. 
The equipment is ancient, but its rarity is compensated by the skill of the workers. 
Would you like a handbag made from this python? 
Or shoes made from this leather? 
By the time you read this note, the white light for these eyes has already faded. Forever. 
And reptile skin replenished the stacks of such preparations. 
All colors of the rainbow are represented. 
Some work with a smile. 
And some periodically withdraw into themselves. 
“Yes, yes, Chief, I’m finishing!” 
Warehouse stocks are replenished daily. 
And they are used up very quickly. 
The shift lasts almost 16 hours. 16 hours in the same position. There is only one entertainment: stretch out a stiff leg, sitting on the other, in which blood circulation has just been restored. 
The feet of the future Cinderella, who desires shoes made of python skin, are measured. 
“Darling, maybe from this one”? 
I wanted to order a laptop bag made from the leather of this example, but for some reason I was refused. 
The factory store is the only room with air conditioning. Rows of shoes run off into the distance. 
The rods sag under the weight of hangers with jackets and leather jackets. 
And money... Money, as you know, loves counting... 