Good day! A selection of ideas on how to make a postcard for a man with your own hands! A postcard in the shape of a shirt or tuxedo is an original addition to a gift.
It's always difficult to come up with a gift for a man... Let's try to surprise him with this shirt and tie using the origami technique.
DIY postcard in the form of a shirt and tie
This card can be used as an envelope for money or you can write a congratulation on the back side. It is perfect for any occasion - Father's Day, brother's or grandfather's birthday, February 23rd. Instead of a tie, you can tie a bow tie or a headband. This postcard is very easy to make and takes about 10 minutes.
For work we will need:
- colored cardboard or A4 paper, choose the color according to your taste or the taste of the birthday boy
- bright ribbon.

Place the paper face down and fold the vertical edges toward the middle. The folds must be symmetrical and even.
We unfold the edges back and bend the upper corners inward along the fold line. Be sure to make sure the corners are turned evenly.
We fold the same corners in half inward. Try to make the correct fold right away; several folds in one place will not add beauty to the card.

Along the resulting fold line, we continue to bend the top of the paper down. The resulting triangles along the edges will be the sleeves of the future shirt.
We turn the paper over to the other side with the “sleeves” down and fold down a strip from the top along the width of the taken ribbon.
We turn the paper over to the other side and make a collar, bending the upper corners towards the middle.

Unfold the resulting collar, insert a ribbon at the fold and fold it back. Straighten and align the ribbon.
We fold the bottom of the paper upward, under the collar and tie a tie.
DIY greeting card for a man Tuxedo
Let's not lose precious time in search of interesting and original postcard for your birthday, let's do it ourselves. Moreover, it is not difficult at all and only takes 10 minutes!

The theme of our card will be traditional Man's jacket- the tuxedo.
For work we will need:
- paper of only two colors: white and black;
- glue;
- scissors;
- a pair of small white buttons.

Prepare necessary materials so that everything you need is at hand.
Fold the blank under the card in half. Now you need to cut out a piece of black paper that is the right size for the front of the card.
Divide the black rectangle vertically in half and choose the depth of the cut to your taste. Step back 1.5-2 cm from the edges at the top and connect the lines with a ruler. Glue the rest to the card base. Cut a triangle from the black paper.

From the black triangle, cut off the excess, and in the end we will get a butterfly bow.
Glue the bow to the card.
The final step is gluing the buttons.
Beautiful card DIY shirt for a man’s birthday
Another simple idea for a men's card in the form of a shirt and tie.

Fold a piece of paper in half as shown in the picture. Make two cuts on different sides and bend the cut corners.
Cut out a tie from a different color of paper and glue it onto the card. You can also make a bow tie. Glue the corners of the collar of the resulting shirt, attach the buttons.
You can use any accessory that matches the size of the button. Don't use buttons that are too big, it will look bulky.
The postcard is ready!
Postcard Ties
Such a card with ties can be made for any men's holiday and for any man - husband, dad, grandfather, brother. It will take a little time, about 20-30 minutes.

Necessary:
- several matching shades of paper;
- scissors;
- paper glue and, preferably, hot glue;
- wire;
- pliers.

We use wire to make a hanger shape. To do this, bend the wire into a triangle with the end sticking out from above. We bend the hook at the end and twist the remaining edge at the base of the hook. Align all the parts so that the hanger looks neat.

We cut out several ties from paper. Of course, it will be more interesting if they are of different colors and textures.

We bend the ties, place them on a hanger and glue them together.
We bend the cardboard in half for the base of the card; if desired, glue on an additional background; the background color should be a light shade so that the ties do not get lost against its background. Using hot glue, attach the hanger. We sign the card beautifully after it dries.


Original gift packaging for a man
There are many dates in the year to please your beloved man, brother or father. Let's try to pleasantly surprise them with an elegant and original packaging gift.

We take for work:
- white cardboard;
- black paper;
- scissors;
- glue stick.

Creating a package will take 20 minutes. Let's start with the diagram.
A birthday gift is always a hassle, albeit a pleasant one. I want the congratulation to be remembered, and the gift to become pleasant surprise. A good gift For the guy's birthday there will be a card made by the girl with her own hands. Unique and stylish card – good way please a loved one.
Handmade birthday cards for boyfriend require preparation. Before you start making it, you need to think about how it will look, choose the theme of the postcard, the technique of execution, the color scheme, and finishing materials.
We should not forget that the card is made for a guy, and this means:
- relevant topic;
- restrained colors;
- special “brutal” decor;
- clear, laconic design style.
You need to immediately decide what technique the postcard will be made in. Vintage pastel shabby chic is unlikely to suit. Despite its popularity and attractiveness, this style is too sophisticated and feminine. No matter how romantic a guy is, he is unlikely to appreciate the abundance delicate flowers and elegant lace, typical for such cards.
Postcards using the quilling technique are not so sophisticated and pretentious, but again, do the graceful curls and the flower-sheep-patterns laid out from them combine with the image of the guy? Although if he is an artist, designer or creative person of another profession, he can appreciate it.
But the plot of the picture needs to be thought through: a car, a sailboat, a guitar, a bicycle – on thematic sites it’s easy to find ideas and tips for implementing truly masculine subjects. In combination with a restrained color scheme, such a plot will give the postcard a masculine character.
But scrapbooking, which allows you to use anything in compositions, even gears and metal rivets, is an excellent option for a brutal postcard for a brutal guy. You need to choose the theme of the postcard, one or two pictures, appropriate decor, and all that remains is to create a harmonious composition.
Materials for decoration need to be selected appropriately: metal parts, dressing twine, large buttons, leather appliqués, rough cardboard.

The appliqué technique will also work. Carefully and tastefully cut out and selected details, glued to the base, can become a wonderful postcard. In addition, applications can be made voluminous, “rising” from an open card, multi-layered, from different materials.
You also need to think about the plot, the materials used, color combinations to make the card look stylish.
Postcards using quilling technique
Quilling is the creation of compositions from twisted strips of multi-colored paper. Creating complex compositions requires experience and skill. But even a beginning craftswoman can make simple images.
Postcard with tie
To make a postcard in the form of a shirt with a simple quilling tie:
- For the base of the postcard, use thick colored cardboard measuring 12x18 cm in light brown color;
- a 9x10 cm rectangle is cut out of white paper - the top of the shirt;
- a vertical cut 3 cm deep is made in the center of the long side. The paper along the edges of the cut is bent to the sides in the form of corners - a shirt collar;
- a 5x10 rectangle is cut out of dark brown paper - the bottom of the shirt;
- the white top and brown bottom of the shirt are carefully glued end-to-end in the center of the card;
- A tight roll is twisted from a black quilling strip 5 mm wide, slightly unraveled to a diameter of 2 cm, the tip of the tape is secured with glue;
- the roll is compressed to give it a triangular shape, glued under the collar - a tie knot;
- the same roll is rolled up, expanded to a diameter of 8 cm, and compressed to give it an oblong shape - a tie. The inner curls are laid asymmetrically to create an unusual pattern;
- the tie is secured under the knot.
To finalize the postcard, you can use a beautiful inscription, decorate the edges, add patterns and quilling figures.
Postcard with guitar
Creating a guitar will require more time and patience, but it also looks much more interesting. It is better to use it in the design of a double postcard; this voluminous composition will look good on a large base.
To create it:
- a thick sheet of A4 format is folded in half - the base of the postcard;
- Place the card so that the fold is at the top. On the front side there is a guitar on the left, and a congratulation is drawn up on the right;
- on the left is the base for the guitar - a rectangle of thick paper 9x12 cm, in a yellow-brown color scheme, with figuredly cut edges;
- on the right is pasted the same sheet, but 2-3 times smaller - the basis for the congratulatory inscription. It can be attached slightly obliquely, creating an interesting composition;
- to create a guitar you will need strips of brown (black), white and yellow flowers. First, the outline of the guitar is drawn on the base: the outlines of the soundboard, fretboard and neck are drawn;
- stripes-borders are laid out along the drawn contour - the outline of the soundboard is laid out in brown, the pickguard is white, the fingerboard is laid out in yellow stripes;
- the next step is to fill in the created contours. Rolls are rolled in three colors. Their number depends on the size of the guitar and the size of the rolls. On average, you will need 15-17 rolls per part, 12-14 per neck;
- brown rolls bloom to a diameter of 2 cm, slightly flatten and fit into the contour of the deck. They are given their final shape as they are filled. You may need 2-3 rolls of smaller diameter;
- the overlay is filled in the same way with white rolls;
- for the neck, the rolls open to a diameter of 1-1.5 cm and are laid out vertically;
- two small black stripes are glued on top of the pickguard in the center of the guitar - imitation of pickups. The guitar is ready;
- a congratulatory inscription and the inside of the postcard are drawn up.
On a postcard for a guy it would also be appropriate to put a car, a sailboat, a motorcycle, or - why not? - a mug of beer.
Postcards using scrapbooking technique
Happy birthday cards for boyfriend using scrapbooking technique look very stylish. You can use any materials and details for them; the choice is limited only by the imagination of the master.
Denim card with zipper
This card imitates a pocket on jeans.

To create it:
- take thick cardboard of a dark shade measuring 12x18 cm;
- two pieces of denim are connected by a metal zipper. “Pocket” size 11x18 cm;
- With reverse side a beautiful lining is sewn to the bottom flap;
- the edges are turned up and trimmed with large stitching;
- the denim flap is fixed to the cardboard along the edges so that there is free space in the middle, like in a pocket. The edges can be glued or sewn; metal rivets must be used;
- for decoration, you can additionally attach denim harnesses, metal keychains, leather appliqués;
- the “zipper” is unzipped halfway, the corner is bent down, secured with a button or rivet;
- a piece of congratulations, money, decorative decoration- as your imagination dictates.
There are a lot of options for such a postcard - the pocket can be made of a different fabric, fastened with a button, or there can be two small pockets.
Postcard-vest
A postcard in the shape of a men's vest looks very funny.

To create it:
- thin cardboard of a beautiful shade measuring 20x28 cm is bent into three parts: on both sides it is bent inward by 7 cm;
- the workpiece is given the shape of a vest: cutouts are made for the arms, a neckline is cut out on the front flaps;
- For pockets, choose cardboard of a harmonizing color. Cut out two rectangles measuring 5x6 cm and two 3x6 cm;
- the pockets are attached around the perimeter with narrow bulky tape, symmetrically on both sides - larger at the top, small underneath;
- Congratulations and decorative little things are placed in the pockets.
Thematic vests look creative, the pockets of which are filled with items indicating the guy’s hobby.
Postcards using applique technique
You don't need to be an artist to make a beautiful applique card. Even simple compositions can look very interesting. Careful execution and well-chosen materials are important.
Card-shirt
For a postcard like this:
- take thick cardboard 14x20 cm in a beautiful dark shade - the base;
- a 13x19 cm rectangle is cut out from a sheet of bright blue colored paper - a shirt;
- the sheet is cut from the top - at a distance of 3 cm from the top, symmetrical cuts 3 cm deep are made on the left and right - the collar;
- the sides of the collar are folded symmetrically at an angle, fastened with rivets;
- the shirt is glued to the base, strictly in the center;
- A tie is cut out of bright paper, the shape and size of which depend on the imagination of the craftswoman. The edges of the tie must be folded. At the top, a transverse stripe imitates a knot;
- the tie is glued to the shirt. You can attach a rhinestone or bead on top to imitate a tie pin.
Video master class on how to make a greeting card-shirt yourself:
A congratulatory inscription is attached with a separate applique.
Postcard “hanger with ties”
It's easy to do and looks very interesting:
- a background is glued onto a sheet of colored cardboard 12x18 cm - colored paper measuring 10x16 cm;
- a small imitation coat hanger, 7 cm long and 4 cm high (including a hook), is twisted from thin colored wire;
- the hanger is hooked onto the top edge of the background sheet, in the middle;
- 4-5 ties are cut out of colored paper or fabric, 8-9 cm long and 3-4 cm wide. Paper or fabric is selected in bright colors, preferably with patterns. You need to choose a fabric that does not fray, or trim the edges;
- the ties are beautifully placed on the hanger, the whole composition is neatly glued;
- An applique with congratulations is glued separately.
Themed cards for men with hobbies
Birthday cards for a guy can be themed, reflecting his favorite activities, interests, and hobbies. Such a card will not only be a gift, but also a confirmation that the interests of the birthday person are remembered and, perhaps, shared.
Postcard to an athlete
If a guy is into sports, he will appreciate a postcard with his favorite theme.
 Happy birthday cards for a guy can reflect what he is interested in in life - sports, fishing, passion for music, etc.
 For this:
- a sheet of thick paper 22x24 is folded in half, forming a double postcard;
- a background is glued to the front side in the center - colored paper measuring 10x20 cm;
- the background is decorated with geometric patterns - appliques of squares or stripes, in a discreet color scheme;
- images of various sports balls are prepared: for tennis, football, handball, volleyball and others. You can make them yourself, print them on a color printer, cut them out of a magazine, but the drawings must be dense. The diameter of the balls is within 5-6 cm;
- With right side, as close as possible to the edge of the postcard and even protruding slightly beyond it, a vertical composition of balls is assembled using bulk tape. They are attached to bulk tape of different heights and are located a little chaotically, overlapping each other;
- on the left is the inscription “Congratulations!” or “Happy Birthday!”;
- The inside of the card is drawn up, where the congratulations are written.
If a guy is interested in another sport, then his symbol easily fits into the overall composition. It is enough to attach an image of boxing gloves, a paddle or other sports paraphernalia in the center of the postcard. You can devote the entire inner spread to your favorite sport.
Postcard to the master
If a guy has “golden hands” and likes to make things, he will be pleased to have confirmation that the girl remembers this.

For such a bright card:
- take a piece of cardboard measuring 18x24 cm, bend it in half, and place the fold upward;
- the front side is decorated around the edges with a bright canvas 3 cm wide;
- stylized images of tools are made from gray cardboard and multi-colored thick paper (velvet paper is perfect): screwdrivers, pliers, hammer, pliers, saws and other male attributes;
- images of tools should be large, bright, and interesting. For example, for a screwdriver:
- a working part with a pointed end, 1x4 cm in size, is cut out of gray cardboard;
- a rounded handle 3x5 cm is cut out of yellow “velvet” paper. The handle at the bottom is decorated with a green stripe;
- two white circles with a diameter of 1 cm and two black circles of 0.5 cm are cut out - eyes are glued together from them. A triangle-mouth is cut out of black or red paper;
- eyes and mouth are attached to the handle. It turned out to be a fun and cute screwdriver. The remaining instruments are made in the same style and corresponding sizes;
- the resulting images are arranged using voluminous tape in the central part of the postcard, leaving the side border open, but occupying the rest of the part.
the congratulation is drawn up on the inner spread of the postcard.
Traveler's postcard
Birthday cards for a guy who loves traveling can be made based on a map or globe.
For an interesting globe postcard:
- two color images of a globe with a diameter of 14 cm are printed on thick paper;
- a circle with a diameter of 15 cm is cut out of dark brown cardboard, folded in half and cut along the fold;
- at the top point, the cut halves are fastened with a thin bridge;
- A circle with a diameter of 5 cm is cut out of the same cardboard and cut in half;
- a 1x2 cm leg made of the same cardboard is glued to each semicircle in its upper convex part;
- large semicircles are glued vertically onto these legs - a standing structure is formed;
- The images of the globe are carefully glued onto the brown semicircles on both sides so that a brown outline 1 cm wide is formed;
An image of an airplane or car, a congratulation, or a heart is attached to the globe using bulk tape.
Postcard to a musician
A funny postcard designed for a musical nature is made like this:
- For the base, take colored cardboard measuring 12x17 cm:
- the notes of a congratulation song are printed out or beautifully written on a white sheet of paper;
- The size of the musical note line is selected so that multi-colored buttons can fit on it, replacing the lower parts of the notes. The buttons are carefully glued onto the music ruler.

the words of the song are beautifully signed under the corresponding notes as a congratulation.
Postcard to a fisherman
A postcard made using quilling technique and minimalist style will not leave the fisherman indifferent.
For her:
- cardboard measuring 18x24 cm is bent in half;
- inside, a fishing hook, a float and a fish are laid out using the quilling technique;
- for the hook, roll up a tight roll with a diameter of 1 cm from a gray strip and glue it to the postcard. A hook is laid out from 4-5 strips folded together. For the point, a small roll is twisted, expanded to a diameter of 0.5 cm and flattened;
- the float is made up of white and red rolls, loosened to a diameter of 3 cm. Two semi-ovals are formed from them, folding into a float;
- At the top of the float, a black roll flattened into an oval with a diameter of 1 cm is fixed;
- for fish, a green roll blooms to a diameter of 4 cm, and the inner spiral is laid so as to form an eye. The fins and tail are laid out from four orange rolls, spread out to a diameter of 1 cm and compressed into ovals.

a congratulatory inscription in a minimalist style is written here.
Ideas for designing cards
Happy birthday cards made as a gift for a guy can become small masterpieces, it all depends on the craftswoman.

Here are some more tips:
- use of origami technique. Intricate paper figures will decorate any card. You can fold just a tie, or you can fold a whole shirt. Even an inexperienced craftswoman can easily do this by following the instructions;
- They look very impressive in the design of photographs. You can make a collage. Or interesting idea– a postcard with a model of a clock, where instead of numbers there are photographs;
- Postcards in the style of minimalism look impressive and discreetly masculine. For example, black stripes on a white background. Or it could be a single applique in the form of a bow tie or mustache.
Such cards require impeccable selection of shades and accuracy.
Birthday is a day of surprises and gifts. And a hand-made postcard for a guy can be a wonderful demonstration of care, attention and love. But for this you need to take care of its production in advance, sparing no time and effort.
Article format: E. Chaikina
Useful video about a happy birthday card for a guy
Video idea on how to design greeting card for a guy's birthday:
YouTube channel Red Ted Art
What do you need
- Thick blue or turquoise double-sided paper;
- scissors;
- ruler;
- a simple pencil;
- thick white paper;
- colored paper with drawings and patterns;
- glue stick.
How to do
1. Cut a rectangle measuring 15 x 11 cm from blue or turquoise paper. Fold it in half crosswise. Cut a rectangle measuring 14 x 10 cm from a white sheet.
 YouTube channel Red Ted Art
 2. Fold the white piece in half crosswise. On the fold side, make four cuts at equal distances from each other. The first two (at the bottom of the paper) should be the same. The third is about 1 cm shorter, and the fourth is even slightly shorter in length.
 YouTube channel Red Ted Art
 3. Fold the cut pieces as shown in the photo.
 YouTube channel Red Ted Art
 4. Unfold the strips and open the paper. Bend the cut pieces inward along the marked folds.
 YouTube channel Red Ted Art
 5. Cut out three rectangles from colored paper according to the size of the layers of the future cake. They should be quite a bit taller than the white stripes. Fold them in half and glue them to the sheet.
 YouTube channel Red Ted Art
 6. Bend and straighten again White list so that the lines on the cake are more clearly visible. Cut out several candles in the form of small rectangles from bright paper, and the same number of droplet figures from yellow paper. Glue the droplets to the candles and them to the cake.
 YouTube channel Red Ted Art
 7. Apply glue to the back of the white paper and attach it to the blue base. The card can be signed next to the cake or outside.
What other options are there?
Incredible beautiful card with a voluminous round cake:
A piece of festive dessert is hidden inside this option:
Print it out, cut along the lines and create a card like this:
And here is, perhaps, the easiest option: with a drawn cake. It looks simple, but very cute:

What do you need
- Thick gray paper;
- double-sided paper of different colors;
- ruler;
- a simple pencil;
- scissors;
- double sided tape;
- compass;
- regular glue and/or glue stick;
- glue gun;
- twine or other thick threads;
- White paper;
- felt-tip pen;
- glue stick;
- colored tape.
How to do
1. Fold gray construction paper in half crosswise. Cut a rectangle with sides 20 and 14 cm from a pink sheet. Cut a rectangle measuring 16 x 10 cm from gray construction paper.
Using double-sided tape, glue a small gray detail to the pink one, and attach the last one to the cover of the future postcard.
 YouTube channel Crafting Hours
 2. Cut many strips of colored paper of different thicknesses, but the same length. These are blanks for balls. Conditionally divide one strip into three parts and bend it twice along the lines.
Draw on the resulting part using a compass. Cut along the contour - you will have three circles.
 YouTube channel Crafting Hours
 3. Prepare circles from the remaining colored stripes in the same way.
 YouTube channel Crafting Hours
 4. Cut small triangles from the remaining folded paper. Glue them to the bottom of each circle.
 YouTube channel Crafting Hours
 5. Fold a small strip of paper in half. Unfold and fold each side like an accordion, as shown in the photo and video below.
 YouTube channel Crafting Hours
 6. Make as many of the same parts as you have balls. Glue them to the circles so that the accordions are on top.
 YouTube channel Crafting Hours
 7. Using a glue gun, attach a piece of twine or other thick thread to each ball.
 YouTube channel Crafting Hours
 8. Fold the long edges of the white paper about 2 cm and cut along the contour so that you get two strips folded lengthwise. Fold each one in half crosswise three times. Cut out identical triangles from them so that the bases of the shapes are on the fold. Details are in the video below.
 YouTube channel Crafting Hours
 9. Write one letter from the phrase “Happy Birthday” on each triangle. Lubricate the inside of the flags with glue, put them on two pieces of rope and glue them together. Tie the ends of these two strings together.
 YouTube channel Crafting Hours
 10. Lubricate the accordions with glue on the back of the balls and distribute them beautifully inside the card. Save a few for the cover.
 YouTube channel Crafting Hours
 11. Tie the ends of the twine, twist and cut off the excess. Using a glue gun, attach the letter flags to the card.
 YouTube channel Crafting Hours
 12. Write a congratulatory message at the bottom of the cover. Glue a few balls at the top. Cut off the excess twine and tie it with ribbon.
What other options are there?
You can make a three-dimensional postcard with balls flying out of the box:
Here's a similar option:
Here's how to make balls using the quilling technique:
And this simple card, made using the appliqué technique:
How to make birthday cards with flowers

What do you need
- Thick crimson double-sided paper;
- a simple pencil;
- scissors;
- pink double-sided paper;
- glue;
- colored paper or;
- several beads;
- White paper.
How to do
1. Fold the raspberry paper in half crosswise. Draw a smooth line in front, as shown in the photo, and cut along the contour.
 YouTube channel Tonni art and craft
 2. Use scissors to divide a sheet of pink paper in half crosswise. The half should be the same size as the folded card. Glue the paper to the back cover.
Draw semicircles on pink paper along the edge of the cover. For convenience, you can outline the lid or something else. Cut along the outline.
 YouTube channel Tonni art and craft
 3. Form from papers of three two small identical squares of different colors. You can use stickers without adhesive.
Fold one diagonally. Then bend the corners as shown in the photo or video below.
 YouTube channel Tonni art and craft
 4. From the corner side, draw something like a heart on the figure and cut it along the contour.
 YouTube channel Tonni art and craft
 5. Open the part and curl the petals with a pencil. In the same way, fold the second square of the same color, draw a heart on it and cut it out. Open, shade the beginning of the petals and twist them outward. Make a small cut in one place between the petals and glue one petal to the other.
 YouTube channel Tonni art and craft
 6. Secure the second flower to the first. Place a bead in the middle. Make two more flowers in the same way.
 YouTube channel Tonni art and craft
 7. Cut out several small rectangles from green paper. Green stickers can be divided into two parts.
Fold the rectangle in half crosswise, then fold it again. Draw half a leaf on the part. Cut along the outline. You will get two leaves. Make six more in the same way.
 YouTube channel Tonni art and craft
  YouTube channel Tonni art and craft
 9. Attach several beads to the fold of the cover. Write a congratulatory message on white paper, cut it out and glue it to the back sheet of the card in the part visible from the front.
You can write a congratulation by pasting white paper inside. Or add interesting inserts to the inside of the card, as was done in the master class.
What other options are there?
Here you can see how to make a three-dimensional flower inside a card:
In this instruction, the flowers are made very simply - from twisted spirals:
And here is a postcard bouquet. The flowers are made using the same principle as in the previous video:
How to Make a Pop-Up Cupcake Birthday Card

What do you need
- Pink double-sided paper;
- ruler;
- a simple pencil;
- scissors;
- glue;
- White paper;
- double-sided bulk tape;
- paper of different colors;
- Red ribbon;
- felt-tip pen.
How to do
1. Fold a sheet of pink paper in half. Place it so that there is a fold at the bottom. Place a ruler at a slight angle on one edge and draw a line. Approximately in the middle, draw another slanted line so that the figure resembles a pot.
 YouTube channel Crafting with Rachna
 2. Cut out the part along the marked lines. Apply glue to the side edges inside the figure.
 YouTube channel Crafting with Rachna
 3. Connect the elements and press the paper on the sides so that it sticks together. Place a ruler in the resulting pocket and measure the distance from the bottom to the edge. Also measure the length of the bottom edge of the figure, stepping back a little on the sides. The author got 9 cm.
Draw a rectangle on white paper. Two sides should be 9 cm each (or whatever value you get), and the other two should be a few centimeters more than the distance from the bottom to the edge of the figure.
The resulting rectangle should easily fit into the pink pocket. Cut out the white piece.
 YouTube channel Crafting with Rachna
 4. Place the item in the pocket. Measure the length of its top edge and the height of the pocket along with the inserted white piece.
Draw another rectangle on white paper. Its length should be 2–3 cm longer than the edge of the pocket, and the required width should be approximately half the measured height.
 YouTube channel Crafting with Rachna
 5. Cut out the cloud. Place it on top of the white piece so that it covers the pink piece. For convenience, mark the places of their contact with a pencil.
Remove the cloud. Glue several pieces of bulk tape to the visible part of the white part. Attach a cloud to them by placing it on the pencil marks.
 YouTube channel Crafting with Rachna
 6. Cut out small circles of different diameters from colored paper. Glue them to the cream, that is, to the part in the form of a cloud. Cut out a heart from red paper and attach it at the very top.
Tie a bow on the side of the ribbon. Cut out a small tag from white paper - a rectangle with cut corners. Write “For You” or a congratulation on it.
Glue this element to the bottom of the card and attach the ribbon horizontally above the tag.
 YouTube channel Crafting with Rachna
 7. Glue the ends of the ribbon to the back of the card. Write your congratulations on the white removable part.
How to make a heart-shaped card with flowers for a birthday

What do you need
- Thick pink or raspberry double-sided paper;
- scissors;
- ruler;
- a simple pencil;
- White paper;
- stationery knife;
- glue;
- self-adhesive rhinestones;
- peach double-sided paper;
- stationery proofreader in the form of a pen;
- hole puncher;
- pink ribbon.
How to do
1. Cut out a piece measuring 30 x 15 cm from pink construction paper. Make marks on the sides at a distance of 7.5 cm from the edges.
Place the ruler vertically on one side of these strokes. Fold the paper along the ruler. In the same way, bend the sheet from the other edge.
 YouTube channel Mukta Art & Craft
 2. Fold the future card along the fold lines. Cut out a piece from white paper: its width should match the width of the postcard, and its height should be slightly smaller. Bend it in half crosswise.
 YouTube channel Mukta Art & Craft
  YouTube channel Mukta Art & Craft
 4. Open the heart, attach it to the card and trace the outline. Using a ruler, add two horizontal lines at the top and bottom where the shape ends. At the top, near the middle, draw two small vertical lines.
The lines are visible in the photo. And the video below has all the details.
 YouTube channel Mukta Art & Craft
 5. Open the card and cut the paper along the lines on both sides with a utility knife.
 YouTube channel Mukta Art & Craft
 6. Cut out a piece from white paper to fit the back of the card. The height should be slightly smaller so that the pink color is visible at the top and bottom. Glue the part from the inside.
 YouTube channel Mukta Art & Craft
  YouTube channel Mukta Art & Craft
 8. Cut out three squares with sides of 5 and 4 cm from peach paper. Fold each piece in half twice. You will get small squares.
On one of them, closer to the corner, draw a circle. Draw something like a triangle in the corner.
 YouTube channel Mukta Art & Craft
 9. Cut out the part along the contours and unfold it - you will get a flower. Make the same elements from other squares. Using a pencil, curl the petals inward.
 YouTube channel Mukta Art & Craft
 10. Apply glue to the edges of each petal of one small flower and glue them together to form a bud. The detailed process is shown in the video below.
Apply glue to the petals of a second flower of the same size and glue the first bud to it. Then attach the third piece in the same way.
Glue the large parts on top of each other, and attach the resulting lush bud on top.
 YouTube channel Mukta Art & Craft
 11. Make two more flowers: one the same size, the other smaller. Glue all three to the side of the heart.
 YouTube channel Mukta Art & Craft
 12. Using a proofreader, write a congratulatory inscription on the other side of the heart. Write nice words inside the card too. Use a hole punch to make one hole in the middle of the heart, thread a ribbon through it and tie it with a bow.
How to make birthday cards with a butterfly
 YouTube channel Tonni art and craft
 What do you need
- White paper;
- a simple pencil;
- scissors;
- stationery knife;
- raspberry double-sided paper;
- pink double-sided paper;
- double-sided bulk tape;
- pink or red pencil;
- self-adhesive rhinestones;
- peach or pink ribbon;
- simple double-sided tape.
How to do
It has the outline of a butterfly on it, as shown in the photo and video below.
 YouTube channel Tonni art and craft
 2. Cut out the shape. Open the butterfly and divide it into two equal parts with scissors. One of them will serve as a template.
 YouTube channel Tonni art and craft
 3. Draw a pattern on the template as shown in the photo or video below. Go over the pencil sketches with a utility knife and remove any excess paper.
 YouTube channel Tonni art and craft
 4. Attach the template to the raspberry leaf and trace the outlines inside and outside. Cut out the piece with scissors and use a knife to remove excess paper to create a pattern. Make the second wing in the same way.
 YouTube channel Tonni art and craft
 5. Place one wing on the pink paper and trace the outer and inner contours. Place the second wing next to it and do the same.
 YouTube channel Tonni art and craft
 6. Cut out the pink parts along the outer contours. Color in the edges of the patterns with a colored pencil.
 YouTube channel Tonni art and craft
 7. Glue the crimson parts to the pink ones using bulk tape. Details are in the video instructions below. Decorate the wings with rhinestones.
Cut a piece of tape and attach simple double-sided tape to the edges. Glue the wings to them.
 YouTube channel Tonni art and craft
 8. Along the edges of the tape, on opposite sides, make a small vertical cut. Write your congratulations on white paper and roll it into a tube. Wrap it with tape and “fasten” it at the cuts.
What other options are there?
Here is another similar composition:
Here's how to make a card with an elegant carved butterfly:
And another cute option with a voluminous butterfly and an unusual cover:
A declaration of love can be said beautifully, or you can do it beautifully... with your own hands. So in today's master class you will learn how to create a voluminous “I love you” card, thereby once again proving that no best gift, howtime devoted to its production.
So, to make a voluminous card, prepare the following materials:
- 3 sheets of scrapbooking paper 15x30 cm. Select harmonious combination, determine which color will be the main color of the card and which will be the secondary color. The sheets should not be too dense, from 100 to 250 g/m2 will be enough;
- Scissors, regular and curly;
- Figured hole punches;
- Ruler;
- Pencil;
- Glue.
DIY postcard for your beloved man or woman: “I love you”:
Take a sheet of paper whose color will be the main background of the card and fold it in half. 
Using curly scissors, cut out a rectangle from paper of a different color,
so that it is 2.5 cm smaller than the main sheet, i.e. approximately 12.5x27.5 cm. 
Fold it in half, right side inward. Stepping back 1.5 cm from the edge, draw a line 4 cm long on the fold.
Then, retreating another 1.2 cm from this line, again draw a segment 4 cm long. And so, alternating the distances
from lines 1.5 and 1.2, mark segments 4 cm long to the next edge of the postcard. 
Using regular scissors, make cuts along all the lines. Those segments that were 1.2 cm wide
Bend it inward, to the front side. 

Take the glue and go over the entire surface of the underside of the sheet, except for those sections
which we just bent outwards. 
Glue this sheet inside the sheet of the main color. 
Now let’s form a message for your loved one (or beloved) “I love you.” To do this, cut out the letters “I”, “T”, “E”, “B”, “I” from a sheet of paper of the third color. The letter "I" should be about 5.5 in height. cm,
the remaining letters are about 3 cm. 
Glue the letter “I” on top, above the segments. And attach the remaining letters to the segments themselves, one for each. 


From a sheet of the same color, cut out a heart, about 5 cm in diameter. 
And 3 stripes. Two pieces 4cmx0.5cm and one 2cmx0.5cm. For long strips, make folds along the edges
(about 1 cm from each edge), and simply bend the small strip in half. 
Glue a little less than half of the short strip to the bottom corner of the heart. 
Glue two long strips just below the letters “E” and “B” with one fold. 
Glue a heart on each hemisphere to the opposite ends of these segments. 
Glue the short piece that we have already attached to the corner of the heart to the card. 

Now let's decorate the spine. Using curly scissors, cut a 15 cm x 5 cm piece and glue it to the end of the card. 
Use shaped hole punches to make different elements. 
And glue them to the edges of the card. 
And also inside the postcard. 
And decorate the cover with them. 
The voluminous “I love you” card is ready. Give it to your beloved man or girlfriend! Everything made with your own hands is valuable. 

On the eve of the celebration of someone dear to your heart, you want to give a gift that would impress and leave pleasant memories. We suggest making voluminous postcards with your own hands, they are also called pop-up postcards. What are these wonderful postcards?! At first glance, these are ordinary postcards, but when you open them, a three-dimensional figure or an entire composition suddenly appears in front of you! Such cards will not leave anyone indifferent! Especially if they are original and keep the warmth of your hands!
DIY cards with flowers inside
Even a child can make a heart-shaped card with a three-dimensional flower inside:

YOU WILL NEED IT
We make both simple and complex creation technologies.

A lush flower for the inside or outside of the card can be made from colored or even plain paper painted with watercolors or pastel crayons. You can cut flowers using this template:

Print out the flower template and color it with paints. Fold it according to the marked fold lines and glue the resulting flower onto the base of the card.

Such a lush and bright card with flowers inside, made with your own hands, will undoubtedly delight the recipient.

He explains how to make it in his master class. TheJulianaHappy:
The option with delicate, pastel colors looks very cute. Making stamens for flowers is not difficult!

Original master class on English language, so for your convenience we offer a short translation of the process of creating this flower card.

Standard materials and tools: colored paper, cardboard, scissors, glue, plastic to imitate glass in a window.
Take a tight one colored paper, fold it in half. Cut out a square window in one half.

We make a frame from colored paper of a different color. The glass for the window can be made from a protective film for your phone or transparent plastic. Glue the resulting window frame to the base of the postcard. You can do without “glass” at all.


Glue it into the hole
Glue from cardboard flower pot, glue it in the middle of the card on the fold line. Glue the sides of the resulting pot together so that when you close the card, the pot folds up.


Next, from colored paper we cut out green stems and all kinds of bright flowers: crocuses, hyacinths, daffodils and tulips. Perhaps your bouquet will not be spring, but summer, which means that cornflowers, daisies, pansies, etc. will appear.


Glue the flowers into the pot
The height of the flowers should be such that they do not stick out from the card, but are visible through the window!


The window can be decorated with a cozy curtain.

Original master class
Using the same principle, you can make a card with felt or painted flowers. cotton pads. Additionally, insert a laconic but warm congratulation along with the flowers!

In addition to the flowers from the postcard, you can also see air balloons, stars, bows.

How to make a panoramic flower card along with a congratulatory envelope shows in his master class TheWorkshop:
We take thick paper - the basis for our postcard. Create a rectangle in the center of the fold line of the card. The width of the rectangle is 3 cm, length is 7 cm.

We make cuts along the pink lines with a stationery knife. Then we fold the resulting rectangle inside the postcard. We attach the base of the card to another sheet, b O larger in size than the original base.

Then we make a floral design: a flower pot, the flowers themselves, fluttering butterflies and grass. We combine all this and glue it to the front of our postcard.


Original master class.
Using the same technique, you can make an original vase postcard. You can also make flowers in such vases with your own hands from paper or other available materials.


We bring to your attention a master class on making a very delicate three-dimensional card, which will not only congratulate the recipient, but will also fit perfectly into the interior of, for example, a children's room.

First we make a box frame. To do this, take thick blue paper and cut out a template for the box from it. We fold the edges of the template 4 times, 5 mm on each side, thereby forming a frame. Glue the resulting frames together.

On top of them we glue colored or scrap paper in a color that matches your composition.

Next, we will prepare the elements of the future composition. Glue it together balloon from paper circles. We fold the circles in half and glue them together. A waxed cord is glued into the base of the basket and directly into the circles, forming a ball.

We cut out clouds from scrap paper and a sun from yellow paper. Glue the elements of the composition into a frame. We glue the balloon as follows: we glue the base of the balloon with bulk tape, and the balloon itself with glue. We glue the clouds using the same principle: one with glue, the other with bulk tape.

We make green grass from a simple napkin. First we cut it, then glue it. On the right side of the box we glue a tree made using a hole punch for Scrapbooking. The final touch is to glue serpentine, butterflies and a congratulatory inscription into the empty spaces! We glue a ribbon with embroidery or lace to the bottom of the box. The original three-dimensional postcard is ready!

Original master class.
3D postcards using Kirigami technique
Kirigami is the art of cutting and folding figures and cards from paper. This is the main difference between Kirigami and other paper folding techniques and is emphasized in the name: “kiru” - cut, “kami” - paper. The founder of this trend is the Japanese architect Masahiro Chatani.

For production, sheets of paper or thin cardboard are used, which are cut and folded. Unlike traditional 3D postcards, these paper models are usually cut and folded from a single sheet of paper. Most often, three-dimensional models of architectural buildings, geometric patterns and various everyday objects, etc. are developed.

It’s better to start with a simple three-dimensional DIY birthday card. For example, using thick paper of two contrasting colors, you can make a birthday cake card:

To make it, use this template:

Using various templates, you can make more complex cake cards:


He explains how to make a kirigami cake in his master class. OksanaHnativ:
Using this technique, you can cut out various congratulatory inscriptions. The cake can be decorated and colored to your liking.

To create it, take this template:

White embossed paper will also make an impressive postcard:

By combining two mirror “cake” parts cut from different sheets, you can make a whole three-dimensional cake in a postcard!


Use the following template:

Creation options voluminous postcards a whole lot! Cut and fold your paper masterpieces!
Volumetric postcards using scrapbooking technique
Scrapbooking is the art of decorating photo albums, but its techniques are also very popular when creating cards.
Using Kirigami elements, using the Scrapbooking technique, you can also make a three-dimensional postcard with your own hands. We cut out and fold “steps” from scrap paper for the “pop-up” candles on the second half of the card. Glue the candles and glue the resulting blank onto the base of the card.

You can make a simple but original greeting card from scrap or colored paper. We cut out the candle flame and decorate it with sparkles, then glue it to 2-sided tape. We glue the second part of the candle with glue. The congratulation itself can be tied or glued to an elegant satin ribbon. Simple and original!

A postcard made from paper of a different texture will look completely different)

By overlaying each element of the postcard on top of each other, again using double sided tape, you can create such a voluminous bright cake!

Let's take a look at Tatyana Sadomskaya's master class on how to easily make a voluminous, delicate postcard using the Scrapbooking technique using ready-made pictures.

To create such a postcard, Tatyana used:
- scrap set ScrapBerry’s “Favorite Pet”
- scissors
- thick cardboard
It is better to use scrap paper with a large number of miniatures that can be cut from a single sheet, as well as colored stamp prints and chipboards.
Before creating a postcard, you need to decide on its subject in order to choose the color of the base of the postcard and its “ characters" In this case, the basis is paper with a calm beige print, and the components of the plot are cut out of it: kittens, a puppy, flowers, a crown on a pillow.

Don’t forget to decide before starting this work what will be in the foreground and what will be behind it!
In our case, we put the larger kitten in the foreground, this will enhance the feeling that it is closer than kittens with a dog.

We make the necessary cuts. The result is a design with “steps”. We glue leaves of arbitrary size onto the resulting “steps”. These leaves imitate a wooden fence.

Next, we gradually glue our elements, starting from near to far. We start from the foreground and glue the kitten. We glue it onto beer cardboard, because it gives additional volume and casts a shadow. Using the same principle, you can glue several other elements, for example, balls and flowers. When inner side ready, glue it to the base of the card.

We also decorate the outside of the card with an elegant floral print.

For greater elegance, decorate the elements of the card with sparkles (use glitter).
Original master class.
For inspiration, check out this masterpiece 3D cake card:

Volumetric postcards-dioramas
We present to your attention a master class on making a 3D postcard - a small three-dimensional scene. On such a stage, everyone can place various fancy figures and decorations)

To make a postcard, take 4 sheets of thick cardboard, in this case We take cardboard in four shades of orange. You can choose colors to suit your taste.

On sheets of cardboard, draw the outline of the frames with a pencil and cut them out. Make the frame outline 1 cm wide.

From the remaining fragments of paper we cut out two strips, each measuring 10 by 4 cm. We line each one into 4 parts of 1 cm each. We cut off all the corners of the resulting strips. Fold the strips along the lines to form a paper zigzag. These zigzag pieces will support the diorama fragments. Glue the zigzags to the frame on both sides.

Glue the second frame clearly along the line on the other side of the zigzag.


The top of the zigzag should cover one side of the frame. The same must be done with the opposite side. Thus, the first scene of the diorama is ready!

Using the same principle, we make the remaining frames of the diorama.
It's better to decorate each of the frames (especially the last one) in advance than to try to squeeze decor into the finished card.
The back wall does not have to be solid; you can make a transparent diorama without a back wall.

Decorate not only the “wall” of the diorama, but also each frame. Use more volumetric jewelry, such as beads, bows, feathers, ribbons, etc. This will make the card seem more voluminous and this will enhance the 3D effect!

Original master class.
You can come up with absolutely any plot! Create your own little theater!
For example, the waiting Assol!

Or a hot air balloon in fluffy clouds.

Bright meadow with lupine and butterflies!

Birdhouse with birds and flowers:

Accordion postcard (diagrams and templates)
Another type of voluminous postcard is the accordion postcard.
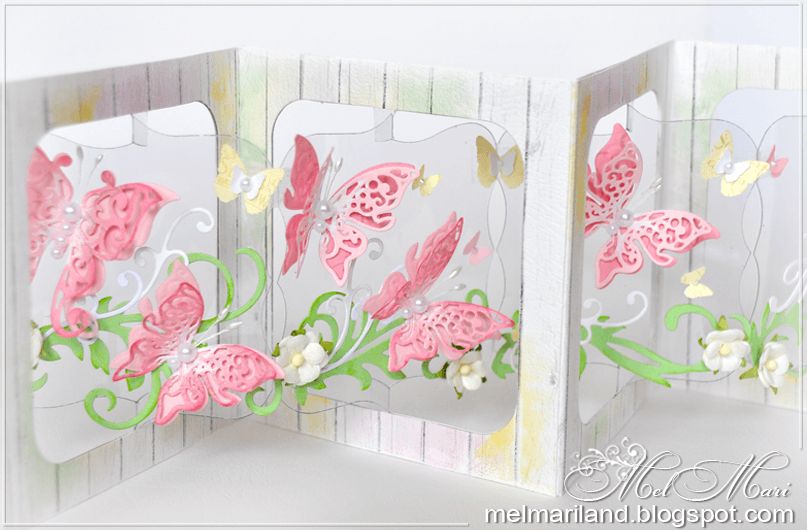
To create such a postcard you will need: thick scrap paper for the base frame, a die-cut scrap knife or a stationery knife, transparent plastic for the internal parts, stamens, semi-pearls and other materials for decoration.
We take the template and make blanks for the postcard. We cut out 8 blanks for the base frame from thick scrap paper and 4 from transparent plastic.

Thick paper blank...
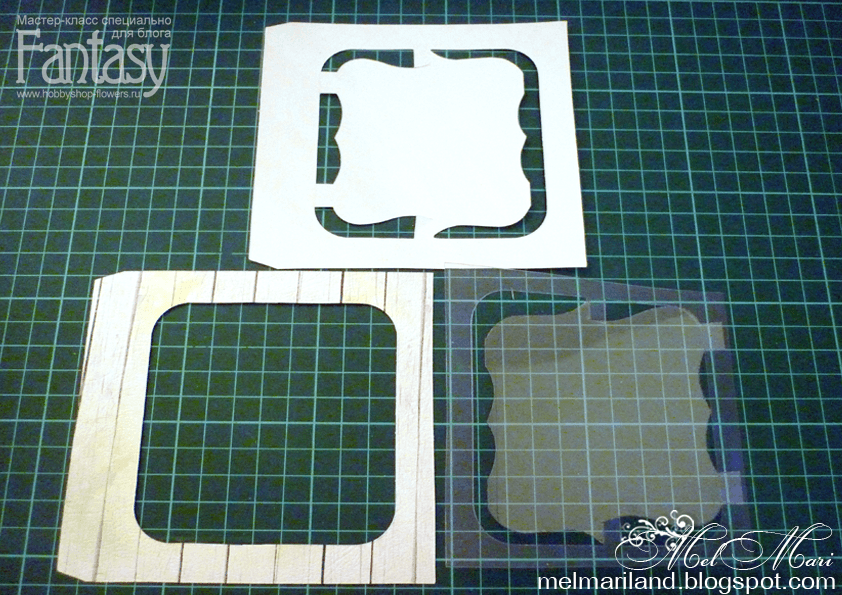
...and transparent plastic
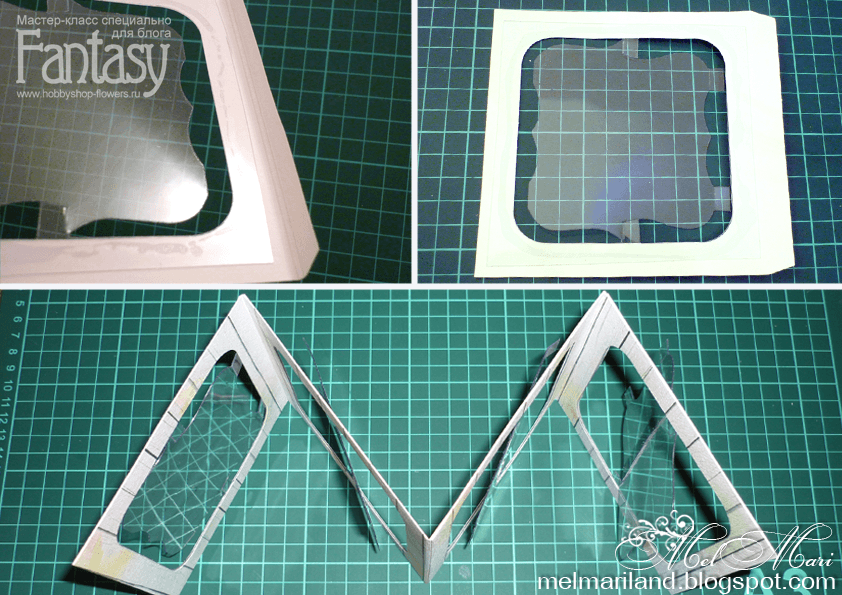
We glue the plastic blanks to a paper base. To make the card fold, we make a double crease of about 2 mm on the outer folds. We connect the resulting 4 parts - glue them with glue or use 2-sided tape. Glue the remaining 4 frames on the opposite side.


Now you can begin the most creative part of creating a card - decorating it! Glue fluttering butterflies and twisted greenery to the plastic. The postcard is ready!


Original master class
See below for various templates for making the bases of such postcards:


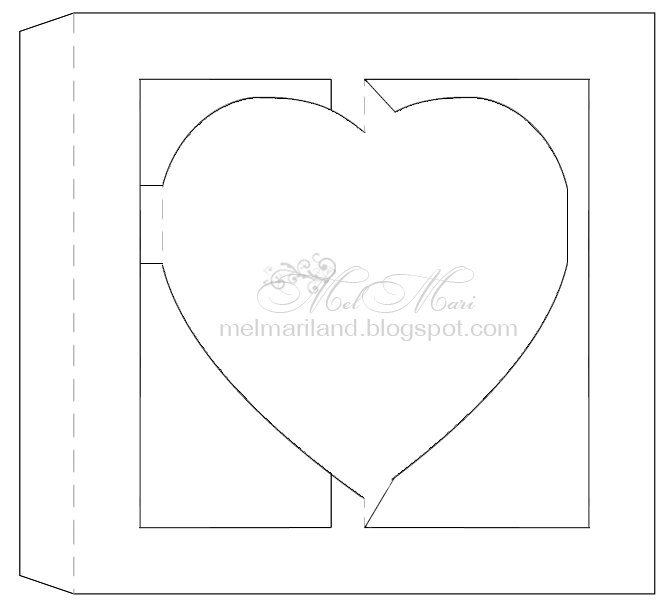
Using your imagination, you can create all sorts of variants of such folding postcards. For example, with a predominance of children's themes. The number of components may vary.


Birds, flowers, butterflies always look very light and airy on postcards!


Postcards for all occasions
We have already seen that handmade postcards are more original than those you can simply buy.
YOU'LL LIKE IT!
Let's give, and sometimes for no reason at all! 🙂
