Guys, we put our soul into the site. Thank you for
that you discover this beauty. Thanks for the inspiration and the goosebumps.
Join us at Facebook and In contact with
Many people notice that the older they get, the more difficult it is to re-experience that magical feeling of a fairy tale and miracle that always came to us in childhood under New Year.
But we are in site sure - good New Year spirit you will not be long in coming if you make one of these wonderful decorations for your home and Christmas tree with your own hands. Almost all, with the exception of two or three, do not require much time and any special materials - they can be made in half an hour from what is at hand.
Thread sprockets
A wreath of balls and an old hanger
In just half an hour, you can make a colorful wreath by buying a couple of sets of inexpensive balls. Blogger Jennifer, the author of this article, recommends unbending an old hanger, but if you don't have one, a piece of sturdy wire is perfect.
- You will need: a pair of sets of balls (20-25 balls of different colors and sizes), a wire hanger or wire, spruce branches, braid or a ready-made decoration for decorating a wreath.
Snowflake tablecloth
A delicate and surprisingly festive tablecloth will turn out from snowflakes, on which we have stuffed our hands since childhood. You can sit down and cut snowflakes with the whole family, and then lay them out on the table and fasten them with small pieces of tape. A great solution for receiving guests or just dining with your family during the holidays.
Multi-colored beanies
The cutest colored hats can be made from leftover yarn, which can be used to make a garland for a Christmas tree or to decorate a wall. Or hang them on a window or a chandelier on different levels... Children over the age of five will do just fine too. simple decoration... See details.
- You will need: sleeve toilet paper for rings (or regular cardboard or thick paper), scissors, colored yarn and good mood.
Lamp "Snowy City"
For this charming lamp, you need to measure a piece of paper around the circumference of the can with a small margin (to glue it together), depict and cut out the simplest city or forest landscape. Wrap around the jar, and put a candle inside.
- You will need: a jar, thick paper of any color, you can white, any candle. Alternatively, you can coat the top of the can with "falling snow" using a special "snow" spray that is sold in hobby stores.
Balloons with photos
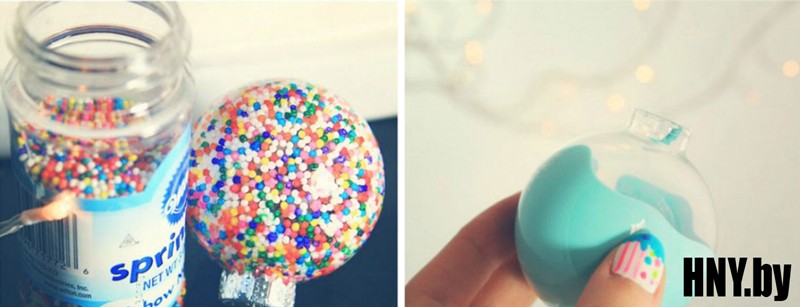
A great idea for decorating a Christmas tree or for a gift to relatives and friends. The photo must be rolled up into a tube so that it goes into the hole in the ball, and then straighten it with a wooden stick or tweezers. Small black and white rectangular shots will do, and you can also cut out a photo to fit a ball or silhouette (like with a cat in the snow).
- You will need: plastic or glass balls, photographs, various sundries to fill the ball - tinsel, garlands, coarse salt (for snow).
Christmas lamps
And this miracle is a matter of five minutes. It is enough to collect balls, fir branches, cones and put them in a transparent vase (or a pretty jar) and supplement with glowing garlands.
Embers
Glowing garlands hidden among cones, branches and pine paws create the effect of embers smoldering in the fireplace or a cozy fire. They even seem to give off a fever. For this purpose, a basket that has been lying on the balcony for a hundred years, a nice bucket or, for example, a wicker container for small things from Ikea, will do. Everything else (except for the garland, of course) you will find in the park.
Floating candles
A very simple decoration for New Year's table or for a cozy evening with friends in new year holidays- composition with candles floating in a vessel with water, cranberries and pine twigs. You can use cones, orange circles, fresh flowers and leaves from a flower shop - whatever your fantasy tells you. And as a candlestick - deep plates, vases, jars, glasses, as long as they are transparent.
Snowman on the fridge or door
Children will definitely be delighted with this - quickly, fun and very simple, because even a three-year-old can handle cutting out large parts. It is enough to cut the circles, nose and scarf out of self-adhesive paper, wrapping paper or colored cardboard and attach them to regular or double-sided tape.
Snowflakes on the window
An interesting use for a glue gun lying around. In order to glue these snowflakes to the glass, it is enough to lightly press them to the surface. For details, see our video.
- You will need: a stencil with a snowflake drawn with a black marker, tracing paper (parchment, baking paper), a glue gun and a little patience.
Christmas trees-sweets
Bright Christmas trees can be built with kids for children's party or decorate with them festive table... Cut triangles out of colored paper or cardboard, tape them to a toothpick, and stick the resulting Christmas trees into the candy.
- You will need: Hershey's Kisses or any other truffle candies, toothpicks, scotch tape, colored paper or cardboard with a picture.
Garland with pictures and drawings
New Year, Christmas - warm, family holidays. And it will come in handy with photographs, children's drawings, pictures. The easiest way to secure them is with clothespins, which can be decorated with hearts or snowflakes.
Origami star
Painted spoons
Ordinary metal spoons or wooden cooking spoons turn into interesting New Year decorations using acrylic paints. This idea will surely appeal to children. If you bend the handle of the metal spoons, you can hang them on the tree. And wooden spoons will look great in the kitchen or in a bouquet with spruce branches.
Sock snowman

Olesya Tulinova
New Year is one of the most beloved and anticipated holidays, it is equally loved by both adults and children. And when the New Year comes to our home, we gladly surrender to the power of children's habits and traditions. One of these habits and traditions for all of us is decorating christmas tree... We also began to decorate our Christmas tree in the classroom. Decorating our beauty, we got an interest and the question of where did the first Christmas decorations and balls? Why have they been the main Christmas tree decorations for so many years?
The first sacred tree that was decorated and around which merry songs and dances were arranged was the apple tree. Later, the spruce became a ritual tree, because ancient people endowed wildlife with extra strength and in order to receive favor and and help, it was necessary to make sacrifices.
Decorated "Christmas tree"according to special canonical rules: crowned the top " Star of bethlehem", the apples personified the forbidden fruit that the ancestors Adam and Eve ate. Burning candles are the essence of Christ's sacrifice.
The first Christmas tree decorations could be eaten. These were: apples, tangerines, oranges, carrots, potatoes, eggs, nuts, waffles, gingerbread cookies, figured sugar, lollipops.
But still, of all the abundance, apples occupied the most honorable place among all the variety of the first decorations. In the fall, the most beautiful apples were selected, even large, strong. They were carefully kept until winter. And it was the apples that became the prototype of the glass balls.
According to legend, once there was a poor harvest of apples. Then the believers came to the glassblowers with a request to make glass apples for the holiday. And in 1848. In Thuringia, in the town of Laushta, glassblowers proposed a replacement for the apple, a glass sphere made of transparent and colored glass, which was covered from the inside with a layer of lead, and from the outside it was decorated with sparkles.
Such balls immediately won the hearts of people and their production became massive.
Glass jewelry has been expensive for a long time (one bead cost as much as a car, so homemade crafts continued to be loved and useful activity... These were shell toys, color. paper, cardboard, cotton wool, etc. Now glass balls gradually become a thing of the past - after all, they are fragile and short-lived. Plastic ones come in their place balls.
And for you, I offer a manufacturing option DIY styrofoam balls... Balls from foamcan be decorated using: pieces of felt, sequins, beads, threads, etc.
We decorated our balls with sequins. To decorate the balls, we needed:
Foam ball-shaped workpiece;
Petya of various kinds and colors;
Multi-colored beads;
pins-carnations

The sequins are glued to the base using pins-studs in a spiral from the center.

By attaching all the sequins, a very beautiful ball is obtained.


You can use a wide variety of sequins and colors to decorate the ball, which will give you the opportunity to make many different balls.


Thank you for the attention!
Related publications:
 A book and not just a book, but something familiar from childhood. The value of books for a child is very great, because books broaden the horizons of children, develop.
Abstract of GCD for drawing "Christmas balls" Municipal preschool educational autonomous institution Kindergarten No. 3 of the general developmental type of the city of Zeya Abstract of the lesson.
 Hello everybody. I want to offer you a simple way to make New Year's decorations, together with your child. Found this idea on the internet.
 I warmly welcome you, my dears! Recently, I really love and close to me the rustic style in the decor and decoration of handicrafts, for this.
 A wonderful and fabulous New Year holiday is not far off, and of course everyone is preparing gifts for their family and friends. But it has long been customary to give.
 The most beloved and long-awaited holiday of the year is coming - New Year. Many people love the winter season because of new year holidays, everyone is waiting.

New Year's DIY: we decorate Christmas balls with our own hands.
The countdown will begin very soon to one of the most beloved, magical and cozy holidays - the New Year. The weather outside the window is not happy, so it's time to take matters into your own hands and create a New Year mood on your own, or even better - with the whole family. For example, arrange a home decorating workshop Christmas balls... You will have a pleasant company and a good mood. We provide inspiring examples and detailed instructions.
History of toys. How did the Christmas ball come about?
Christmas and New Year are shrouded in many legends and legends. One of them is about the appearance of Christmas balls.

The ancient peoples believed that spirits dwell in the branches of trees, influencing the harvest and fertility of the soil. To gain their favor, the sacred tree (apple tree) was decorated with vegetables, fruits and a celebration with songs and dances was arranged around it.

This tradition was adopted by Europeans. An evergreen spruce became a ritual tree - oranges, gingerbread, nuts and even eggs were hung on it, but the apple remained the most affordable and popular decoration.

In the second half of the 16th century, there was a terrible crop failure, there were few apples. And then German glassblowers from Thuringia came up with the idea of replacing fruit with glass balls, which the townspeople fell in love with at first sight. This is how the first Christmas balls appeared, which we still use to decorate our homes with pleasure.
1. Glass ball decor

Necessary materials: transparent ball made of plastic or glass, filler of your choice, loop and ribbon for bow
The easiest way to create a unique decoration for a Christmas tree is to buy transparent Christmas balls for decor made of plastic or glass (for example, at ozon.ru) and fill them with tinsel, moss, large beads, paper stars, feathers, small cones, fir branches. We make a loop of ribbon, twine or thick thread and decorate the metal hat with an elegant bow.
2. Decor with acrylic paint and marker

Necessary materials: transparent glass ball, acrylic paint and a marker for glass and ceramics, a plastic bottle / cup
Hand-painting of New Year's toys is a real art. But the lack of art education does not mean that you should not take up paints or markers. To avoid uneven strokes and other problems, paint the Christmas ball ... from the inside. Yes, that's okay too. To do this, drop a little acrylic paint inside (it looks especially luxurious with sparkles) and twist the toy until you achieve the desired result.

Then turn it over, fix it on a bottle or glass (so that excess paint flows out) and leave it for a day. On the outside, you can draw something with a special marker or write wishes on next year... Voila! You are a brilliant artist who didn't even need a brush.
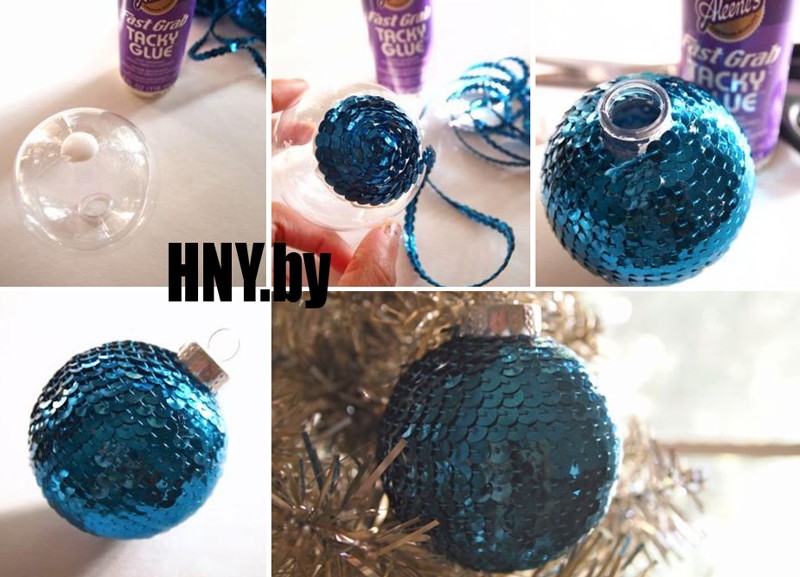
3. Decor with sequins and beads

Necessary materials: Styrofoam ball, sequins or beads, studs, polymer glue, fittings (metal ball cap and tape)
Balls decorated with sequins or beads will make any tree sparkle and shine in the light of the New Year's lights. Each sequin needs to be attached to a styrofoam ball with a sewing pin. To avoid gaps, pin with an overlap.

Working with beads is not much more difficult. Here you can experiment and string several beads of different sizes on each pin at once. Then we glue the fittings, make a loop and hang our beauty on the tree.
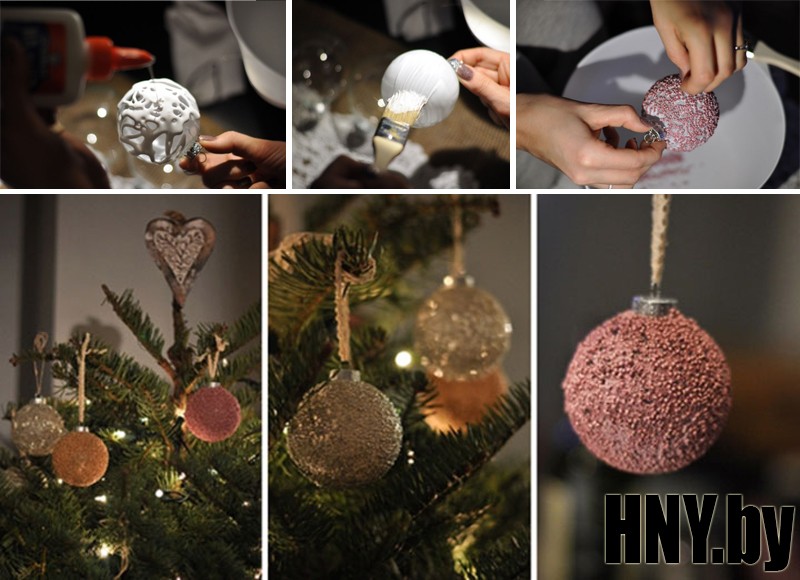
4. Lace decor

Necessary materials: foam ball, lace details, PVA glue, acrylic paint in two colors, sponge, polymer glue, accessories
To make an exquisite vintage Christmas tree ball, glue the lace details to the base using PVA glue. Then paint it with acrylic paint, first in one color and then in another. It is advisable to choose a contrasting pair: for example, white and bronze. Finally, we go over the surface with a sponge to create the effect of aging, and attach the fittings. It seems to us that such a ball is a great addition to a gift.
5. Ball of thread, rope or twine

Necessary materials: balloon, thick thread, rope or twine, PVA glue, container for glue, polymer glue, accessories
You can even make stylish balls for the Christmas tree using simple scrap materials. To do this, tie a balloon and cover it with PVA glue. At the same time, we prepare a thick woolen thread or twine: pour glue into an unnecessary container and leave the rope there for about 15 minutes.

Then we randomly wrap an inflated ball with it and dry this unusual design for 8-10 hours. Then we pierce - we have a hollow ball of ropes. You can glue fittings to it, decorate with sequins, beads, rhinestones or cover with spray paint. A simple but sophisticated decor item is ready.
6. Decor with acorns and cones

Necessary materials: foam ball, natural materials(cones, acorn caps), acrylic paint, wire cutters, polymer glue or glue gun, accessories
Cones, acorns and other gifts of the forest are associated with nature. Why not use them instead of endless plastic and other artificial materials to decorate your Christmas tree balls? For example, you can paint a toy with brown acrylic paint and use a glue gun to decorate it with acorn caps. Another option is to glue the ball with separate scales or the tops of the cones. So you will not only have a good time and, but also become a little closer to nature.
The symbol of the New Year is a fir tree with lights and balls. Did you know that balls can be made from threads, felt, sequins, discs, and even with a citrus scent? Decoupage technique can update even the most ordinary-looking toy. About ideas that you did not even know about, further in the article with a detailed description.
Basic moments
Absolutely any materials are suitable for needlework:
As a basis, you can take a foam sphere or a simple christmas ball ik made of plastic without decorations. We bring to your attention several master classes on making Christmas balls. They can not only decorate the Christmas tree, but also create a festive interior in the house.
Christmas balls made of threads
Balls made of threads look very gentle and impressive, casting a festive and romantic mood.
For work you will need:
- round balloon;
- PVA glue;
- thick threads (light shades);
- needle;
- scissors.
Operating procedure
Inflate to match the desired size of the future toy. We tie it tightly so that it does not go down ahead of time. We massage with our hands, giving it the correct round shape.
We pass the edge of the thread into the eye of the needle, from which we will make the decoration. We pierce the plastic bottle with glue with a needle and thread it through. The thread, passing through the bubble, will be evenly covered with PVA, which eliminates the need to additionally open all the threads with glue.
It is better to use PVA glue undiluted, otherwise the ball will not keep the desired shape.
Now we pull the thread through the glue and at the same time wind it in different directions, as if we were winding the threads into a ball. We turn the ball intensively in our hands, trying to tightly wind the thread. In the place where the air is tied, we slightly reduce the tension.
We wind the thread to the desired density. Cut the thread, and form a loop at the tip. We leave the workpiece in a dry warm place until the glue is completely dry. You can speed up the drying process by using a hair dryer.
When it becomes completely dry, pierce it and gently pull it out.
We tie a thread or decorative ribbon to the loop and decorate the Christmas tree.
Optionally, you can add sparkles, beads, sequins or other decor to the toy made of threads. A composition of several different diameters looks especially beautiful.
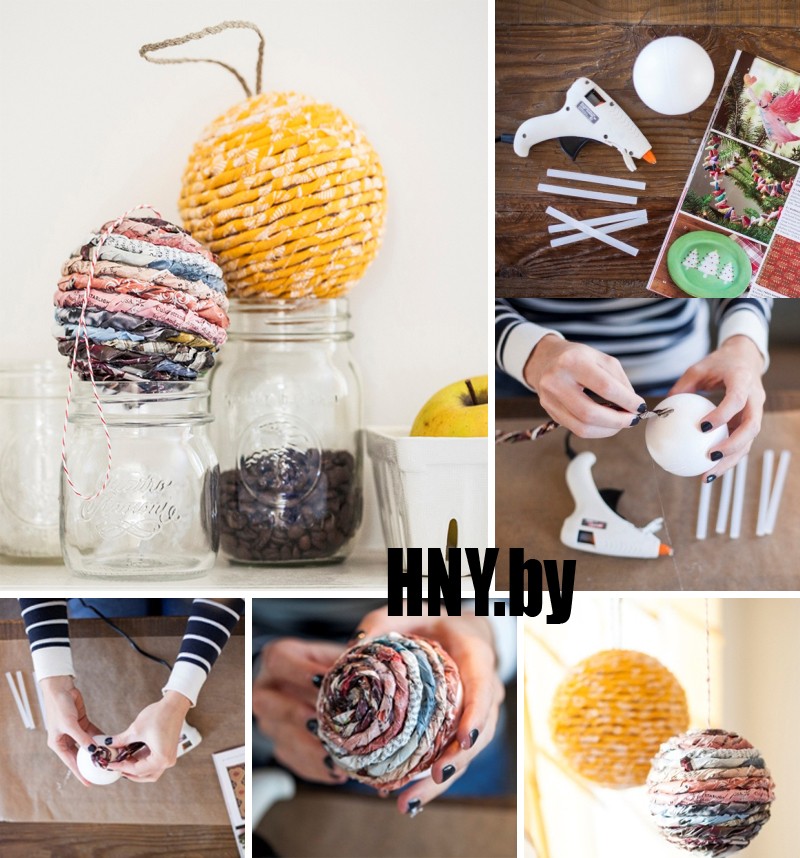
From newspaper tubes
Quite a simple but time consuming manufacturing method.
For work you will need:
- foam blank ball;
- polymer glue;
- old newspapers;
- scissors;
- decor elements (beads, sequins, ribbons).
Operating procedure
The most time-consuming stage is the twisting of flagella from old newspapers. We try to twist the harnesses tightly. If you need a long tourniquet, then glue several short ones together.
In the center of the workpiece we attach the end of the flagellum... Now we begin to lay the tube tightly, securing each new turn with polymer glue. The end of the tube is also securely fixed with a glue gun.
As such, the product can be used to decorate festive decorations. Or you can go ahead and paint it with spray paints in any color, cover it with sparkles, beads, ribbons, etc.
Christmas decorations made of felt
In winter, you always want warmth and comfort, so felt are perfect for decorating your home for the New Year.
For work you will need:
- felt in two colors;
- foam ball;
- cardboard;
- pencil;
- scissors;
- decorative tape;
- pins-nails.
Operating procedure
First you need to draw and cut out two identical templates of a simple flower with five petals from cardboard. Only one template should be slightly smaller.
We apply the pattern to the felt, draw a pencil around the contour. We make large blanks from one color, and smaller ones from another. Depending on the diameter, we need from 20 pieces of blanks of each color.
Now we fold the patterns in pairs, placing the petals in a checkerboard pattern. Cut off about 10 centimeters of a thin decorative tape, glue its edges to the foam blank, forming a loop. Now tightly to each other, bending the top of the petals, attach each flower to the foam in the center with carnations.
The result is bright and soft.
From sequins
A truly festive sparkling ball can be made from sequins. This decorative material has a wide range. Sequins come in different sizes, shapes and colors.
Large sequins can be glued to any, without convex drawings with a glue gun. We apply glue to the ball itself, sequentially gluing sequins in a circle in a checkerboard pattern.
Try to block the holes for fastening on the sequins so that they are not visible on the finished toy.
For working with small sequins, the usual one will not work, but you will need a special foam blank of the required diameter. In the center of each sequin there are holes through which we will attach the sequins to the workpiece with special studs.
By combining various forms and sequin colors, you can create the most bizarre patterns. Your imagination or little helpers will tell you the design options.
The main thing is to fasten the sequins close to each other so that the white base does not show through (it is imperative to provide and fix the loop fastener).
Another option for decorating balls is sequin ribbons. We also glue them with hot glue, carefully placing the turns with a little overlap so that there are no gaps. You can make it solid or alternate turns of several colors.
A bow made of a beautiful iridescent ribbon will look beautiful at the base of the mount. The product will add charm, glued on top of a decorative beaded or twisted cord.
Decoupage technique
Festive ones made using decoupage technique look very elegant and cute. The technique is very simple, but it requires precision.
For work you will need:
Operating procedure
First you need to paint. Pour some white paint into the container, remove the top cap and start covering the surface with paint with a sponge. We put the finished one on a skewer and leave it to dry, putting the structure in a glass.
In order not to throw away paint residues, you can make several balls at once. The pattern can be matched with different new year characters: gnomes, fairies, Santa Claus and Snow Maiden, angels, deer, etc.
With an interval of 1 hour, apply two more layers of paint to completely cover the color of the base. While the paint is drying, we are preparing napkins for decoupage. We iron them with an iron, unfold. Carefully tear off the necessary fragments with drawings on the napkin, remove the thin top layer with the image.
Pour a little PVA into a small container, dilute it with water in a 1: 1 ratio. We apply one of the fragments to the ball, we begin to glue it with a fan brush, starting from the center to the edges of the picture. We try to smooth out all the wrinkles to get a flat surface. Thus, we glue all the desired fragments on the ball, moving in a circle.
Ready to dry completely, put on hats with strings. We open with acrylic glossy transparent varnish in 3-4 layers. While still wet, the varnish can be sprinkled with sparkles for extra shine.
From CDs
If damaged or no longer needed DVDs are lying around at home, they can be successfully used to prepare for the New Year.
For work you will need:
- transparent ball on the Christmas tree;
- hot glue;
- scissors;
- satin ribbon or a piece of brocade;
- old disks.
Operating procedure
Cut the discs into small pieces of different shapes with scissors.
We take a transparent Christmas tree ball, apply a drop of glue, glue a piece of the disc on this place with the iridescent side outward. Thus, we create a mosaic of iridescent pieces, leaving small gaps between them.
Remove the hat, push a piece of brocade or a piece of bright satin ribbon through the hole inside the ball, put the hat back in place, hang the ball on the tree.
There is another way to use old discs for decorating Christmas tree decorations. V In this case, a crumb of discs is used.
To obtain crumbs, grind the disks cut into pieces in an old unnecessary blender, sift through a sieve. The shine will be sifted, and all the plastic will remain in the sieve.
Now we coat the round blank with glue, dip it with its entire surface in the resulting shine. After the glue has dried, brush off all excess gloss with a brush.
With citrus and clove aromas
Each holiday is accompanied by some kind of aroma. New Year is the smell of citrus, pine needles and mulled wine with cloves and cinnamon. To maintain the atmosphere, it is imperative to hang fragrant balls from dried oranges or lemons on the Christmas tree.
True, such jewelry will last no more than one season, and for next year will have to make new scented balls.
For work you will need:
- orange (lemon);
- toothpick;
- cloves and cinnamon sticks;
- ribbon;
- wide elastic band.
Operating procedure
We put an elastic band on the citrus so that it tightly wraps around the fruit. Now we make holes with a toothpick where we will attach the carnation buds. Now we loosely insert a carnation bud into each hole we make.

Today, on store shelves, you can find a huge number of a wide variety of Christmas tree decorations, so it will not be difficult to turn an ordinary Christmas tree into a real festive beauty. However, New Year is a special day! Day when old year remains behind, and new adventures, new events, new victories await ahead. But after all, the old year did not pass without leaving a trace, warm memories, bright events, your personal victories and achievements remained from it. It would not be bad to remember the passing year for many years. And you can do this with the help of a DIY Christmas ball. Each time you decorate a Christmas tree, you will get Christmas balls out of the box, and with them remembering the past.
Making Christmas balls with your own hands is quite simple: for this you need inspiration, a desire to create and a little perseverance. We have prepared for you 15 DIY master classes for making Christmas balls.
To make such a ball, you will need: a simple glass or plastic ball, old CDs, scissors, tape, glue.
# 2 Christmas ball with fingerprints. We decorate Christmas balls in an original and simple way
To make such a masterpiece, you will need: a glass or plastic ball without a pattern, paints (watercolor, gouache, acrylic), felt-tip pens or markers, brushes.

# 3 Christmas ball made of paper tubes. Manufacturing master class
To make a New Year's ball from paper tubes, you will need: a foam or plastic ball, glue, thin paper, threads.
# 4 Christmas ball made of sequins. Step-by-step master class
To make a New Year's ball from sequins, you will need: a foam, plastic or glass ball, a ribbon with sequins, glue.
# 5 Do-it-yourself fragrant Christmas ball
New Year is a holiday of smells! Why not add some flavor to your Christmas tree? To make such a ball, you will need: an orange, lemon or any other citrus fruit, ribbons, a wide elastic band, a toothpick, New Year's spices (cinnamon, cloves, etc.).

# 6 New Year's ball from old newspapers
Christmas balls decorated with old newspapers look very original. To do this, you will need: a foam or plastic ball, newspapers, glue, masking tape, thread, paints, felt-tip pens or a gel pen.

# 7 Christmas ball decorated with felt. We make decorations for the Christmas tree with our own hands
To create an original Christmas ball, you can use pieces of felt or other fabric. To create such a ball, you will need: a ball (plastic or foam), felt or other fabric of several colors, glue, thread, scissors.

To make a New Year's ball from fabric, you will need: a foam ball, fabric of several colors, safety pins (a lot!), Beads, scissors, glue.

# 9 Christmas ball made of patches
If you want to make an original New Year's ball with your own hands, then pay attention to the patchwork ball. To do this, you will need: a foam ball, a stationery knife, fabric of different colors, a felt-tip pen, a tape measure, glue, safety pins, a wooden skewer or a toothpick.

# 10 DIY Christmas ball made of threads
The New Year's ball made of threads is incredibly popular among needlewomen. To make it, you will need: a balloon, threads, PVA glue.

# 11 Christmas ball decorated with stained glass paints
Excellent Christmas decoration can be done with stained glass paints. To create such a ball, you will need: a glass or plastic ball, stained glass paints. You can do it in several ways: draw directly on the ball or make preliminary blanks, and then glue them onto the ball.


# 12 Christmas ball made of cord and beads. Do-it-yourself Christmas balls
To make such a New Year's ball, you will need: a foam or plastic ball, cord, beads, glue.

# 13 Button Christmas ball. Decorating a Christmas tree with children
Even the smallest residents of the house will be able to make a New Year's ball from buttons. For such a craft, you will need: a foam ball, multi-colored buttons, glue, thread.

# 14 Christmas ball with beads
Balls decorated with beads look very nice on the Christmas tree. You can decorate the ball with beads from the outside or from the inside. Which of the ways to choose is up to you, but we, for our part, will notice that the external decoration may crumble after a while. In any case, you will need: a plastic or glass ball, glue, beads.
# 15 Decorating a Christmas ball with cloth or paper
If there is very little time left, and you really want to decorate the balls, you can use a very simple and original technique: decorating the ball with wrapping paper or fabric.

# 16 DIY Christmas balls using decoupage technique
If you want to make a truly unique New Year's ball, then it's time to master decoupage. To make a New Year's decoupage ball, you will need: a plastic ball, themed napkins, white acrylic paint, PVA glue, acrylic decoupage varnish; fan-shaped brush, foam sponge, sequins for decoration.

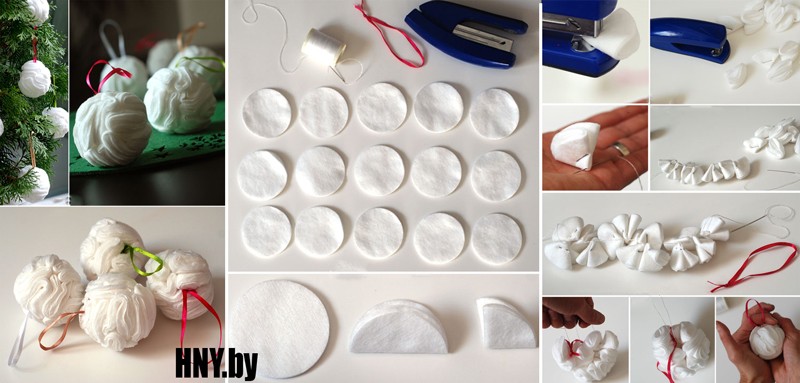
# 17 DIY Christmas balls from cotton pads
An excellent option for a New Year's ball would be a toy made from ordinary cotton pads... To make it you will need: cotton pads, stapler, needle, thread, tape.