Sculpting helps children develop fine motor skills and imagination. And this contributes to the formation of speech, attention, coordination and visual memory... A wide variety of figurines can be made from plasticine. Very often they are cartoon characters. These can be cats, dogs, ponies and others.
One of the children's favorite cartoons is Pony from Ponyville, whose characters are charming little horses with a bright long mane and tail. It is not always possible to collect a complete collection of such animals, but the child himself or with the help of his parents will be able to make a horse from plasticine.
How to mold a plasticine pony
Both girls and boys will want to learn how to sculpt ponies from plasticine. Each child will be interested if he is given the opportunity to mold an animal from plasticine himself, and then name it. There is no need to make a horse one to one like a cartoon character. You can pick up color range at your discretion.
Materials required for sculpting
To make a pony from plasticine, you will need the following:
- Plasticine, preferably wax. You can take any other mass for modeling.
- Stack.
- Sticks for making legs.
- Oilcloth or special board for modeling.
The procedure for making crafts
Basic rules must be followed sculpting techniques to understand how to make a pony with your own hands. The creative process will help your child learn to match colors. For example, you need to choose such shades for the elements of the craft, so that they match the color of the body. You can use a color matching card.

The craft is ready. The child can boast that he now knows how to make a plasticine pony. You can make such animals on weekends or, for example, on rainy weather when there is no desire to go out. It is easy to blind from plasticine not only ponies, but also other cartoon characters.
Maya the bee
Many children are very fond of the funny Bee Maya. It will be interesting for them not only to watch the cartoon, but also to mold a bee from plasticine.

The result is an amazing Maya bee, which everyone will make, having mastered the procedure for performing the work step by step.
Princess figurine
Princesses are the main characters in some cartoons. Her fairy-tale world has opulent castles, balls, and many stunning dresses. A charming princess can be molded from plasticine. For manufacturing, you will need the following:

 Before you mold a princess from plasticine, you need to form the frame of the dress and the corset from the mass of pink. To do this, roll a third of the bar into a ball, and form the frame of the dress in the form of a cone from the remaining part. Connect the resulting parts together using a toothpick. In this case, the rounded part should be located on top, this will be a corset.
For skirt decoration to dazzle lush ruffles. Roll sausages from the lilac and pink mass and divide them into several pieces. Turn each part into a sausage again, flatten it slightly and stick on the frame. In this case, the shades of the material must be alternated. You should get voluminous folds.
At the junction of the corset with the skirt, lay a yellow plasticine ribbon. Tighten the ends of the tape, and fasten the bow in the central part.
The neck and head of the princess are attached to the body (it is also a corset).
For the manufacture of hair will fit brown mass. First, decorate the face with strands, and then the crown.
Make eyes from black material... Glue them into the previously prepared pits on the face.
Then add handles to the figurine. Sculpt the sleeves from pink mass, and the handles from beige. Connect the details and attach to the body of the princess.
Make a crown from a piece of yellow plasticine. To do this, roll out the cake and cut out a strip with cloves. Connect the strip and turn out the cloves a little, decorate the ends with beads.
Decorate the dress with beads too. You can make earrings from two identical beads.
Using a skewer, draw the mouth, hair and patterns on the dress. The plasticine princess is ready.
Pony from mastic
Characters from the cartoon "My little pony" will be a wonderful decoration for a birthday cake. It is not difficult to make a little pony from mastic, a master class will help you learn this. You need to prepare:
- Balls of mastic: three pink, one purple or purple, two black and two white.
- Toothpick.
- Water to wet your fingers.
 The pink ball is used to form the horse's head. Need to sculpt nose, ears and mouth.
Make a torso from the second ball of the same color, and from the third make legs widened downwards. The hooves do not need to be sculpted.
Attach the legs to the body, rubbing with your fingers the places where the joints of the parts are visible. Fasten the head to the neck, then to the body using a toothpick.
Make eyes from white balls. Stick circles of a dark purple hue on them, and place black dots in the center, you get pupils.
For the formation of the tail and mane, take the purple mass. Use a toothpick to give a textured surface that resembles wool.
From the remaining mastic, make accessories in the form of hearts and flowers for decorating the cake. Similarly, you can make a pony figurine from other colors. It will look more realistic if you attach the horse's brand name to the side of the horse.
Why are modeling lessons useful?
 In addition to plasticine, you can sculpt crafts from polymer clay... Its peculiarity lies in the fact that it is used for sculpting small figures. This material is suitable for creating decorative ornaments.
Modeling contributes to the correct development of speech and construction logical conclusions in the child... Learning the basics of art helps to develop imagination and Creative skills other directions.
By building the order of modeling work in stages, the child learns to plan, correctly distribute his funds and forces. You can ask him to orally reproduce the sequence of making a pony or any other animal from plasticine. It is important that in the process of creating a sculpture, children do not lose sight of small details.
If you take a softer mass, then a child can be sculpted from 1 year old.
Attention, only TODAY!
Many girls will be interested in how to make a pony from "Friendship is a Miracle" from plasticine. Multi-colored ponies are known to several generations of children: the first figures and dolls were produced back in 1983. They were followed by coloring books, educational games, short and full-length cartoons. At present, the animated series "Friendship is a Miracle" is being broadcasted and filmed.
The main characters of the animated series are colorful funny ponies from the My Little Pony franchise. Each of the heroes has its own color and unusually lush mane and tail. Some of the characters also have wings and horns.
We sculpt cartoons
Let's consider how to make the characters of the cartoon "Friendship is Magic" step by step using the example of three characters: Pinkie Pie, Apple Bloom and Rainbow Dash.
Pinkie Pie is the main character of the cartoon. To create a figurine, you will need the following materials and tools:
- plasticine of pink, purple, white, black and blue;
- stacks;
- modeling board.

Progress:
- We make blanks for all parts of the body: we form nine balls from pink plasticine - four identical average size(we roll cones out of them), two large and three small;
- Roll a large ball for the mane and tail from purple plasticine, and small balls from white, blue and black;

- We begin to sculpt the body: draw out one of the large pink balls, roll it up and attach a small ball, smooth it out, forming the neck;

- Smoothing, we glue the cones - legs to the body (we make sure that they are on the same level);

- We sculpt the head from the remaining pink balls: lengthen the large ball, form the muzzle, sculpt triangular ears from the small ones and attach them on the sides to the head;

- We connect the head with the body and smooth the seam;

- We put the pony on its feet (the figure should not fall) and slightly bend its hind legs;

- We make a tail and a mane from purple plasticine: we divide the ball in half and form a wavy mane from one part (it resembles a mustache), and from the second - a wavy tail (like the letter "M");

- We attach the mane: one end of it should clasp the head, and the other rests against the back;

- Attach the tail and smooth the seams;

- We make the eyes: we roll two cakes of white, blue and black plasticine and put them on top of each other;


- We glue the eyes and make the mouth in a stack.

The pony is ready!

Apple Bloom is a red and yellow pony. To create it you will need:
- red, yellow, black, brown and white plasticine;
- matches;
- instruments;
- modeling board.

How to sculpt:
- Roll a ball out of yellow plasticine (about 1/5 of a bar);

- Form a muzzle: pull the ball forward from below, stretch the ears from above on the sides, make a stack of the mouth and nostrils;

- Make eyes: form two identical cakes of white plasticine, glue a slightly smaller cakes from brown plasticine on top, then even smaller ones from black, add cilia and glare from small balls of white plasticine from black sausages;


- Divide the remaining yellow plasticine into approximately two equal parts;
- Roll a ball from one part and pull it into a cone;

- Bend the narrow end up and insert a match into it for the future fastening of the head;
- Divide the remaining plasticine into four equal parts and roll the balls;

- Make cones with a flat base from the balls;

- Attach the legs to the body and flatten (for greater stability, you can stick matches in them);

- Attach the head;
- Roll several sausages out of red plasticine and make bangs out of them, and then a mane;
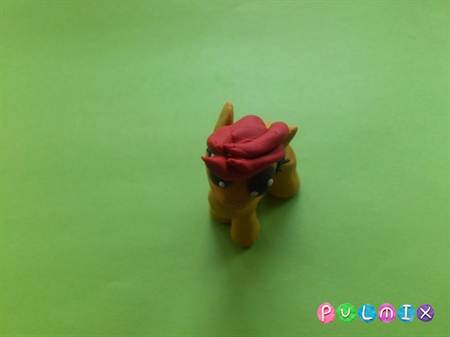

- Make a fluffy tail from the remnants of red plasticine (twist and stretch at the ends) and attach to the pony (used as a support).


Rainbow Dash is a flamboyant character.
To create it, it is better to take a whole pack of colored plasticine with rainbow colors.

In addition, you will need:
- stacks;
- matches;
- modeling board.
How to sculpt:
- We make the head: we roll two balls (large and smaller) from blue plasticine;

- We glue and smooth the balls so that we get an elongated muzzle, we make a mouth and nostrils in a stack;

- For the eyes, we make a stack of notches and form cakes from balls of different sizes and colors (black, white, purple);

- We collect the eyes in the following sequence: glue large black cakes in the recesses, on top - white, then purple and again black;
- We decorate the eyes with white highlights and cilia;

- We make triangular ears from two small equal balls and attach them to the sides to the head;

- We make the body: we roll the cone out of blue plasticine and wrap the end up;

- We make legs: we roll four equal balls, form cones from them and insert matches into three of them;

- We attach the legs to the body (bend the front leg without a match and smooth it to the body);
- We attach the head;

- We make bangs, a tail and a mane: we roll up sausages of all colors of the rainbow and collect in rows in bunches;

- We attach the "hair" to the pony;

- We make wings from blue plasticine: we roll up four cakes (two large, two small), pull it out, put it together and process it with a stack;
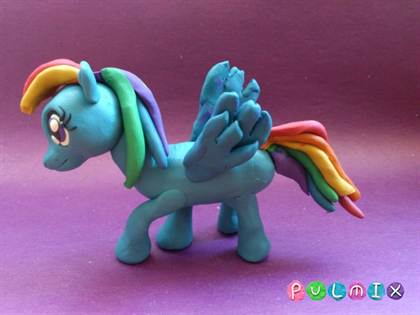
- We attach the wings to the back;

- Roll a thin sausage from pieces of red, yellow and orange plasticine and make a zipper, attach it to the side.

The winged pony is ready!
You can see how to make other ponies in the video selection.
Related videos
Creating various figures from plasticine mass is a great type of creativity for kids. different ages... Most of all, kids love to create all kinds of animals with their pens. Therefore, today we have prepared another interesting lesson on sculpting a funny animal - a little pony. Children are very fond of these animals, and because of them characteristic feature- small in stature, absolutely not afraid to contact them. If the kid saw a pony not only in cartoons, but also in reality, then this will help to observe all the proportions of this mini-horse in modeling.
To create a pony, prepare:
- plasticine;
- stack;
- skewer;
- a toothpick or piece of wire;
- brush.

How to make a plasticine pony
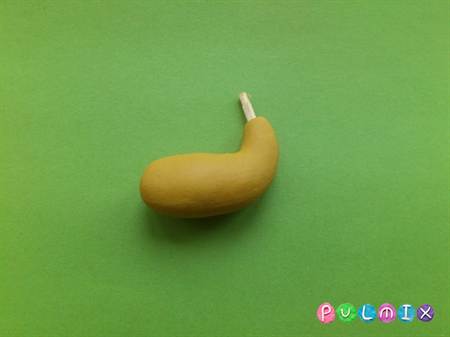
Step 1. Choose the main color for creating a pony at your discretion. We decided to use brown tone plasticine. We start sculpting the animal by creating a head. We roll a small piece of mass into a ball. Then we give it an oval shape. Press one side of the workpiece a little. 
Step 2. Next, we sculpt the legs. We roll up four mini-balls. 
We give all the blanks a conical shape. We glue the four legs together. 

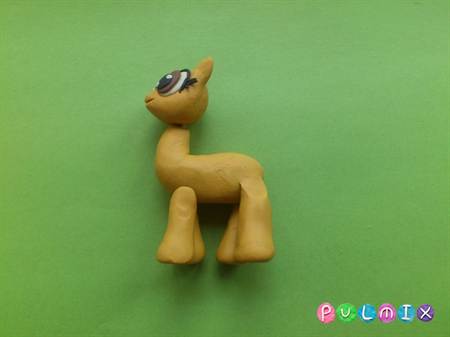
Step 3. From above we attach an oval body to the structure. 
We fix the head on it with a piece of wire or a toothpick. 
The pony's legs are short, so if they turned out to be too long, then they need to be shortened. Just cut off the bottom of the parts with a plastic knife.
Step 4. From pale orange plasticine create a bangs, a mane and a lush ponytail. 

The mane and tail can also be created from thin sausages gathered in bunches. Or make from three thick sausages, which can later be braided into a pigtail.
Step 5. Let's make the hooves out of mini-balls. 
We attach them to the legs and flatten them. We make small cuts in a stack. 

Create cuts along the edge of the brown legs. 
Step 6. With the back tip of the brush, mark the grooves for gluing the eyelet. 
First we glue the white balls, then we attach the green and black balls to them. 
Step 7. Draw a simple texture with a skewer on the mane, ponytail and bangs. 

With the creation of texture, the child can safely experiment and come up with a unique way of processing these details of the craft.
Everyone is familiar with the cartoon about bright ponies "Friendship is a miracle". Cartoon characters are no less popular. The most important character is considered the pony Pinkie Pie, who introduces everyone to her world. Therefore, we will analyze how you can make this horse using plasticine. Such lessons are very exciting for the child, in addition, they help to develop fine motor skills of the pens. When preparing for modeling, you can prepare your colored plasticine together with your child, which will not harm the baby's health in the process.
Materials you need:
- Simple plasticine.
- Board for work.
- Sharp plasticine knife.
- Stacks.
- Napkins.
First, we will prepare everything you need for the work process. We need a huge ball of light pink plasticine, a small dark pink ball, tiny pieces of white, black and blue. Don't forget about the knife and the stacks. They will help when creating elements, for example, ears or manes. We will lay out everything that is needed on our modeling board or on a piece of paper so as not to stain the table.
How to blind a pony
Let's start our master class on making pony crafts.
- Parts.
Divide the light pink ball into 9 parts. The first 4 must be the same size. We create cones from them. Let's make two more medium-sized balls and three small balls.
- The torso.
From one huge and one small ball we blind the body of a pony. It is round, from one part of the body ends in a triangle - the neck. Let's create a neck from a small ball. Having connected the elements, smooth out the irregularities using a stack.
- Legs.
Let's turn the body over so that the neck moves up. Attach two cones to the lower part on the left. They should expand slowly and evenly, so do not press them too hard against the body. Attach the remaining legs with right side... Remember to keep your feet on the same level. Then you need to smooth the connection lines with a stack.
- Head.
Let's make the head with the last light pink balls. We will lengthen the huge ball, creating a muzzle. Create ears in the form of triangles from small balls and connect them to the head.
- Attaching the head to the torso.
Now we attach the horse's head to the body. This must be done correctly so as not to spoil the appearance of our elements. The head does not need to be pressed firmly, otherwise the neck will become too short.
- The main part of the figure.
At this stage, let's check Pinkie Pie's torso. Let's put the horse on the table.
- Creation of a mane.
For now, let's leave the ponies and start creating other elements. We need a dark pink ball of plasticine. We will divide this ball into two particles. One will be larger, we will sculpt a mane from it. We make a mane from one ball. It looks like a curled antennae, only the left particles are shorter, as it will be Pinkie Pie's bangs. The right particle should be the same length as our neck.
- Creation of the tail.
Let's turn the second ball into a tail. It will turn out to be wavy, bend it twice. The first bend is larger than the second.
- Joining the mane.
Attach the finished mane to the head. The lower part of the mane will be on the back. You can press down a little so that the element is well secured.
- Attaching the tail.
We attach a ponytail to the body of the product. These elements should not be smoothed, as the colors of the product will mix completely.
- Creation of eyes.
Let's get down to the last thing - the eyes. Divide the white ball into two particles and create small cakes out of them. We will also divide the blue ball into two parts. These cakes should be smaller and fit on white plasticine. White tint should be clearly visible... Put very small black cakes on the blue plasticine. The eyes will then turn out to be large.
- We attach the eyes.
Attach the eyes to the left and right on the head of the product. Use a knife or a stack to create Pinkie Pie's nose and mouth. We do it slowly so as not to ruin the head of the toy..
- Ready product.
Pinkie Pie is done... Let's check the connection of the elements again, in particular the peephole, mane and tail. By the same principle, you can fashion a pony Sparkle or Rarity step by step. If you want to watch a master class on modeling these particular ponies, you can easily find video tutorials on the Internet. And by the way, the ability to sculpt ponies from plasticine can be useful to you in cooking - if you want to gradually sculpt pony figurines from sugar mastic to decorate a cake at a children's party.
Gallery: plasticine ponies (25 photos)


Plasticine rainbow
A plasticine rainbow can be made in the form of a colorful applique, because everyone knows that the elastic texture of the material helps to use it as paints.
To date, many kind and instructive cartoons have been created for kids, and "Pony from Ponyville" is one of them. Beautiful miniature horses fascinate with their bright color and fluffy mane. In today's lesson, we will try to make a pink figurine of this animal together with you. Invite your child to create such a miracle on their own, and after finishing work, he will name his craft. Naturally, instead of pink, you can use any other color, for example, blue. This master class will be interesting for both boys and girls and their parents.
1. So, first, decide what color your child would like to see new toy, made by hand. It can be pink and all shades close to it. If there is only one suitable block in the set, you can always add black to a small amount of the available material, knead it thoroughly and thus vary the saturation. On the other hand, a white base color will help create a light pink from a darker plasticine.
2. From the prepared block, mold the main details: an oval body, a tapered neck and a round head. Leave a little plasticine for sculpting the legs.

3. Attach the neck to the body with a wider area, smooth out all joints with your fingers.

4. Attach the head and mask the junction. Pull the front of the muzzle slightly forward.

5. For the strength of the limbs and economy of plasticine, use additional details. These can be matches, lollipop sticks, or a regular straw. Cut the tube into four segments. Start sculpting plasticine on it.

6. Treat all legs in the same way. Do not cover the upper part of the tubes with plasticine, because they will still need to be inserted into the body. Make hooves out of dark pink or purple.

7. Attach four legs to your torso.

8. Place on the face big eyes with cilia, cut the mouth with a spatula, mark the nostrils with a rod, and place sharp ears on the crown of the head.

9. Roll into oblong thin sausages from pink, slightly different in saturation.

10. Divide the sausages into segments and pin in place of the mane.

11. From the remaining parts, make a fluffy ponytail.

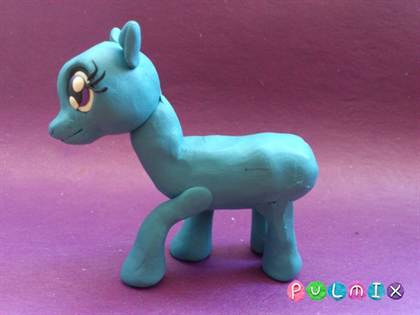
The final view of the craft.
The plasticine pony is ready. Now the child has a toy that he can brag to his friends, because he made it himself and from now on he knows how to mold a pony from plasticine with his own hands. Pay your attention also to the crafts of animals made of plasticine or to interesting crafts by February 23rd.