Evgenia Smirnova
To send light into the depths of the human heart - this is the purpose of the artist
18 Mar 2014
Content
Compared to other types of handicraft, papier-mâché stands out for its versatility and originality. Now you will learn what the rules are for making papier-mâché and how to make simple but very beautiful things from it.

To make a souvenir, gift or just a useful thing, you don’t have to be a master of pottery. You can stock up on plenty of scrap paper and start creating. We will now look in more detail at how to make papier-mâché from what is at hand. Thanks to these recommendations, you will easily learn all the intricacies of this matter, understanding the main difficulties and nuances.
History of papier-mâché
Papier-mâché is a homogeneous mass created from paper waste with the addition of any adhesive. Translated from French, this name translates as “chewed paper.” This composition was first used in the 16th century in France. Even then, paper dolls became incredibly popular. In Russia, papier-mâché appeared only under Peter I, and its industrial use began at the beginning of the 19th century.
A huge number of products are made from papier-mâché. Thanks to their composition, they are particularly light but durable. If initially the mass was used only for creating dolls, then later it began to be used for making dishes, souvenirs, masks, toys, and decorative elements. But papier-mâché is especially indispensable in theatrical art, where dummies and theatrical props are made from it.
Methods for creating paper pulp
Today there are only three ways to create a mass of papier-mâché:
- The simplest is layer-by-layer technology. Small pieces of paper are placed on a pre-prepared mold made of clay, plaster or other material. In some cases, the number of superimposed layers can reach up to a hundred. As a rule, for this purpose several strips are cut and placed on top of each other in different directions.
- It is especially important that the strip is coated with glue on both sides, which will subsequently ensure the strength of the finished product. As soon as the first layers of 3-4 pieces are created, it is necessary to thoroughly dry the product. Only after this they continue to work, drying every 4 layers. Further work directly depends on the purpose of the craft.
- A more ancient method is the production of papier-mâché from paper pulp. To do this, you need to tear newspaper or other paper into small pieces and soak hot water for 8-10 hours. Next, heat the mixture to break down the fibers. Using a colander, drain the water and grind the paper into a homogeneous mass (with a mixer or blender). Add paste or glue to it, depending on the chosen method. The result is a homogeneous mass, which is as easy to work with as with plasticine.
- The third method is more complex and is often used in industrial settings. Sheets of cardboard are placed on top of each other and coated with adhesive, after which they are pressed. As soon as the workpiece dries, it is sanded and painted. This technique produces flat elements that require special strength.
How to prepare material for working with papier-mâché
Any instructions regarding the creation of papier-mâché begin with the preparation of the necessary supplies. First of all, it is paper. For the first time, use newspaper. It gets wet easily and ready product will be especially durable. It’s just as easy to work with regular toilet paper or napkins. In addition to the above, egg cartons, cardboard, including corrugated cardboard, and other similar paper products are suitable.
Ready-made glue is used as an adhesive composition. As a rule, it is PVA diluted with water in a 1:1 ratio. At home, starch or flour can be used to prepare the paste. The density of the composition depends on work experience and the type of product being manufactured.
In addition, you will need a base or mold for modeling, with which you lubricate its surface with vegetable oil to prevent the mass from sticking to the mold, acrylic paint and varnish. With absence special paint You can mix gouache and PVA glue in equal parts. This composition is easily washed off from the product when it has not yet completely dried, and after complete drying it does not smear even when applying subsequent layers or varnish.
Before you work on paper, you need to prepare a paste. To do this, boil a small amount of water. In a separate bowl, mix 2-3 tablespoons of flour or starch with water until smooth. Pour this mixture into boiling water in a thin stream and heat until thickened. The more starch or flour you add, the thicker your paste will be. It is much easier to prepare glue. To do this, pour the required amount of glue into a separate container and add the same amount of water, stirring thoroughly.

The selected material (newspaper or paper) must be crushed. This work is painstaking, but the further process will depend on how finely you tear the paper. The pieces need to be poured with hot water and allowed to stand for several hours. After this, drain the water and use a mixer to grind the paper into a homogeneous mass. If the mixture is too liquid, simply drain it in a colander and squeeze out the excess water. A similar technique can be used no matter what material you use.
The resulting dust must be mixed with glue to form plasticine and allowed to rest. If you do not plan to sculpt immediately after preparation, you can store the mixture in a tight bag in a cool place. For those who do not fully understand the features of preparing the mass, we recommend watching the video lesson.
To make the product especially durable, do not be lazy to make more layers. This is especially true for masks and plates. While working, you need to wear gloves to avoid contamination of your hands, otherwise the glue and paste will dry on the skin and the product will begin to stick to your hands.
Experiment with the materials you use. Gradually you will find what you are more comfortable working with. Be sure to cover the base with oil, otherwise after drying you simply will not be able to remove the workpiece from it. It is especially important not to cut the paper, but to tear it. This is the only way you can break the bond of the fibers, and the mass will be more homogeneous.
Important advice for painting papier-mâché items. If you plan to create white product, then you need to use white paper, and only for the last two layers. In other cases, you can simply paint the product in the desired color. But the varnish coating will protect the craft from moisture.
Be sure to cover the work surface, otherwise the glue will be difficult to clean off later. Do not rush to apply the next layers without waiting for the previous ones to dry. You also need to paint only after all layers have dried thoroughly.
Step-by-step instructions for making a papier-mâché plate

- Prepare a plate - it will be our base. It needs to be lubricated vegetable oil or Vaseline.
- If you use ready-made mass, then simply apply it to the plate in the required layer, carefully pressing it to the surface.
- When using strips, simply stick them in a chaotic order on a plate.
- We smooth the surface with fingers dipped in glue, creating a perfectly smooth surface.
- Let the workpiece dry for 2-3 days (depending on thickness).
- Carefully remove the plate from the mold and dry it in this form for another day.
- Next, we use paints or, as an example, a mixture of gouache and PVA glue. You can also decorate the product with decoupage napkins, craquelure varnish, or use other techniques for decoration.
- A day after applying the last layer, you need to coat the product with varnish on both sides and dry it.
- A hole is made with a thin drill (if it was originally planned to hang the plate on the wall).
Step-by-step making of a carnival mask from papier-mâché

- Let's prepare the form. This can be a ready-made plastic mask. You can also mold it from plasticine. It is especially easy to make masks using jars. To do this, a contour is drawn on the can, and a convexity of the nose and forehead is created from plasticine.
- After the surface is lubricated, apply the mixture and dry all layers.
- This work continues until the mask becomes durable. Be sure to follow the instructions for working with layered papier-mâché, otherwise if there is not enough glue between the pieces of paper, the finished product will simply crumble.
- Then the previous scheme is repeated: the mask is covered with paints, decorated with feathers, beads and other elements, and also varnished.
Making papier-mâché beads

- You can make beads of absolutely any shape. We need to determine what our product will look like. After this, prepare thin wire, pliers and scissors. IN in this case all steps must be performed as carefully as possible, since this depends on appearance of the entire product.
- Make the required number of elements from the papier-mâché mass: balls, triangles, ovals, and so on.
- Let them dry a little, but not completely. Using wire, we make loops and carefully insert them into the workpieces. Create the desired length and secure the lock.
In this way, not only beads are made with your own hands, but also bracelets, necklaces and even brooches. Look at the photo and choose the most attractive option for yourself. You can use your imagination.
See what papier-mâché dolls you can make using toilet paper. From the same material you will make a piggy bank, toys, and New Year's crafts.
How to make a papier-mâché piggy bank with your own hands?

You will make such a funny tiger cub if you take:
- two sheets of white paper;
- newspapers;
- plasticine;
- small polyurethane jar;
- PVA glue;
- scissors;
- paste;
- gouache;
- stationery knife;
- thin and thick brush;
- acrylic pistachio varnish.

Prepare the paste. To do this, take a glass of cold water, pour it into the pan, pour 2 tsp here. starch, stir well. Place the container on the fire, stirring frequently, bring the liquid to a boil, and remove from the stove. When the paste has cooled, it is ready for use.
Remove the lid from the jar, turn the container over, and place it on the table. Covering the jar with plasticine, immediately form the ears, eyes, paws, and facial features of the tiger cub. Here's how to make a piggy bank next.

Tear the newspapers into small pieces and start covering the workpiece with them. Attach the first layer with water. The remaining 10 layers need to be fixed by smearing each piece of newspaper with paste.

Leave the workpiece overnight to dry. In the morning, cover it with pieces of white paper, which must be attached using PVA glue, which will give the product strength.

Let the toy dry completely, then cut it stationery knife into two halves.
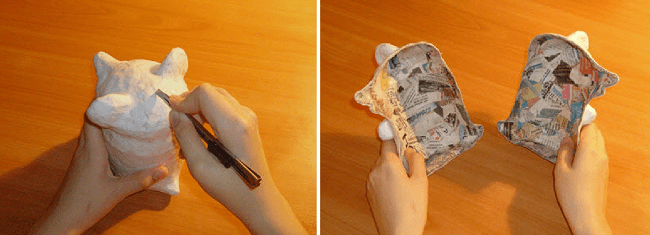
Remove these parts from the jar, connect them again, gluing them at the cut site with white pieces of paper greased with PVA.

At the top, use a stationery knife to make a cut of such a size that you can drop coins of the desired denomination into the piggy bank through this hole.

Now go over the outer surface of the piece with white gouache to prime it. When it dries, paint the product in the desired color.

Here's how to make a piggy bank from paper and newspapers. If you want to see how to make a funny pig, which is also designed for storing and multiplying small items, then check out the second master class.
This is how touching and at the same time funny the pig will turn out to be. To do it, use:
- inflatable ball;
- toilet paper;
- acrylic paints;
- construction PVA;
- foil;
- newspapers;
- toothpicks;
- acrylic putty.
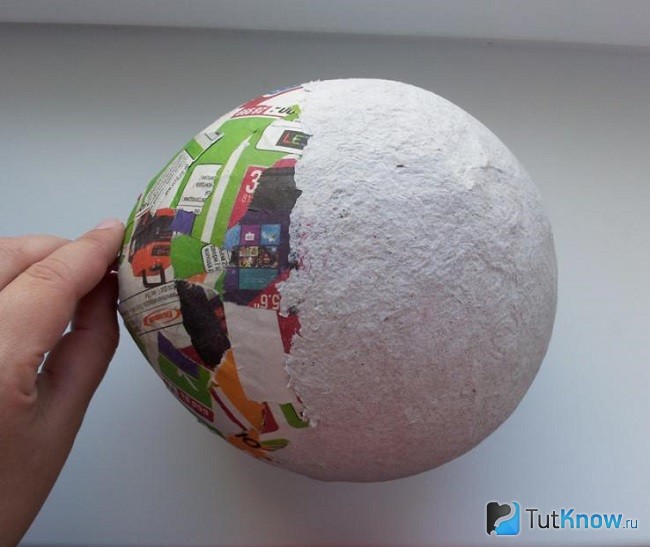
You can first moisten pieces of newspaper in water, then dip them in PVA, shaping the surface of the ball, and glue torn pieces of paper here.

We make a mass for papier mache, for this from toilet paper They tear off quite large pieces. Place them in a container to which you need to add PVA. After this, all that remains is to mix the contents well. Now, using a sponge or hands wearing rubber gloves, apply this mixture to the ball covered with newspapers.
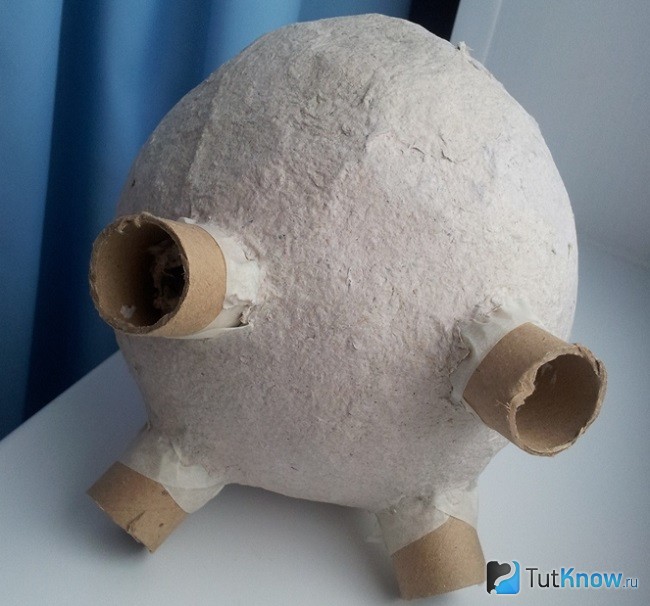
When it dries well, make a puncture with a needle. Take out the burst ball through the bottom hole. Cover the gap with two strips of masking tape, which are attached in a crisscross pattern. Legs for a piggy bank can be made from a reel left over from foil or stretch film. These cardboard tubes need to be cut into 4 parts with a knife. If you want, you can use toilet paper rolls.
These blanks need to be attached to the base with masking tape, and papier-mâché paste should also be applied on top.
Make a patch from a piece of foil, attaching it with toothpicks and tape. Cover it with toilet paper soaked in glue and form a nose.
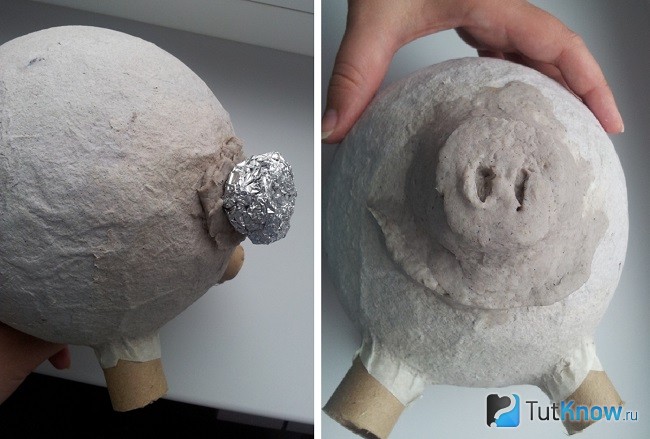
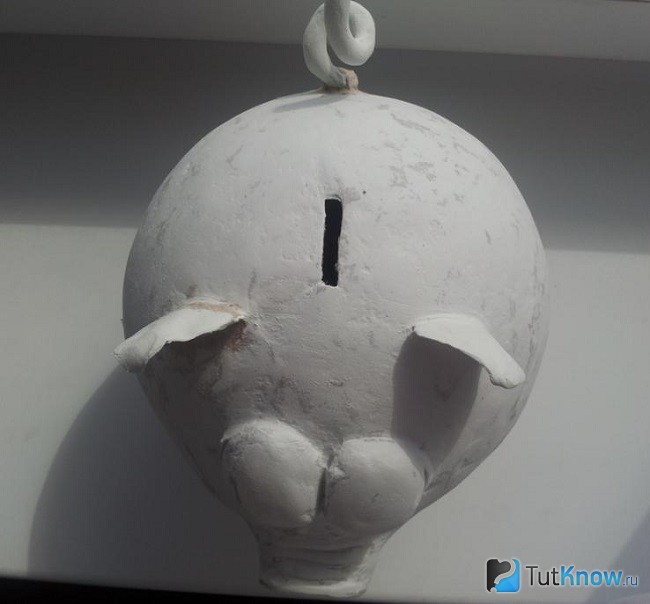
You will need to sculpt eyes from it and attach them in place with glue. Ears can be made from papier-mâché or clay

Now you need to leave the piggy bank so that the papier-mâché dries well. Then sandpaper We grind the workpiece, and then apply acrylic putty to it. We wait for it to dry, then wipe the piggy bank with a damp cloth to level the product. Apply putty in several layers until the surface is smooth.

Use a utility knife to make a hole for coins. We attach a tail, which must be made in advance from wire and papier-mâché.
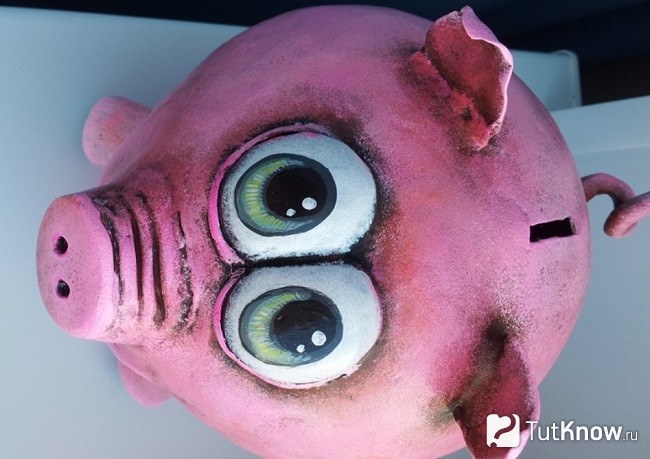
We begin to paint the product. First we apply any dark paint, then, using a sponge, cover it with red.

Next comes pink, followed by a mixture of white and pink. The next layer is white paint, but you only need a little bit of it.
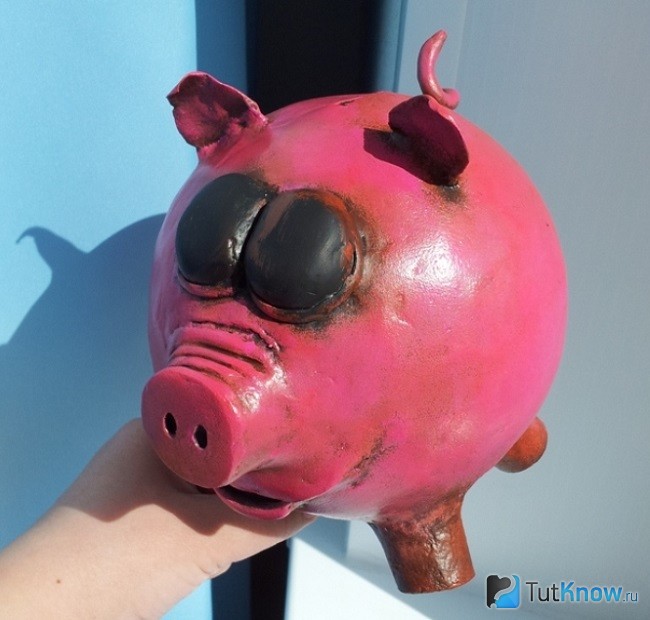
All that remains is to paint the eyes, after which the papier-mâché piggy bank is ready.
How to make paper modeling paste with your own hands?
The base is not always simply covered with torn newspapers; there are very interesting recipes for preparing papier mache paste. Meet one of them.
From such a mass you can make a figurine of an animal, for example, a bear. Take:
- 2 rolls of the cheapest gray toilet paper;
- 3 tbsp. l. linseed oil;
- 500 ml of universal or construction PVA glue of liquid consistency;
- 1.5 liters of water;
- gauze;
- large bowls;
- medium and fine sandpaper;
- colander;
- PVA glue.
Now you need to squeeze out the paper. To do this, place gauze folded in several layers on a colander, put a little mass here, some of the water will drain. Remove the rest by lifting the edges of the gauze and squeezing out the paper. Also squeeze out the rest, but do not dry it out, leave a little water.
Place all this paper in a large bowl, then add construction adhesive. Stir the mixture. This will be easier to do if you mix the paper and glue in small portions.
Add linseed oil, stir. It will allow the mass to become more plastic. Now you can sculpt from papier-mâché or put this mass into molds to make toy parts. You will glue using PVA, which is called “Moment joiner”.
When the papier-mâché blanks are completely dry within a few days, they will need to be sanded with medium, then fine sandpaper.

The finished product is primed and then painted.
Master class: DIY Baba Yaga's hut
It can also be made from a mass whose recipe you just learned or use another one. This is how the house of this fairy-tale character will turn out.

But for this you need to work hard, but first prepare:
- a bottle of suitable size and shape;
- napkins;
- stack;
- PVA glue;
- ruler;
- pencil;
- mass for papier-mâché.

Starting from the bottom, papier-mâché paste is glued in strips. Decorate both sides at once, forming circles in the form of log cuts.

Using a stack, make stripes on doors and logs so that they convey the texture of wood.

Make smaller details of the door.

Let the house dry for 24 hours.
Make a window and shutters from papier-mâché mixture. Using a stack, decorate them with carvings. We begin to make the attic, in the photo it is pink.

Such elements need to be made above the window and above the door, then we design the roof.

Having made a row on one side and the other, leave it to dry, only after that make another tier.

Then complete the third row and pipe.

Use a stack to create a brick pattern here, then give these elements a roundness.

There will be another row at the top of the pipe. Then we decorate the wall with fly agarics from polymer clay.

Leave the house to dry completely. After that you need to paint it.

Baba Yaga's hut is ready.
DIY papier-mâché dolls
I can’t even believe that such wonderful works of art can be created from toilet paper.

To make such a Snow Maiden, take:
- an empty glass bottle in the shape of a trapezoid;
- copper wire;
- pliers;
- papier mache mass made from toilet paper;
- rubber glue;
- polymer clay;
- cotton wool;
- elastic bandage or well-stretchable fabric;
- scissors;
- paints;
- fabric for clothing;
- satin ribbon for hair;
- rhinestones for decoration.

Cut a piece of wire with pliers and wrap it around the neck to make the arms of a papier-mâché doll.

Moisten the elastic bandage with rubber glue and wrap it around the workpiece.

Now grease this bandage on top with PVA glue, attach papier-mâché here, forming the chest and back of the doll.

Make a head for her from the same mass.
To use less papier-mâché, you can first wrap the top wire with foil, then cover it with this mass, forming facial features and ears.
Leave the workpiece to dry completely, then sand it and apply putty. After it dries, it also needs to be treated with sandpaper.

To make hands, moisten cotton wool with an aqueous solution of PVA glue and apply it to the wire. Wrap with an elastic bandage or strip of fabric soaked in glue. Make brushes from polymer clay. Paint the doll using flesh color, designate eyes, eyebrows, lips with appropriate shades.

Sew a petticoat and a dress for the doll from cardboard. Unraveling the satin ribbon Brown, you will receive such luxurious shiny hair. It will take a lot of time to make such a papier-mâché doll, but the materials will cost little, and what a luxurious result awaits you!

If you want to get acquainted with another example, then watch the second master class in this section.

You will get such a wonderful doll on a horse. To make this duet you will need:
- toilet paper;
- wire;
- cardboard;
- Styrofoam;
- strong thick thread;
- newspapers;
- foil;
- acrylic paints;
- foam ball.

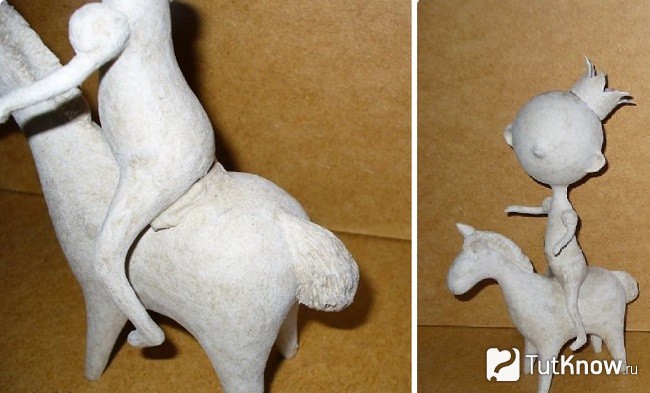
Give the doll the desired shape by covering it with papier-mâché.

Let's make a horse. Bend the wire as in the photo and wrap it with foil.

Coat this blank with papier-mâché mixture.

When it is thoroughly dry, stick two pieces of wire into it to make the legs of the animal.

Cover the top of the piece with damp papier-mâché. Let the horse dry thoroughly. Now we need to add volume to both blanks; for this we also use papier mache, including to make the ears and nose of the prince. We make the horse’s ears from cardboard, cutting out parts of the appropriate shape. Sand the workpieces.

Trim the excess wire on the animal's legs, add a mane, tail, and muscles to the prince. Cut a strip with zigzag edges from cardboard, cover it with newspapers, and roll it into a crown. Cover with papier-mâché.

After finishing with sandpaper, the doll will look like this.

Glue on the crown using papier-mâché. We use the same mass to connect the two heroes.
For the platform, a piece of foam plastic is used, which must be covered with newspapers.

Cut out the wheels from cardboard using coins as a template. Also cover them with newspapers and papier mache.

Apply the same mixture on top in 4 places of the cart to attach the horse.

Sand the workpieces, then paint them.
Let's create them using the same papier-mâché technique. If you want these funny hedgehogs on your Christmas tree, then start creative work right now.

To create them, you will also need materials that do not need to be purchased - the savings are obvious. Take:
- two toilet paper rolls;
- cones;
- papier mache mass;
- cotton pads;
- paints;
- plasticine;
- Titan glue;
- two wooden skewers;
- brush;
- sparkles.

Disassemble the cones into scales, glue them on one side of the roll, as well as on the sides. Form rows starting from the bottom, arranging the elements of subsequent rows in a checkerboard pattern. Use Titan glue for this.

At the beginning of the article, you read how to make papier mache paste from toilet paper. You can use other similar materials, such as paper towels. In this master class, napkins were used for this purpose. yellow color, their color does not matter. Form the body and nose of a hedgehog from this mass.

Let it dry, make the front legs, attach them to the tummy, using the same mass. Here's what interesting crafts on New Year 2017 is working out. But for now we need to let our hedgehogs dry well, then cover the arms and tummy with beige, and then brown. We paint the animal spines in reverse order - use them first brown tone, then beige or white. Then the hedgehog’s coat will look like it’s dusted with snow.

Make eyes, eyebrows, mouth, nose out of plasticine, sculpt a mushroom, attach it between the animal’s arms.

If you want, you can make lower legs for the animal from plasticine or plastic, placing them on the ends of the laces, the middle of which is threaded through the upper hole. You can attach a bell so that when the hedgehog moves, it makes interesting sounds.

These are the most wonderful and interesting crafts you can make for the New Year.

Make them with your children. If it’s difficult for the kids to do this, then tell them interesting idea creating papier-mâché cakes that they will be happy to bring to life. Let the child make these as a New Year's treat for his dolls and toys.
To do this, place next to it:
- foil;
- cardboard;
- two bowls;
- not a food spoon;
- newspapers;
- paper towels or a cloth to dry your hands.
Cover the table with newspapers in advance and cover it with plastic wrap. Then the child will not stain the work surface.
Let him tear or cut the newspapers into small pieces and put them in a separate container. In the other you need to pour the paste. It is prepared like this: pour a glass of water into a saucepan, add 2 tsp. flour or starch, mix. Place on the fire and bring to a vigorous boil while stirring vigorously. Let the paste cool and pour it into a bowl.
Let your child roll the foil into balls.

You need to make a box from a sheet of cardboard. Look at the diagram to see how to cut its sides, fold them, and glue them.

Everything is ready, it’s time to start making crafts for the New Year with your own hands, the photo will show how to make it.

Everything you need is on the table. Let the child dip the lumps in the foil in the paste, then attach pieces of paper here.

Then you need to leave the craft for several days so that the glue dries well. If this is not done, the work may begin to mold.
When the cakes are well dry, let the child give free rein to his imagination. Using paints, small red pompoms, and finely chopped colored pieces of paper, you can make this festive treat for dolls.

Once the paint is dry, it’s time to arrange these cakes to decorate the toy table.
Using the same technique, you can make other children's crafts for the New Year. With their own hands they will construct blanks from foil, which must be covered with pieces of newspaper. This process has just been described. To attach the toy to the Christmas tree, at this stage you need to tie a carpet ring with a lace or rope, as was done in the photo tip.

This is followed by another 2-3 layers of papier mache from newspapers, after which Christmas decorations needs to be painted.

Now you can make papier-mâché dolls, New Year's toys from the same material, a piggy bank. We invite you to familiarize yourself with the process of making an apple. It turns out so realistic that you should immediately warn both guests and family that the fruit is not edible.
If you want to see how to make papier mache paste, then watch the second story.
Only a lazy person who has never been to preschool does not know what papier-mâché is. From childhood, kindergartens teach how to make plates, cups, and vases from paper. But if for some reason you missed this lesson, then we suggest you find out right now how to make papier-mâché at home.
Manufacturing technique

It's hard to believe, but this set is made of paper. Of course, you can’t drink tea from it, but such crafts can be an excellent decor for your home or an entertaining toy for a child. Children really like to do various items made of paper, and since the papier-mâché technique is very simple, you can create similar crafts together with your kids.
What do we need:
- Paper/newspaper/paper towels.
- Deep capacity.
- Water.
- Glue.
There are two ways to make papier-mâché:
- From torn paper (machining)
- Made from sticky paper mixture.
Made from torn paper

For the first method, you need to tear the paper into pieces. Prepare the surface on which the material will be glued. If the model needs to be removed, it is best to coat the surface with Vaseline or cream.
The paper should be soft. Cardboard is not suitable for papier-mâché.
Next comes simple, monotonous work: apply glue, put pieces of paper on top so that they completely cover the surface of the selected object. After making two layers, let the layout dry. Then we repeat.
Each piece should be in contact with its neighbors so that there are no gaps. And dry it again. The total complexity of layers is from 8 to 10.
Important! To avoid getting confused when counting layers, you can alternate colored and white paper. But the last layer should be white if you continue to paint your craft.
Papier-mâché takes at least 48 hours to dry. But there is no need to try to speed up this process by placing the craft in a hot place or on a battery.
Important! At high temperatures, papier-mâché will develop cracks.
From sticky paper mixture

Place the torn or cut paper in a deep bowl. Add water and mix using a mixer. It should be a thick paste.
Important! To make the mixture without a mixer, fill the paper with hot water and let it sit for about 2-3 hours. After this, knead until smooth.
After this, strain the remaining water through a sieve. Add glue and paste to the paper. Knead until the mixture sticks to your hands.
Papier-mâché helmet

Not only cups and plates are made from papier-mâché. Here is a clear example of what can be done using regular paper and glue.
To make a helmet we need:
- basic layout;
- paper;
- PVA glue;
- container for PVA;
- brush.
First, prepare some pieces of paper. They must be different sizes.

Make sure there is enough material for the first 2 layers. Then, while the layout dries, you can prepare the paper for subsequent layers.
Important! If you dilute PVA with water, the paper will be better saturated, but it will take a long time to dry. If you don't thin it, you'll need more glue, but the papier-mâché will dry less quickly and won't soak as much.
Now we need a mock-up of the helmet, which will serve as a form for papier-mâché.

Apply glue to the required area and apply pieces of paper, slightly overlapping the edges with each other. We do this until the entire surface is filled. After 2 layers, let the craft dry.


You can alternate newspaper and toilet paper.

To smooth out dents you need to use the smallest pieces of paper. They are poured with glue and mixed well until it becomes a paste.


Using your fingers, cover all uneven areas with a thin layer. After this, let the layout dry thoroughly.


After complete drying, lubricate the entire craft with this mixture.


For final leveling, coat the entire surface with acrylic relief paste.
Papier-mâché is used in art and crafts as a material for making sculptures, puppets, fruit bowls, dolls and other items. You can make a variety of crafts for the interior. The papier-mâché surface can be easily painted in the desired color and can also be decorated.
How to make papier-mâché products
To prepare a lot of papier-mâché, you will need unnecessary newspapers or other paper, glue, and water. Mix glue with water in a ratio of 2/1. Newspapers should be cut into strips two centimeters wide or torn into small pieces. Combine the newspapers and the adhesive solution, stir until the mixture is homogeneous with a spoon or a bristle brush.
If you use office glue to make the material, keep in mind that you may encounter difficulties when painting the molded product. The paint may refuse to adhere to the surface. It is best to prime the product with artist’s white or acrylic primer before painting, and then coat it with paint.
Some products look better with a smooth surface. When covering a mold with strips of paper, it is not always possible to achieve perfect smoothness. But the procedure for leveling the surface is not as complicated as it might seem - you just need to be patient with it.
How to get a smooth surface of a papier-mâché product
First, you need to level out the most noticeable holes by gluing small pieces of paper there. Do this until the surface looks more or less smooth. The product must be dried, after which the surface is treated with fine-grained sandpaper. Perform the treatment in a circular, light motion, pressing as lightly as possible. Remove paper fibers periodically with a cloth. Coat the treated surface thickly with glue and dry well to make the top layer stronger. This procedure can be repeated several times to increase the strength of the top layer. After this, you can begin painting, inlaying or decorating the surface in another way.
For minor roughness, cover the surface with several layers of PVA glue or use aerosol car varnish.
If you want to paint the product, after the painting procedure is completed, it is better to coat the surface with varnish - in two or three layers. The varnish is suitable for both nitro and furniture, just make sure that the paint does not “float”. The product processed in this way will be smooth and shiny.
DIY crafts are usually associated in our minds with children's creativity. However, now they devote their time to this activity. free time Many adults enjoy creating interesting and original things. It is this trend that we owe for the renewed interest in the ancient technique of making decorative elements using the papier-mâché technique.
DIY crafts are usually associated in our minds with children's creativity
Directions of paper creativity
Initially, papier-mâché gifts were only available to aristocrats
The origin of papier-mâché occurred in France. This happened at the end of the 16th century. Translated from the language of the pioneers, this hobby is translated as “torn paper” or “chewed paper.” Initially, dolls were made from paper pulp mixed with glue. Then snuff boxes, music boxes and so on. Nowadays, there are two areas of technology:
- crafts made from paper pulp mixed with glue and paste (this allows you to sculpt three-dimensional figures, like from dough);
- products made from paper strips glued to a base (this method is called mashing).
They are labor intensive. In the first case, it is enough to prepare the mass and, having given it a shape, dry it well. And in the second - carefully, layer by layer, place strips of paper on a base made of cardboard, wood or plastic. Whatever method you choose, you can make dolls, jewelry, boxes, souvenirs, masks, etc. from papier-mâché.
This is interesting. The huge rotating globe that Harry Potter used in the film of the same name was made from papier-mâché by a Scottish craftsman. Following the success of the Boy Wizard films, the set was auctioned off for $20,000.
Photo gallery: papier-mâché dolls and figurines
Such a girl could be an appropriate gift for the beginning of the school year.
To create a colored item, you need to carefully paint all the details and glue the cat’s whiskers
Unpainted items occupy a special place among crafts made from toilet paper.
Initially, papier-mâché meant making dolls
These cats can be used to decorate a shelf in your closet.
This craft will take about 8-10 hours to dry.
What kind of paper is used
For papier-mâché it is better to use the cheapest toilet paper
For papier-mâché, you can use any paper. But it is most convenient to use:
- newspapers,
- cardboard,
- toilet paper.
Let’s look at making crafts based on papier-mâché from toilet paper in detail.
Making a lot of papier-mâché from toilet paper
For volumetric crafts you need a kind of paper dough, which is easiest to prepare from the most useful paper - toilet paper. The convenience of this material is explained by the fact that it soaks well in water. Let's consider several options for preparing papier-mâché mass.
You can prepare the mass for papier-mâché more than once
First method: paste based on flour or starch
- Tear two rolls of toilet paper into small pieces, pour in ½ liter of hot water and let sit for 5 to 8 hours.
- Preparing the paste. Fill a pan of suitable volume (2 liters) with water, put it on the fire, stirring.
- Mix in a glass cold water from 4 tbsp. l. starch (or flour), after boiling, remove from heat.
- Meanwhile, we bring the paper pulp to condition. Put it on the fire and let it boil.
- Using a blender or food processor, mix the pieces of paper until smooth.
- Mix the mixture with the paste and let stand for 20 minutes until the mixture thickens. The material for papier-mâché crafts is ready.
This amount is enough for 2-3 medium-sized crafts, and making them is a pleasure, as the dough turns out elastic and soft. How long will it take for the finished figures to dry? Approximately 3–4 days. If you doubt your patience, then use a different recipe.
Second method: use PVA glue or putty

If you add more glue, the material will turn out to be slightly rubbery. This is convenient when making round-shaped crafts. This amount of papier-mâché is enough for 1 medium-sized craft, which will dry in 1–2 days. If you make more of the finished material, don't worry: you can put it in a plastic bag and store it in the refrigerator for about 2 weeks. To work, you will need to heat it in a water bath.
Preparing a thicker mass - the third method
To obtain a mass resembling plasticine or clay, add wallpaper glue to the mixture.

Video: how to prepare a lot of papier-mâché
Master class on crafts made from papier-mâché using toilet paper
Before starting work, you need to prepare everything you need so as not to be distracted during the process.
Making crafts from paper dough does not require a frame; the creation process is reminiscent of modeling from clay or plasticine. The only difference is that the finished item must be dried. But this is not the most difficult thing. The fact is that, despite its apparent lightness, it is quite difficult to make small details, for example, faces, from the mass of papier-mâché. So the difficulty step by step instructions will be determined by precisely this parameter: the presence or absence of small elements.
Let's make a snowman
This is an excellent craft for those who are just beginning their acquaintance with the papier-mâché technique - there are few details.
Materials:
- A mass of papier-mâché (from 1–2 rolls of toilet paper), prepared using PVA glue;
- A couple of small pieces of cotton wool;
- PVA glue;
- Shish kebab skewer;
- A piece of cardboard;
- Acrylic paints (white, black, orange, gray, brown);
- Tassels.
Instructions:

Making a souvenir - Babu Yaga
Despite its small size, this craft requires certain skills in working with papier-mâché, since you will have to sculpt the character’s face.
Materials:
- A mass of papier-mâché (from 2–3 rolls) based on wallpaper glue;
- Pieces of fabric, woolen threads for finishing (Baba Yaga’s clothes and her hair);
- PVA glue;
- Beads for eyes;
- Wooden skewer for detailing.
Instructions:

Video: papier-mâché Christmas tree decorations
Working with papier-mâché from toilet paper does not require any special skills. The main thing is to make the right composition for modeling and let it reach the desired condition. When making crafts, it is also important to remember that you should not immediately take on products with many small parts; it is better to start with something simpler in order to get used to the technology of creating original things using the ancient papier-mâché technique.