One of the additions to any girl’s image is beautiful well-groomed hands. Often girls coat their nails with varnish immediately before going to work, or before going to any event. But in this case, the varnish will last literally 2-3 days. The best solution would be to cover your nails with shellac. Therefore, it would be a good idea for every girl to know how to properly apply shellac on her nails.


What is shellac: gel or varnish?
Shellac is a material that covers the nail plate. It is quite long lasting and stays on the nails for about 5 weeks. After this time, you need to cover your nails with a new layer of shellac. It is applied to nails quite simply, as regular varnish for nails. You can remove shellac from a nail using a special liquid, which cannot be done with extension gel. The color range of shellac is quite diverse; you can easily choose the color of shellac to suit any look. Applying shellac to your nails is easy, having everything necessary materials. Shellac is used to cover nails not only on the hands, but also on the toes. Nail plates on the toes do not grow very quickly, unlike fingernails; it will be enough to get a good pedicure every two months.


Required materials and tools
In order to cover your nails with shellac at home, you need to prepare everything in advance. necessary tools and materials.
By choosing a shellac coating, a fashionista gets a two-week manicure in one hour that does not lose its gloss, does not chip or crack. But such a result is only possible if you know all the subtleties of application. Otherwise, the end of the wear will come in just a few days.
To make your hands beautiful you need to stock up on time, patience and the necessary materials:
- Abrasive file
- File for processing natural nails
- Nail file
- Napkins
- Protective coating for nails
- Cuticle remover
- Degreaser
- Orange stick
- Nail and shellac bonding agent
- Basic coating
- Sticky remover
- Cuticle oil
- Fixing coating
- Ultraviolet lamp
When purchasing the necessary materials, it is important that the base coating is of high quality; this is also necessary so that all layers of applied products last for a long time. It is better to opt for well-known, trusted companies. Perhaps the amount will be slightly higher than what you expected. But this is better than purchasing cheaper materials, which are usually of poor quality. Such products will not allow the manicure to last for a long time, and will also harm the nails. The fixing and base coating must be uniform in consistency. When purchasing, you should always check the expiration date of the material.
Shellac should be worn for no longer than two weeks, and then take a break, allowing your nails to rest.

We cover the nails with shellac. Sequencing
To apply varnish you need to know a few rules. You need to do everything slowly and carefully:
- Before applying shellac to your nails, let's prepare them. To do this, we do a manicure as usual and use a nail file to shape the nails.

- Be sure to process the cuticle by moving or trimming it. After which the nail plate is polished with a special file.

- Then wipe the surface of the nail with a degreaser using a cotton pad, so that the gel polish adheres well to the nail.

- But disinfection alone is not enough to ensure that all products applied to the nails last longer. Therefore, it is important to degrease your nails; to do this, apply a thin layer of nail bonding agent and shellac.
- This concludes the preparatory stage. Next, we proceed directly to applying shellac. Shellac is applied in three layers. The first layer is the main gel coating. After the gel is applied to the nails, dry them for a minute in an LED lamp. We do not remove the resulting sticky layer; it increases the strength of the coating.
- Then we apply colored shellac in one layer. After this, dry the nails in a UV lamp for about 2 minutes.

- Next, apply a second layer of varnish to even out the color. And we also dry the nails, as we did after applying the first layer.
- The next step is to apply a sealing coating. The thickness of this coating should be slightly greater than the thickness of the color layer. The fixing coating should lie evenly, it is worth paying attention Special attention edge of the nail. After that, dry the nails in an LED lamp.

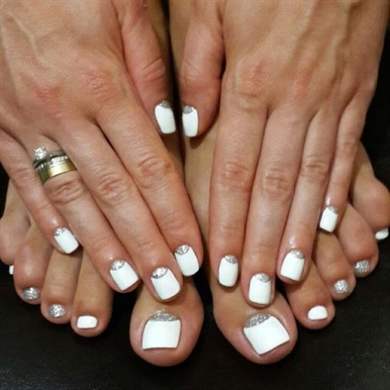
- Next you need to remove the sticky layer. Make it better with special means, if there is no such remedy, then you can use an alcohol-containing liquid. Then we moisturize the cuticle with special oil. This must be done because after exposure to ultraviolet light, the cuticle becomes dry. This completes the shellac application process. Nail design options are shown in the photo:


Advantages and disadvantages of shellac
The advantage of shellac is that it is very practical. There will be no need to adjust your manicure often, as it will always look neat. Due to the fact that shellac is applied in several layers, the nails become dense, so you won’t be able to damage the nails. This gel polish is universal, even on short nails it will look very nice.
The disadvantages of shellac include its price; such a coating is not cheap. But it’s still more profitable to cover your nails with gel polish at home than in a salon. The fact that shellac lasts a long time can be attributed to its disadvantage, because you can get tired of the monotony. I have to go to the salon again to change the coating. And a manicure done at home will not cause problems, because... You can remove the old coating yourself and apply a new one.
The video provides materials on how to properly coat your nails with shellac:
The image of a beautiful well-groomed woman consists of many components: hairstyle, clothes, shoes, face. It often happens that nails are somewhere at the end of the list - and this is wrong.
A neat manicure and well-groomed hands are the calling card of any woman. Peeling nail polish looks simply terrible, and there is simply no time to refresh it. Today this problem can be solved quite simply: shellac has become the most popular procedure in nail care salons.
But what to do if you don’t have enough time or money to go to the salon? Of course, there is a way out - this is to make shellac at home. For beginners, here are step-by-step instructions for this now popular manicure.
Beautiful word, by the way, does not conceal anything mysterious. Shellac is a waste product (in other words, excrement) of scale insects that feed on tree sap. This digested resinous substance is collected, dried and crushed, then the varnish mass is melted and cast into molds. The end result is a great manicure product.
Manicure has never been a special procedure, but the use of shellac has its own distinctive features. Firstly, the need for nail extensions disappears; secondly, the coating is quite durable and lasts much longer; thirdly, gorgeous appearance and a rich range of colors.
 The disadvantage of shellac is primarily its cost.
 The life of a manicure, no matter how elegant it may be, is very short. Housework is the responsibility of any woman; very few have au pairs. Daily cooking, washing dishes, laundry, cleaning - all this leads to the fact that nail polish quickly fades, cracks and loses its appearance.
Shellac is a different matter: a symbiosis of gel and varnish (even done at home by beginners in accordance with step-by-step instructions) holds up enough long time , and during this period it becomes possible to further strengthen the nail plate.
Advantages and disadvantages of shellac
Shellac, as you may have guessed, has many advantages:
- Shellac manicure looks great on any nails: both long and short. At the same time, the painting method gives you a chance to grow your nails to the desired length.
- Because shellac natural remedy, it allows you to strengthen thin and brittle nails.
- Shellac stays on your nails for a long time: some fashionistas manage to keep their manicure for up to three weeks.
- To remove shellac from nails, special products are needed, which means that household chemical products are not harmful to it.
- Shellac gives your nails a dazzling shine that lasts incredibly long and does not fade.
- Manufacturers closely follow fashion and the color palette of shellac is constantly expanding. On sale you can find not only classic tones for manicure, but also bright avant-garde paints.
- Perhaps the most important advantage of shellac is that it is absolutely harmless. Dangerous formaldehydes are not included in its composition, therefore women prone to allergies and pregnant women can safely do a shellac manicure.
If for some reason the coating suddenly becomes boring, then shellac can be removed at home. To do this, you need to buy special products, liquid and film at the salon, carefully study the step-by-step instructions for beginners and clean the nail plates yourself.
Everything in the world has its downside - and shellac is no exception:
- First of all, this concerns the high price of the procedure itself, and if there is a need for correction, then this is also quite expensive. So, if your nails grow too quickly, you will have to put up with additional costs.
- The second negative factor is more significant. Shellac, as the manufacturer assures, is indeed a very durable coating. But nails tend to expand under the influence high temperatures, and then decrease again, taking on its original size. So washing dishes in hot water or taking a bath that is too warm contributes to nail deformation and causes microscopic cracks in the coating.
Through these microscopic holes, dirt can get under the varnish layer, and dirt creates greenhouse conditions for many bacteria and microorganisms. Shellac lasts a long time, which means the bacilli have enough time to damage the nail. So fungus is not the most dangerous disease.
To avoid sad consequences, it is better to do all dirty housework with gloves.
What tools and equipment will be required?
Shellac is a very complex procedure, and it is best to do it in a salon, with an experienced specialist. But “it’s not the gods who burn the pots,” so if you have certain skills, you can do it yourself at home. To do this, you need to know step-by-step instructions for beginners and have special tools and ultraviolet lamp for drying manicure.
 To apply shellac at home you will need some tools and supplies.
 First of all you will need: basis for applying the base coat, shellac coating and sealer. Professionals recommend using a base and base coat from the same shellac category, preferably from the same manufacturer. Otherwise, there is a risk that the desired result will not be achieved.
In addition, you must have:
- antibacterial agent;
- orange wood spatula or stick;
- nail file;
- manicure scissors;
- Bondex, a product for improved adhesion;
- cuticle cleaner;
- sanding file.
Preparing nails for shellac
So, having all the necessary tools for shellac at home (read about step-by-step application for beginners below), you can start preparing your nails.
 Before applying gel polish, you need to prepare your nails, treating the cuticle in particular.
 The preliminary operation includes:
- cuticle processing and shaping nail plate;
- grinding is a mandatory procedure that improves the adhesion of shellac directly to the nail;
- disinfection with an antibacterial liquid, which additionally degreases the nail and ensures uniform coverage;
- applying the base layer;
- heating with an ultraviolet lamp to fix the gel, at least 25-30 seconds for each nail.
How to make shellac at home. Step-by-step instructions for beginners
Now that the nails are ready, you can proceed to the actual applying shellac:

 When making shellac at home according to step-by-step instructions for beginners on your own, you should know that There is no need to remove the sticky layer after the first and base coat, as this will enhance adhesion.
 After applying each layer of shellac, nails should be dried in a UV lamp.
 What will happen to your nails after applying shellac?
No matter how safe the shellac procedure is for nails, restorative measures are still necessary. After all, everyone changes their underwear every day, but the nail remains in a kind of shell for a long time. So, if yellowish spots appear on the surface of the nail plate or the nail is somewhat deformed, then urgent measures should be taken.
You can revive your nail in the master's salon or use home remedies, which is generally preferable because they are inexpensive and available:
- Make lotions from heated olive oil during the week. Nails will receive additional nutrition and hydration, which means they will maintain a healthy appearance.
- A piece of lemon, which should be rubbed daily on the surface of the nail, can work wonders. Essential oils and vitamin C will restore shine and eliminate delamination and fragility.
- A bath with sea salt will get rid of a possible fungal infection. It is advisable to do the procedure every day, for 10-15 minutes.
 Sea salt baths are recommended for restoring the nail plate after shellac
 Secrets of applying shellac at home
By making shellac at home yourself, following the step-by-step application technology for beginners, you can save a little. So, what means and tools can be replaced and with what:
- Manicurists use special products to remove cuticles, which are quite expensive. But if the cuticle is not too noticeable, then in this case you can use an orange stick to simply push it back.
- The grinder is completely replaced by a regular polishing file: the end result will be the same.
- A small bottle of salon disinfectant, which can cost about a thousand, is easily replaced with nail polish remover or acetone.
- Base coat It will not be possible to replace it, but in cosmetics stores you can find a suitable product that, among other things, also has a healing effect.
Take a couple more secrets of applying shellac at home.
 Cuticle oil should be used morning and evening every day
 Useful tips from the professionals:
- When purchasing an ultraviolet lamp, you should pay attention to its power; the most optimal result is achieved when using a 36-watt lamp. In this case, the coating dries quite quickly.
- Before starting your manicure, roll the coated jar in your hands. This little trick will significantly improve the properties of the varnish, which will lie smoothly without much effort.
- To prevent shellac from thickening, it should be stored at room temperature, carefully closing the bottle after each use.
- Any corrective treatment should be carried out only under the obligatory condition: the nail must be dry. No soft file will protect a wet nail plate from damage.
- Use cuticle oil daily: morning and evening. Only in this case will you be able to avoid the appearance of sloppy hangnails.
- Before going to the salon to get your hands beautiful, you should treat your nails if necessary. Shellac can only aggravate the problem of brittleness and splitting of the nail plate.
- Do not apply hand cream immediately before a shellac manicure.
How to remove shellac gel correctly
To remove shellac manicure yourself at home(for beginners step by step application described above) you need to prepare:
- cotton pads or special sponges;
- 10 pieces of foil so that you can wrap your fingers;
- isopropyl alcohol or a special solution for dissolving shellac.
Before removing shellac, hands should be washed with warm water and soap and dried thoroughly.
 Shellac removal procedure
 Now you can start removing the shellac:
- Cut the cotton pads in half.
- Soak a piece of the disc in alcohol and apply it to the nail, secure with metal foil. Try to avoid getting alcohol on your skin to avoid causing irritation. Foil is used to prevent the alcohol from evaporating too quickly. You will have to wait about 15 minutes for the result, during which time you can lightly massage your fingertips for better penetration of the alcohol.
- In some cases, shellac is removed with a film; if this does not work, then it can be removed with an ordinary plastic spatula. It happens that, due to inexperience, the coating was applied in too thick a layer and the shellac cannot be removed. This means that you will have to repeat the procedure with alcohol or simply cut off the shellac.
- Finally, you should lubricate the nail with cuticle oil to avoid drying out the skin and nail surface.
Shellac - wonderful remedy for manicure both in the salon and at home (you have already read the step-by-step instructions for beginners), the nails look neat, elegant and, importantly, natural.
Over time, experience and proper dexterity will come, and the whole procedure will not take too much time. As a result, your hands will look very attractive, and your nails will receive additional protection.
Shellac "Cat's Eye"
Cat eye nail design is very popular and looks very impressive. Using gel polish with the addition of a metal base and a magnet, you can get a pattern that really looks like a cat's eye.
For such a design you need to prepare green gel polish and special magnet . However, if there is no special one, then any ordinary one will do.
 Manicure "Cat's eye" can be performed at any time color scheme
 First, a base coat is applied to the nails., which needs to be dried in ultraviolet lamp. The next layer is green, which is also dried. The magnet is not yet used.
But now a magnetic plate is brought to the second coating: metal particles of varnish are folded into an elegant pattern. If the magnet is held upside down, a stripe will form on the nails; but if you scroll it over the surface of the nail, the image will come out intricate, similar to a drawing cat eye. Now all that remains is to complete the usual procedure.
It is not at all necessary to use only green color palette: After all, a cat’s eyes can be yellow or even blue.
If you like the cat design, then you should buy a special magnet, with which you can get a spectacular pattern.
As you can see, shellac at home (for beginners) step-by-step execution see above) is quite feasible. The main thing is to follow the instructions and not be afraid to fantasize.
Covering your nails with shellac is no longer a problem for anyone. modern girl. The days of ordinary nail polish, which had to be applied very carefully, dried for quite a long time, handled extremely delicately with the finished coating and, despite all this, washed off after a couple of days due to peeling in order to repeat all the steps again, have come to an end. Nowadays, with the help of special varnishes, you can create a neat and very durable manicure, not only by turning to professionals such as KRC, but even at home, if you purchase the necessary materials and equipment.
The concept of shellac came to us, which is not surprising at all, from America. It was positioned as a durable and vibrant manicure option, and successfully confirmed its status, becoming one of the most popular services in the beauty industry in most countries around the world. Many were afraid that such good qualities shellac is due to its toxicity or negative effect on the nail plate, as was the case when using acrylic technique, but the experience of many women and the opinion of experienced experts confirm the groundlessness of such fears.
Of course, if you use cheap varnishes that may not be stored properly, their composition has not been tested, as well as devices of dubious quality, then problems may arise both with the final result of such a manicure, the duration of the coating, and with the health of the client’s nails. The only caveat is that any varnish, even premium class, can cause an allergic reaction, but for such people there is the possibility of choosing other options that will not include the allergen, and competent craftsmen can give full information about such moments.
Correct application of shellac guarantees a good duration of wear without loss of coating quality and no harm to the body. In addition to the ease of application, it can also be easily and safely removed using a special liquid or by filing - at the discretion of the master and the client. Shellac can even be beneficial for nails, since the lines of medium and luxury quality varnishes contain vitamins, strengthening complexes and nutrients for nail plastic, which promotes its growth and maintenance of density. Therefore, women can use shellac for many years, and the condition of their nails after removal is no worse, and sometimes better, than those who used other products or did not use any coating at all.
How to apply shellac?
The product is no more difficult to apply than regular nail polish. The bottle also looks typical and contains a standard brush. Some craftsmen like to use a separate brush, which they then wash and reuse – it’s a matter of taste. The advantage of shellac is that it does not dry out on its own, so you don’t have to rush too much when applying a layer of coating, but carefully and evenly distribute the varnish over the surface of the nail. This allows you to avoid streaks, lumps, and remove any fluff or dust that might have gotten in by accident, without losing the quality of the coating. After the layer is applied, the varnish is dried in a special lamp, which even a beginner can use.

How to properly apply shellac at home?
How to properly apply shellac at home? In order to use shellac yourself, you need to equip yourself with a set of all the components that are needed for shellac coating. This can be somewhat expensive, especially if you buy high-quality products and tools, but it will all pay for itself very quickly when compared to salon coating. Having bought all the basics, then you can only supplement your palette with new colors, sparkles, broths and other decorations for every taste.
The effect and durability of the manicure depends on the correct technique for applying shellac. Only a complete complex can guarantee the quality result that any master strives for. So, in addition to shellac itself, which essentially performs a decorative function in itself, a novice craftsman will need to purchase the following products:

Knowing how to apply shellac on nails and what products will be needed is not enough. You will also need some additional “accessories”, which you also cannot do without. Some of the main tools are nail files and polishing buffs. Files are needed not only as an element of giving shape to the free edge of the nail plate, but also to remove the remnants of the previous shellac after removing the coating by other means. It’s good if you also have a glass file in your arsenal, which is ideal for natural nails, injures them less and gives good effect. A buff is a kind of very fine-grained file, the purpose of which is to polish the surface of the nail, eliminate small irregularities, and make it smooth. You also need special wipes for degreaser and liquid for removing the sticky layer, which do not have lint. Ordinary cotton pads or cotton wool leaves particles and can stick, creating difficulties in work and taking up time.
And, of course, shellac is impossible without a drying lamp. This is usually a UV lamp, but you can also purchase an LED lamp. Different manufacturers provide a wide selection of lamps in terms of design, power, and drying speed. You can choose any one that meets the basic criteria of safety and convenience.
Let's consider in what order and how to apply shellac correctly.
First of all, first you always need to prepare your nails for varnishing. This applies not only to shellac, but is especially important for it, because we are focused on long-term coverage, and everything must be perfect. Nails are shaped, cuticles are trimmed, hangnails are trimmed - the appearance of nails and hands must be neat and clean, otherwise even the most beautiful and high-quality coating will not save the impression of uneven, bumpy nails with protruding cuticles.

Before application
Before applying shellac polish, you need to wipe your nails and fingers with a disinfectant after the manicure, and then degrease the surface of the nail. After this, dry the surface naturally, without a lamp. At this stage we remove all dirt, foreign particles from the nails, dust particles and sebum. The primer is applied next and is also clear and watery. You don’t need a lot of it, just a thin layer that is quickly absorbed and dries itself, also without the use of a UV lamp.
At this point, the preparatory stage is almost complete, all that remains is to cover the nails with the base. It is recommended to take all products from the same brand, since the compositions in them interact better with each other. The base coat is applied in a thin layer, there is no need to apply it thickly or in two layers - it works great just like that. You need to be careful when applying, make sure that the coating is uniform and the liquid does not flow down to the cuticle. After application, the base is dried under the foot for the time specified by the lamp manufacturer (from 30 seconds to 3 minutes, depending on the type of radiation and power). A sticky layer is formed, but it should not be removed; it is necessary for good adhesion to the next layer.
The next layer is shellac gel; how to apply it doesn’t need to be particularly explained. The process is no different from conventional varnishing, the only thing is that one layer is usually not enough. Therefore, we apply one layer, dry it in a lamp, then apply a second layer, dry it again. It is usually not necessary to apply more than two layers. It is important that the sticky layer is not yet removed between layers of varnish.

After the color layer we apply the finish. The topcoat is often also called topcoat or topcoat. This is almost the final stage of manicure. The finish has a fairly thick texture; it must also be applied carefully and in a thin layer. Depending on the desired effect, the finish can be glossy or matte. After application, also dry.
After the top, like after other layers, a sticky layer remains. But, since no more layers will be applied, it does not have any functional essence, so we carefully remove it using a degreaser or a special product with a lint-free cloth until a tactile sensation of smoothness arises.
Finally, we treat the cuticle with oil, which will care for the delicate skin, which has lost a lot of moisture after several stages of drying under the lamp, and this completes the shellac application procedure. The oil is absorbed quickly enough, so it will not cause any discomfort.
So, we looked in great detail at how to apply shellac on nails, what is needed for shellac at home, and what are the advantages of such a manicure. Good shellac can please its owner for at least 4 weeks, which saves a lot of time and money for something that there were always not enough hours in the day for, when you had to constantly spend hours on regular varnish.
Not only a manicure, but also a pedicure should be beautiful. It gives confidence to the owner. For various reasons, not every woman can afford to visit a salon, but you need to devote time to your legs just as you do to your hands. However, if you follow a few simple tips, you can easily do a pedicure at home, gradually following the sequence of the legs, the result will be no worse than the salon one.

Tools for home pedicure

Pedicure tools are divided into two types. The former are needed directly for working with nails and toes, and the latter for treating the skin on the feet. So for home pedicure required:
- Scissors;
- Double-sided spatula;
- Manicure tweezers;
- File;
- Pumice;
- Foot bath.
Having prepared all the necessary tools in advance, you can proceed to the procedure.
Manicure at home is not a complicated matter; it includes several main steps:
- Preparation stage;
- Foot baths;
- Cleansing and treatment of feet;
- Nail treatment;
- Varnish coating.
We will analyze each of the listed procedures in detail.
Preparation stage
First you need to prepare all the necessary tools and materials, remove the existing nail polish, and decorate your nails.
To achieve beautiful manicure It’s worth taking care of good tools in advance. You should not choose a file for a pedicure that is too rough; this can worsen the condition of the nail, it begins to flake and ultimately the pedicure becomes untidy and takes on an unattractive appearance. A glass file is considered optimal for pedicure; it files perfectly, prevents nail splitting and, moreover, has a long service life.
Sawing must be done carefully, in one direction. There is no point in changing the shape of your toenail; it is better to try to leave it as close to natural as possible. Otherwise, it will lead to unpleasant consequences, such as ingrown nails.


Nail polishing
The second stage of manicure is polishing the nails. To do this procedure, you must have a polishing file in the kit, preferably double-sided. First of all, one, rougher side needs to be walked over the surface of all nails to remove roughness and unevenness. After this, use the other, not too hard side of the nail file to make them shiny and smoother.
Foot bath

To use the bath, you need to take a container of water, add sea salt, a little soda, and two drops each of iodine and lemon juice. This bath helps exfoliate, soften and nourish the skin of the feet; in addition, adding sea salt to foot baths is an excellent disinfectant. The allotted time for the bath should be at least 15 minutes, and it is also necessary to control the temperature of the water and add hot water as it cools. At the end of your bath, pat your nails well and continue with the pedicure.

Peeling for feet
To carry out the stage of cleansing the feet, you need to take pumice with a fine-grained coating. During work, more attention should be paid to strong calluses and rough areas of the skin of the feet. However, using pumice does not always allow you to clean hard-to-reach places; in this case, it is better to have an exfoliating foot scrub in your arsenal with which to treat these areas. The procedure of peeling and scrubbing the feet is the most labor-intensive and requires a lot of effort. Carefully treated feet can maintain a pedicure for a long time.

Cuticle removal
To work with the cuticle in the area of the nail plate, it is better to take a wooden stick. Masters do not recommend doing a trimmed pedicure; it is better to constantly push back the cuticle. After working with the cuticles, also using a wooden stick, you need to check and clean the nails from any remaining dirt.


The nails are decorated and ready for the painting procedure. But if time allows, a massage procedure can become pleasant for the feet. To do this, apply a generous amount to the skin of the feet. nourishing cream, and rubbed into the skin with soft massage movements. Such a small massage will help relieve fatigue, moisturize and provide a deodorizing effect.


Applying varnish
For a more convenient coating of toenails with varnish, it is better to use special separators. With their help, the process will become much more convenient. It is better to cover your nails in two layers, but be sure to degrease the nail plate before doing so.