Elizaveta Rumyantseva
Nothing is impossible for diligence and art.
Content
Is it difficult to imagine a solemn moment without decoration or decoration with elegant bows? Lush and strict, elegant and frivolous - they create a special mood at the holiday. Make a hair clip or butterfly for an evening suit from satin ribbons It won't be difficult if you follow the instructions.
How to make bows from satin ribbons
The technology for assembling the decoration requires ribbons of different colors and special widths in accordance with your idea. A minimum set of tools and materials for manufacturing will be required. If you complete the master class, you will not have a question about how to make a bow from a satin ribbon. Proposed step by step instructions will make the work process pleasant and understandable. You will need:
- lighter;
- scissors;
- threads;
- needle;
- ruler;
- glue or heat gun.
Depending on the purpose of the bow, there are various options for manufacturing technologies. He can be:
- small, made using a fork - suitable for decorating a postcard;
- lush, elegant - in kanzashi style - for a holiday in kindergarten;
- a formal bow tie for an important banquet;
- double – for hair decoration, attached to a headband or hairpin,
- solemn - on gift box.

Satin bows can be made in the form original flower. If you choose the right color and shape, they will become unique decorations:
- elegant evening dress;
- frivolous sundress;
- styled hair;
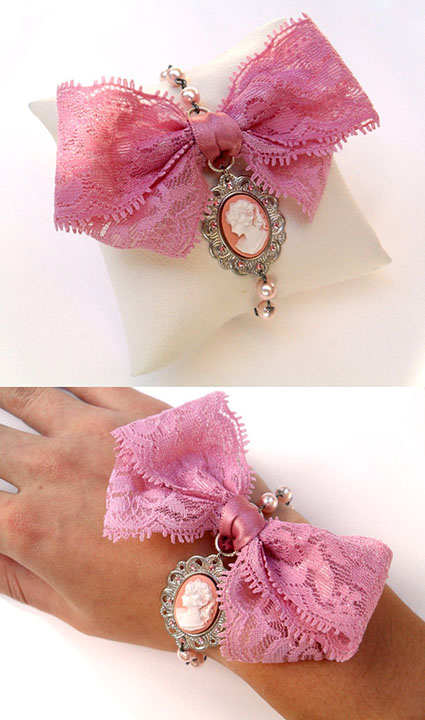
- in the form of a wrist bracelet;
- stylish handbag;
- bridesmaid dresses;
- smart blouse;
- as a neck pendant;
- furniture in the interior;
- stylish dress on prom;
- curtains in the apartment.
How to make a bow from a satin ribbon in a classic style
The most popular and simple, this bow is used for clothing and interior decoration. Even a modest gift decorated in this way becomes elegant, solemn and attractive. To tie a bow you will need:
- take a piece 20 cm long;
- burn the edges;
- fold in half with the smooth side facing in;
- fold the edges outward again;
- take it in your hands so that each has a loop at the top, and a bend between them at the bottom;
- cross the folded parts in front, forming a ring under them;
- pass one loop through it, tie.

A strict beautiful bow made of satin ribbon with your own hands
You can tie a strict stylish bow for a special occasion. It will become a decoration handbags, dress or gift. Here it is important to choose the right colors for the craft so that it looks elegant. How to make a bow from a satin ribbon, for example, like the one in the photo. Prepare for work scissors, glue, material of three colors. You should:
- take a workpiece 30 mm wide with a length of 18 cm;
- roll into a ring;
- connect the edges with glue.
The next steps to assemble the decoration are:
- fold the ring so that the seam remains at the bottom in the middle;
- iron;
- take a ribbon of a different color of the same width, with a length of 7 cm;
- wrap a ring around the workpiece crosswise;
- fix with glue;
- prepare a ribbon of a contrasting color of the same length, but thin;
- wrap around in the middle of the previous ring;
- seal;
- iron.

Two-color beautiful bow made of satin ribbon with your own hands
A stylish and very elegant decoration can be assembled from blanks of two colors. Ease of manufacture does not mean that it will look modest. Elegant and spectacular, it will decorate your hairstyle and original dress. You will need a wide and narrow blank. To make jewelry:
- measure 2 pieces 15 cm long - one narrow, the other wide, cut;
- put one on top of the other;
- roll into a ring;
- Fix the joint with glue;
- iron;
- use a narrow ribbon to tie a bow in the middle, covering the joint, forming a knot;
- cut off the ends;
- glue it.

DIY gift bows made from satin ribbons
A gift box for an anniversary or birthday will look much more impressive if you decorate it with a bow. Depending on the situation, it can be small, elegant or voluminous and lush, for example, like this. Tying it is very simple - you can quickly learn, even without a master class, by following the instructions:
- take a piece two meters long;
- wrap around the open palm of your left hand;
- remove carefully;
- leave the end free.
- on a workpiece folded in several layers, cut off both corners on one side, approximately 5 mm;
- burn so that they do not bloom;
- repeat the operations on the other side;
- fold the workpiece so that the cut parts are aligned in the middle;
- tie with the free end of the ribbon;
- straighten each petal, giving it volume.

A lush bow made by yourself can please a young beauty if it is woven into her hair or becomes a decoration for a gift box. To make it you will need 6 blanks 12 cm long, 5 cm wide, the same number 11 cm long and 30 mm wide. They must first be burned around the edges. You will also need an elegant thin braid, small beads and a piece of felt. Next, you need to do this:
- take wide blanks;
- fold in half;
- assemble sequentially onto one thread;
- tighten, fasten;
- repeat the process for narrow ribbons;
- cut a circle with a diameter of 40 mm from felt;
- stick a large blank on it;
- take pieces of thin braid 12 cm long - 6 pieces;
- fold each into a ring;
- glue on the front side, placing it on the petals;
- fix a piece of narrow ribbon on top;
- pour glue, approximately 10 mm in diameter, onto a piece of fabric;
- place the beads on it tightly in a circle;
- cut in circle;
- glue the decor in the middle of the decoration.

If you want to decorate holiday card tiny bow, try using a fork. The process will go like this:
- take in left hand fork;
- loop a ribbon over it so that the edges remain to the right;
- Throw the far end behind the fork over the lower one in front;
- insert it in the middle between the teeth and bring it back;
- insert the remaining tip of the ribbon on the right into the same gap, but from above;
- turn the fork over and tie both ends with two knots;
- remove the bow;
- cut the ends and singe them.
DIY lacy satin bow
Do you want to learn how to wrap gifts like Dior? The technology will not cause difficulties, and the look will be unusual and original. To make such a decoration, you need satin blanks 25, 20, 16 and 10 cm long.
Good day, my dear friends! When the time for the holidays approaches (especially last bells and September 1), an item such as a ribbon bow becomes especially relevant. This accessory is so popular among schoolchildren, mothers and just needlewomen that I couldn’t ignore it and decided to devote a whole post to bows.
Various kinds of bows are actually found in our lives so often that we don’t even notice them - in jewelry, clothes, or even used as an element school uniform... In general, if you want to learn how to make bows from the most different types ribbons, then welcome!
Beautiful DIY ribbon bows: master classes
In fact, learning how to tie even the most complex bows yourself is not that difficult. Instructions with a large number of photos, which I have prepared for you today in abundance, will help with this. There will be both selections from the Internet and unique master classes specially prepared for you.
How to make satin ribbon bows: step-by-step instructions
Satin ribbons are the most popular material for creating small masterpieces. Smooth, shiny, relatively inexpensive ribbons have always attracted the attention of needlewomen from all over the world. The material has found application in the most different areas creativity, and decorations based on various kinds of bows are no exception.
To create accessories, you can use ribbons of different widths, but it all depends on the chosen design and execution technique. Let's start with the simplest types.
The simplest classic bow
The basic bow that any beginner should learn to make is presented below. For it, you can take either a narrow or a very wide ribbon - it will work from any one.
Work process:
- Fold the ribbon by placing its two halves over index fingers both hands.
- Cross the halves and insert one into the other.
- Tighten the product. Ready!

You can make a chic decoration based on such a bow. It will be enough just to fill it with waterproof glue or shiny acrylic varnish, then attach the rings to which the chain will be fastened.

The same bow will not be difficult to tie on a fork; with its help it will turn out more neat and even (although you can create a very beautiful accessory on your fingers). There is also a limitation for such an “assistant” - it is useful only when creating very small bows; for larger products you will have to resort to the traditional method.

Double tape
The double bow is made in a slightly different way from the previous one. For it, two rings made of tape and a separately created center, obtained by sealing the edges, are useful.
Fold the two rings in the middle and sew or glue them so that their sides touch. After this, the middle is closed with a pre-made part. The design can be attached to a hairpin or elastic band.
Note!
For this accessory, you need to take a medium or wide ribbon; such beauty will not come out of a thin, narrow material. If your choice goes to a width of 2.5-5 cm, then this will be the ideal solution.

A variation of such a bow of two ribbons can be this analogue: in this case, two rings are superimposed with their centers on top of each other. You can also experiment with color scheme– for example, create a red or green bow, or even combine one or more shades in one product.
Try to make more than two layers, take ribbons of different widths and textures. Thus, from one pattern for creating a bow, you can create a wide variety of accessories.

Multi-layered puffy bow
A great option for schoolgirls and more. This bow can easily be placed on a hairpin or comb to attach to your hair. It is based on the two simple bows discussed earlier.
To fold one, you'll need to make a base of two overlapping layers. The ribbons folded in this way will form the back part. The front one is similar to the simplest first bow. At the end they must be connected using glue or thread. Everything is held together by a central piece.

This way you can get more voluminous accessories, like the white bow shown below. There is one difference here - the basis is not two layers, but three.
Romantic and sophisticated, this addition to the image will delight any graduate who wants to indulge in nostalgia. But this option, unlike jewelry for girls, is more mature and feminine, which is exactly what is needed in such cases.

Twisted bow of 3-4 ribbons
A very beautiful bow that is well suited for head decoration. To do this, three or four (or even more) pieces of tape of the same width, but different lengths you need to sew them with an infinity sign and put one inside the other. Design the middle as in a few microns earlier.

Kanzashi
Many beautiful bows are made using the kanzashi technique. This type of creativity came, as you might guess, from distant Japan. In this way, they create magnificent details to complement not only everyday, but also festive outfits.
Bow flower
Making such a flower is not difficult, but painstaking. You will need at least 12 petals, which will need to be pre-cut from a ribbon 2 and 4 cm wide (you can take a different width, but not less than 1.5 cm).
First make the first layer by stringing six wide petals and pulling them together. Place some decoration between the layers and attach the second layer made in the same way. Don't forget the bead in the middle.

Another variation of simple but beautiful petals is located below. Here the flowers come out more pointed.

More graceful White flower is created below. In the step-by-step photos you can see that the petals for the flower are made by twisting the ends into the middle. Such a bow can consist of either a pair or five or six layers, gradually increasing in the number of elements.

Bow for discharge from the hospital
Newborns (and children in general) deserve the best! That's why I found for you a beautiful bow that will suit both girls and boys. For this you will need a fairly long ribbon (at least three meters).
In the middle, make a winding of several layers and then a knot as in the photo. After this, you will need to pull out several petals formed by the previously folded rings.
Why leave such long ends around the edges? The fact is that you will need to tie them around the long-awaited package, leaving a beautiful middle in front. At one time, I actually bought a five-meter ribbon - the nurse tied it into such beauty that we still remember it with a smile with the whole family.

How to tie a bow from grosgrain ribbon
The good thing about grosgrain ribbon is that, unlike satin, it is less susceptible to various types of damage. The satin one only needs to be hooked once and that’s it - appearance bantha is spoiled. This trick won’t work with reps, but it also costs more.
Baby bows
The combination of several types of ribbons looks very interesting. IN in this case The colors are also combined, which, nevertheless, look very organic. The polka dot ribbon is just perfect! Such a bow will decorate a girl’s head for the holidays and Everyday life. For it you will need to connect two folded parts, as was seen earlier in master classes. The top will be decorated with a classic variation.

With elastic band
Assembling a lush bow with an elastic band is not difficult. To do this you will need several layers of bows, decorated as we did earlier. The number of layers is limited only by your imagination and common sense. The difference between this accessory is that underneath it there is a kind of cross with serifs at the ends.
You can connect all this splendor with ribbons 1 cm wide, tying the middle. You can attach the bow to the elastic using a glue gun or something similar.

A bright bow with a school theme explodes early ideas about what a school accessory should be. It's just a bomb!

Butterfly bow
You can even make something like a tie using grosgrain ribbons! Yes, the butterfly will be small, but very impressive. To create it, fold the ribbon, tucking the edges under each other, as in the photo below. You will need three such layers. Attach a longer ribbon underneath so that you can tie it at the back. In MK it is quite short, in this form it can be left for a simple accessory.

Here's another fun variation of the bow tie. Here we use nothing less than bird feathers, connected with a ribbon in the middle. Interesting interpretation of the standard butterfly, isn't it?

By the way, a butterfly bow can also be made from fabric; a master class on this is below.


Bows for gift boxes
To tie a bow on a gift box you will need not only ribbon, but also different types of wrapping paper.
Big bow
A very large accessory for a very large gift. Such a bow can be made from ribbon, but it is better to use wrapping paper, which will take a lot to make such a creation.
Place a small box at the base of the decorative element. There may be a surprise in it or it may just be the basis for such an accessory. Place it in the center of the square, which is covered with its edges at the top and bottom. Fold the free edges as in the photo below (as if you were wrapping an envelope). Press the middle and wrap it with a small piece of paper of sufficient length. Spread the edges to make them as fluffy as possible.
This bow can be used as an independent package or as a decorative part for a huge surprise.


Beautiful for a gift
This next puffy bow has an incredible Christmas feel to it. He literally reeks of them! For this you will need to fold the ribbon as shown below, overlapping and tying several layers together.
Place several bows on top of the design, folded as shown below. Decorate the middle with a beautiful bear in a cap or any other decorative element.

Paper bows: simple, cheap, original. All master classes describe their creation in great detail.


Do you want even more bows for a gift? Read about this in another article.
Nylon bows
Nylon ribbon is traditionally used for graduation and hair decoration. But such bows can also be used for other purposes.
A simple bow on a fork is created in just a couple of minutes. To do this, you take a fork, thread a thin ribbon in the middle, and a thicker one on top. Wrap the thicker tape around the tines of the fork many times, forming a braid. A thinner ribbon becomes the central part of such a flower.

A semicircular metal template will help you “cut” the petals using a small resemblance to a soldering iron. To do this, two ribbons - nylon and satin - must be folded as shown below. After this, the middle is bent inward and you will need a lot of such petals. They merge into one layer, then into another, etc., until you get a lush multi-layered bow that can be used to decorate your hair.

In the next accessory, nylon tape is used only as an additional accessory, decorating a base made of fabric. You can create such beauty in a few minutes, and decorated with nylon ribbon it will look even richer.

The next bow belongs to the gift category, but I decided to put it in this section because it is made of nylon ribbon. For it, you will need to fold the tape in many layers, and make a cut in the middle, which will need to be tied with a thin fishing line, around which the ends will be tied. The most important stage: You need to pull out all the ends of the folded ribbon to get a very fluffy design.
This bow will decorate a Christmas tree or simply decorate your apartment.

A similar accessory can be made from thicker tape and even burlap. Pulling out the ends will be more difficult, but the effect will be more unexpected and extraordinary.

Photos of other beautiful bows
How can they not register them! In the form of elegant brooches, bracelets and much more. For example, the accessory below will be an interesting addition to a holiday outfit.


Another lace bow with a bead inside.

In general, thanks to lace, even the simplest design begins to look more original and festive.


Just look how you can decorate your handle by adding several layers of lace and satin ribbons.

A bow on the headband will turn an ordinary girl into a doll hurrying to the ball.


Roses as bows. Wonderful, isn't it?

The bow on the dress looks very impressive and original.


Sincerely, Anastasia Skoracheva
Every woman has her own little secrets and tricks that make her life better and easier. And if there is also a little princess in the family.
Ribbon bows or various materials tends to add festive mood, complement an outfit or hairstyle, decorate gift set, complete the table setting, etc.
Most women have the opinion that making a bow with your own hands is a very difficult task. And completely in vain. Anyone can master such a craft.
To do this, you just need to prepare everything necessary materials, and then get down to business.
Making a beautiful bow from ribbon
Even twenty years ago, every schoolgirl wore braids with ribbons woven into them.
Today, manufacturers produce a wide variety of bows for hair, clothing, gifts, etc. from satin or nylon ribbon.
But the most beautiful bow can only be made with your own hands.
1) A rather interesting bow is made from a satin ribbon of two colors
With the free ends you can tie a bow to your hair, items of clothing, or attach it to gift wrapping.
2) Dior – a chic DIY bow made from a thin ribbon
This amazing decorative element can be attached to any surface.
3) You can make a big fluffy bow from ribbon with your own hands
To manufacture individual parts you will need to follow a few simple steps:

The royal bow is ready!
You can see how to make such a bow in the video.
4) DIY hair bow
A bow for decorating a hairstyle, made by yourself, always looks beautiful and original. And also a real exclusive. 
Are you planning a holiday or is your daughter going to first grade? In addition to a magnificent outfit, you need to prepare a beautiful bow to decorate your hair. Can such a bow be made from nylon tape?
If you were unable to find nylon ribbon of the required width on store shelves, organza can easily replace it.
To begin, we will prepare 2 ribbons 1.4 m long and 7.5 cm wide. We fold the ribbon in half lengthwise. Then we sew the folded edge with a needle by threading it on a thread. After the entire strip is stitched in this way, we begin to tighten the thread until the stitched strip becomes 0.4 m long.
Fasten the thread well and straighten the product. We do the same maneuver with the other tape. We cut out a circle with a diameter of 7.5 cm from felt or thick ribbon. We make two holes in the center of the circle, and thread a thin braid or ribbon into them to match the color of our bow. 
Apply glue along the edge of the base and glue the first piece, then coat the base with glue in a spiral and glue the tape, after finishing the first tape, glue the second.
To prevent the edges from spilling out, the tape must be burned.
5) DIY bow from paper ribbon
With the help of such a bow you can beautifully decorate a gift box or complement a table setting.
For such an occasion, you need to choose a very elegant ribbon, perhaps with a golden edge, as well as a pink or blue ribbon.
We make it from a plain satin ribbon, from a ribbon with a golden edge of the same color, a thin satin ribbon and braid with a pattern.
We begin to collect the flower from a piece of wide ribbon. Fold the ribbon in half and stitch it with thread. We perform this manipulation with all segments.
And remember, in the store you can always buy a lot of elastic bands and hairpins for your beloved daughter, but a bow or hairpin made by yourself always looks more impressive and elegant!
Views: 3,658
One of the skills that can add femininity to you and your daughters or help create celebration and fun is the ability to make bows from ribbons with your own hands. These accessories can become not only an excellent hair decoration, but also an interior element, decoration for holiday packaging, souvenirs, Christmas trees and so on.
You can not only buy a beautiful bow made of satin ribbon, but also make it yourself. This will give your little queen sophistication, emphasize the beauty of her hair, and also create a guarantee that her style will be unique among other girls. After all, most mothers are accustomed to buying such things in stores, where the choice is not very diverse, and children decorated with standard bows differ little from large quantity children at school or kindergarten, feeling gray and like everyone else.
This lush ribbon bow is very easy to make, you just need to take a little time and try a little, and step by step photo creating a bow from ribbons will only simplify this task.
Before you make a bow from a satin ribbon, try to find out from the girl what colors she likes best, how she would like to decorate the bow and other details. Please keep these notes in mind as you work and select materials.
We will need:
- Satin ribbon of the chosen color.
- Elements for decoration to choose from (rhinestones, beads, multi-colored stones). To prevent the bow from becoming too heavy, try not to overdo it with the size and quantity of these elements.
- A small piece of felt for attaching parts.
- Lighter.
- Hair tie to match the color of the bow.
- Scissors, ruler or meter.
Manufacturing process:
- We cut the satin ribbon into 50 pieces 11 cm long. To make the bow voluminous, it must be made from a wide ribbon (at least 3 cm).
- Fold the cut parts in half with the satin side facing inward.
- Lubricate the inside of the parts with glue along the width of the tape. Fold and press the tape. When the glue is well saturated, turn the edges of the ribbon with the satin side up and fold one on top of the other, as in the photo.


- We fold a small bow from the free edges of the ribbon, placing one on top of the other on both sides. As a result, we end up with ends on different sides. To make the ends even, burn the edges with a lighter.


- In the center of the resulting part we glue the decoration elements we have chosen (rhinestones, beads, etc.). We carry out similar actions with all the other petals of the bow.
- From a prepared piece of felt, cut out a circle with a diameter of 4-5 cm. For one layer you will need about twelve petals.

- We form the upper rows in the same way. On the second layer we use the same number of petals as on the first. As the rows go up, the number of petals will decrease. Accordingly, the circle in diameter will become smaller.


- After giving the bow the desired pomp, attach the hair elastic to the felt base.

Ready! The resulting lush kanzashi bows made from ribbons can also be an excellent gift, and your efforts and originality will undoubtedly be appreciated.
Rep ribbon bows
Rep ribbons differ from other types in their ability not to fall apart for a long time. Due to their density, such tapes also eliminate unnecessary fuss during the work process.
We will need:
- Rep ribbons of different widths and colors (you can buy multi-colored ones or with a ready-made pattern)
- Barrette
- Thread, scissors
- Jewelry (bead, beautiful button, finished decoration or thin ribbon)
Manufacturing process:
- To obtain a wide and voluminous bow, cut out ribbons of the appropriate size. They should be rectangular in shape. about 10 cm long. We make small holes in the center.


- We wind the ribbons around one in such a way that its ends are distributed on different sides. Depending on the desired number of loops on the bow, we make the appropriate number of turns. In this case we made two loops. We fix the edges of the tape with clothespins.
- We sew the cut ribbons in the center with white thread using a “forward needle” seam. Carefully tighten the thread several times.


- We attach the top layer of a different color in a similar way. For this ball, a thinner ribbon and a different color that goes well with the background is suitable.

- We attach two types of bows to one another using glue or sewing.
- We decorate the bow in the center with the decoration element we have chosen:

- WITH reverse side attach the hairpin:

Ready! This accessory will add zest to the assortment of existing school ribbon bows and will improve the mood of you and your child.


Satin ribbon bows 5 cm wide
This elegant ribbon bow for any dress will be a great addition to your little beauty, and it’s very easy to create.

Required materials:
- Regular metal hairpin
- Satin ribbon to match the color of the girl’s planned style (5 cm wide)
- Thin ribbon to match the background (you can buy ribbons with various ready-made patterns and designs)
- Glue, needle, thread to match the color of the ribbons
- Lighter or candle and matches

Manufacturing process:
- Using scissors, we cut out strips about 6 cm long. We cut out as many as we decided to make similar hairpins.
- We make thin strips about 1.5 cm long. To ensure that the edges of the ribbons are even, we scorch them with fire.

- This process must be done carefully and slowly so as not to burn more than necessary.
- Fold the strips in half and sew in the center. Leave a small piece of thread for tightening. As a result, we get the shape of a bow.
- We tie the bow in the middle with a thin ribbon and carefully sew it on.
- Glue the resulting bow onto the hairpin.
The hair ribbon bow is ready to turn heads!
Nylon ribbon bow
Nylon ribbon differs from other materials for bows in its affordable price, lightness and a very large number of varieties of shapes and tones. Most often, this type of bow awakens in the mind an association picture associated with the famous September holiday at school.
Required materials:
- Nylon tape 5 meters long and 5 cm wide
- Jewelry (beads, small bows, buttons, etc.)
- Needle and thread
Manufacturing process:
- Fold one of the edges of the ribbon into a triangle, then fold the resulting piece in half again. As a result, we have the first petal of our bow.

- For the next ball of petals, fold another triangle on top of the first. We fix each new triangle in the corners indicated in the photo, numbered 2 and 3.


- We do the same with the next petals, using the entire tape.


- When the ribbon ends and all the petals are already formed, we connect the first and last petals from above and below with a light seam.

- In order to get the desired height of the decoration, press on it from above. After reaching the required height, fasten the bow at the top and bottom.

- We decorate the bow with the selected decoration element and sew a regular hair elastic to the bottom.

Large and cheerful ribbon bows are ready for all occasions!
Ribbon bow for discharge
The birth of a child is one of the most beautiful and joyful events in life. On this day, you want everything to be unique and remain in your memory as an excellent memory for the rest of your life. One of the ways to add specialness to the day of discharge from the maternity hospital is to put a bow on an envelope, especially if it’s made by hand. All you need for this craft is a few free evenings and a good mood.

Required materials:
- Satin ribbon. To create a voluminous bow, you need to take a wider ribbon. It is customary to choose its color according to the sex of the newborn.
- A circle cut out of felt with a diameter of 3-6 cm.
- Moment glue or hot melt glue.
- Scissors.
- Lighter.
- Decoration elements of your choice (rhinestones, beads, sparkles, small ribbons).
Ribbon bow for discharge: step-by-step photos and instructions
- We cut the satin ribbon into 30-55 pieces 6 to 9 cm long and another 10-15 pieces 5-8 cm long.
- We bend one piece of tape, with the front side facing up. We cut off the edge of the tape and singe it so that it doesn’t stick out.
- Bend the other end of the tape up and inside out. The result should be a petal.
- We perform similar actions with all remaining segments.
- After finishing the work, the petals need to be folded into a flower bow made from ribbon. To do this, glue the petals one by one onto the felt circle we cut out. The glue should be applied in the center of the circle, leaving about 1 cm of free space around the edges.
- We attach the upper balls of the petals in a similar way. Each subsequent layer should be composed of smaller petals.
- We decorate the bow according to your wishes and whims of your imagination. You can use beads or a small bow in the center, and place small rhinestones along the edges, adding sophistication to the product.


This bow is suitable both on the day of discharge of your own baby and as a gift bow for loved ones who are lucky enough to become parents.
Bow for a gift
A universal decoration for any gift is a bow. Its presence on a gift helps create a festive atmosphere, as well as awaken in the soul the trembling feelings of the process of untying the bow and unpacking the box with the gift. You can create such a bow with your own hands, and it’s not that difficult to do. We invite you to see this for yourself.

Required materials:
- Several ribbons from any material (can also be made from paper)
- Scissors
Manufacturing process:
- We fold the prepared tape into several balls or simply wrap it around our hand.
- Remove from your hand and fold the tape in half.
- Cut off unnecessary corners.

- We fold the tape so that its corners end up in the center. We tie the result with thick thread or rope.

The holiday decoration for the gift is ready!

Handmade work can not only provide you with the opportunity to create something new and original, but also increases self-esteem, creativity, and helps overcome stress and internal tension. Even if you do not have pronounced creativity, you should not assume that you cannot cope with this task. In fact, progress in creativity is only possible with the constant development of the inclinations that everyone has. Every person is a creator, so create and be happy!
Video: Bows for school. How to make bows with your own hands?
Today, bows are becoming an ideal decoration, decoration festive table. However, the appearance remains unchanged when you need something individual for your hair. This accessory is also used to decorate gifts. Every girl has various tricks up her sleeve to make the holiday more festive and look more elegant at the same time.
If the question arises about how to make a beautiful bow with your own hands, then if you have the housewife’s little arsenal of tricks, this is quite easy to implement.

Paper or ribbon bow
You can make similar decorations different ways, you just need to be smart. They are realized using all kinds of materials, but the most popular are paper and tape.


Technology or how to make a paper bow for a gift:
- cut thick paper into strips;
- each piece should be a different length;
- fold the segments without distorting them;
- it is necessary to make six large “eights”, three small ones;
- leave one figure, straight, as it will serve as a border ribbon for the “eights”;
- Each resulting figure is crossed, and in the middle the straight mold left for the border is secured with glue.

To understand the process of the action algorithm, there are photos of ready-made bows and at the implementation stage.

There is another option for creating a similar decoration:
- Various shapes are cut out of colored paper;
- drawings will be an additional touch;
- is implemented according to the previous principle, only by immediately gluing them together and tying them with a straight strip;
- At the bottom of the bow you can cut out paper in the shape of a triangle.

Tape technology
If you need a voluminous, lush bow for a gift, then you can use the following instructions:
- the material used will be a fairly dense tape;
- then it is folded into several rings so that it appears right size, volume;
- the loops are smoothed out;
- corners are cut off;
- straighten, then roll into rectangles in the center;
- the middle is fastened with another tape, stapler, wire;
- after this, the loops need to be turned on different sides;
- adjust the rings.


Classic decor ideas
You can also use traditional decorations for gifts:
Butterfly. The ribbon is divided into equal halves and crossed with each other. The loops alternately go down and then up. Then you need to pull the decoration together in the middle.

Strict. Two ribbons are cut, smaller and larger. The long one is used as the main blank itself; its edges are dipped in glue and both sides are glued together. The other is grabbed in the middle, at the gluing site.

A simple ribbon bow can be made with two crossed figure eights. These figures are held together. The highlight can be various beads. Simple decorations are created from thin ribbons.

Multilayer. This type is carried out with three ribbons of different lengths and widths. If desired, they can differ in tone palette. The widest one will be at the bottom, and the narrowest one at the top. The ends are trimmed with a corner and left stretched so that the product can be attached to the packaging. Another piece will be needed to tie the three layers together.


Double layer. To do this, you will need two segments: one wide, the other narrow. They are also connected with a ribbon in the middle. The tips of the primary figures are fastened to each other.


Lush compositions
Mostly chic, voluminous bows are made to decorate the appearance. Not so long ago, hair decor was in fashion, and most girls today are wondering how to properly make a bow for their heads.

A lush composition is made as follows:
- the length and width of the material are chosen based on the final intended result;
- a two-meter tape is folded like an accordion;
- in the middle the accessory is tied with a nylon thread, the ends are torn off so that it is convenient to attach to the hair;
- in addition, decorative elements or other colors of fabric are glued together, only in a different color.
- additional touches are also bandaged.

There is another way to make a lush head accessory made of fabric:
- material of two meters, cut into 20 cm;
- fold in half;
- the wrong side will turn out;
- in a folded line, it is necessary to glue the fabric;
- the product is turned inside out after the glue dries;
- the tips are folded;
- then they are stitched with thread;
- sewn to the base;
- You can decorate the accessory with beads, rhinestones, beads.

Satin, floral bow options
Technology of how to make a bow from a satin ribbon:
- the material is folded several times in a figure eight;
- fixed in the middle;
- the coils are fluffy;
- the ends are trimmed or burned.


To implement the planned accessory, in any case, a certain set of tools and materials is required. In most situations, it is better to stock up on fabric more than two meters long and twenty centimeters wide.

The master class on how to make a bow with your own hands indicates a clear sequence of actions. Only tools are taken as a basis, the algorithm is always different, because there is fantasy at the head of the rules.

For example, an attribute in the form of a flower can be made like this:
- one tape is fastened with the ends inward, creating loops;
- having retreated a little space, continue the same actions until it becomes magnificent;
- The base is bandaged with a thin cloth, sometimes a stapler and glue are used;
- then straighten the product.

Or it can be implemented in another way, where the sequence will be similar, but at the same time, the ribbons are cut in the area of the loops. Today, ideas and instructions on how to make a bow are often Western.

A common option is the following:
- a thin ribbon from which figure eights are made;
- some parts are fastened in two pieces;
- a base of several ribbons connected in the middle, while being straight;
- edges jagged;
- two parts are assembled, beads and rhinestones are placed on top.


There are other ways to implement the accessory. It looks especially unique and interesting on Christmas trees, on Christmas and other wonderful holidays.

Photos of DIY bows


