A universal selection of gift ideas for any occasion and occasion. Surprise your friends and loved ones! ;)
Good day, Dear friends! 2018 is coming very soon New Year. This means that it’s time to prepare in full for the upcoming event, for example, prepare homemade gifts. Do-it-yourself dog - what could be better as a souvenir for an upcoming event?
Now many have already begun to prepare for the holiday, which I strongly advise you to do too. In this article you will find many representatives of the canine world of various breeds and from a variety of materials.
This post is so detailed that I will be very surprised if you don't find what you are looking for. This year will be special for me, since I was born exactly two eastern calendar cycles ago, also in the year of the dog. So I’ll try not to lose face and collect as many ideas as possible. There will be warm and soft toys, pillows, crafts, even elements of home comfort.
Do-it-yourself dog: symbol of the New Year 2018 with photos and master classes
To make a dog yourself, you don’t need any special skills or hard-to-find materials. Almost everything is clear from the master classes, and sometimes even from the photos themselves. The main thing is to be patient and do something really practical.
By the way, a dog can be given not only for the New Year. After all, this creature is the personification of loyalty and devotion, so by presenting it, you seem to want to strengthen the connection with the person to whom you decided to give such a surprise.
Dog costume
To create a dog costume, it is not necessary to sew a full-fledged outfit for going out. It is enough for him to acquire, for example, a cool mask of this furry creature. It can be printed on a color printer or used as a template for cutting out felt.

If you want to make the image complete, then I advise you to take a closer look at the following simple ideas for the holiday. What and how can you make a cute New Year’s costume for a child and more?
Look at the girl: she is wearing a fluffy tutu skirt, which is complemented by openwork top, striped tights and a headband with textile ears. Two cute ponytails will help complete the look. A small nose is drawn on the nose.
It’s easy to make a tutu skirt yourself, for this you will need a large number of translucent fabric, which will need to be folded in several layers and gathered at the top with an elastic band.

For a boy, you can adapt a fluffy suit from pajamas (for example, a Japanese onesie) or sew it like one. For such an outfit, only approximate body parameters (height of the child and waist circumference) are useful, so even a not very experienced seamstress can handle the creation.

Do you want to do it easier? Make a cap with ears, the creation process of which is described below. Take fur, fleece or velor for her. Velsoft is also suitable if you can handle it (it stretches quite strongly).

Other options for hats can be seen in the following pictures. For example, a hat like this could be a good alternative to the previous option. You will need fleece with long pile.
In the future, such a hat can be worn outdoors as the main headdress. In this case, it will be enough to match such a hat with a T-shirt and pants (skirt) in the color of the dog. The image will be almost complete.

Another headdress is sewn using the same patterns, but the muzzle here is completely different, as well as the ears. Fleece here can be taken with much shorter pile.

How about a flirty dog hat? Choose a cartoon character and make a catchy addition to your look.
Progress:
- Cut out a circle base from thick cardboard.
- Cut a circle of fabric, one and a half to two times the diameter of the base, and tighten it using a “forward needle” seam along the edge. Place a solid base inside.
- Using a similar principle, make the top of the cylinder.
- Side part: Cut a long strip of thick cardboard and cover it with fabric so that the edges do not stick out. Join at the back using a blind stitch.
- Sew or glue the top of the hat to the side so that the side fits tightly to the top and forms a cylinder. Attach the design to the bottom base and decorate the hat.
You can attach this to your hair using hairpins or a headband.

You can also sew ears on the headband; for this you will need the headband itself and ear patterns. The first option is more complicated; it implies that the inner part will be slightly smaller than the outer part. To create it, it is best to use fur or fleece.
 But the ears are simpler.
To look real, take regular gloves in the color you want and some felt. Cut out the details of future paws from felt and attach them with a thin layer of glue or thread. You can make these gloves in literally 10-20 minutes!

Crafts from scrap materials and more
We got the costume, but what about the Earthen Yellow Dog crafts? We will make them the most different ways. Paper cards and souvenirs, even matchboxes - all this will be used and will delight you with its unusual appearance.
Paper fantasies: postcards and origami
You can make cards and original origami from cardboard and paper. For example, what do you think of this cartoon dog? You can print it out and trace it around to make your own original postcard. Congratulations can be written on the card itself, or the text part can be attached inside as a separate layer.

The second option with a simpler form looks no less original. And if you try, you can also make such a dog with a surprise: if you pull the tongue, the ears will open.


Try transferring this dog to felt. This way it will last much longer than the paper version and can be used even after the New Year.

The next dog can be used as a bookmark, which will certainly come in handy around the house. Make it from a regular square of paper.
FROM such paper dogs you can create a New Year's tree garland that will remind you of the symbol of the year.

Here's how you can fold napkins onto festive table. This form is quite stable, but at the same time it does not take much time to assemble. Fans of Scottish Terriers will especially appreciate it.

The last one in this series is a very cute and inventive dog: it is made from a matchbox, and a heartfelt message is left inside. A series of such boxes will make all your family and friends happier. If you coat the box with a special varnish for paper, then even snow and rain will not be a problem for such a gift (although you still shouldn’t wash it).

Wooden doggies
Warm material that is perfect for celebrating the upcoming New Year. Make a key holder or some sort of hanger for dog things out of plywood. Woodworking skills, templates for carving a dog and acrylic paints with specialized wood varnish.

As children, many of us made toys from plywood. This hobby can be turned into something more by making a full-fledged home sculpture.

And here it is completely children's way prepare for the holiday: a dog with movable legs, which can be made from cardboard or plywood.

New Year's toys
In fact, you can hang almost anything on a Christmas tree. For example, I decorate a green tree with small soft toys- purchased and made by myself. Try sewing the dogs you see below. You can literally take them from a photo and get ready-made patterns.

A great way to surprise your friends and family is to paint your own Christmas tree balls. To do this, buy plain round balls and acrylic paints.

We use polymer clay and plasticine
Many children really like to create figures from plasticine, dough or polymer clay(by the way, using the presented MKs you can do both). But this develops fine motor skills and in many ways has a very positive effect on the child’s psyche. Therefore, when preparing for the New Year, let’s take this important factor into account and create several cute dogs.
The production of such figurines is generally the same, but has some differences. If you're good at sculpting techniques, you can jump right into something like the dog below.

If you still consider yourself a beginner, then start with simpler forms, which can be repeated right after the photo, as in the picture below. It turned out to be a very cute pitbull)

The pug is also not inferior to its brother. Thanks to its in its simplest form Even very young children will be able to do it.

With the following three step-by-step master classes, you will create several dogs of completely different breeds. All of them can be done with children.
The souvenir can be either close to real-life dogs or have the appearance of a cartoon character (in the second case, this may turn out to be even more interesting).


How to sew a dog from fabric: patterns like this
Sewn dogs will be popular not only on the eve of New Year's holidays, but also in the future.
Stuffed Toys
A fabric dog can be sewn in a variety of ways. How do you like the doggie below? He rather resembles a hyena, but due to his similarity with the desired character, he looks very attractive.

You'll definitely love the avant-garde patterned characters you can see below. They have very big heads and small bodies, making these dogs look childishly clumsy and naive. The effect is achieved using a very wide insert in the head and rather modest side parts.

The classic dog in the next version is made from faux fur and stands on 4 legs, unlike most of the previously mentioned dogs. For the New Year, she can sew a Christmas red cap and scarf.

Our selection even includes designer dolls and toys with designer patterns. Just look at this adorable basset hound! The author (Alice Shangina) even came up with a description for it: “The world is beautiful, like a basset.” The dog's nose is felted from dry wool, but it can also be cut out separately by highlighting the corresponding part on the muzzle pattern.

If you dote on the Dalmatians, then the next idea New Year's surprise you will definitely like it. Patterns are enough high level, but the result is simply gorgeous. Stock up on white fleece, white and black thread and beads for the eyes. Don't forget the black marker.
Sew a dog like this better with your hands, because you just have to be a virtuoso sewing machine, in order to thoroughly grind the parts of such a dog.


A tilde dog can be made using the following patterns. For her, take a thin one cotton fabric. To the character the dress will suit, trousers - whatever you want.

A square-headed dog can be made even without ready-made patterns (create them yourself), if you look closely at its structure.

If you have several pieces of leather in stock, then create a small dog from them.

Let's use socks
The good thing about socks is that there is a huge selection of colors even in small stores (unlike the same fabrics). So feel free to go to the store for a new pair of socks and create adorable babies.
Both versions of New Year's dogs are sewn according to the same principle, but the result is completely different. The first dog is very bright and cheerful, while the second one is restrained and laconic; it can be given to even a serious man.


What can be done from nylon tights! A couple of pugs for inspiration from Lyudmila Tkachenko. They are made by tightening and further painting.


We create from felt
Pugs are incredibly charming representatives of the canine kingdom. To make such a dog, you will need several colors of thick felt and thread to match the color of the fabric. Then this symbol of the year can be turned not only into a keychain, but also into a brooch, magnet, or simply left as a soft souvenir. Please note: the clothes are sewn on top of the finished body.


The Scotch Terrier breed inspires designers and creators to create a variety of crafts with it. Below it is proposed to make a puppy and an adult version of this wonderful dog.

Continuing the series of flat felt toys, it is impossible to pass by this dog. It is sewn a little more complicated than the previous options.

Well, how can you get past this charming boule? Try to do it too.

A refrigerator magnet with a Chihuahua can also be made from felt. You don't need threads here - just stock up on transparent glue and scissors.

Pillows with dogs
Decorative pillows can do more than just sit on sofas. This dachshund, for example, props up the door and protects against drafts. You can sew it according to the indicated patterns, increasing the animal to required sizes and stretching it in the center. The body can also be composed of many pieces.


Two dachshund girlfriends are well suited for daytime relaxation, and at the same time as cuddle toys for a child.

Do you want more ideas? There will be more than enough of them in the next selection! They are easy and quick to sew, but each one can be given as a gift for the New Year and beyond. Use them in the car or at home.


Other gifts with the symbol of the year
If you want to surprise your loved ones not only original toys and keychains, you can make a set of potholders for them. Design them as your imagination dictates.

When creating a souvenir, you can also take into account the favorite breed to which the recipient gravitates.

Wool dogs
They can be felted from dry wool, and fastenings for a brooch or magnet can be glued or sewn on the back.

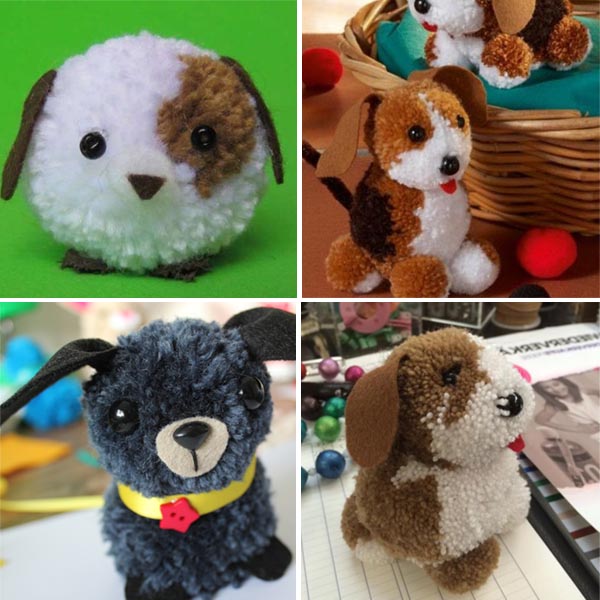
Threads and pompoms
Thread pompoms make very realistic dogs. To create pompoms you will need special devices or two circles of very thick cardboard on which threads will be wound. After winding several layers, cut the threads along the outer edge and thread another thread through the rings, tightening properly to form a knot.

The most important thing is to learn how to make high-quality pom-poms. And from them, with the help of various variations of sizes and additional elements you can get a variety of figures.
Experiments with coffee beans
Funny dogs can also be made from scattered coffee beans. To do this, you only need to outline the contours of the dog and cover the entire surface inside with glue. This way you can keep your child busy and make a beautiful holiday panel.

 Bottle dogs
Schools and kindergartens often require crafts made from recycled materials. Bottles will come in handy here. In addition to the base, you can make wool and other decorative elements from plastic bottles. You can put multi-colored glass balls or something similar inside the bottle to make it look more festive.

Rolling up a towel
A universal gift that is in no way inferior to the store-bought version. Thin mohair towels are suitable for this, but thicker ones with wider edges can be used. A towel alone is not enough: for a believable image, ears made from pieces of felt, a nose, eyes and a ribbon will come in handy.

And a few more ways to festively roll up a towel. Not only in the form of a dog, but also in the form of other representatives of the fauna around us.
I saved the juiciest for last) Just look at this amazing lamp in the shape of a dog, which you can create yourself. This masterpiece will be a worthy gift for your loved ones.
Knitted and crocheted dogs: video mk
Since knitting is not such a quick and simple thing, I decided to make a selection of video master classes on this topic.
First of all, I suggest you knit baby booties (this is done with knitting needles). If you or your family have Small child, then this will be a great gift.
But the next three dogs are crocheted using the favorite crochet hook. The result is completely different and dissimilar dogs, each of which claims to be a designer toy (which costs a lot of money in stores). Thanks to detailed instructions, you will learn how to make exactly the same dogs.
The first one is made of fluffy yarn, which makes dogs very soft. The rest are made from ordinary threads, but also have their own charm.
The next two dogs are knitted according to the amigurumi principle, a very popular type of knitting now. Thanks to it you can create very cute creatures.
Finally, I suggest you make a square dog like this. Here presented detailed description the creation process along with patterns at the end of the document.
That's all for today. Happy New Year to you, friends! Create creative dogs with your own hands and come visit more often. I will be glad to see you here and in other articles on my blog. See you soon!
Sincerely, Anastasia Skoracheva
Hello, dear friends, today we will sculpt a dog from polymer clay. As you know, the next New Year 2018 is the Year of the Dog in eastern calendar, so my child and I will sculpt a dog out of polymer clay as a keychain or souvenir for the Year of the Dog. We sculpted a polymer clay rooster for the Year of the Rooster here.
The main condition is how to easily and quickly mold a dog from polymer clay, plasticine, plastic, fimo clay. We will look at more complex sculpting of dogs in this article: “How to sculpt a dog from polymer clay.” Here, for inspiration and examples, we have collected these photographs of cute little plastic crafts - dogs, simple and light, which even a child can quickly make.

Plus, I personally love such simple “kawaii” shapes of animals - crafts made from polymer clay. Also, for such souvenir modeling with children, you can use Play Doh plasticine and dry the craft. And if you take ordinary plasticine to sculpt dogs, you will need to open it with varnish so that the craft can be preserved longer.

For some reason, the craftswomen who made these plastic dogs used them as stud earrings. I don’t know who would think of wearing such earrings, maybe children? But thanks to them for the idea. Based on these earrings, you can make keychains and figurines of dogs from clay, or plastic, or plasticine.
 Earrings are dogs made of polymer clay.


 Look, this is not just an ordinary dog made of polymer clay, there are even different breeds of dogs here. Dogs: huskies, terriers, spitzels. How lovely.


And this is my favorite:

And these are my number two favorites.
This dog is very cute and beautiful. Sculpting it is not that difficult. You can make it not only from polymer clay, but also from other plastic materials from plasticine to dough. But if you make it from plastic and bake it, you will get an excellent souvenir and gift.
For sculpting you need to take the following materials:
- polymer clay cream or beige color
- polymer clay Brown
- white polymer clay
- a little black clay for the nose
- soft pink polymer clay
- ready-made eyes can be cut out of paper
- modeling board
- All necessary tools for shaping clay (stacks, bars)
Step-by-step and visual master class
1 . We start work as usual with a ball, which needs to be shaped into a head, then use stacks to make folds and a recess for the mouth. Then attach the spout from black plastic (Fig. 1-2). The second element is to mold the dog’s torso (Fig. 3-4), and the third is the dog’s hind legs (Fig. 5-6).
2. We decorate the hind legs with white clay pads (Fig. 7-9) and glue them to the body. Next you need to mold the front legs (Fig. 11-13). They are similar to the back ones, but of a different shape. Sculpt as shown in the photo above.
3. You also need to make pads out of white clay for the front legs and glue them to the body (Fig. 14-17). Next, put on the dog’s head and make a neck strap from pink clay. Wrap it around your neck (Fig. 19-20).
4. Attach another diamond-shaped medallion to the pink collar (Fig. 21-22). Now you need to mold wavy ears from brown clay and glue them to the head (Fig. 23-26). Since we have a girl, it would be a good idea to glue pink bows to the ears (Fig. 27-29). Now all that remains is to glue the eyes, give them a ruddy look with paints, and don’t forget to darken the mouth as shown in the picture.
Can be varnished if desired. So the souvenir is ready. Happy sculpting.
Modeling dogs
Master class on sculpting a dog from polymer clay
Such cute and wonderful dogs, and you can make them yourself or with your kids together! Such a wonderful souvenir will be an excellent gift for the New Year or any other holiday. The most valuable thing is your effort put into the product.
What materials do you need to take for sculpting:
Polymer clay white, black, red and other colors depending on the chosen dog
- modeling board
- stacks
- a little patience and time
Any work with polymer clay begins with softening. Since clay usually has a hard consistency when cold, it needs to be kneaded warm hands, which will have a softening effect.
Step-by-step master class with visual images:
1. It’s better to sculpt a dog from the body. Take a piece of white clay, roll it out into a ball, and give the ball the shape of a drop.
2-4. We sculpt the legs, cut the fingers with a stack.
5. Glue the dog’s legs to the body.
6-7. We sculpt the head, also from a ball, but slightly bigger size. Give it the desired shape.
8-9. Using a small ball of black polymer clay, form two ears and glue them to the dog's head.
10-11. Glue a round nose and small eyes to the muzzle.
12-13. Before gluing the head to the body, make a collar out of red clay and then place the head on it.
14-17. There's just a little bit left to do. Make handles from the balls, cut out the fingers and glue the arms to the dog’s body.
19. Roll out an oval-shaped skate from red clay. Make stripes in stacks.
20. Glue a smaller oval plate to the bottom of the skateboard.
21-22. Make four wheels out of yellow clay, give them a similar shape using stacks and put a small dog on the skateboard.
A ready-made dog can not only sit on a skateboard, but also in an inflatable boat or with a life preserver. You can make all this yourself using polymer clay. At the end, the finished work needs to be baked in the oven. See the packaging for baking time.
Magazine image source: Porcelana Fria
1.
2.
3.
4.
5.
6.
As the eastern horoscope says, the patroness of the coming 2018 is the dog. Souvenir compositions with funny dogs various types and rocks are already full of souvenir shop windows. But best gift– created with your own hands. Thereby step by step master class, you can create a cute dog from polymer clay, which will become a New Year's talisman.
Tools and materials for sculpting a dog
To create a cute dog for the New Year you will need:
- materials - polymer clay black, red, yellow and green, foil;
- tools - stacks with a flat blade;
- auxiliary materials - silicone or plastic mat, oven with thermometer, wet wipes

How to make a dog from polymer clay: step-by-step instruction
Prepare necessary materials. Before working, knead the clay well. Roll two balls from foil: one larger, the other smaller, with a diameter of approximately 4 and 2 cm.
 Squeeze slightly and give them an elliptical shape. Connect a strip of foil in the place where the neck should be.
 Form the frame of the paws with two more strips.
 For getting different shades brown, mix red, yellow and green clay.
You can use ready-made brown clay, but then the color will be uniform, without transitions.
 Make two strips - yellow and brown, 2-3 mm thick, along the entire length of the product. Brown stripe there should be more.
 Using your fingers, flatten the strips in the place where the nose will be, sharpening one end.
With the sharp end, attach a yellow strip to the figure’s nose, clasp the belly to the tail. Carefully press the strip onto the frame.
 Wrap the brown strip around the dog, including the paws and tail. It is desirable that there is an overlap on the strip covering the stomach.
 Carefully smooth the joints in one direction.
 Roll the clay between your fingers to form the paws and tail.
 Cut the bottom of each paw twice. Smooth everything out.
 Advice! Before handling clay of a different color, wipe your hands with a damp cloth.
To make the dog's eyelids, roll two balls yellow color with a diameter of 5 mm. Press at the top of your head.
 Pressing into the muzzle, smear one edge from top to bottom along it. Gently smooth the edges. Try to do everything symmetrically.
Make two small identical cakes, these will be the ears.
 Attach them to your head with your fingers. Bend your ears.
Use the tip of the stack to make indentations for the eyes.
 Roll two black balls with a diameter of 1.5 mm and insert into the eye sockets.
Use small pieces of clay to shape your eyebrows and nose. Form a mouth in a stack, cutting lightly at the mouth.
For the hat, roll two multi-colored flagella and fold them in half. One turn from right to left, the other - vice versa.
 Wrap around the head, make a base and a tassel.
Inspect the figurine for any flaws. Smooth out any imperfections.
 Make a gift bag by wrapping a ball of foil and stretching out part of it with your fingers.
Flatten the plastic at the ends of the bag into corners. Decorate with balls of different colors. Place the bag in the figurine's mouth.
 Bake it strictly according to the instructions for your clay.
Creative master class on modeling New Year's toys— Natalya Neustroyeva prepared the dogs from polymer clay with her own hands.
 For the Year of the Dog, you can also create fragrant and original things with your own hands. Have a successful New Year's creativity and happy holidays!