DIY drawings (mosaics) made of stones (pebbles) for children. Photo.
Children's paintings, panels and drawings made of stones
Few children have not brought home a beautiful pebble at least once. And so that the pebbles do not just lie there, but are useful, you can make a game out of them - a mosaic (constructor): lay out various images, and then take them apart and create new ones.
Stones (pebbles) for this can be anything: sea, or the most common, found near a river, road, brought for repairs or construction.
If you glue them with super glue or a glue gun to cardboard, you will get panels or pictures made of stones. This activity develops fine motor skills, creative thinking, and perseverance. Moreover, panels and paintings made of stones are not just children's fun. Adult masters create real masterpieces using this technique.
DIY stone drawings for 1st grade
To show children the diversity of one of the species children's creativity made from natural material, in many schools, children in the 1st grade are asked about the world around them homework make drawings from stones with your own hands, and then take photographs of your work and bring the photo.
Since the drawings themselves do not need to be brought to school, the background for them can be made like this:
- use cardboard, paper, fabric, etc. as a background for the drawing.
- lay out the drawing outdoors: on the ground or in the sand
If you create patterns and drawings from stones not on paper, but on the ground or sand, you will get works using the technique, which, although not durable, can be admired by all random passers-by.
The drawing itself can also be done in different ways:
- lay out the entire image with stones along with the internal parts (mosaic)
- lay out stones only on the outline of the image
- lay out the outline of the image and some of its parts with stones
- take into account or not take into account the color of stones when drawing up an image
The image can be laid out with stones without preliminary sketches or a sketch with an outline can be made. If a child finds it difficult to come up with a plot for such a drawing or is somehow not satisfied with the outline he has drawn, you can find on the Internet and print out the simplest coloring book for kids with a minimum number of small details, and then line it with stones.
Drawings of stones for children on paper
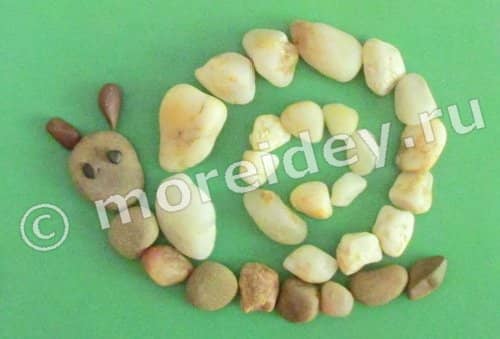
As an example, I’ll show you a few photos of my daughter and I’s drawings made from stones.
Snail - drawing from stones
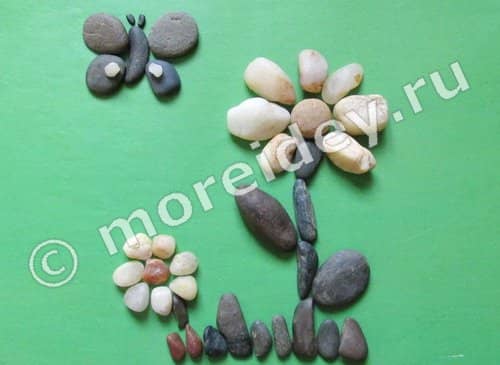
Butterfly - drawing from stones

Composition of stones: flowers and butterfly
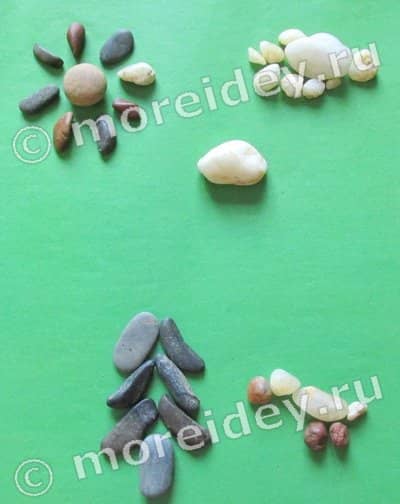
Composition of stones: sun, clouds, Christmas tree, duckling
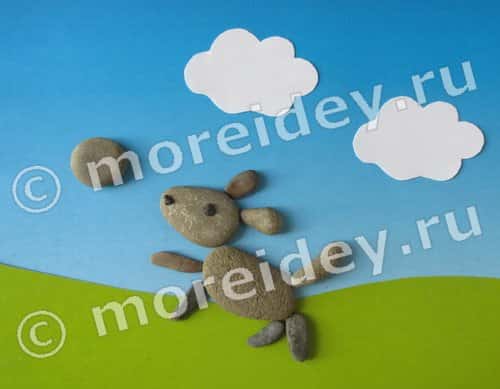
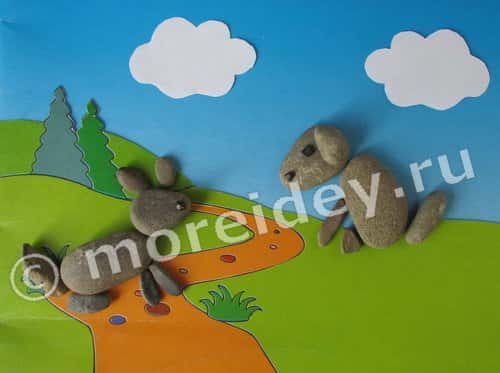
Dogs - crafts made from stones
My daughter and I made the next few crafts with dogs made from stones like this:

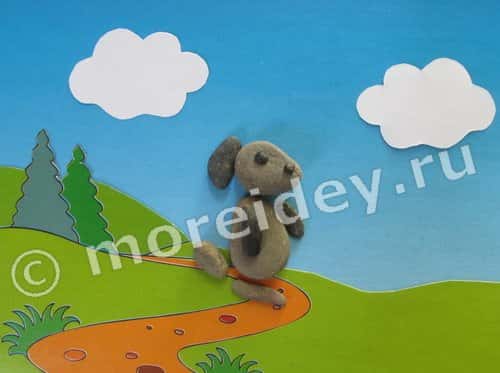
These are the compositions we came up with (in one of them, in addition to stones, my daughter used a straw).
Man with a dog on a leash

Dog playing with a ball
Meeting on the track
Walk
Autumn pictures made of stones
For the picture on autumn theme we found a handful small stones yellow, orange and brown colors, to lay out the base of the clearing - earth with fallen leaves, as well as several larger stones (for butterflies, dragonflies and mushrooms).

From these stones the picture “Mushroom Meadow” was created.
Mushroom clearing

And the picture "Autumn Flower".
autumn flower

And then, when the youngest daughter began to play with these pebbles: sorting them out, pouring them into a toy bowl, etc., the eldest daughter made a few more simple figures. On paper, especially colored paper, they would have looked better than on oilcloth, and the lighting left much to be desired, so the photo is of poor quality. But as an example, I will show these figures.
From left to right and top to bottom: bird, bunny, ducks, cat, giraffe.

Plots for Halloween
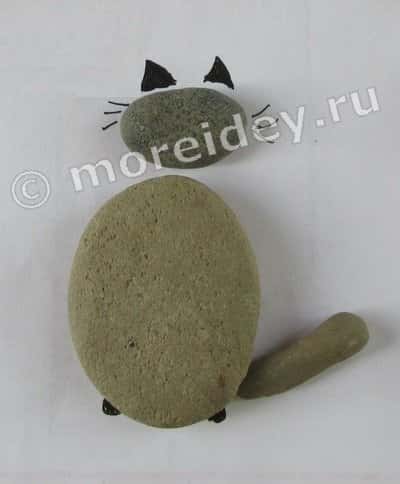
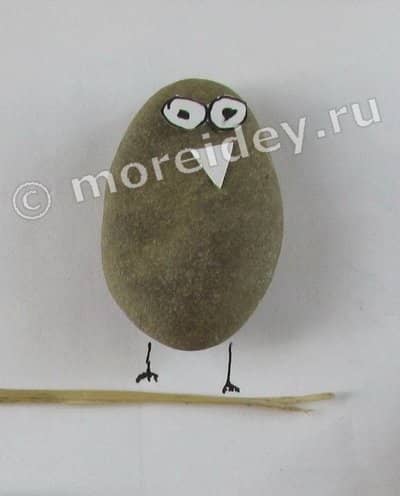
And my daughter made these figures using painted details: a witch on a broom, an owl, a cat, a pumpkin and some kind of tailed robber.

The cat and the owl are closer. The owl's eyes and beak are made of paper.
Children's drawings with stones on the street
Several works were received using stones created by children during their walk. These ideas can be used with children both to do their homework on the world around them, and to help them spend time outside in the summer (and maybe not only in the summer).
Many thanks to the participants for these ideas and photos!
Drawing made from stones and other natural materials
The work "Dragon" was completed Senkina Anastasia(5.9 years old) and Senkin Yaroslav (2.8 years old) from Moscow. When creating it, not only stones were used, but also other natural materials: twigs, leaves, flower petals.

Painting with stones
The work "Drawings with stones" with a little help from Yulia's mother was completed by Kolya Kucheryavyi, 4 years old, St. Petersburg.
Julia told how she and Kolya created these drawings:
"Good afternoon! I decided to show you how we learn to draw simple pictures natural materials, namely, stones.
Coming to the lake one fine day with my child, we thoughtlessly, but with pleasure, simply threw pebbles into the water, and then I invited my son to build a castle out of sand and stones, but my son didn’t want to... Well, he didn’t want to, and okay, work for fantasies are indeed not easy. And then the idea came: to draw a castle! And then a boat, a fish and even a turtle.
It was here that the child took great pleasure in laying out drawings with stones, which he then did not mind taking apart and laying out a new pattern. And the secret is that the drawing must be drawn in advance with a stick or finger on wet sand (this is done by an adult). This is such a simple coloring!"
Crafts from sea stones which are easy to make at home. This creative activity will be interesting for adults and children, and the resulting products will decorate a room or garden. To make crafts from sea pebbles, you will need smooth pebbles of different shapes and lengths. You can assemble them yourself during a trip to the sea or purchase them in specialized stores. You can make a wide variety of crafts from pebbles with your own hands, since this stone has the most bizarre shapes and colors: from snow-white to deep black.
There are a large number of workshops on making crafts from pebbles. As experts advise, it is best to use river pebbles or those created artificially for products. They are distinguished by the fact that they do not change color over time and do not become covered with a white coating, unlike sea pebbles. Pebbles collected from the sea can also be used in crafts, but they are more suitable for yard items.
The simplest master class that can be found on the use of smoothies is making rugs for a bathhouse, bathroom or corridor. Such products will not only look beautiful, but will also bring benefits by providing a massage effect. It will be pleasant to walk on such rugs, they are practical and easy to clean.
As the master classes show, stones can be placed on the base randomly, combining different colors and shapes or in the form of original designs - fish, dolphins, insects, etc. The whole family can make rugs from stones with their own hands. This activity is simple and exciting, and even Small child.
In master classes on creating flat crafts(rugs, hot pads) it is recommended to use rubber as a base: stones of any size will be well attached to it. To glue them, you should use strong waterproof glue, which must be transparent. Stone big size attached to a mesh and a special solution. You can varnish the pebbles on top or leave them in their original form.
Interior decorations

Pebbles can be used to create wonderful crafts for interior decoration: they are easy to care for, easy to clean and will go perfectly with any home design idea. A popular workshop is how to create cute cacti from oval pebbles. It's very easy to make them by painting the pebbles green and applying a pattern of thorns to them. For the kitchen, you can make vegetables and berries from stones, covering them with paints and putting them in a wicker basket.
A photo frame made from seashells and pebbles will look beautiful: it will decorate a bright vacation photo. The simplest master class, which is suitable for beginner craftsmen or very young ones, is decorating pebbles with eyes. They can be applied with paints, made into an applique, or pasted on ready-made plastic eyes for toys. This simple trick will help bring gray stones to life, making them cute and original. You can then use the craft for decoration or development. fine motor skills in kids.
You can create with your own hands from shells interesting crafts. You can glue 2 identical shells together, put a mother-of-pearl bead inside, and you will get a beautiful souvenir in the form of a shell with a pearl. For experienced craftsmen, a master class on making a ship or boat is suitable. The resulting product will be an excellent gift for any occasion. You can make keychains and pendants from round shells.
Pebbles in the garden interior

Limitless possibilities for using pebbles in the garden interior. Such garden crafts can be quite practical, original and almost eternal, because pebbles consist of a material that hardly wears out and does not lose its appearance over time:
- Flowerpots decorated with smooth stones will be beautiful. You can take any flowerpot as a base, attach a mesh to it and plant the smoothies on the glue so that they completely cover the flowerpot. You can decorate the top ring of a well, trash cans, bench legs, and outdoor barbecues.
- If it is possible to purchase pebbles in large quantities, you can make garden paths from it, laying them out in fancy patterns. In this case, the stones are attached to cement mortar or a special mixture for slabs. Despite the apparent simplicity of the material, such a pleasure will not be cheap: for 1 m² you will need about 60 kg of stones, while 1 kg costs from 40 to 100 rubles.
- You can decorate the garden with candlesticks. To do this, pour about 1/3 of the pebbles into glass jars, place a large candle and close the lid with holes. Jars hung around the perimeter of the house will create an atmosphere of magic, tranquility, romance and comfort.
- The foundation of a private house will be durable and stylish if you decorate it with smoothies. They can be simply added to the cement mortar or attached to a ready-made base that has not yet hardened.
From sea stones and shells you can make paintings where you can see a seascape, magical castles or a fairy-tale plot. Pebbles will look good in a decorative aquarium, in the form of various fish, turtles and frogs. Large pebbles with pictures of houses on them will decorate decorative ponds and bridges. The use of smoothies in the interior of the house and garden is limitless. The main thing is a little imagination, a minimum of material and a little free time.
On the beach, hands are drawn to smooth sea pebbles of different shapes and sizes. Few people can resist the temptation to bring home this piece of the seashore with them. Sometimes, if you get carried away, you can collect a whole bag of these treasures. But what to do next with sea stones? An active mother suggests making crafts from stones with her own hands.
Coloring pebbles
The most famous way to make crafts from pebbles is to decorate them. Look carefully at the selected pebble and think about what it reminds you of: what animal or object. Fantasy will tell you what an unremarkable stone would turn into a minute ago.
The most popular stones for coloring are flattened oval or round shape: in this case, you don’t even have to strain your imagination, just use the ideas that we have collected especially for you.
Ladybugs are the most common option for decorating pebbles.

The oval shape of the stones also resembles an owl.

By drawing a funny face and gluing eyes to it, you can get the following funny toys:

Definitely, many of the pebbles look like strawberries.

Or for a fish.

Actually, any subjects can be painted on the stones.

How to paint a stone? Wash the stone thoroughly with soap and dry it. For better paint application, pre-apply primer - it can be regular PVA glue. Use gouache or acrylic as paints. After the paint has dried, secure the design with decorative varnish.
DIY stone crafts: role-playing games
Since we have already touched on the topic of plots, then, having decorated one or two stones, we can move on to thinking role-playing games with them. You can draw characters from one fairy tale on individual stones, for example, “Turnips” or “Teremka”. Or the characters of one cartoon. Or choose one theme: summer, animals, food.
This could be a cheerful family of pebbles:

Funny minions (here you can use the idea with glued eyes, which was already above):

Crafts made from stones on the theme of space:

Original patterns (it’s great to decorate a flower bed with these pebbles):

A whole town made of stones:

Dinosaur World:


If you don’t know how to draw at all or you’re just too lazy, you can choose the simplest option: stick pictures with characters on the pebbles:
Crafts made from pebbles for apartment decor
Stones brought from the sea are actively used to decorate pots indoor plants, flower beds and aquariums.
This is how you can originally update a pot with an indoor flower:

And these crafts made from pebbles will decorate your room:


Creating paintings from stones with your own hands requires much more patience, time and flight of imagination. Lay out all the pebbles that you have collected and think carefully about what kind of whole composition they can be embodied in.
Perhaps into a tree like this:

Or this girl flying on balloons:

Or these cute birds:

Perhaps in a declaration of love like this:

Sea stone pendants
Such a handmade craft will become original decoration for children and adults. If you managed to find a stone with a hole on the beach, then everything is simple - attach it to a string and put it around your neck. But if you are not lucky enough to bring such a pebble home, do not be upset. Any pebble can be beautifully crocheted using an openwork pattern.

Crafts made from stones and sea pebbles
One of the most popular trends in modern creativity is making crafts with your own hands. Often, to create various crafts, they use the most ordinary objects and available, natural materials. The most ordinary stones make beautiful and unusual crafts, which will decorate the interior of any room or become an excellent element of landscape design. For self made Both ordinary stones and sea pebbles are suitable. The material can be of different sizes and colors.
Stone crafts
Stone is used to decorate fountains, arrange terraces, design garden paths, and even construct furniture. But most often, stone is used to make crafts that become decorations for a garden or personal plot. Stones of different sizes, which are decorated in the form, will perfectly decorate the garden. ladybugs. If you show your imagination, the stones can turn into cute caterpillars, snails, frogs and other cute inhabitants of the garden.
Garden figurines made of stones


A swan can also decorate a garden; its head and neck are made of bent reinforcement, and its body is made of a rounded stone. Other animals can be made in a similar way, where the armature can be used to make legs. Large and medium-sized stones can be decorated in the form of a fairy-tale house and a small gnome can be placed next to the house. Lying stones are an excellent material for creating a dog, cat or tiger.


If you show a little imagination, fabulous mushrooms will grow on your plot or in the garden or daisies will bloom. Pots or buckets with stones painted in the shape of berries will look impressive.
Painting on stones - craft ideas
In order for the painting on the stones to last as long as possible, a varnish coating should be applied over the design.


Crafts made from stones look very interesting and unusual. average size, decorated using the “napkin technique” - decoupage technique. In order to make such a craft you will need:
Medium sized stone with smooth surface;
Bright napkins;
PVA glue;
Acrylic paints;
White “water emulsion”;
Glossy clear varnish.
First of all, it is necessary to apply a layer of “water emulsion” to the surface of the stone. It is better to choose three-layer napkins. The first layer of napkins must be removed, then cut out the design, and remove another layer. Only the top, colorful layer is suitable for crafts. The design from the napkin is fixed on the surface of the stone using PVA glue. As the glue dries, make sure that no wrinkles form on the napkin. Further acrylic paints The background of the craft is created, the drawing is done, and then the painting is done. After applying the design, the stone must be varnished and left to dry for 2 days. Then another layer of varnish is applied.


Crafts from sea pebbles
Sea pebbles are a very convenient material for creating various crafts with your own hands. Due to their baked shape and relatively small size, sea pebbles are used to make various decorations and buttons.
Sea pebble jewelry


You can make holes in the pebbles yourself, using a drill and various drill bits, or seek help from a jewelry workshop.
Perhaps the simplest craft made from sea pebbles is a refrigerator magnet. To do this, you just need to glue a small magnet to one side of the stone and paint the other side with acrylic paints.
Decorating flower pots using sea pebbles
Will look good in any interior flower pot, covered with sea pebbles. In a similar way, you can decorate various boxes, vases or any other containers.


Sea pebble paintings
In order to make unusual paintings from sea pebbles, you need to select the base of the painting and paint it in the required color. You can use a piece of wood or plywood as a base. Then you should draw a sketch of the future design onto the paper and determine what color stones you will need. Then the stones must be painted in the required colors and then glue the stones to the base using a glue gun. If you wish, you can experiment a little and add other materials to the picture.


Crafts with children: let's paint pebbles
Pebble painting will be a great activity not only for adults, but also for children. To paint stones, you must use acrylic paints or gouache. Of course, acrylic paints will be more durable, and if the design is varnished on top, the craft will delight the eye for decades. Using pebble painting, the interior of the room can be decorated with cute cacti. For this craft you will need pebbles large sizes, which should be painted in the form of cacti. Fill a flower pot with fine crumbs and place the resulting “cacti” in it. Thus, one “cactus” or a whole “green family” can be placed in one pot.


With crafts made from sea stones or all kinds of shells, you can decorate not only your home, but also the area adjacent to it. Even children can use them to create a huge number of toys and various things.
What you need to create crafts: tools and materials
Any stones that are collected on the sea or river banks are suitable for making souvenirs.
Pebbles can be any:
- to size;
- smooth, like gloss, or rough;
- plain or painted with veins or splashes;
- transparent or translucent.
They use it to create panels, decorate frames for paintings or photographs, decorate a variety of containers, sometimes even large surfaces, create all kinds of characters, and pave garden paths. They combine well with other natural materials. They decorate the interior of rooms or gardens.
You even have to dive to depths to find particularly valuable shells. They are collected in the summer, however, on overseas beaches this can be done at any time of the year, and only empty. Some people buy them in souvenir shops. And although many unusual shells are found on the shores of a lake or river, It is sea shells that are considered the most attractive and suitable for crafts.
They will look great on all kinds of frames; you can use them to create panels and paintings - real masterpieces.
Glue, paints and other creative materials
Sea stones and shells are not the only things you will need when working on crafts. Usually, on the farm you will find much of what you need, and if something is missing, you can always buy it.
What you will need:
- ordinary and hardening plasticine, which is distinguished by its ability to harden after some time in the air;
- clay;
- paints - gouache, watercolor or acrylic;
- glue;
- nail polish (sometimes acrylic);
- salty dough:
- Take a glass of flour and salt, mix with half a glass of water and a tablespoon of starch or PVA glue. Glue is used when you need to sculpt thin shapes.
- To store the dough, put it in a bag and refrigerate it for no more than a month. Later, it is enough to paint it with gouache, watercolor or food coloring to give the product the required color, cover it with varnish, dry it in the oven and remove it from it completely cooled.
- gypsum;
- any sand;
- shards of glass;
- flexible soft wire;
- scraps of fabric, leather, suede, fur, yarn or thread;
- cardboard (or plywood);
- beads, beads, buttons;
- glass or ceramic containers.
It will not be difficult to make crafts from sea stones and shells with a similar set of very valuable things in the house.
Tools
To work you will also need some tools:
- pencil;
- awl;
- tassels;
- various stacks;
- round nose pliers for working with wire;
- drill;
- file;
- sandpaper.
Workplace and safety
The workspace must be properly organized.
You need to cover your work table with old oilcloth or newspapers. Should be provided workplace light source. A work robe or apron will help keep your clothes clean. The child has enough old t-shirt. In summer and fresh air you can work sitting on the veranda or balcony.
You'll have to use a portable box to fit necessary materials and tools.

Safety precautions should be given priority Special attention, especially if children are involved in the work process:
| Job | Precautionary measures |
| With a drill | Goggles or eye protection mask, gloves (cannot be given to children) |
| WITH salt dough | Electric or gas oven (adult supervision only) |
| With varnish | Do not keep the container open for a long time. You can pour a little varnish into a plastic cup and close it again. The room should be well ventilated. After use, the brush should be washed in solvent. |
| Working with 10% hydrochloric acid solution | When working with acid, use an old toothbrush and wear gloves to protect your hands. You should protect your eyes |
Preparing shells and stones
Just rinse the pebbles with boiling water and they are ready for use. You'll have to work hard with shells.
First thing is cleaning:
- It is enough to soak “dead” shells for half an hour in a chlorine-containing product diluted with an equal part of water;
- shells that are too dirty are soaked longer, then they are cleaned with a brush and rinsed in water;
- “live” ones, which contain the remains of mollusks, due to which they emit a disgusting odor, must be cleaned especially diligently. Boil for 5 minutes. will allow you to easily remove the remains of mollusks with tongs or nail scissors, after which the shells should be treated with a product containing chlorine.
Some crafts require drilling a hole. The main thing is that cracks do not appear on the shell, or that it does not delaminate at the drilling point. It is recommended to first cover the shell with masking tape, place it on a flat surface and place a mark on it. inside.
A hole can be made in it in two ways:
- Manual. If you don’t have a screwdriver or a drill, then you can find a nail and a hammer. Carefully place a nail on the mark and begin tapping with a hammer until an initial hole is formed. Expand it to the desired diameter, making translational movements inside the hole with the same nail.
- Automated(drill or screwdriver). You will need a drill with a diameter not exceeding 0.8 - 2 mm. If you drill a hole using tape, the shell will not be damaged.
How to remove chips and cracks on sinks and stones?
Treated sinks should be carefully inspected to make sure there are no chips or cracks. Ideal shells without such damage are quite difficult to find.
To polish the surface of shells you can use:
- sandpaper;
- bar;
- disk.
The varnish coating will hide even cracks invisible to the eye and give the material shine.
Master Class
Crafts from sea stones and shells are not the only thing you can do with your own hands. Interior items and landscape design elements are created from these materials. You can involve children and all household members in this matter.
DIY sea shell frame
Materials required:
- shells, pearls, starfish, or skate figurines;
- waste paper;
- epoxy glue (if necessary);
- scotch;
- glue gun
 Crafts made from sea stones and shells can decorate any, even the most simple, interior
 Manufacturing instructions:
- Cover the mirror with paper and use tape to secure it.
- The shells need to be sorted according to size.
- Glue small or medium-sized even shells into the first row closest to the mirror.
- Now you can glue the large ones, filling the voids between them with smaller shells.
When using epoxy glue, the frame must first dry.
Panel made of shells and sea stones
Materials required:
- shells;
- leg-split;
- cardboard;
- scissors;
- glue gun.
Video selection of panels made of stones and seashells:
Manufacturing instructions:
- Draw the shape of the future panel on cardboard.
- Cut out the base from cardboard.
- Make two holes.
- Glue the shells onto the cardboard base tightly to each other, leaving the holes for the loop open.
- Thread the two ends of the rope of the required length from the inside out into the holes. Double knots will prevent the loop from slipping out of the holes.
Product with seashells You can alternate the pebbles.
Shell painting
Materials required:
- shells;
- template or stencil of a drawing on paper;
- canvas on stretcher;
- acrylic paint and brush (if necessary);
- glue gun.

Manufacturing instructions:
- You should create a background on the canvas using paint of the desired color.
- Wait until completely dry.
- Fix the template on the canvas with masking tape.
- Trace the outlines of the drawing with a pencil.
- Glue the shells one after another, being careful not to go beyond the boundaries of the picture.
Seashell candlestick
Materials required:
- large shells;
- candles in molds;
- pot;
- water;
- PVA glue (you can use 2-sided tape).

Manufacturing instructions:
- It is necessary to remove the candle so that the wick, container and the candle itself are separate.
- Glue the wick in the center of the shell.
- Melt the paraffin in a water bath in molds until it turns into liquid.
- Carefully pour paraffin into the shells.
The paraffin will harden completely after 20 minutes.
Candlestick made of double shells
Materials required:
- flat shells;
- plate as a base;
- glue gun;
- beads, marine-themed figurines.

Manufacturing instructions:
- It is necessary to sort the shells by size.
- Glue one layer of shells – the largest ones – to the base.
- Glue new tiers on top of the bottom one, one after another (it is recommended to place the shells overlapping).
- Cover all free gaps with decorative elements.
- Coat the finished product with colorless varnish (you can use white paint).
Wind chimes made from sea shells
There should be a ring at the base, but this is not necessary. Forms may vary.
Materials required:
- shells, starfish, beads, corals, pieces of glass;
- jute twine or any other thread;
- wire for beads;
- willow branches;
- crochet hook;
- knitting threads;
- scissors;
- glue gun (you can use a drill with a small drill bit, nail scissors or a needle).
Manufacturing instructions:
- Willow branches must be boiled for 2 hours, then cooled and the bark removed.
- Form a ring from the branches, braiding some branches with others (the branches should be wet), level it and leave it to dry overnight.
- Prepare flowers using clear nail polish and wire.
- Tie the shells (let them be openwork).
- Prepare several beads by stringing each one onto a wire and securing it.
- Cut 8 ropes of 120 cm each.
- Attach the parts to a string: some you simply tie, some you glue, and tie it to the base ring, leaving the end hanging down. Do the same with the rest of the ropes.
- Collect the loose ends into a bun and tie it with a separate thread. If the ropes are loaded with parts unevenly, it is difficult to achieve balance. And this is necessary correct production crafts. So, when distributing beads, fragments, stars and shells along the rope, you will have to monitor your balance.
- From the resulting start, tie a braid up to 10 cm long and form a loop from it. Wrap one of the threads around the base and cut off the rest.
Willow branches can be replaced with hoops and wrapped with twine.
Ship made of shells
The basis of the sailboat will be a large rapana shell.
Materials required:
- shells of different sizes;
- stone as a stand;
- wooden skewers;
- threads (preferably with lurex);
- glue gun.

Manufacturing instructions:
- You need to draw a schematic diagram of the ship on paper (it is recommended to indicate the order of the shells with numbers).
- Fold the future sails of a sailboat from shells: there should be 2 masts, one lower than the other, in which there are 4 and 5 shells.
- The first larger shell must be glued to the skewer; it is recommended to apply glue in 2 places: at the top and on the side. Each subsequent sink should be smaller than the previous one (or, conversely, all the same in size).
- Next you will need to make the bow of the boat - glue a skewer along the rapana.
- First glue the finished masts perpendicularly to the large shell, then the side sails.
- Apply a drop of glue to the end of the skewer and wrap a thread around its edge.
- First, stretch the thread to the mast, wrap it, lower it down and glue it with the shell. Then again lift the thread up and wrap one mast, throw it to the other and repeat the steps. After the thread is glued to the rapan, the excess can be cut off.
- The ship must be fixed to the stone with glue - it must stand firmly on the stand.
A child will be happy to take part in the construction of such a ship.
Seashell flower
Materials required:
- shells;
- wire;
- frame;
- velvet fabric;
- beads and seed beads;
- glue;
- clothespins.

Manufacturing instructions:
- You need to make several flowers. For one you will need to connect 3 shells of the same size using transparent glue. Flowers may be of different colors and sizes.
- Varnish the finished products, decorating each of them with a large bead or beads in the middle.
- Glue the fabric to the frame.
- You should make a semblance of a stem and leaves from the wire and attach it to the fabric.
- Strengthen the buds along the wire in any order.
- Wait until completely dry and cover with glass.
Applications for children
It’s best to make crafts from sea stones and shells with your children. You can create applications on a variety of topics, for example, the underwater kingdom.
Materials required:
- shells, pebbles, feathers and dry moss;
- corrugated paper blue and brown colors;
- wooden frame;
- plasticine;
- salt colored yellow;
- PVA glue.

Manufacturing instructions:
- The paper needs to be fixed to the frame, it will become the background - blue water and brown seabed.
- Glue dry blades of grass - seaweed.
- For the crab figurine, select shells: 1 larger one for the body, 4 smaller ones for the legs, 2 very small ones for the eyes.
- Transfer the crab to the paper, carefully gluing each shell.
- Make up several fish (shells instead of a body, a feather tail and plasticine eyes), and “set them swimming” in the picture.
- Add dry moss.
- Glue shells to the bottom.
- Coat the free areas of the bottom with glue and cover with salt painted with gouache.
- Decorate the wooden frame with a variety of shells.
Decoupage
If you manage to find a large stone, smooth and flat, on the seashore, you can decorate it using the napkin technique. It is called "decoupage".
Materials required:
- white water-based paint;
- napkins in 3 layers with bright large drawing;
- PVA glue.
- acrylic paints.
- The stone must be painted with water-based paint.
- Separate all layers of the napkin and cut out the design from the first.
- Soak the picture with glue (it is recommended to start from the middle) and carefully glue it to the stone so that wrinkles do not form.
- Wait until completely dry.
- Draw with acrylic paints, paint, if necessary, add sparkles, rhinestones, and other additional decorations.
- Varnish the surface.
- Dry for 2 days.
- Varnish the other side.
In total, up to 3 layers of varnish will be required. Finished product You can decorate a flower pot or just leave it on the coffee table.
Decorations for landscape compositions
Pebbles fit perfectly into the surrounding landscape, which is why they are widely used in landscape design different stylistic directions. For a creative person, this is simply a godsend. A garden path made from sea stones will be quite durable.
Materials required:
- pebbles of different sizes;
- stone chips;
- sand;
- concrete mixture;
- level;
- plywood (can be replaced with film or tarpaulin);
- water;
- hose;
- hammer (wood or rubber);
- hard brush.

Step-by-step instruction:
- Remove the soil layer and install curbs along the edges of the path.
- Lay polyethylene on the ground.
- Pour a layer of sand and crushed stone on top of it.
- Prepare a solution: 4 parts sand and 1 part cement, pour it into the embankment.
- Lay the pebbles after wetting them.
Advice! The solution dries too quickly, so it is better to lay out the path in small sections.
- Compact the pebbles with a rubber hammer once the small area has been paved.
- Fill the space between the stones with a more liquid solution.
- After 3 hours, spray water along the path and cover with film.
- After some time, spray with water again, but do not cover with film anymore, wait until it dries.
About the ornament
Patterned paths look impressive. First, you will need to sort the stones by size, shape and color, then make a sketch of the ornament and its template, and lay the latter on the mortar. Pebbles look great regardless of whether they are laid flat or edgewise.
A path is the classic and most common option for decorating a site.
Make a backlight and it, created from a light stone, will become “lunar”, and from a colored one - contrasting. However, this is not the only design technique. Pebbles will help hide uneven terrain or not particularly attractive objects on the site.

It could be:
- a high flower bed, steps or an alpine slide;
- garden sculptures - no restrictions for creativity;
- fencing.
Crafts from sea stones and shells that you can make with your own hands are a source of countless ideas for creativity. Sea pebbles can be easily transformed into sea creatures. The child can even cope on his own. The main thing is to tell him how to make fish of various colors using a brush and paints.
And finding a use for them later won’t be difficult:
- put in the aquarium;
- make a mosaic on personal plot;
- just play with them in the water.
Can be collected at playground a whole town of fairy-tale houses or, armed with a glue gun, transfer pebbles to a panel, using as a basis:
- cardboard;
- plastic;
- even a wooden fence.
You can lay out a flower bed in the form of a mosaic of stone flowers. Pebbles make a great portrait of a friend. You can make several stone men and even lay out an entire scene from life. The child will rejoice, turning ordinary pebbles into funny animals.

You don’t have to limit yourself to miniature crafts. From this material you can create something more significant, for example a dry stream, a mosaic carpet near a house or a pool. Having a cowrie shell and going to a craft store for accessories, you can make a bracelet in a boho style.
If you do crafts with your children, they will be happy to paint sea stones and glue shells. Spending time together like this will definitely bring family members even closer together.
Article format: E. Chaikina
Useful video about crafts made from sea stones and shells
Video of a master class on making a rug from sea pebbles: