Every child loves to create something. It is difficult to determine at what age he managed to make the first funny craft, but after it a whole collection of works made by small skillful pens appears in the house. What to do with these jobs as the child grows up? It's a pity to throw it away, put it on the shelves, there is hardly enough space, since some children are ready to do something new every day. We invite everyone to participate in the All-Russian contests of children's crafts and receive well-deserved prizes.
Goals and objectives of the craft competition for preschoolers and schoolchildren
It would seem that there is nothing unusual in the fact that boys and girls love to do something with their own hands. But this is not at all the case. Why do some children constantly make crafts, while others do not want to work with any materials? This question is asked not only by parents, but also by the workers of the preschool educational institution. To help children get involved in any kind of creativity, parents, and later educators, teachers, educators additional education should interest the little man in an unusual activity. Try to show them the manufacturing process, offer to see the final result in advance. And when the children learn how to make crafts with their own hands, take part with them in the All-Russian contests that are held on the Klassnye-chas.ru portal.
Doing crafts develops the child. Everyone who works with paper or plasticine, beads or natural material has well-formed fine motor skills of the hands. It will be easier for them to learn to write, they will always take the initiative when performing creative work. In addition, the manufacture of various products with your own hands pursues other, equally important goals:
- the formation of perseverance;
- education of accuracy in work;
- development of interest in creative independent activity.
How to submit crafts at the all-Russian creative competition 2017 - 2018?
 Almost any child can do the job. It will turn out even better and more interesting if an adult gives his all possible help. But not everyone decides to provide a finished masterpiece for a remote competition. And not at all because they are not sure that their work will be appreciated at its true worth, but because they do not know how to send it to the organizing committee.
Before sitting down to do the craft, you must carefully read the position. Most likely, this is the only way on the site Klassnye-chats.ru, the work is not required to be submitted in the original for the competition. The participant must take a picture himself or with the help of his parents ready product and send to the specified address only a photo along with a completed application. You cannot process the resulting photo in Photoshop or similar (similar) programs. There must be foreign objects in the photo. If the position indicates the maximum allowable size of the sent file, then you should pay attention to these parameters. It turns out that everything is extremely simple: the work at home remains, and the participation is accepted.
How are children's entries of the All-Russian handicraft competition evaluated?
Having completed the competition work, having sent all the documents to the competition, each participant expects the results with impatience and excitement. In their hearts, everyone hopes to get the coveted first place, but at the same time doubts gnaw that, apparently, more original works will be sent. The evaluation of the works is given by the jury in accordance with the criteria that are stipulated in the regulation. In addition, the works of the participants are separately assessed in age categories. Thus, you should not worry that the work of a preschooler will be in a less advantageous position than the work of a high school student or an experienced teacher. And even if the participant of the competition did not become the winner, it is important that he was able to declare himself and take the first step towards victory.
Do you know how to do something with your own hands? Be sure to participate with your children in the All-Russian craft contests in 2017 - 2018 academic year... By the way, on our website Klassnye-chats.ru and teachers participate in such events, competing in their age category.
The idea of making a bouquet of flowers out of paper is very good. For paper crafts, we need to purchase colored paper, cardboard, felt-tip pens, stationery knife, tape, scissors and PVA glue.
Bouquet of paper
First you need to make three blanks for each flower, two of which should be the same color, they should have six petals.

Place one blank in front of you, on top of which stick a circle.

On the mug, pre-make holes for the eyes and mouth in the form of a smiley.

After gluing the mug with a flower, you need to paint your eyes with a black felt-tip pen, and then bend the petals inward.

The next step is to cut out the stem, which we further attach to the flower, and on the other side of the flower, attach the same blank.
You can also make leaves for a bouquet, which can be made from green paper.

First you need to draw an oval and cut it out, and then use scissors to make notches.

In order for the individual pieces of paper craft to become a single whole, tie the flowers with a ribbon or some other fabric for decorating the bouquet.

Such a bouquet will never fade and will be a great decoration for your home.

Simple crafts from plastic bottles
The simplest crafts for children include crafts from bottles.

For example, you can make a piggy bank from a bottle, for which you only need a marker, a clerical knife, dice (4 pieces), a small bottle, glue and colored paper.

The first step is to cut a straight line, the width of which can be 5 centimeters, and the length of this line should be enough to grip the bottle.


Draw eyes with a marker, and draw nostrils on the bottle cap. Using a clerical knife, cut a hole for coins.

As legs for the pig, you need to attach the dice with glue.
Note!


This craft develops the child's imagination, and is also useful in everyday life.
Ball of threads
The craft can be used as a lampshade for a lamp or simply hung as a decoration.

A ball of threads is made very simply; for its manufacture you will need colored threads, a ball, transparent glue.

First, we need to inflate the balloon and tie the tip so that the air does not come out.

Then the inflated ball must be wrapped with threads, after which glue is applied to the surface of the ball and wait until it dries.

Note!

Now you need to separate the ball from the threads, to do this, just pierce it with a needle and everything is ready for the craft.

Plasticine gnome and cones
As a simple DIY craft, you can make a gnome. For crafts, you will directly need a pine cone, light-colored plasticine, pieces of fabric, glue and a brush.
First of all, the child should roll a ball out of a piece of plasticine, after which it is necessary to make indentations for the nose, eyes and mouth on the ball using a brush.


At the next stage of our craft, you need to attach the resulting head to the top of the cone.

Then the child should cut a triangle out of the fabric and glue it on the sides, as a result, a cone should be obtained. The cone will play the role of a cap for our character.
Note!


At the end, you need to make mittens from fabric, and then attach them to the cone using plasticine and our gnome from the cone is ready.
Paper bookmark
As a simple craft for kindergarten a paper bookmark is perfect. For children to be able to make such a simple craft, they will need a pencil, a ruler, colored paper, scissors and glue.

To begin with, children should draw a square measuring 20 by 20 centimeters.

Then divide the resulting square into 4 identical parts using a pencil and a ruler, in the end there will be 4 squares measuring 5 by 5 centimeters.

The second step is to divide the upper right and lower left squares in such a way as to get triangles, that is, you need to draw a line diagonally from the upper corner to the lower corner.

We do not need triangles with the outer side and can be crossed out.

Then it is necessary to cut out a figure from paper without taking into account the crossed out triangles.

The upper triangle needs to be trimmed. If everything is done correctly, the paper will be in the shape of a diamond with two triangles glued to it.

The next step is to fold all the triangles in half, and then alternately put them on the tip of the rhombus. You should have a pocket that fits over the end of the book page.

To make the bookmark original, children can be advised to cut some kind of applique from colored paper.

Photo of simple crafts


Every year nature gives us a lot of natural materials suitable for creativity. The process of creating with your own hands develops the artistic taste, thinking, memory of the child, fosters perseverance. But the most important thing is that you can have fun and usefully spend time with friends, delighting yourself and others with crafts.
Preparation of natural materials for their further use
Nature is the best artist, she creates such natural materials that, in skillful hands, turn into works of art!

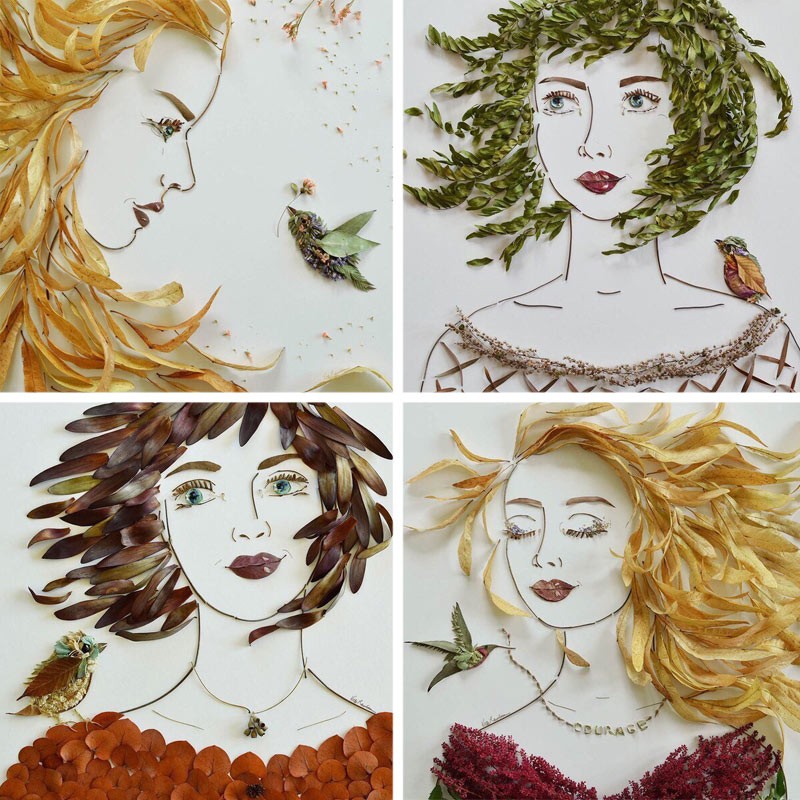
Plant materials
Chestnuts
Chestnut fruits have a bright brown color and a shiny surface, so they make excellent DIY crafts from natural material. The shell of fresh chestnut is thin, easily pierced with an awl. Chestnuts are a fertile material for working with young children themselves. Many different pupae can be made,.


It is best to store in a cool place in boxes.
Acorns
Oak fruits ripen in autumn, in September-October. collect of various shapes and magnitudes.


At the same time, their cups (plyus) are also collected, on which they are held. Cocks are very often used separately from the acorn, as an independent natural material for various crafts.

Puffs from acorns and balls made of wool
How to dump even balls of wool, see the video Olga Skibina:

Acorn puffs and Christmas bells
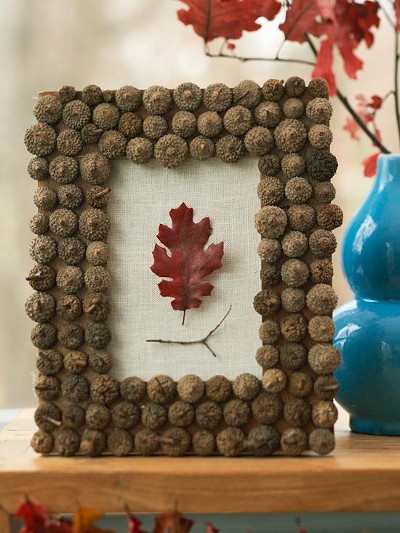


You can store them for a very long time, after thoroughly washing and drying them. But why just store stones like that when the whole family can play with them fun?)


Another way to apply an image to river or sea stones watch the video from You can do it craft... You will be surprised how easy it is!
Seashells
You can collect shells on the banks of rivers, seas, lakes while relaxing with children. Many of them are original in appearance, in shape - oval, in the form of a scallop, elongated, etc.
Boil them for a few minutes to free them from living organisms. The shells are washed with a small brush (you can use a toothbrush), after which they are dried, sorted by type and size. Stored at any temperature.
You can also clean the shells in a solution of whiteness and water at the rate of 1: 1. The top layer will disappear after a while and the shell remains with a beautiful shiny top.
Animal figurines are made from large shells.


Small shells make wonderful applications, garlands:


Shells can be used not only as the main material, but also as additional decor(bird wings, dog ears, flower petals, etc.)


Sand
A very accessible material that can be collected in any sandbox. It differs in structure. Before work, it must be well rinsed and dried. And then you can use it as a decoration in your works:


Storage rules for natural materials
DIY crafts from natural material will be perfect if, after collecting, drying, pre-processing, you properly store these natural gifts. To do this, you must adhere to certain rules.
- A dark, cool and well-ventilated area is the best place for storing natural materials.
- You can buy plastic containers for storing every type of material; use cardboard boxes for shoes, tea, sweets; take regular glass jars with a screw top. For seeds, as well as for beads, it is better to have a container with many compartments.
- Dried flowers are fragile, break easily, so they are placed in a tight box or container. The petals are kept separate from the flowers. Flowers with a stem can be stored in a vase.
- Prepared leaves are brittle too. You can store them in large books. Also, for safety, put them in signed candy boxes, grab a little with scotch tape so that they do not accidentally open.
- Seashells are placed in glass jars or plastic containers with a wide neck to prevent crumbling.
Additional tools for crafts made from natural materials
To create a beautiful craft from natural materials, you will need additional tools and materials.

It can be:
- colored paper;
- cardboard;
- trimming the skin;
- scraps of fabric;
- bird feathers;
- Styrofoam;
- plasticine;
- wire;
- PVA glue, "Moment";
- gouache;
- stain;
- varnish, etc.
Paper very often used as an addition to natural materials. Children, bending, gluing it, make the work much more interesting.
Plasticine fasten separate parts of simple toys at the initial stage of work. It is not very durable, but as a supplement it is often used in kindergarten and in primary school.

From wire most often they make the frame of the toy, the connection of its parts. Copper wire diameter 0.29-0.35mm - soft, flexible and durable - most comfortable. And for the frame, a wire of a larger diameter is used - 1-1.5 mm.
Threads it is better to take thick, multi-colored (No. 10).
Glue it is better to take white PVA, BF, etc. However, in kindergarten it is better to use PVA glue.
They also use foil, pebbles, cherry bones, bristles.
It is best to store additional material in a small drawer with compartments for each type of material.
The use of additional material depends on the intention, the skill of the children, the degree of development of the imagination! Offer your options, but rely more on children's intuition and desire.

It is also additionally necessary to have certain tools for making crafts from natural material:
- art scissors;
- awl;
- jigsaw;
- tweezers;
- pliers and wire cutters;
- sewing needles;
- brushes for glue and paints;
- cotton cloth for wiping up glue residues.
Scissors for children should be with blunt ends, small, with rings comfortable for a child's hand.
Awl you need to take from a durable material with a handle length of about 6 cm, a diameter of about 2 cm, the piercing part - 3.5 cm
Needle I need a large sewing machine. It is imperative to keep it in the needle case with the thread threaded into it.
Attention! Pliers, pliers, drill are used only by an adult!
To draw the contour of the cut out part, you need a simple pencil... For example, dresses, hats for a doll, etc. It is better to take a soft pencil (2M).
Brushes(softer for drawing, harder for glue). Better to buy squirrel brushes (no. 4 and 6). For glue, take a brush with a hard bristle.
Stack- a tool required for surface treatment made of clay or plasticine. The length of the stack for children is about 12 cm. You can make the stack yourself from a worn-out brush: round it on one side, and sharpen it on the other.
Crafts from natural material for kindergarten
Kids love it when in their hands chestnuts and plasticine turn into toys with which to play. Crafts from natural materials for kindergarten are not very complicated, so any child can cope with the help of an adult. Sometimes they are made from fruits and vegetables, but more often these are applications from leaves and animals from cones and acorns.
Crafts from leaves and maple "helicopters"
The easiest and most affordable job, even for babies, is an applique made of leaves. If this is the first time you are doing a composition with your child, offer him a picture that will serve as a template. Do not rush to do everything yourself. Invite the kid to choose the leaves at will, so that the work turns out to be similar to the sample. This will develop your child's creativity.
Applique material:
- colorful leaves;
- dense sheet A-4;
- glue brushes;
- PVA glue;
- scissors;
- sample.
To make a simple composition, you need even dry leaves. Put them under the press or in a book. The material is ready in two days. Use scissors to cut out the appropriate pieces and lay them out on a piece of paper.
Now you can glue. The background and lower layers first, and then the finer details. For example, if you want to make an elephant, then first make the body and head from the leaves, and then glue the trunk, tail, legs. If there are not enough eyes, then they can be completed with a marker or made from tree seeds.

It is not necessary to do everything according to the template. You can come up with a picture yourself and create an original composition of leaves.


Use colored paper, felt-tip pens, paints as an addition, so your applications will be even more interesting.
Along with leaves as a basis for crafts made from natural materials for kindergarten, "helicopters" from maple are ideal. Just look at this miracle!

Maple Seed Fairy Wings

Maple helicopter dragonflies
Now you are convinced how beautiful and original appliqués from leaves can be. Use these ideas for leisure activities with your kids.
Simple master classes for creating children's crafts from acorns and cones
At the end of summer, acorns begin to ripen, and they make wonderful crafts from natural materials for kindergarten or school. They are well preserved, and on long autumn evenings, together with the children, you can do a pleasant and useful business that develops fine motor skills baby's hands, imagination and perseverance.
The most common acorn crafts are animals and various people. From toothpicks, matches, thin twigs, you can easily make legs, arms, horns and other small elements. An adult needs to help children poke holes in acorns.
For fastening small parts, you can use a glue gun, Super Moment glue, but only adults should do this. And for the guys, the safest way is to fasten the parts with plasticine.

Fly agarics from acorns are even easier to make! To paint acorns, you need to remove the caps from them, and after the paint has dried, glue them in place.


Acorns are very beautiful in themselves, and if they are also painted acrylic paints or nail polish, then such crafts will decorate any home.

And from the hats painted with silver paint you can make original decoration on christmas tree... The process of creating such an eco-toy is quite simple: we stick it tightly on a foam ball (you can take an old christmas ball) acorn caps. And it sparkled with a new one.

We found another video for you, where Niki Junior tells what wonderful craft it will turn out from leaves, cones, twigs and plastic bottle... Look, you will learn a lot of new things.
Categories
Making out various crafts for children with your own hands together with your child is an exciting activity that significantly contributes not only to the development of the child, but also to the strengthening of your relationship with him. Any child will be very happy if he has the opportunity to do something beautiful with his parents. Therefore, even in the most busy schedule, try to set aside a piece of time to devote to activities with children. The sections of our article will provide useful recommendations on how to make a DIY craft from various materials taking into account age characteristics kids.
DIY crafts for children from paper
The most frequently used material for applied art is, of course, paper. Moreover, it is worth paying attention not only to the usual color sets, but also to its other types: corrugated, velvet, designer. You can create do-it-yourself crafts for children from paper flat (applications), as well as voluminous, using various techniques. For example, having learned how to fold a flower using the origami technique, form a beautiful bouquet of tulips.


The easiest DIY crafts for beginners
For those who are just starting to teach their child the applied arts, we advise you to start with the simplest solutions, making easy DIY crafts for children. Perhaps you will like examples of caterpillars made of paper rings, an applique made of colorful fish or funny mice on a piece of cheese.


DIY cardboard crafts for children
Cardboard is an easily accessible material, which is well cut, bend, painted, it is often used in children's creative works. In addition to the set of cardboard purchased in the store, cardboard boxes, disposable dishes, packaging from cereals, egg "honeycombs", as well as sleeves from toilet paper... In our photo-catalog you will see what craftsmen make from cardboard with their own hands for children. For example, a stand for pencils, funny animals, jewelry boxes.


Craft "house" with your own hands
Cardboard houses are made at will of any size - it all depends on their purpose. Perhaps it will be a large structure with child growth, "Dwelling" for dolls or a craft "house" with your own hands, made as christmas decoration, gift wrap... In any case, the manufacturing technology is the same, the differences will be in size and design. We have prepared some sketches for making blanks. If you make small structures, there is enough PVA glue and tape holding the parts together. When building a large house, it is better to use a heat gun for reliability. New Year's craft The do-it-yourself “house” is complemented by a decor that imitates snow on the roof (cotton wool, foam balls), and the gift wrap must have at least one opening sash, for example, a door, a roof slope.


How to make a DIY craft out of fabric
Wonderful DIY toys are sewn using fabric. Moreover, not only a single cut, but various scraps, household napkins and even socks. Look at the photo, isn't it, a cute bunny came out of a sock? An older child will do it on his own, and the baby will have to help. Make the necessary cuts and seams, and instruct the child to fill the figure tightly, as well as draw the muzzle.
You can also sew crafts for children with your own hands, which will become not only an ornament, a toy, but also a useful little thing, for example, a large soft ottoman duck, a photo of which is in our catalog, a star pillow.


DIY felt crafts for children
Felt is a wonderful comfortable fabric with a vibrant palette of colors. It allows you to sew a variety of DIY crafts for children, and then decorate the children's room with them. Household napkins (usually sold in a set of four colors) can help you replace the fabric. Such crafts-toys are sewn with their own hands without help sewing machine, manually.
DIY children's crafts for the New Year
On the eve of new year holidays, children's matinees, rooms are decorated everywhere, lush Christmas trees are dressed up. It is quite possible to make a lot of interesting symbolic additions on your own, without spending money on purchases. It can be the most original balls for the Christmas tree, garlands, other decorations that are quite within the power of a child to make.


DIY snowman craft
The snowman is a kind of symbol of winter and, of course, his presence for the New Year's interior will come in handy. The photos of our selection show options for how to make such crafts with your own hands in stages, using foam balls, socks, pompons. A larger figure, decorated with a thread, is suitable for a kindergarten matinee, balloons, glue. Inflate five balloons of different sizes (two are the same for pens). Wrap each of them with a thread dipped in glue (PVA is quite suitable). When the blanks are completely dry, the balls need to burst, get out from the inside. Finished balls are fastened together. Craft "snowman" with your own hands, almost ready. It remains to arrange the eyes (beads, buttons), the mouth from the thread, the nose-carrot (sew from the fabric). Traditionally, the head is complemented with a bucket, the neck is decorated with a scarf.


Santa Claus do it yourself
Santa Claus is indispensable in the New Year's interior. Most easy way- arrange it from thick paper (cardboard). Use a ready-made template, or make a conical shape from a sheet, which then, with the help of multi-colored paper, "put on", decorating your face, beard, pens. They do such children's crafts for the New Year with their own hands using fabric (here you will find examples of patterns), plastic bottles, and other improvised means.


Crafts for kindergarten do it yourself
Various creative works for little kindergarten children should be distinguished by simpler techniques and materials. The child is just beginning to learn to do something beautiful on his own, so you need to choose the most simple, but interesting options.


DIY crafts for kindergarten children: applications
The most common way to teach children to create pictures is with applique. Such crafts for kindergarten with your own hands (photos are presented below) can be designed not only using colored paper, they also take thick fabric, artificial leather, velvet paper, scrap materials (cotton pads, cereals, etc.), natural raw materials (leaves, seeds). Children of older groups can start voluminous work, for example, make an applique in a box "aquarium" with hanging representatives of the aquatic world.


DIY crafts in a garden from natural material
Often, especially in autumn, exhibitions of works are held showing do-it-yourself crafts for kindergarten from natural ingredients. Chestnuts, acorns, cones, sunflower seeds, pumpkins, colorful autumn foliage - all this provides a great basis for the development of children's imagination. To make various figures, compositions are additionally used plasticine, which holds the parts together or forms the base. Pictures of DIY crafts using natural raw materials are presented in our photo selection. Feel free to try using them by making a chestnut caterpillar, a hedgehog, and other samples.
DIY crafts for school
School work varies in complexity. If do-it-yourself crafts in elementary school have simple forms, then high school students with enough skills are able to arrange more complex compositions, for example, a bouquet of roses from maple leaves, cardboard town or paper basket with asters.
DIY crafts to school, the photos of which are posted below, involve the use of a large selection of raw materials, including all sorts of improvised means ( plastic dishes, DVDs, matches, buttons).


DIY crafts for schoolchildren using the facing technique
Facing is a rather entertaining creative process that is suitable for children. of different ages... It allows you to create "fluffy" pictures that will decorate the room, as well as an original gift relatives. DIY primary school crafts have simplified options until the child acquires certain skills. For example, only the outline of the picture can be drawn in this way.
To make a lush applique you will need corrugated paper, scissors, glue, match or toothpick with a blunt end, sketch drawing on cardboard. Before making the craft with our own hands, we cut the paper into small squares (0.5 cm), which we sort by color. Grease the sketch with glue. We put the match in the center of the square, turn it (so that the corrugation is fixed on it), then glue it with its end to the sketch. Thus, we decorate the whole drawing, applying the necessary colors of the corrugated squares.


Teaching to create beauty yourself is The best way development creativity child. Children's crafts with their own hands significantly develop the imagination, giving the joy of an interesting joint pastime with adults.
DIY crafts for children: a selection of 50 ideas with step-by-step examples updated: May 2, 2018 by the author: Irina Kievskaya
Every person in his life has probably been engaged in the creation of some cool handicrafts not only in childhood, but also in adulthood. After all, as you know, needlework brings everyone great pleasure and a lot of positive, relieves the accumulated stress and negativity, makes us rejoice and look at the world with completely different eyes. Its fruits transform our homes, replenish school and kindergarten exhibitions, flaunt in the hands of our relatives and friends as expensive gift on New Year, March 8, February 23, Birthday, Easter, May 9, Mother's Day and even Cosmonautics Day, or just like that, for the sake of deep respect. This activity is especially interesting for our children. They, like no one else, love to craft something out of paper, cardboard, plasticine and other materials in labor lessons or at home at their leisure, thereby developing their inner world, making it richer and more beautiful. If you and your family decided to start making some original gizmos from the accumulated unnecessary items at home, then we recommend that you look at our article. She will provide you with 74 beautiful photo ideas DIY crafts from improvised means created for the beauty of the room interior and for the benefit. Informative videos with an accessible and step-by-step description of creative works will come in handy. They will solve all the questions and problems that suddenly arise.
The best cardboard crafts
You can also do cardboard crafts do it yourself with instructions and diagrams for all family members. This is a fun and interesting process, and will not leave anyone idle.
Of the whites decorative stones small size, you can make a very original cup holder with your own hands, as in the photo. To do this, the pebbles need to be glued together. This is a very painstaking and long-term work, but the result will exceed all expectations. Such a stand, made from an affordable tool at hand, can be used even under hot dishes at home.
Jewelry box from a metal can

We have provided you with many interesting photos ideas for creating crafts with your own hands from various improvised means. They are all equally beautiful and original. However, I would also like to offer you one no less cool idea, which is carried out at home from a simple tin can and variegated fabric. If you are interested in our proposal, then let's start our step-by-step master class with a description of all the actions.
To work you need:
- metal can;
- the cloth;
- hot glue;
- scissors;
- cardboard;
- pencil or compasses.
Manufacturing process:
- We take an empty metal can and cloth. We need to arrange a festive container. To do this, take measurements from the side of the can and transfer them to the material. Then we cut out the right size decor and glue it to the side surface of the container with hot glue.
- We should also bend the protruding part of the fabric on the top of the can inward and glue it. It turned out something like a neat side.
- From the cardboard, having measured the diameter of the metal container, we cut out two circles of the corresponding size and additional third slightly smaller.
- Our cardboard blanks should also be wrapped with cloth on both sides, using hot glue to secure.
- One round piece will become the bottom of our decorated box, where we insert it, and the other two will become a lid, consisting of two circles, differing in size (the large one is the top of the lid, and the small one is the bottom).
- Upon completion of the creative work, you can transform the box with satin bows, rhinestones, beads or something else, no less bright. It is not a sin to give such a craft to your mother, sister, girlfriend or your young girlfriend. This is how you can create many original things at home with your own hands from empty jars of cream, hair balms, tea, and more. All these improvised means are quite accessible and varied.
Video: master class on making matchbox boxes
9 ideas of lungs and beautiful crafts from leaves with your own hands
If you want to make wonderful DIY leaf crafts with your children for home, garden or school, then visit our article. In it we will provide you with some photo ideas and videos with step by step wizard classes ....
To create simple do-it-yourself napkin crafts for the New Year 2018 or other holidays, you should visit our article. In it you will find a lot of great photo ideas and videos with step-by-step instructions ...