It is not difficult to buy a gift for every taste in modern stores. However, DIY birthday crafts can become an original and sincere gift to a loved one. Plus, making homemade gifts is fun and exciting. Beautiful crafts as a gift can be made from different materials... It is worth considering the age of the addressee and his personal preferences. After all, a gift to an older person should differ significantly from a gift to a peer. What can you make yourself and what needs to be prepared for this?
The article has selected the best gift ideas for family and friends.
What can you give
There are a lot of ideas for gifts and their decoration, and, at times, it is easier to show imagination in creating a presentation than to decide what to give. Among the most popular gifts that you can make yourself, it is worth noting:
- author's postcards in various techniques;
- Photo frame;
- original notebooks;
- boxes;
- candles and candlesticks;
- interior vases;
- unusual pillows and decorative toys;
- mugs.
A postcard is the simplest gift, which at the same time provides a large field for creativity. Everyone loves to receive postcards with pleasant words, regardless of age and status. The only thing worth considering is that the design of the postcard should correspond to the birthday person. For example, if this is a postcard for a man, then it can be designed in the form of a shirt, a tuxedo, or decorated with ties. If this is a postcard for a woman, then it can be decorated with flowers and other "female" items - a hat, dress, beads, lipstick.


The postcard can be decorated various materials and objects - fabric, lace, leather, accessories, dried flowers, etc.

In addition to a postcard, you can make many other gifts from paper, for example, in origami style or using quilling techniques. Even a beginner can fold a flower out of paper or decorate a box with curled strips of paper.


You can also experiment with a photo frame. To do this, it is enough to stock up on a finished wooden frame (cut it out of cardboard), a glue gun and necessary materials for decoration. The frame can be painted and painted, decorated with decoupage or pasted over with shells or buttons.


You can also decorate caskets, candlesticks, vases and mugs. Needlewomen who love to sew can easily make textile interior items. The main thing is to use ideas and show a little imagination and skill.

To each his own
Each family member should have their own gift. Let's try to figure out which birthday people will like what.
A dad with a mathematical mindset will love the unusual Rubik's cube, which will remind you of pleasant family moments.
For crafts you need to prepare:
- Rubik's Cube;
- any photos (6 pcs.);
- scissors;
- glue.
How to do:
- Remove the colored stickers from the puzzle (the painted cube can be left without processing);

- Pick up photographs according to the size of the cube and cut them into 9 squares that coincide in size with the squares on the edges;

- Gently smearing the edges with glue (you can use a brush), glue all the squares on all edges.

After drying, the cube can be used for its intended purpose.

From a son or daughter, dad can get a pen holder made of Lego. Kids will practice assembling figures from the constructor, and dad will always remember whose gift it is.

If you plan to present a bottle of alcohol as a gift, then you should take care of its design. For example, you can use sleeves from old shirts.


Mom can be presented with a cover for an i-pad or i-background made of natural or artificial leather... Such covers will not only protect equipment from damage and scratches, but also emphasize the status of a business mother.
You can take the skin from old bag or portfolio. To fit the gadget, taking into account the allowances, cut a rectangular piece of material so that the gadget can be wrapped in it twice. It remains to make holes along the edges at equal distances with an awl or a clerical knife and sew a cover over them with a cord or twine. To close the cover, sew on a button with a lace-loop on top. The gift is ready!

A beautiful floral card will complement the cover. It can also be presented to other women, for example, as a gift to a friend or sister.
You need to prepare:
- bilateral colored paper;
- scissors (curly);
- a skewer, toothpick or quilling awl;
- PVA glue;
- the basis for the postcard (cardboard or thick paper);
- double sided tape;
- ribbons and beads.

Progress:
- Cut circles of different sizes from colored paper;
- Starting from the edge and moving to the center, cut a spiral from each circle (you can make the edges wavy);

- Using an awl, toothpick or skewer, twist the resulting spirals into flower corollas;
- Cut a trapezoid out of dark paper - a vase;
5. Glue the background to the card, and on it - a vase and flowers;

- Decorate the card with beads, ribbon, inscription.


Grandma will certainly like the box in which you can collect various little things. You can buy a blank and decorate it to your liking, or you can make the box yourself. For this you will need:
- thick cardboard or other base;
- toothpicks;
- yarn;
- PVA glue;
- heart-shaped pattern;
- glue gun;
- beads or other decorations.
Progress:
- Cut out the bottom of the box from cardboard according to the template;
- Stick toothpicks into the cardboard around the perimeter, use glue for better fixing;
- Start wrapping the toothpicks with yarn, alternately bypassing them from the outside and from the inside;
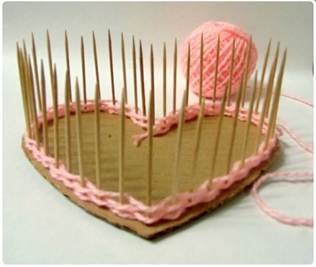
- Braid to the end, tie the tip on the last toothpick and hide it inside;
- Put a small bead to match the yarn on the tip of each toothpick (to secure the weaving);
- Decorate the box with beads.
The gift from the granddaughter is ready!
If you wish, you can make a lid by also cutting it out of cardboard and wrapping it with threads.
Grandpa will most likely like the practical things he can use every day. Good idea- a case for glasses, sewn from an old tie or neckerchief... To do this, you will need thread with a needle, Velcro, fabric glue, scissors and a tie. The main thing is to correctly determine the length of the case so that the glasses fit in it and at the same time it can be closed freely. The finished cover can be decorated with buttons.

The older generation can also be given a common gift - genealogical tree, which will contain photos of all family members. Options " family trees" enough. Various techniques will come in handy here, including quilling, applique, spot painting.


The younger generation can make funny and cool DIY crafts. It can be original jewelry, toy pillows, topiary of sweets, or just unusual packaging.

A brother who loves Star Wars will surely love the watch with the characters in the movie. To do this, it is enough to prepare a base for a clock with a hole in the middle (you can make a plate of clay or plaster), a clockwork with hands, a glue gun and Lego figures from the corresponding Star Wars set.
First you need to paint the base, and then fix the clockwork. Use a pistol to glue the flat lego pieces as a dial. After drying, fix the figures on them.


Related videos
Gift ideas can also be found in the video.
The most important and expensive holiday in the life of every person is, of course, his birthday.
And it is on this solemn day that I want to give the birthday man a special unforgettable gift, which he will treasure for a long time.

Naturally, the most expensive and the best gift is a handmade birthday craft.

Such a present will be remembered and will delight much more than a ready-made gift bought in a store.

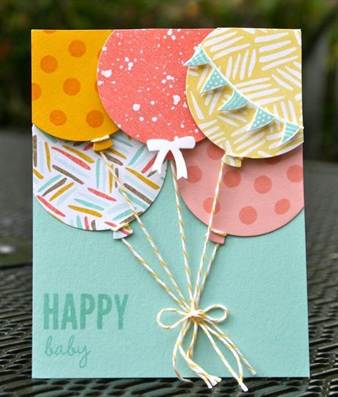
"Paper" gift
Simplest original gift can be made from plain paper, examples are shown in the photo of birthday crafts.
Paper does not require special financial costs and preparation of a presentation will not take much time.

Birthday paper crafts can be given to absolutely any loved one.

After all, a little thing prepared from the bottom of my heart with my own hands will undoubtedly be a unique and non-standard surprise.

For example, you can make a small mysterious chest of drawers from numerous boxes, inside of which are hidden interesting trinkets or a message with wishes for the birthday boy.

Or a mug, the layout of which is made of bright colored paper, will undoubtedly attract attention.

It is wise to fill it with delicious sweets or vitamins.

If you want to present not only a beautiful, but also a useful surprise, you can prepare an original personal calendar, which is pasted over with joint photographs or pictures on topics that are interesting for the birthday person.
A bouquet of paper flowers is an excellent gift for beloved women, which even the smallest member of the family can handle (of course, not without the help of an adult).

Another original present is a piece of birthday paper cake with good sincere wishes.

Simple materials will come in handy for this:
- paper glue (you can glue - pencil);
- ruler;
- simple pencil;
- colored paper or thick cardboard (a gift made of cardboard will be much stronger and more reliable);
- beads, ribbons, beads and rhinestones for decoration.

The work on making such a tidbit consists of several steps:
- We are preparing the desired template for the future piece. It is more convenient to find it on the Internet and transfer it to a sheet of cardboard, then carefully cut it out.
- According to the finished scheme, we carefully bend the necessary places, using a ruler for greater convenience.
- On the back of the piece, you need to make a small incision in order for the cake to close.
- We glue in the right places with glue.
- Then the most interesting painstaking process is the decoration of the gift. Without hesitation, we turn on the imagination: rhinestones, ribbons, bows. But it is worth considering that everything should be in moderation!
- We put the prepared wish inside the so-called gift box.
"Sweet" gift
A gift of sweets will undoubtedly delight even an adult, not to mention children. It is possible to use sweets in bright wrappers or a bar of chocolate.
Note!


As an example: candy bouquet, which will not take a lot of time and costs. Will come in handy:
- wrapping paper;
- scissors;
- glue for paper or PVA (you can use a special glue gun);
- round sweets in beautiful packaging;
- "Crispy" paper for gold or silver;
- a basket or an ordinary metal can of coffee;
- decor elements: beads, rhinestones, small bows;
- toothpicks or skewers;
- Scotch.

We do the following work:
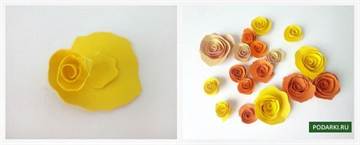
- We cut several squares of gold or silver foil. Then you need to wrap sweets in them, securing the ends with wire or strong thread - this is the core of the future flower.
- The petals will be colored from small cut squares corrugated paper, which should be enough for the entire candy shape. For one piece, you need to cut out two petals rounded at the top.
- One candy must be placed in the center of each petal, forming a bud. We again fix the structure with wire or thread.
- We take paper Green colour and form small leaves, fix them at the base of the rose, that is, candy. A wire needs to be embedded in each, which is also wrapped in green paper.
- In an already decorated vase (a prepared decorated jar), carefully stick the required number of ready-made roses. So that the flowers fit snugly to each other, ribbons or leaves of paper should be placed in the gap between them.
Papula as a gift
To make a birthday present for dad, you have to use your maximum imagination.

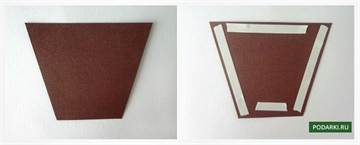
For example: a card with a festive shirt and tie.

For this you need:
- We fold a sheet of cardboard in half, in the form of a postcard.
- A sheet of colored paper of the same size must also be folded in half, making cuts on the sides and bending the corners - this is the collar of our shirt.
- We take paper of a different color and form a tie, then glue it under the collar.
- The shirt is attached with PVA glue to the main side of the cardboard postcard.

Note!

Inside ready-made gift wishes for the holiday are written, or you can even glue daddy's internal postcards, or your photo as a keepsake.

You always look forward to your favorite holiday with impatience and anticipation of a miracle.

And hand-made birthday crafts allow you to keep warm joyful memories!

Photo of crafts for birthday


Note!


Who always has sweet treats? Who will always forgive and understand, help at any time, and sometimes even "will not give" to parents? Granny, of course! For this, the grandchildren love their grandmothers so much. Even more grandmothers love their grandchildren, and especially when it turns out that a do-it-yourself gift for a grandmother's birthday, made with their own hands, in which they put their love and a part of themselves, is not a grandmother's dream, but a reality.
What crafts can be made for grandmother's birthday:
Crafts from natural materials
 Many at school made herbariums for biology lessons or just kept their favorite beautiful leaves of trees or flowers for themselves. But not only they are suitable for decorating your gift - cones, orange peel, Christmas tree needles, pieces of bark, birch bark, tea bags, even small semi-precious stones like quartz - all of this can be used to make a congratulatory composition.
In an original, beautiful and simple way, you can depict the granny's favorite animal: just draw its outline on paper, evenly cover it with glue and pour tea leaves from a cut bag with a thin layer. Eyes, whiskers, draw either with a pencil or paint.
Drawings with applique elements
 To create a craft, you only need to have scissors, colored paper, glue and interesting idea... Various shapes, images are created from cut and pasted applique elements on the main paper - the background. It can be flowers, the sun, clouds, and there can be completely invented lines and shapes. It will be easy for even the smallest grandson to complete such a craft for the grandmother's birthday, as described above.
Origami
 Such a gift requires not only paper and an idea, but also sleight of hand. A paper craft is more difficult to complete than an applique, but it will be very pleasant for grandma to get such a craft for her birthday! There are many techniques for creating volumetric figures from paper: you can make roses even from ordinary napkins. Quilling and origami are currently popular.
The essence of quilling in creating compositions from paper ribbons different lengths swirled in a spiral. In origami, sheets of paper are transformed into the "details" of the composition, like a constructor. Paper crafts are great for developing fine motor skills of the hands, which is extremely important for the development of the child., so origami, for example, would be a very rewarding hobby.
Figurines made of salt dough, clay and plasticine
 Fans of sculpting can try to make a craft for the grandmother's birthday in the form of a figurine of an animal, a house, a flower, a loaf of bread, an apple, or whatever! Like the previous version, sculpting develops fine motor skills of the hands well! Unlike clay or salt dough, plasticine is easier to use, allows you to correct mistakes at any stage of creativity. Clay and dough have better strength and durability. In addition, clay and dough figurines can be painted as you like. Figures made of dough and clay, after molding, are dried before painting. This can be done quickly in the oven, after which you can start painting.
Burning out on the board
 Quite a simple and interesting way for boys to make a gift to a granny. Such a souvenir-drawing for a grandmother's birthday, for example, a wooden spoon with a pattern or a cutting board, will also have practical value, because many grandmothers love to cook. And cutting vegetables on a board presented by a grandson is much more enjoyable! The complexity of the method lies in the fact that not many have a home necessary tool- a burner and not many can make or buy a piece of wood - a board, a spatula or a spoon. After drawing with a burner, the craft can be painted, after which it should be varnished for more long service... Special talents can make a painting a burner!
Wool toys
 Quite a laborious and time-consuming lesson, but for the sake of a good craft for grandmother's birthday, nothing is a pity! To create a toy from wool, in addition to the wool itself (of different colors), you also need to purchase special needles for felting wool. The needles are sharp, so this method is fraught with some danger of pricking, but what beautiful toys are made from wool! You can caricaturely dump your beloved grandmother's cat or dog, such a gift will certainly cause a lot of positive emotions in your grandmother. In addition to felting with needles, there is also a method wet felting, convenient for creating all kinds of wallets, handbags, phone cases. As a rule, objects made by the method of wet felting are taken as a basis, on top of which the main pattern is “felted” with the help of needles.
Bead jewelery
 Many girls love jewelry, so almost all of them are happy to weave beaded jewelry. Why not weave a piece of jewelry for your grandmother? Great craft for grandma's birthday!
It can be just a bracelet or pendant, or you can make a keychain in the shape of an animal. It is better to put beads on a strong fishing line than on a thread, because the latter is easier to break, accidentally catching on something, besides, the line is transparent.
And these are just a few of the various options for making gifts with your own hands. You can choose 1-2 options and combine them in one composition, making a voluminous greeting card, but you can make a "useful" gift, stored not only as a memory, useful in everyday life. The most important thing is that the grandmother will always appreciate the gift, in which a part of her soul and love is invested, higher than even the most necessary thing bought in the store.
If you liked our site or the information on this page came in handy, share it with your friends and acquaintances - click one of the social media buttons at the bottom of the page or at the top, because it is quite difficult to find really interesting materials among the heap of unnecessary garbage on the Internet.
Children make crafts from polymer clay not only in kindergartens, but also in schools, because this is an educational activity. The ideas for such crafts are varied. On the Internet there are simple and easy lessons and methods for such sculpting for beginners. Making clay crafts is not only easy, but also very interesting. It turns out real animals, cute cartoon characters and others beautiful crafts for Game.
Children make crafts from polymer clay not only in kindergartens, but also in schools, because this is an educational activity
It is always pleasant to do something with your own hands, especially when you get something beautiful and useful. Clay modeling is a great activity that can be done by both children and adults.
A lot of wonderful figures can be sculpted from this material.
Here are some of these ideas that make great souvenirs:
- Christmas tree.
- Doll.
- Flower.
- Frog.
- Rabbit.
- Dog.
- Sun, etc.
For beginner craftsmen, there are many simple master classes on creating such crafts, which tell you how to make products step by step. So why not start creating them now?
Gallery: crafts from polymer clay (25 photos)


Keychain in the shape of a unicorn made of polymer clay (video)
New Year's craft made of polymer clay for beginners: master class
It's always a pleasure to receive New Year's gifts. And gifts made with your own hands are doubly pleasant to receive, because the person who presented such a present put his soul into it.
A lot of beautiful works are made from clay, which can be presented for holidays, for example, for the New Year. New Year's gifts should be symbolic, which is why a Christmas tree can be made from this material.
Master Class:
- Green polymer clay rolls out in the hands. From it you need to sculpt a cone-shaped figure. Do not cut the top of the cone too far.
- Then take ordinary nail scissors and dilute slightly. Now you need to press them a little against the cone in a circular motion in each row. Thus, the branches of the Christmas tree are made.
- Then each twig made must be slightly raised upward with your finger. This will give the figure a three-dimensional look.

It's always a pleasure to receive New Year's gifts
At the last stage, the tree must be fixed on a flat surface.
How to make polymer clay at home?
It is not necessary to spend money on the purchase of this material, because it is quite easy to make it at home on your own. However, it should be noted that clay prepared by yourself cannot be called polymer, since it is made on the basis of plastic.
However, you can make good clay at home that can be used for sculpting.
There are several recipes for its preparation.
Glue and cornstarch
This home material will differ from industrial material in that it dries faster. Because of this property, a craft can lose up to 30% of its weight. Therefore, it is important to take this into account when sculpting and make the craft a little bigger size than planned.
So, the cooking method:
- A glass of cornstarch is mixed with an incomplete glass of glue. It is recommended to use PVA glue.
- Then a little lemon juice and mineral water are added to the mixture.
- The fire turns on. The mass should be stirred to form a homogeneous consistency.
- In order for the clay to become colored, you can add to the mixture acrylic paints or food coloring. But there is an alternative option: coloring the already finished shape. The paint dries quickly on such material.
- After that, the mixture is laid out on the table and kneaded like dough. Gloves can be worn to keep yourself safe and to protect your hands. When the material is smooth, you can finish kneading it.
- It is recommended to store ready-made clay in the refrigerator, because this way it will retain its "freshness".

This homemade material will differ from industrial material in that it dries faster.
Advice: such a mass must be stirred all the time while it is heated on fire. If this is not done, then the structure of the clay will be broken.
Glue and glycerin
The advantage of clay made from these materials is that it will not crack after drying. It turns out to be quite dense, albeit slippery.
So, the way to prepare it:
- The water mixes with the glue. The water should be half as much as the glue. The mass is put on fire. It is enough to boil it for a couple of minutes.
- Then starch and glycerin are mixed with water in a separate container. To these ingredients is added the hot mass that has just been removed from the heat.
- Knead the mass on a flat surface.
- To prevent the mixture from drying out, it is recommended to store it in a hermetically sealed surface.
- For beginners, it is recommended to prepare clay with a margin so that they have the opportunity to practice more in sculpting. The more figures a person blinds, the faster he will master this skill.
- Clay is not a toxic material, so even very young children can sculpt figures from it. In addition, this occupation develops them perfectly.
- Before decorating the finished molding, you need to wait for it to dry completely. This will take at least 3 days.
- Before baking a figurine in the oven, you need to think about safety precautions. When the craft is baked, you cannot pull it out of the oven with your bare hands, because this can get burned. Therefore, when the baking sheet with the craft is removed from the oven, it is imperative to wear mittens.
- Before you start coloring the craft, you should put on a robe. The fact is that the process of dyeing clay is rather dirty, which is why it is better to protect your clothes from getting paint on it.

Before decorating the finished molding, you need to wait for it to dry completely.
How to make a clay frog?
Such a craft can be given as a birthday present or left for yourself.
- You will need a small piece of material. Since frogs are green in nature, it is worth using clay of this color. The piece should fit in your fist.
- The piece is wrinkled in hands, and then placed on a flat surface and smoothed with hands.
- You need to make the "cheeks" of the figure by pressing on the material with both hands on the right and left sides.
- Then red clay is taken and rolled out. You should get a worm. The frog's mouth will be made from it.
- You also need to make the frog's eyeballs. To do this, 2 pieces of white clay must be rolled into balls. They are attached above the mouth, symmetrically.
- Two small balls of blue clay will be the pupils of the frog. They need to be glued over the eyeballs.

Modeling is one of the oldest human crafts. Now from it you can make not only dishes, but also jewelry, toys, gifts, and all sorts of interior things. It also has a good relaxing, sedative effect. So you can both relieve stress and spend time with benefit. But where to get the material and how to work with it correctly - this will be discussed below. So, quite often polymer clay is used for this business. But how to work with her and create masterpieces is worth talking about in more detail.
Details about sculpting for beginners
What kind of clay crafts can you make with your own hands? In this article, you can find ideas for beginners. Clay can now be presented in the form of a polymer, very similar to plasticine, but at the same time it can harden. And the names are different - plastic, thermoplastic, thermoplasticine, cernite. It can harden in one version without firing, in the other - only during firing. Novice craftsmen should determine for themselves what they will work with - with purchased material or with a lot of their own preparation.
Making polymer for modeling right at home.
In fact, this is not a polymer at all, because it is made from other components. But the techniques for working with him are practically the same. Here's how it prepares:
- 1 glass of regular white PVA glue,
- 1 cup corn starch
- 2 tablespoons lemon juice
- 1 tablespoon non-greasy cream (any)
- 1 tablespoon of petroleum jelly.
You will also need:
- Glass mixing bowl.
- Stirring spoon.
- A pad for mixing the mass.
- Polyethylene film.
From all this, about 350 grams will turn out. masses for modeling. First, stir the glue, starch and petroleum jelly in a bowl with a spoon. Then add lemon juice there and mix well again. And after that, send the bowl with the contents to the microwave at maximum power for 30 seconds.
Lubricate the surface for kneading with cream. After the microwave, mix the mass well again and spread it on the prepared surface and mix again, like a dough, for at least 5 minutes. You should have a flexible and resilient material. Now we roll it into a "sausage" and wrap it in fabric. After cooling and absorbing excess moisture into the fabric, the mass is ready for use.

Modeling equipment.
Here we are talking about how to make clay crafts. Of course, this cannot be done without some details. In the process of sculpting, we actively use any suitable material at hand. Here is the novice master's duty set:
- The work surface is always hard.
- Sharp cutting tools - a knife, blade or scalpel for small parts.
- Cylindrical objects at hand can be adapted under rolling pins for rolling out the mass.
- Needles and toothpicks - they can make holes, or you can fix small parts.
- Cutters are cutters different forms, but instead of them, you can easily adapt different caps from the bottles.
- Gloves and wet wipes.
Various sculpting options
Before we offer you easy clay crafts, for a start it will be logical to familiarize yourself with various sculpting techniques in order to determine for yourself suitable option, and new creative ideas in the process of acquaintance can also come to mind. This all applies to baked clay and self-hardening. The most popular techniques are:
The cane technique. Thin multi-colored pieces of clay are folded together in layers and rolled into one roll. On the cuts of such rolls, very beautiful and interesting color combinations are obtained.
Technique in a smooth color transition. Different colors of clay are mixed in different quantities so that the colors smoothly blend into one another.
Filigree technique. Chaotically small pieces of mass are placed over the workpiece, a very original pattern can be obtained.
Kaleidoscope technique. Multi-colored layers are rolled into rolls, then we give them geometric shapes on a hard surface.
"Salty" technique. We dip the figures in coarse salt, bake them, and then, washing off the salt with water, we get a corrugated surface on the products.

The actual molding from the polymer mass
Self-hardening clay becomes capable of becoming like wood or gypsum, and then it can be processed accordingly. And the baked clay becomes like plastic. It can be purchased at art or craft stores.
We start with something elementary that does not require sophisticated processing. At the same time, do not be afraid to experiment, master different techniques and techniques, over time it may turn out that your own, special. For starters, you can do jewelry or flowers. We use acrylic paints for coloring. If you decide to paint with gouache, then the top should be varnished. But before painting with nitro enamel, it is better to prime the surface with epoxy glue. 
What crafts to make from clay
Well, now it's time to tell you about what crafts can be made from clay. Take a closer look at these options and your time will not be boring.
Flowers.
We begin to sculpt a rose from a ball, make a drop out of it, then a few more balls, but these will already be petals, after we give them the appropriate shape with our fingers. We stick them around our droplet in the form of a bud, the first petals should be left straight, while the rest, outer ones, should be slightly turned outward.

Articulated figure.
Oddly enough, we take the foil. With its help, we first form the blanks of our parts, apply layers of polymer mass on them, and get body parts, including the hinges. After hardening, we carefully cut these parts, remove the foil, and grind the parts, glue them again and connect them together, as a rule, with strings.

Bijouterie.
Your daughters / granddaughters / nieces and their girlfriends will be delighted with the simple, but original jewelry... It is with children's options that you can begin to fill your hand. And these are not only beads, but also bracelets, pendants, and earrings. Cut out identical squares on a rolled piece of clay and roll identical beads out of them. Then with a needle we make holes in them.

Master class for children on modeling toys
Polymer clay is good stuff for creativity. It is so easy to make crafts for beginners from it. And it is these products that you can see in the photo. Modeling is an irreplaceable activity for development fine motor skills, and this activity also helps to cognize the world. We select the simplest options for crafts. For example, doll food, or flat animal figures.
Food.
Vegetables and fruits can be given the desired shape and texture using a needle or toothpick. It will be interesting and exciting to learn different techniques with a child, because children quickly get bored and get bored, and here there is such a variety of polymer processing techniques.

Animals.
Here, only small figures can be made from solid pieces, but for large forms it is better to use the technique of hollow parts, and beads will perfectly play the role of the eye and noses.

Clay crafts requiring firing
Remember plasticine sculpting? What should be done first? That's right, knead it properly, warm it up in your hands. It's the same with clay. It is important not to overheat or burn white or red clay, for this we observe a temperature of 110 - 130 degrees.
It is very laborious and difficult to make such clay at home. There will be many mistakes. You need both the right natural clay and equipment for high-quality firing.
Vase.
If you are planning a thin and tall figure, then you cannot do without a frame. An unusual beautiful bottle is suitable for the frame of the vase. having cut it into two parts, we stick each with rolled layers of hardening clay. After hardening, remove the parts of the bottle, and glue the clay halves.

Figures.
A human figure is too difficult for beginners, if interested, you can find video tutorials on such modeling on the Internet. In general, a flexible wire usually becomes the basis for the figures.
Video tutorials on modeling.
Better to see once what to hear a hundred times. All your questions and misunderstandings will be resolved while watching these video tutorials. Now you can find everything on YouTube, and how to burn clay, how to create a figure of a man, and modeling in various techniques.

New Year's toys.
After you train and get your hand in a year, the question is New Year's gifts friends and relatives will disappear by itself. If nothing original comes to mind, video tutorials will help you. There, the process of creating even the most complex and intricate souvenirs is shown in stages, like Christmas tree decorations and practical attributes of the holiday, for example, New Year's masks.