Despite the fact that December has just begun, I already want New Year's holiday. And what will create Christmas mood better than a Christmas tree? Although, recently New Year's topiaries have also become extremely popular. Such a small tree can be placed on festive table or decorate your office with it. In addition, the New Year's topiary will be a great souvenir!
We have already talked about what topiary is and what are the basic principles of its manufacture. Today we’ll talk about what features New Year’s topiary has.
Before you start making your own topiary, decide on its shape. The shape can be either round (traditional) or figured (for example, herringbone).

New Year's topiary ball

The principle of creating such a topiary is similar to the previous one, you just can use pine cones instead of Christmas tree decorations.

First, we glue cones to the ball-shaped base, and then fill the gaps between the cones with various decorative elements (beads, bows, small Christmas balls). The main thing is not to overdo it with decoration.


If you take a cone and spruce or pine branches as a basis, it will also turn out quite nice:

Video master class on creating New Year's topiary from pine cones and Christmas balls:
Topiary made from edible materials (nuts, sweets, tangerines)
"Tangerine" tree
It's no secret that tangerines are a favorite New Year's treat. Therefore, we will consider the process of creating a “tangerine” topiary in more detail.

Prepare the following materials:
- tangerines
- a skein of linen rope (can be bought at any gardening and flower shop)
- a flower pot from which our tree will actually grow
- a beautiful branch or driftwood, strong enough to withstand the weight of tangerines
- scissors and paper knife
- a piece of foam or floral oasis
- spruce branches and mistletoe leaves for decoration
- pieces of wire for strengthening tangerines on the tree (a set of small hairpins will do)
- artificial snow(it can be crushed polystyrene foam or anything at all, the main thing is that it looks like snow)

We take our tangerines and wrap them with rope crosswise. We strengthen the wire as shown in the photo:

Lightly coat the twig (so that the needles do not stick together) with PVA glue and dip it in the snow.

We cut out a cone from polystyrene foam or oasis, which is shaped to easily fit into our pot.

Let's move on to the most difficult and important part. We strengthen the branch in the oasis so that it does not dangle. We begin tying the tangerines one to the other, starting from the bottom. There will be fewer tangerines at the bottom, a little more in the middle, and the same number at the top as at the bottom. Then we decorate all this beauty with leaves and twigs.

DIY New Year's topiary is ready! You can safely decorate your holiday table with it.
Remember that tangerines are a perishable product, so it is better to make such a tree on the eve of the New Year. As a worthy alternative, you can use decorative tangerines - plastic or made from polymer clay.

Candy topiary
What do you think of the idea of a New Year’s topiary made from candy canes?

The materials are the most standard: a foam ball, a stick for the trunk, a pot, a satin ribbon for decoration, a foam cube, adhesive tape and 200-300 grams of candy.

Pay attention to how you can secure the trunk in a foam cube, as well as decorate it:

And also see how you can cover a foam ball with colored adhesive tape so that you don’t need to further decorate the gaps between the candies:

The principle of creating a topiary is similar to those described above, but these 2 tips can be very useful to you.
Can decorate any holiday. To give this tree a New Year's look, use appropriate decorations, for example, a Santa hat:

Or make a coffee topiary in the shape of a Christmas tree:

Topiary made of sisal, fabric or felt
There are a lot of materials for creating a Christmas tree. For examples and patterns, you can refer to the article. Make a Christmas tree using any of the methods and secure it in a pot. The topiary is ready.

Despite the fact that the New Year is still far away, you can already think of interesting and original ideas for gifts and decoration. The familiar Christmas tree, garlands and pom-poms are, of course, a good thing, but sometimes the soul desires something new and original. Recently, topiaries (fancy trees made from a variety of materials) have become very popular.
This decorative element can be placed on a holiday table, on a fireplace, window, or used as a gift. So you can do DIY New Year's topiary 2017, which will immensely surprise and delight your guests.
On the Internet you will find many different variations for creating this amazing item. In this article we have included the most interesting and accessible ideas that anyone can do.
Topiary made of Christmas balls
To make this New Year's decor you will need:
- Christmas tree balls of small sizes, matching in color;
- Base for topiary (it can be made from papier-mâché or take a foam ball);
- Palua-trunk;
- Flower pot;
- Floristic oasis (sold in flower shops);
- Details for decoration (tinsel, sparkles, bows, etc.);
- Glue gun.
Step 1. If you purchased a pot that does not fit the New Year's theme, then you can decorate it using bright satin fabric, for example, red.
Step 2. After this, a floral oasis should be placed inside the container. If you don’t have one at hand, you can replace it with polystyrene foam.

Step 3. The trunk of the future topiary needs to be secured in the center of the pot. An ordinary strong branch or cardboard tube is perfect for such a stick. Decorate it beautiful ribbons, and she will look wonderful. You can put shiny tinsel at the base.
Step 4. Now you need to attach the same floral oasis or papier-mâché ball to the trunk. Let's say you use oasis, then before inserting the balls into the base, you need to attach toothpicks to them.
Step 5. If between big balls large gaps are visible, cover them with small balls, cones, bows or other decorative details.
Step 6. To make the toys stick better, it is advisable to glue them together with glue at the end of the work.
Topiary of tangerines

You can make this craft from any other edible materials. Let's focus on tangerines this time, because they are a mandatory attribute at the New Year's holiday.
To make topiary from tangerines you will need:
- Tangerines;
- Twine or any other decorative rope;
- Flower pot;
- A branch or snag on which the ball will be held;
- Scissors;
- Polystyrene foam or floral oasis;
- Christmas tree or mistletoe branches for decoration;
- Hairpins for strengthening tangerines;
- Artificial snow;
- PVA glue.
Step 1. First of all, you need to wrap the tangerines with twine or that decorative rope that you have saved.
Step 2. Coat the ends of the pine branch with PVA glue and lightly dip in artificial snow.


Step 3. Make a cone out of the floral oasis so that it sits easily but tightly in the pot.
Step 4. This part of creating a tree is the most difficult and responsible, so be careful. Insert the branch into the oasis to prevent it from dangling. Attach the second piece of the oasis at the top, giving it the shape of a ball. Thread the pins through the tangerines and stick them into the oasis. Decorate the gap between the fruits with leaves.
Step 5. At this stage, the making of topiary ends!
Candy Topiary

A topiary made from candy canes would be a great holiday decoration. It will be great if you can find red and white candies, but others will work too. The main thing is that they are bright.
To make candy topiary you will need:
- Styrofoam ball;
- A beautifully curved stick for the trunk (you can take an ordinary cardboard tube);
- Satin ribbon for decoration;
- Foam cube;
- Flower pot;
- Multi-colored pebbles;
- Adhesive tape to match the candies;
- 300 grams of candy.
Step 1. Place a foam cube in the pot and insert a stick into it to hold the candy ball.
Step 2. Cover the base with cardboard, as shown in the photo.
Step 3. Take a foam ball and cover it with adhesive tape, onto which you can later attach lollipops. Of course, you can do without the tape and glue the candies using hot glue, but then you will have to decorate the gaps with additional details.
Festive topiary

This master class shows how you can make candy topiary, just in a slightly different style.
To make topiary you will need:
- Styrofoam;
- Candies;
- Wire;
- Cable;
- Decorative details: buttons, balls, ribbons, flowers.
Step 1. Wrap the cable with decorative tape and make a bundle.
Step 2. Take the wire and attach a small bell to it, then you can also wrap it with decorative tape and secure the end firmly.
Step 3. You need to make a cone out of foam plastic (it will be the base of our Christmas tree). Glue the sisal thread at the bottom and start wrapping the product. Note that their sisal topiaries always look attractive.
Step 4. Try to wrap the cone tightly, occasionally coating the base with glue.
Step 5. At the top you should attach a wire with a bell. Just insert it inside the cone. Bend the end slightly.
Step 6. You need to insert the cable into the lower part and only after that start decorating the product with candies.
Step 7 Take a small glass, fill it with a floral oasis and insert a New Year's product into it.
Step 8 For decoration, use your existing beads, rhinestones, tinsel, and bows.
Topiary “Cockerel”

As you know, 2017 will be the year Fire Rooster. For those who want to truly surprise their guests, we suggest paying attention to this one. It tells how you can make a New Year's cockerel with your own hands. Topiary is easy to make and will not take much of your time.
To make the “Cockerel” topiary you will need:
- Fabric of different colors and textures;
- Satin ribbons;
- Scissors;
- Cockerel pattern;
- Pot;
- Two thick wooden skewers;
- Artificial grass;
- Product filler.
Step 1. Print out the pattern below. You can use different designs, the main thing is that the cockerel looks beautiful and festive. Place the pattern on the fabric and mark the boundaries of the product. The photo shows that the top of our cockerel will be made of one fabric, and the “pants” will be made of another. Having finished cutting out parts of the product, you must stitch them from the wrong side.
Step 2. Each of the sticks on which the rooster will sit should be wrapped with the remaining fabric and stuck into the toy. Carefully stitch the holes.
Step 3. Attach the wings. Draw the eyes, a slight blush. You can from the bright ones satin ribbons make a tail.
Step 4. Sew on the beak, and at the top you can attach a crown or comb.
Step 5. You can pour some soil into the pot and add gravel on top. Decorate it all with artificial grass. Hang a soft egg on one of the wings. New Year's tipiary is ready! You can use your imagination with this product and add new details - it will still turn out to be cute and festive.
New Year's topiary. Master class with step by step photos.
Author: Tatyana Eruslanovna Tyagina, teacher kindergarten No. 7 Kiselevsky urban district, Kemerovo region, Russia.
The master class is designed for older children school age, teachers, parents and people involved in creativity.
Purpose: This master class is intended for making a tree of happiness - a topiary, which can serve not only as an interior decoration, but also become an excellent New Year's gift.
Target: making New Year's topiary from improvised materials.
Tasks: familiarize yourself with the technology of making topiary, develop creative imagination and fantasy; instill aesthetic taste, develop hand motor skills, perseverance; cultivate accuracy when performing work.
Initially, topiary was a garden with decorative trimmed plants and sculptures created from artistically trimmed trees. The art of topiary has a long history. Thus, even in Ancient Egypt and Persia, the ability to give geometric shapes to bushes and trees was valued. And most famous example Topiary gardens are the Hanging Gardens of Babylon in Babylon - one of the Seven Wonders of the World. And now topiary (or European tree) is the name for small original trees, for the production of which natural and artificial materials are used. Topiary is decorative in nature, and what it will be made of depends only on the author’s imagination. And the size of topiary can be from 10-15 centimeters to half a meter.
Materials and tools for making New Year's topiary: not a large pot, a branch or stick 40 cm, newspaper, thread with a needle, plaster, artificial white fur, Christmas tree beads, artificial pine branch (brush) sold by the meter, wire cutters, scissors, glue gun, Moment glue, decorative green and red, red bow, decorative silver branch, pine cones, white gouache or corrector, various New Year's mini toys.
Progress:
1. We make the base for the topiary: we form a ball with a diameter of 10 cm from newspaper and wrap it with threads for strength.

2. Make a hole in the ball, insert a branch and secure with hot glue. We wrap the branch with green braid.

3. Fill the pot with diluted plaster and immerse the base of the topiary in it. You don't have to wait long for the plaster to harden.


4. Decorate the trunk of the topiary with Christmas tree beads using glue.

5. Let's start making the topiary crown. Using wire cutters, cut the artificial pine brush into 17 cm pieces. My topiary took 40 of these pieces. It all depends on what diameter your ball is.


6. Bend the pine pieces in half.

7. You get these fluffy lumps.

8. Using hot glue, attach the pine fluffy lumps tightly to each other on the ball. You need to start from the bottom of the ball.

9. It turns out like this crown.

10. Now let’s decorate the crown of the topiary. For this you will need: cones, corrector or white gouache, various New Year's mini-souvenirs, a decorative silver branch.

11. Cover the tips of the cones with a corrector (you can use white gouache).

12. Glue the painted cones between the pine branches.

13. Glue New Year’s mini toys along the crown.

14. Glue decorative silver branches between the pine branches. Cover the tips of the pine needles with corrector or white gouache.

15. Let's start decorating the pot. For this you will need: white artificial fur, red braid, large silver beads, a couple of New Year's mini toys (gifts), pine brush needles.

16. Cut out a “fur coat” for the pot from white fur. The pattern depends on the shape of your pot.

17. Sew the darts together and use hot glue to secure the “coat” to the pot. We tie the “fur coat” with red braid and decorate it with a bow.


18. Place pine needles in a pot, then beads and gifts.


19. Lovely New Year's gift ready for friends and family.

I wish you all creative success!
It won’t be surprising if a master class on what to give to friends and family on Christmas Day will soon be in demand. New Year. When you run out of ideas, you really want instructions to miraculously appear, and it becomes clear what to give, so that the gift is liked and remembered. Handmade gifts are good taste and an excellent sign of attention. And one of these gifts could be a New Year’s topiary.
Topiary is a decorative tree in a pot, usually with a round crown, a beautiful souvenir, the materials for which can be any objects. This and natural materials, and handicrafts, and the most unexpected things.

New Year's topiaries can be a variant of a Christmas tree, decorated in an interesting way. But another bright topiary that will decorate your home or work area on the eve of 2018 is ball topiary.
Step-by-step instruction– how to make a New Year’s topiary with Christmas balls:
- The materials you will need are the following: a foam cone, small Christmas tree balls, a fairly large candlestick, wide ribbon, hot glue.
- The candlestick in this MK is used instead of a pot. The more refined and elegant it is, the better it will emphasize the festive nature of such a topiary. Apply hot glue to the top of the candle holder. The foam cone must be firmly pressed to the place where the glue is applied. You need to hold the cone for some time so that it “takes” well.
- While the glue dries, you can work with the balls. The first thing you will do with your own hands is remove the metal fasteners. For such a Christmas tree topiary, it is important that the balls are well fixed and do not cling to anything.
- It's great if you prepare the cone for gluing the balls. Still, there can be, and probably will be, gaps, so the cone needs to be spray painted. For example, golden or silver, or maybe green with gold. Sometimes the cone is simply wrapped with thick golden threads with your own hands. There is no single method, one master class suggests painting, another – winding, a third – pasting with napkins.
- Grease the top of the ball with hot glue. The ball must be literally pressed into the cone, very carefully, but so that it has a good grip. Many MKs indicate that it is better to pour the glue somewhere so as not to take the gun every time. An unnecessary frying pan will do. The ball is simply dipped in glue in the frying pan, and this way the process goes faster.
- Slowly the entire surface is filled with balls, creating a Christmas tree. You can tie a ribbon with the numbers “2018” on the candlestick or just an elegant, beautiful one.

Ready! This master class is extremely simple, the main thing is not to put too much pressure on the balls, remembering their fragility. You can see in the photo color combinations such a ball topiary Christmas tree.
New Year's topiary: ideas and MK (video)
New Year's topiary: master class
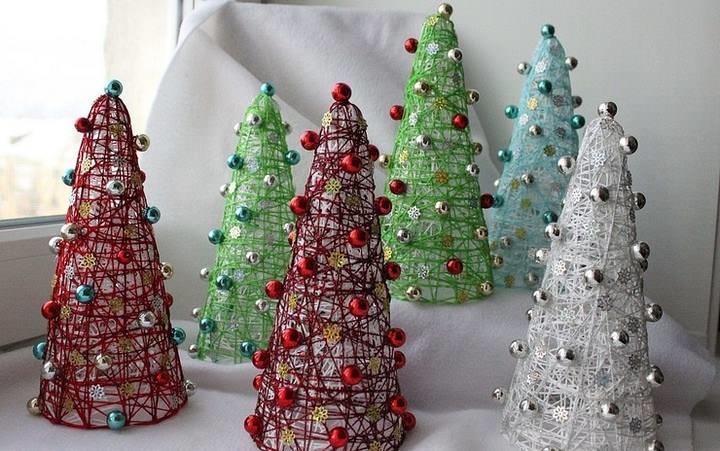
For creatures different interesting Christmas tree you will need yarn in the pot. By the way, this MK is suitable even for children; it does not use hot glue, which is dangerous for them.
You will need:
- Foam or cardboard cone;
- Skein;
- Scissors;
- Sewing needles;
- Very small Christmas balls;
- Round nose pliers;
- Pot;
- Small rod-trunk;
- Ribbon.
It is fair to say that such a tree is often not planted in a pot at all, but while observing a certain tradition, it is still worth doing everything more conservatively.
So, if you look at photos of such topiaries, you will see that it is better to take thick yarn, maybe embossed, or non-uniform. But some Christmas tree colors should be guessed in it - green, blue, white, light blue, silver, etc.

A DIY yarn Christmas tree is made like this:
- Secure a skein of yarn with sewing needles at the base of the cone. Attention, the cone must not be hollow! Please worry about this in advance.
- Gradually wrap the cone with yarn with your own hands, the turns should be tight, no gaps.
- The threads can be secured in place during the process with the same sewing needles.
- Having reached the very top of the Christmas tree cone, the thread is cut and fixed with a needle.
- Half the work is done. You can place the cone on the trunk. At the Christmas tree it should be very small, almost invisible. A piece of pencil, any small cylindrical object. Think about how to secure it in a foam cone. At this point, it is still better to use glue, but if a child makes the Christmas tree with his own hands, fix it with glue yourself.
- Now the tree needs to be inserted into the pot. In fact, you can use any flower pot, small and elegant. So the decor awaits him anyway; initially, color and texture are not so important.
- Usually the master class suggests using plaster or alabaster. And this is the most reliable option. Be sure to decorate the top plaster layer or New Year's tinsel, or sparkles and other decorative things associated with the New Year.
- When the tree is in its pot, you can start decorating. Hang miniature balls on the yarn. An alternative to them is to make berries on needles, which are used in making jewelry. The top of the tree can be a star, also made by hand, for example, from twine or designer cardboard.

The pot can be decorated with the inscription “2018”, wrapped with beautiful ribbons with gilding or silver threads.
Christmas tree made of threads: New Year's topiary (video instructions)
New Year's topiary Christmas trees: step-by-step instructions
Good ideas on the eve of 2018 - soft Christmas trees. They are quite easy to make with your own hands, especially if you have already dealt with wool for felting.

And yet, what nuances may this master class have:
- If a foam cone is not found, make a cone with your own hands from cardboard. Paint it the same color as the fur to prevent any gaps.
- You need to stretch it to the very top of the cone a thick wire that will make such a “squiggle” at the top of the tree, with which the Christmas tree will be cute and cute.
- The trunk for the tree can be wooden skewers. The base of the cone needs to be glued onto skewers, after which they are painted in Brown color so that they resemble a trunk.
- The result is a Christmas tree that needs to be planted in a pot.. Look at the examples in the photo; they use both beautiful expensive pots and ordinary plastic glasses that are decorated with fabric.
- A thin piece of wool needs to be separated from the total mass, and glue it to the squiggle wire. And from there the winding is carried out, so that there are no gaps.
A pot in the form of an unsightly container can be wrapped in a beautiful corrugated paper or foil and tie with ribbon or tinsel.
Topiary for the New Year: master class with coffee
Coffee, or rather coffee beans, is such a universal material that it is perfect for the 2018 New Year’s topiary.

A master class using coffee will be similar to other instructions.
Master class - topiary for the New Year 2018 with coffee:
- For a change, you can stick to the idea of a round tree. The basis, therefore, will be any spherical blank. If you don't have a foam ball or a small rubber ball, a wad of newspaper tied with thread will do.
- The ball must be perfect, therefore, if it is not hard enough, it is covered with napkins according to the papier-mâché principle.
- Next, the ball needs to be painted brown. acrylic paint . And after drying, you can start pasting with coffee beans. There are craftsmen who then specially paint over some of the grains with golden paint to make it look “2018”. It is better to glue coffee beans with a glue gun.
- The blank ball leaves space for fixing the barrel. The trunk for such a coffee tree can be made from a drumstick or a thick pencil tightly tied with twine.
- The trunk is fixed in plaster, which is poured into a pot. This must be done quickly and carefully.
Well, then directly what will make an ordinary coffee tree look like a New Year’s tree. Numerous examples in the photo offer several options at once. First, the pine cones lying in the pot. Ideal if you paint them with gold spray.

In some photos you can see beautiful ribbons with the inscription “2018” and Christmas tree prints. The Christmas tree can also show off like a picture on a pot. By the way, from coffee beans You can put a Christmas tree on the facade of the pot.
The aroma of coffee and beautiful decor are a great gift for a coffee lover in 2018. Often such trees are used as an idea for a photo; photo sessions with such an accessory turn out to be very interesting.
New Year's topiary made from coffee beans in the form of a Christmas tree (video master-cash)
You can make your own photo or video master class, because many ideas come to mind while viewing someone’s work. One inspiring photo and you are ready to make your own Christmas tree topiary. Creative inspiration and interesting finds!
New Year's topiary (photo)