Watch the master class and you will learn how to weave flowers from beads with your own hands.
Order a set of composition materials at.
Composition "Summer Mood"
Watch the video tutorial on the channel "Melody of Beads" on YouTube.
For work we will need:
- Beads for flowers and leaves;
- Wire 0.3mm in the color of the beads;
- in the color of beads;
- Wire 0.5mm in the color of the beads;
- Floral tape;
- Gerbera wire;
- Wire cutters and pliers;
- Sisal;
- Pot;
- Foamiran;
- Scissors;
- Ruler.
For each flower there will be a more detailed description of the beads and wire.


The composition consists of the following elements:
- Lily branches;
- Two calla flowers;
- Two gerbera flowers;
- Leaves of different shapes and sizes.
Lily from beads
To make a lily sprig we will need:
- beads of primary color - 50 grams;
- beads for edging the petals - 5-10 grams;
- light green beads for stamens and buds 10-15 grams;
- brown beads for stamens - 5 grams;
- beads Green colour(about 6 shades) 10 grams each;
- gerbera wire for stem 35-40 cm


An open lily flower consists of three small petals and three large ones.
Small petals (3 pieces)
On the central axis there are 27 beads (about 4 cm) of the main color and we make five pairs of arcs (on the fifth pair of arcs we add an edging color), on 2/3 of the petal we make a step on both sides.

Large petals (3 pieces)
On the central axis there are 30 beads (about 4.5 cm) and five pairs of arcs (like the small petal).

Making a pestle
.JPG)
.JPG)
.JPG)
Stamens

Two unopened buds
The larger bud consists of three petals: on the central axis there are 30 beads of the main color and 4 pairs of arcs with the addition of light green beads at the base.

From the leftover beads you can make loops like these, twist them together and put them in the bud so that it does not show through.

The smaller bud also consists of three petals: on the central axis there are 20 beads (5 green and 15 light green) and three pairs of arcs with the addition of green beads at the base of the petal.

Lily leaves can be made in different sizes and different combinations of green shades can be used.
For example, four sheets - 4 pairs of arcs.

And one - 3 pairs of arcs.


The long leaves (three pieces) used in the composition are woven in a similar way. Such leaves must be stitched in 3-4 places.

When all the elements of the lily are ready, you can begin assembling the branch.

.jpg)
.jpg)

.jpg)

Beaded calla lilies (two pieces)
To make one calla flower we will need:
- beads of primary color - 25 grams;
- yellow beads for pestle - 5 grams;
- light green beads for pestle - 5 grams;
- wire 0.4 mm in the color of the beads;
- 0.5 mm wire in the color of the beads for the central axis of the petals;
- wire for stitching;
- gerbera wire for the stem.

Petal
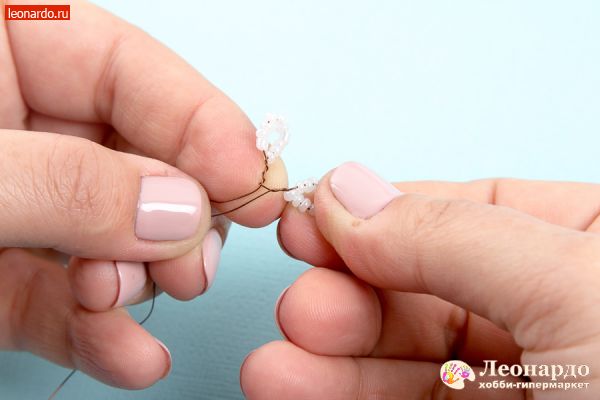
For the central axis of the calla lily, we twist two pieces of 0.4 mm wire 17-20 cm long (or take the same piece of 0.5 mm wire), twist it with a working wire (0.4 mm). We string 6.5 cm of beads and make two pairs of arcs (sharp top, round bottom).


Next, we make 15 turns of the wire around 4 fingers of the hand (thus measuring the required length of wire for weaving a petal with an extension). Before reaching the top of the petal, 7 beads are passed with wire from the wrong side to the front side.

We go with the wire with the beads down.

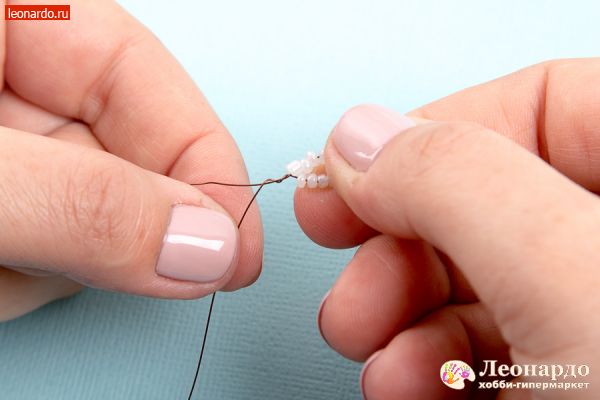
We make one turn at the bottom - if there are excess beads, remove them, and pass the wire from the inside to the face between the expansion arcs. We make a symmetrical step on the other side of the petal (we step back from the top of the petal by eye, parallel to the first step).

We return with the wire with beads and make the second step, retreating again 7 beads.

We make 4 such steps (indented by 7 beads).


Then we continue to make steps, but retreat 6 beads. There should be a total of 8 steps on one side of the petal and 8 on the other.


We sew the petal from the wrong side with thinner wire (0.2 mm) in two places.

Give the petal the desired shape.

Pestle
We take the wire for the stem (it must be decorated with white or yellow floral tape, or it can be painted). We collect light green beads on a 0.3 mm wire, then we make a transition, alternating yellow and light green beads, after which we collect yellow beads.

We wind the working wire to the stem, leave two yellow beads and lower the wire without beads a little down, then go up again, grasping the above two beads.


We insert the pestle into the petal and secure them together.

We decorate the stem under the petal with green floral tape. We string about 20 cm of light green beads onto a green wire. We wind the working wire to the stem from bottom to top, not reaching the beginning of the petal by about 0.5-0.7 mm.

We continue to wrap the stem with beads, rising upward with each turn. We make about 7 turns to cover the joint.

We reach the central axis of the petal and pass the wire through the petal several times, fixing the wire.

After this, we go down with the wire through the turns of light green color.

The calla flower is ready!

Similar to the calla petal, large stepped leaves are woven.

Except that instead of the first two pairs of arcs, we make four pairs of arcs, retreating from 7 to 15 beads (in random order).


Beaded gerbera (two pieces)
To make one gerbera flower we will need:
- primary color - 50 grams;
- edging beads for large petals - 20 grams;
- beads for the flower core, 3 shades (green), 5 grams each;
- wire 0.4 mm in the color of the beads;
- - you can do it yourself
- gerbera wire for the stem;

For one gerbera flower you need to prepare 6 types of petals.

Petal 1 (loop of 9 beads) – 7 pieces.
Petal 2 (loop of 11 beads) – 12 pieces.
Petal 3 (loop of 15 beads) – 18 pieces.
Petal 4 (loop of 17 beads) - 24 pieces.
Petal 5 (11 beads on the axis, two pairs of arcs, sharp top, sharp bottom) - 24 pieces.
Petal 6 (15 beads on the axis, three pairs of arcs (the third - edging - in a different color), sharp top, any bottom) - 24-26 pieces.
Cut off the side of the nylon lid. We make holes (with an awl or a nail) in rows in a circle - according to the number of petals in each row, for petals 1-4, and holes in two rows - for petals 5-6 (that is, 4 more rows for these two types of petals).
Let's start assembling the gerbera
Take petals 1 and thread the tails of the wire into the holes in the center, with reverse side twist the wires together.


Then in two rows - petals 5. We insert the petals of the second row in the spaces between the petals of the first row.


Insert a stem wire into the bundle of wires formed from below and wrap it tightly with wire for assembly.

Take green foamiran and cut out three circles of different diameters from it. Cut the petals.

We cover the lower part of the gerbera with these petals (glue it if necessary).

We wrap the stem with floral tape. Gerbera is ready!
.JPG)
Now all the elements of the composition are ready. We form a single structure from them, arranging the elements of the composition at our discretion.
First you should try on the arrangement of the composition in an empty pot. And only after that we fill the pot with gypsum solution and plant the composition there. We wait until the plaster sets (15-20 minutes). Leave until completely dry (about a day). We decorate the surface of the plaster with sisal.
The composition is ready!

Leave your comments, ask questions and suggestions! We will be very pleased!
Elizaveta Rumyantseva
Nothing is impossible for diligence and art.
The peculiarity of beads is that, in addition to standard jewelry, from such small beads you can create almost any composition, up to an original bouquet or an entire flower basket. They will be a great gift for any occasion. In addition to the materials, this activity requires instructions on how to make beaded flowers, which you will find below.
Features of beading

To learn how to weave flowers from beads with your own hands, it is recommended to master only 2 techniques of such needlework, which are used more often. One of them is called parallel and is more popular, but at the same time requires perseverance. This technique is used to make small details, including flowers, such as bells, sunflowers or spring lilies of the valley. The second technique is called French. It is often recommended for weaving for beginners.
How to make a flower from beads - weaving patterns for beginners
In diagrams with a parallel weaving method, only even rows are depicted, because the odd ones are their exact repetition. Using the French technique, it is fully shown how to weave flowers from beads for beginners. You can also find a legend on the diagram, i.e. a description of the color, size and number of beads. For creating original crafts you will need:
- beads, sequins if necessary;
- wire or thin fishing line;
- special needle;
- scissors, nippers.
Rose

A master class on weaving roses requires the preparation of the following materials:
- beads 0.4 mm green and yellow color for petals and bud;
- copper wire 0.3 mm thick;
- wooden skewer.
Instead of yellow, you can choose any color for work depending on the desired shade of the product. Weaving instructions are as follows:
- Cut a piece of wire 30 cm long, fold it in half and string 1 bead.
- Then thread both wire ends through 2 beads.
- Keep going like this. When you reach 4 beads, start reducing their number gradually to 2.
- Tie the ends of the wire in a knot - you should get a petal.
- Make 6 more of these leaves.
- Weave the next 3 from 11 rows, with the maximum number of beads being 6.
- Using a similar technique, start weaving the petals of the flower itself, only take the wire already 60 cm long. The first bead will be 1, and then make rows only from an even number - this way reach 14 pieces.
- At the end of the 9th row, put 9 beads on both wire ends and thread them through the first one. Tie a knot - you get a rose petal.
- Weave 5 more petals.
- Weave the next 4 petals, reaching 16 beads in the last row, and for edging use 10 beads on each side.
- Give each petal a rounded shape using a simple marker, bending the small ones more than the larger ones.
- First connect 2 small petals by twisting their wire together.
- Similarly, form the entire bud, and then secure all the small petals at its base.
- For the stem, wrap a wooden stick with wire, adding large leaves as you do so.
Lily

For weaving the following no less beautiful flower, in this case lilies, you will need the following materials:
- white or beige beads;
- gold beads;
- bamboo skewer;
- green floral ribbon;
- wire 0.3 and 1 mm thick.
The technique used is French. Step-by-step instruction weaving is as follows:
- Make a wire piece 40 cm long, bend it and start twisting it in the middle. The short part should be approximately 4-5 cm.
- String 15 white beads on the small tip, and 19 on the long tip.
- Twist the wire ends together again.
- Put 19 pieces on the longer tail again and twist it on the main wire.
- Using a similar technique, form 3 rows on both sides, stringing first 24 and then 32 beads.
- Spread the resulting petal and make 6 more of the same.
- For the center, cut a piece of wire 30 cm long, string 21 beige beads and 1 gold bead onto it.
- Pass one end of the wire only through the beads and twist.
- Next, on the long part, repeat the steps as in step 7.
- Weave 3 more stamens.
- First fasten the 4 petals, then attach the stamens to them and add the remaining elements.
- Fix the wire on a wooden skewer and decorate the stem of the flower with ribbon.
Chamomile

One of the simple beaded flowers that you can create with your own hands is the daisy. The colors required for the base material are yellow, green and white. You can easily weave a chamomile according to the following instructions:
- String 15 white beads onto a tail of wire 25 cm long, bend it in half - one end must be threaded through the entire row, missing only the first bead.
- Place 17 beads on both tails. Then pass the wire through the very first bead and tighten.
- Repeat step 2, only use 19 beads. Place all rows in one plane - you get a petal.
- Form 6-8 more of these petals.
- Make a loop on a piece of wire 30 cm long, put on 3 yellow beads, leave the working part and twist another loop.
- String 5 beads onto the free tail, press them tightly against the previous ones and twist the wire.
- Repeat step 6, but on the other side of the main row.
- Weave 4 more rows, stringing 8 beads each, and 4 rows of 10 – you should get a voluminous figure.
- Twist the tails of the wire under the finished center of the flower.
- For the cup, place a lot of green beads on the wire, then twist several loops about 1.5 cm long.
- Connect all the chamomile petals and insert the yellow core into the center.
- Attach a green cup to the bottom.
Jasmine

To weave the next type of flowers from beads with your own hands, you need to stock up on such shades of this material as white, yellow and dark and light green. Weaving instructions are as follows:
- Using the parallel method, weave half a petal, starting with 3 beads and adding 2 more in the next 2 rows.
- In the 4th row, add only 1 bead - in the end, their maximum number will be 8.
- With the maximum number of beads, make 4 more rows, then reduce their number, first twice by 1 piece, and then also, only by 2.
- Start weaving another such half, just additionally weave it to the first - you will get 1 petal.
- Make 4 leaves, only starting from the 8th row, weave each one to the previous one.
- Weave 8-10 stamens, 1 pistil and 4 sepals according to the patterns.
- Connect the elements.
Magnolia

The following do-it-yourself beaded flowers are often woven using the French technique. This is an elegant indoor magnolia. The manufacturing instructions are as follows:
- Take a wire about 25 cm, bend it to make 2 parts - 5 and 15 cm.
- Twist it to form a loop.
- String 8 beige beads on a short ponytail, and 10 on a long ponytail.
- Twist both ends together and put 10 beads on the long one again.
- Make a loop around the central main part, string about 17 beads and repeat the arc again.
- Secure the wire tail and cut off the unnecessary.
- Form 5 more such petals.
- To form the stamens, take another wire and thread it through 12 beads brown tint, make a loop.
- Repeat the steps until you have 6 stamens, insert a large bead into the center between them.
- Using the principle of creating stamens, weave the sepals.
- Connect the elements.
How to weave a carnation flower from beads

The master class on weaving carnations is based on the following steps:
- For the beginner level, make 3 loops from 5 red beads.
- To create the second level, weave 6 petals, which will already consist of 2 loops - one includes 5 beads, and the other as many as necessary to go around the first.
- Weave the third and fourth levels using a similar technology, making 1 more loop on each.
- For the 4th row of petals, make not 6, but 8 blanks, each on a separate wire.
- Connect all the levels in sequence, starting with small petals, and put 11 green beads on the wire tails of the latter.
- Place the ends together and twist.
Small beads called beads can bring great pleasure to any of us if used correctly to make various items. Having mastered beadwork, the necessary techniques and techniques, you will learn how to create various beautiful objects. These could be accessories, jewelry, flowers or beaded trees. Today we will learn how to weave beaded flowers with our own hands, as well as how to make various compositions and bouquets from them. First, we'll look at how to compose flower arrangements from beads. We need to find out which flowers can be used for this, combining them with each other. We will conduct our first master class on this topic.
Spikelet
 To create a composition of flowers from beads, you need to learn how to weave their individual components. We choose a spikelet of beads and beads for the first component. To make it we will need:
- oblong mother-of-pearl beads;
- white mother-of-pearl beads;
- pink mother-of-pearl beads;
- thin copper wire.
Starting beading, let's prepare a piece of wire 60-80 centimeters long. On it we collect 1 large long bead and beads, amounting to seven pieces. It will look very beautiful if you alternate white and pink beads. Let's move the entire set of beads and seed beads to the middle of the wire piece. Below under the beads you need to twist about ten millimeters. Pay attention to the step-by-step photos attached to the lesson. Every action of weaving a spikelet from beads and beads is reflected there.
The entire wire under the twist will act as a stem. We continue our work and string exactly the same set of beads and seed beads as the first time on any of the free ends. Next, we make another twist to the stem, and then twist the stem ten millimeters, as the first time. When making a spikelet, you need to alternate the placement of a set of beads and seed beads on different sides of the wire stalk, as shown in step by step photos. Another feature of this weaving is that the individual parts of the spikelet are located on different levels according to its height. The distance between them is about a centimeter. We do the set at least seven times, and now the spikelet is ready.

Branch with leaves
Beading a twig with leaves will require the following materials:
- large long yellow beads;
- orange beads;
- thin copper wire.
The entire weaving process is reflected step by step in the photos attached to the lesson. We cut off the base of the weaving about 80 centimeters long. We make the set in this order: a bead, five beads and a bead again. This set needs to be moved to the middle of the segment, twisting it into a ring, and twisting the ends under it by ten millimeters. We continue making the twig, and after twisting we again make the same set of beads and beads for one of the free ends. Next, we make a loop out of the beads and twist the two ends.
We string the next beads and beads onto the second free edge. We make this set at the same level as the previous one, and not lower, as in the spikelet. After the next set of sets, the wire needs to be twisted, as we did before, right up to the main stem. Next, we twist both edges of the stem again by ten millimeters, and weave the next two leaves. General form The branches will change dramatically when the color and size of the beads and beads change, so you can make a lot of different bead branches. See the step-by-step photo for the appearance of the already woven twig.

Chamomile
Beading a chamomile flower will require the following materials:
- long large white mother-of-pearl beads;
- blue beads;
- large red faceted bead;
- thin copper wire.
We continue with the master class on making a flower arrangement from beads, and will make the next component of this composition, a daisy. The set of the first flower cell consists of a long bead, five beads, and another bead that needs to be placed on one of the sides. We pass the second one crosswise through the bead on the first one, and tighten the wire. Then we string more beads and beads there. We will consider this side to be the top. Then we will pass the second one, which has become the bottom one, up through the new bead. Follow the progress of the weaving in step-by-step photos, and be sure to tighten the weaving tightly.
We weave chamomile using this technique until we make the desired number of petals. To complete the weaving, we collect five beads on the working edge, and pass them through the bead on the other edge of the flower. Both ends should be on the same side. To complete the weaving, pass the ends crosswise through the red faceted bead in the center of the flower and pull them tightly together. Secure the wire by passing it between the petals several times. After this, you need to form a stem from the tips by twisting. As you twist the stem from top to bottom, string beads and make two loops that will be chamomile leaves. We perform the leaves at different levels for believability appearance. Beading a chamomile flower can be considered complete.
Tulip
To make tulip beading, we need the following materials:
- long large beads of golden color;
- red beads;
- green beads for leaves;
- thin copper wire.
The set of beads and beads for a tulip is as follows: a bead, seven pieces of beads and a second bead. Let's pass the end crosswise through the bead, and the two beads following it, tightening the work. Don't forget to follow the progress of weaving with step-by-step photos. The next set consists of only five beads and one gold large bead. Then we again pass the end through a bead and two beads, and again we make a set similar to the previous one. We work in this technique until we get all the necessary petals.
Finally, we string three beads, and pass the wire through the initial two beads and the gold bead on the other side of the tulip. We perform the last steps as in the case of weaving chamomile, completing the weaving by placing the central bead. We make a stem with leaves, and our tulip is ready.

Daisy
Beading a daisy will require the following materials:
- long large pink beads;
- round bead to decorate the center of the flower;
- thin copper wire.
String 1 long pink bead, twisting the ends together a few turns. In the same way, we collect some more beads and make the first half of the flower. There are four beads in the step-by-step photos. After this, we take a round bead and crosswise draw the ends inside it, tightening them tightly. This will be the center of our daisy. Only after this you need to continue the formation of the missing petals. The larger the central bead, the more petals we will need. Finally, we pass the wire through the hole of the central bead and make a twist for the stem. Our master class is almost ready.
We have made a large number of various flowers and branches from which any bead composition can be made. When we combine different beaded products, the compositions from them can be unpredictably beautiful and varied.
Beaded flower arrangements can be made in different ways. Flowers can simply be placed in a vase, preferably with a very narrow neck. In this case, the composition of the composition can be frequently changed and varied.
The second option is to place beaded flowers in a pot or basket, when their composition becomes more difficult to vary, because the flowers need to be fixed with artificial soil, and sometimes with glue. Flowers made from beads in pots are very beautiful, durable, and do not require special care. To simulate soil, you can use gypsum as an option. Dilute it with water directly in the pot, and place inside all those beaded flowers from which you want to make a composition. Such flowers in a pot will decorate any, even the most sophisticated interior. When you use any bulk material instead of soil, such as small stone, pieces of glass or sand, you can change the composition of your colors as much as you like.
If instead of a pot you want to place flowers in a basket, then when diluting the plaster with water, you need to lay foil or film. When the plaster hardens, the foil must be removed and the plaster placed back in the basket, because it takes on its exact shape when hardened.
And the third option for the composition is making bouquets of beads, or beaded flowers.
How to make bouquets of beaded flowers
 This master class with step-by-step photos will be devoted to creating bouquets from beads. A beaded bouquet can be a brilliant decoration for a bride at a wedding celebration. The most important thing is that a beaded wedding bouquet will never fade. For work we will prepare:
- beads and red beads;
- green and pink beads;
- green and pink stone chips;
- fishing line and needle;
- pearl beads;
- curtain holder;
- foam;
- red satin ribbon;
- fabric for the veil is red.
We begin to weave flowers for a bouquet with our own hands, making a small piece of American rope from large red beads. Beading of such a harness is performed as follows:
- we string the fastening bead, then make a set of twelve beads;
- pass the needle through the first six pieces of bead, getting one loop for the rope;
- we will string seven more beads;
- we pass the needle through the first set of beads, starting from the second part to the seventh, as a result of which a second loop of the rope is formed;
- we string seven more beads, and move the needle again through the first eight;
- this will be the final third loop of the first section of the American harness.
We continue beading the rope using the same technique until the required length. Then you need to connect its ends, resulting in a flower. We will make the number of such blanks that is necessary to create a lush bouquet of beads. We make the central flower more voluminous by adding large red beads to it. Green leaves, as an option, can be made using the technique of parallel weaving with arcs. We use pink stone chips and pink beads to weave a cute little necklace, which you will see in the step-by-step photos. This necklace will decorate our wedding bouquet. Pearls prepared in advance must be strung on wire and the edges twisted.
To make a bouquet, we will use foam rubber, as well as a curtain holder. We wrap the top of the holder with foam rubber in several layers, and draw a circle for the flowers with a pencil. We need to place the red fabric for the veil on top, then sew on all our flowers and leaves, and pin on the pearls. We use green stone chips to trim the edges of the bouquet. Satin ribbon We will wrap the handle of the bouquet in red. Decorate the side of the bouquet with the same ribbon, and use it to make a foam rubber mask in the form of a flashlight. Wedding bouquets It is customary to decorate beads with tulle at the very top, which is what we will do. And now our master class is completed, and you will see its result in the step-by-step photos.


Video: Weaving flowers from beads
Today I want to talk about how my friend and I went to a master class where we were taught how to make garden and wildflowers from beads. This topic interested me for a very, very long time, but somehow I never got around to it, but then MK turned up, and I decided that it was time to weave flowers from beads. I can say right away that it is not very difficult, but quite labor-intensive. In principle, anyone can make a small bouquet or, for example, a rose in a pot, but be prepared for the fact that you will have to work painstakingly.
Weaving specifics
In general, in my opinion, beadwork compares favorably with many other types of needlework. I won’t say that it’s beautiful - in the end, it’s a matter of taste, but there are more objective criteria for the benefits of bead weaving. For example:- This type of needlework develops fine motor skills due to interaction with small beads. Of course, it is most useful for children to develop fine motor skills, but if we remember that communicating areas of the brain are responsible for fine motor skills and intelligence, then we can say that needlework will not harm any adult - it makes us smarter and more savvy.
- Handicrafts are calming, especially when they involve small, monotonous work. Therefore, many women love to do hand embroidery (by the way, bead embroidery is also very popular).
- Beadwork is rarely utilitarian. Well, you must admit, you will most likely knit mittens or a hat, but you only make something nice from beads. Of course, you can do something useful, but in most cases it’s about pleasure and aesthetics.
Important Preparation
First you need to arrange workplace. I really like to do needlework in a comfortable chair, but in the case of beads everything is not so simple - you need a hard surface and good light, otherwise you risk putting too much strain on your eyesight and getting tired. Therefore, I advise you to work with beads at a table - it can be a desk or a dining table, the main thing is that you have free space and desk lamp with soft light.Reaching into a bag or box for each bead is not very convenient. Use a velvet or velor mat in order to sprinkle some beads on it for work. Beads do not roll well on such a rug and do not mix. I also saw one needlewoman use a wonderful method - she simply pours beads into stable bowls and carefully pulls out the required number of beads with her finger.
Prepare working tools - beads, sharp scissors, threads and fishing line, as well as special wire for beading. I also recommend using regular small wire cutters to cut through the wire.
French technology
The easiest way to make a flower from beads for beginners is to weave it using the French technique. Later I will tell you how you can weave certain flowers, but now I will give a description of the technique itself so that you understand its essence.The French technique is bead weaving with arcs, when each element is woven in the form of a kind of boat (from the center to the edges), resulting in a pleasant pattern and the desired volume. If you see a bouquet woven from beads that looks almost lifelike, then most likely it is French beadwork.
French weaving is practically not performed on fishing line - in order for a leaf or flower petal to hold its shape and look elastic and fresh, wire is needed. So, how to weave simple beaded flowers for beginners?


We weave a rose
Everyone loves roses, and weaving this flower from beads is quite simple for beginners - especially with a step-by-step master class.
What do we need to make a rose?
- Beads for the flower itself (you can take red, or you can take a couple of shades of pink - this way the petals will be beautiful and voluminous).
- Green beads (preferably two shades) for the stem, leaves and sepals.
- Toothpick or stem stick and green cloth or paper.
- Wire for weaving.
To weave a rose, you need to make several types of petals - from 3 to 6. The splendor of your bud depends on this. The smallest petals are woven on a piece of wire half a meter long, then with each new petal size the wire size increases by 15 centimeters. 3-4 small petals are enough, 4-5 medium ones, 5 large ones, and 5-6 outer petals. If in the process you want to increase the quantity, everything is in your hands.
How to weave one petal You need to assemble a rose from the petals, tying the petals together with wire at the bottom edge - first the smallest ones, then a layer of larger petals. Make sure that the petals overlap, and not at the joint, so the flower will look more voluminous and more interesting.

Then you need to weave the leaves and sepals. We weave them the same way as petals, only occasionally changing the length of the arc in order to give the leaves a pointed shape.


After all the elements are woven and assembled, you can begin assembly. Leaves, sepals and a flower bud are attached to the stem, after which the entire stem is wrapped in thread or covered with paper.

To make the rose look more natural, shape the petals and leaves, and make small thorns on the stem, and your beaded flower is ready.

If some points are not clear, then watch the video for more details:
Making Petals:
Making sepals:
Making leaves:
Collecting a rose:
I think I have explained in detail, using the example of a rose, how you can make flowers from beads, so next I will simply show master classes with a few comments. By the way, if you are interested in beaded flowers, a master class with photos or videos is what you need!
Honestly, if I knew how easy it is to make flowers from beads with your own hands just from a video, I would not have gone to offline master classes - images and pictures with other people’s flowers would have been enough.


By the way, in fact, you can make crafts from beads - flowers and plants - without using any patterns, if you have already mastered beadwork or just like I did embroidery - one micron is enough so as not to sit over the patterns. It is much more useful to understand how a flower works, and depicting it using beads is an easy task.


Nevertheless, flowers made from beads and patterns for weaving different petals will be useful to you - you already know how to weave them, how to assemble a flower from ready-made petals is also quite clear, and you can weave petals from beads according to patterns.

Don't know how to make beaded flowers more natural? Use two or three shades for the petals and at least two for the leaves - this way you can create the effect of a voluminous petal with a border, which looks unusual.
Beaded poinsettia looks very interesting - it is also called a Christmas star. It is better to weave poinsettia not from beads, but from medium-sized glass beads, which is also called cutting.
For poinsettia, it is better to take bright shades of beads - deep green, carmine red. Of course, everyone has different tastes, but these are the colors that work best for indoor varieties of beautiful milkweed.
See how to make petals parallel French weave- a video tutorial will tell you how to make petals for this flower step by step.

Look at beaded flowers: photos - you will definitely find something for inspiration!


Callas: DIY beaded flowers master class:

Now you know a lot - weave a few small roses in a basket or make a chic decoration for the interior (for example, a full pot of wild plants), or simply use the knowledge you have gained to make jewelry with beaded flowers or decorate your clothes and accessories with them for free!
Video bonus: Lavender made of beads without weaving. A very simple option:
Winter is the most magical time of the year. Shimmering snow, deep shadows, warm light of lanterns in the evening twilight... It happens that even on a warm summer evening you suddenly want to be transported for a moment into a snowy fairy tale. Save a piece of it for yourself winter magic very easy and will help you with this step-by-step master class. Shining beads, wire and structural paste with a snow effect will make a wonderful winter composition. And may the magic be with you as long as possible!
For work we need:

1. Without cutting the “Gamma” wire, art.: DGB-3, from the spool, we will place white “Zlatka” beads No. 0141 on it using the “Gamma” spinner, art.: PNC-09. You need to gain about one and a half centimeters.

2. Let's start making the spruce branch element. Move one and a half centimeters of beads to the free end of the wire.

3. Now we will make a loop out of it. We will make a half-centimeter twist under the loop (Important: there is no need to cut the wire!). By moving the next one and a half centimeters of beads towards the twist, we will make another loop.

4. The crown of the future Christmas tree should be made of three loops, as in the photo. Now the wire can be twisted one centimeter and cut off, retreating another three centimeters.

5. The Christmas tree consists of five tiers of four branches each. It’s more convenient to start with making the branches of the upper tier. The branches of the top tier are simple and have three loops, and the second tier from the top has five loops.

6. The branches of the third and fourth tiers consist of double simple branches of five loops.

7. The branches of the fifth tier consist of three simple branches each.

8. Let's start assembling the Christmas tree from the top of the head.

9. To make the trunk of the Christmas tree, we use a piece of thicker wire. Apply the prepared crown to it and wrap it tightly with Blumentag floral tape, art.: CLF.

10. Having wrapped about one centimeter of the trunk, add branches of the first tier and continue wrapping. After about one and a half centimeters, add branches of the next tier and further down. After the lower tier is ready, we will wrap the tape around another five centimeters of the tree trunk. We cut off the thin wires of the branches sticking out from under the winding with Micron pliers, art.: HTP-21.


11. Now we will form the support of the tree by twisting the remaining piece of wire from the main trunk into a spiral.


12. Two finished trees, the only difference is the number of branches:

13. Let's start making a bush with berries. On a piece of wire one meter long we collect seven centimeters of beads.

14. Move the beads to the middle of the piece of wire. Using the free end of the wire, we will enter the penultimate bead and pass in the opposite direction about two centimeters of beads. Pull out the free wire.


15. Add red bead No. 0045 to the resulting needle loop, imitating a berry. Let's continue making needle loops.


16. The resulting preparation of a bush branch:


17. Let's collect the twig blanks into a bundle and attach them to the base, which is a piece of thick wire twisted into a spiral.


18. Ready bush

19. Let's deal with pine. Without cutting the wire from the spool Brown, put white beads No. 0141 on it using a spinner. You need to gain about one and a half centimeters.


20. Then we will start making pine branches. Move the beads to the free end of the wire and measure one and a half centimeters. From this amount of beads we will make a twisted loop, similar to what we have already done for the Christmas tree.

21. Having made three loops, we will make a branch consisting of three or four more loops. The design of a pine branch is very similar to that of a Christmas tree, but with more branches. Having done five or six
Blanks of twigs, let's start assembling the tree.