Hand knitting, as opposed to machine knitting, is presented today various techniques, and not all of them are limited to knitting or crocheting. Among alternative ways, for example, work on a special fork or on a template.


 But there are several original techniques that do not require you to have professional skills in using special tools, since you can use them instead:
- their with my own hands;
- fingers;
- on a wooden ruler;
- an empty shoe box.
Hand knitting in these cases involves fairly simple techniques, and the product (most often a scarf) can be knitted without knitting needles, and in almost half an hour, such a master class can easily be found on video.
Hands instead of knitting needles
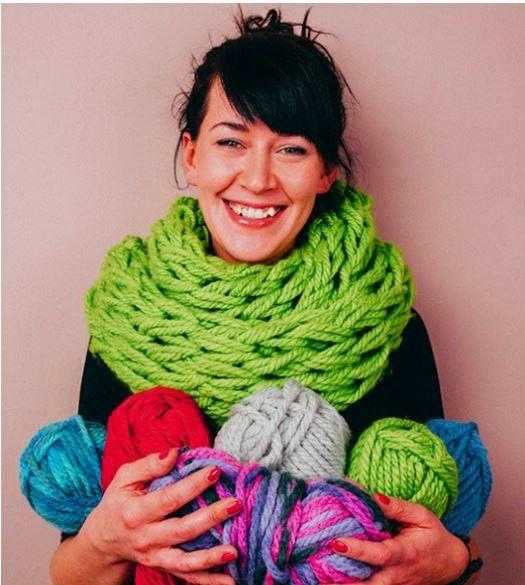
 Hand knitting is gaining popularity today, especially among craftswomen who do not know how to handle knitting needles. There are a lot of master classes appearing. The knitting needles, as the name implies, are the knitter’s hands, so their “number” turns out to be huge.
Here either very thick yarn is used, or regular yarn, but in many folds. Casting on loops and knitting rows occurs only through hand movements. The result is something like a giant stocking stitch. This is discussed in more detail in the video master class.
Video: DIY scarf
This way you can do it without needles various scarves, snoods, clamps. These are voluminous warm things that can be knitted, even without knitting needles, literally within 30-40 minutes. Original, fashionable and unusual things will make their owners stand out from the crowd. And connecting them, as is clear from the video, will not be difficult. Even if you have to interrupt your work (for example, you urgently need to go somewhere), such hand knitting allows you to transfer the fabric from your hand, for example, to plastic bottle, and when you return, continue again.
Tricotine technique
 It is better known as finger knitting. This is also a knitting technique without knitting needles - instead of them in in this case you will use your fingers. The number of loops you can cast on is limited by the number of fingers on your hand, so you won’t be able to cast on more than 5. Accordingly, the finished fabric is a thick cord.
In order to knit a scarf on your fingers, you must first make a basic cord several meters long, as in this video master class.
Video: Knitting with fingers
As you can see in this video, such “necklaces” look especially elegant on girls. They can be tied together in the form of several rings, or sewn in several places, and supplemented with decorative details.
Such a product for adults will most likely require greater length, and more turns will need to be fastened. Its function is rather decorative: it is unlikely to warm well. But it’s easy to emphasize the owner’s individuality. The results of the work presented in the master class confirm this.
Japanese knitting on a box
 This is a completely extravagant hand knitting of a scarf, the existence of which is simply impossible to guess. In essence, this is the same knitting on fingers, only instead of fingers, the first row is cast on specially cut recesses in the box.
This method has its advantages:
- the scarf will be warm (hollow inside);
- the scarf will be of sufficient width, because you can add more loops to the box;
- By taking a smaller box, you can knit a little thing for a child.
A master class on making a scarf without knitting needles on a box is given in the following video. Lesson on foreign language, but in this case the sequence of work is important to us, and it is shown here step by step.
Video: Knitting on a box
Peruvian knitting - broomstick
 Hand knitting, based on removing loops from a template (ruler, strip of thick cardboard) and then interlacing them with a hook, without using knitting needles, is called “broomstick”, or, in other words, Peruvian knitting. This technique will require some crochet skills.
A chain of air loops is assembled, and with the help of a hook on this chain they form loops stretched around a ruler or template, which are then intertwined and knitted different ways. Brumstick workshops teach you how to knit various patterns, but it depends on the skill. If, for now, you can only crochet a chain of air loops and half-columns, then there are master classes on crocheting scarves on a ruler with simplified techniques. For example, such as in the following videos, which show the entire process in great detail.
Video: Scarf on a ruler
When casting on a ruler, you need to know how many loops together you will continue to knit - the total number of them should be a multiple of this number. The length of the scarf can be varied by removing the already cast-on loops from the bottom of the ruler.
If you want to knit a scarf of a larger width than shown in this video tutorial, add the number of interlaced rows of stripes. If you don’t yet know how to beautifully crochet a finished product, to begin with, you can leave the scarf in this form, decorating only its ends with tassels or fringe.
Having mastered these simple techniques, you can improve in knitting a scarf on a ruler while learning other patterns. This is the difference between Peruvian knitting and the other methods described above.
As you can see, in order to classify yourself as a knitter, you don’t need to master master classes on working with knitting needles or learn complex crocheting techniques. Thick yarn, the ability to use your hands or fingers, a ruler or a box - and you can knit a scarf without much difficulty.
Video: Hand knitting for beginners
Everything you will see in this article is sleight of hand and no fraud. The person who came up with the idea of using his own hands instead of thick knitting needles should be given an order for his idea. Hand knitting without knitting needles or a hook is very simple, very fast and just hilariously fun.
Hand knitting without knitting needles or hook
Finger knitting for beginners is even easier than knitting with a tool. Once the algorithm is memorized, you will be able to knit even with your eyes closed or under the table at work. We will tell you how to knit a scarf-collar without knitting needles or a hook. The thing is ultra-fashionable and practical.
Choosing yarn
For hand knitting without knitting needles or crochet hook you can use any yarn. Thick and fluffy yarn produces voluminous products, and thin yarn produces fantastically delicate ones.
You will need 3 skeins of yarn, 100 m thick and weighing 100 g. Choose the composition to your taste, but wool or a blend of wool and acrylic yarn will protect you from the cold better.
The dimensions of the finished scarf are 150 cm in length, about 30 cm in width.
Start knitting
Follow the illustrations, we’ll explain it in your fingertips! Knitting for beginners should be elementary - even a child can do it.
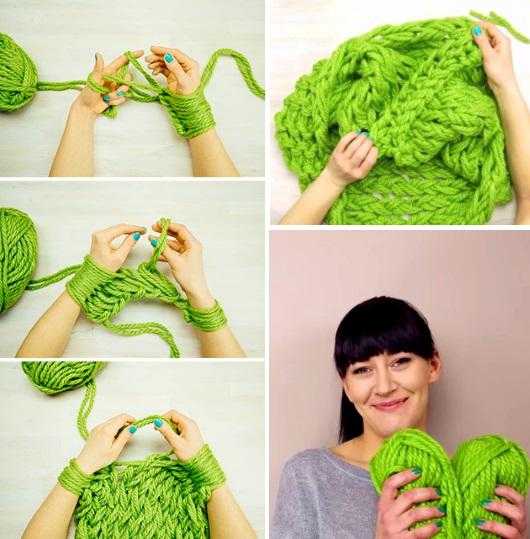
Casting on loops: Hand knitting without knitting needles and a hook also begins with casting on loops, directly on the right hand. Take thread from 3 skeins and make the first loop about 1.5 m from the end. Place the loop on your right hand and tighten. Use your tail to place a loop over left hand from bottom to top, take the working thread left behind with your left hand and pull out the loop. Place the new loop on your right hand and tighten. Make 10 loops.

First row: place the working thread on thumb right hand, make a fist. Pull the outer loop from your wrist off your fist. You will have a new loop in your right hand, put it on your left hand and continue in the same vein with the rest.
Knit the second row in mirror image. Continue knitting from right to left and from left to right until you finish. Leave about 4 meters of yarn for the last row.

On such thick “knitting needles” the work goes quickly. You can knit a scarf in just half an hour. If you need to put aside hand knitting without knitting needles and a hook for a while, just remove it from your hand. When putting the knitting back on, make sure that the loops are not twisted.
Last row: Knit 2 stitches as usual, then simply slip the first one from the hand, leaving the second one on the wrist. Knit 1 more, remove the previous one. When the last loop remains, take the end of the working thread, thread it through it and tighten.

Sew the ends of the scarf: align the edges, pull a loop from the remainder of the thread through the loops of the two outer rows, pull the next one through the loops of the edge and the working loop. At the end, tighten the loop and hide the end.

The scarf is ready. And how delightfully fluffy it turned out!

If you tell your friends that you know how to do it without any knitting needles or hooks in just half an hour, no one will believe you!
Cold, inhospitable weather encourages warming up. And what will warm you better than something made with your own hands? This small instruction will teach you how to do it yourself knit a scarf without using knitting needles.
Our article contains detailed video, thanks to which we can connect such magic scarf Even a beginner can do it!
How to knit a scarf without knitting needles
YOU WILL NEED
- 4 skeins of very bulky yarn (1 skein - 100g/40m or 150g/100m)
OPERATION PROCESS

An alternative to knitting is weaving. All you have to do is choose threads of your favorite color and pleasant structure, find half an hour of time and get inspired. Anyone will be delighted with such a gift! Watch and learn how it's done.
Surprisingly simple, right? When I watched this video, I immediately wanted to make something similar knitted item. Nowadays, such scarves are very appropriate; they look great with many outfits. Beautiful shawl It will not only warm you up, but also add aesthetics to any look. And most importantly, the creation process is not at all complicated, shown in detail.
I admit, I have a fierce passion for voluminous scarves. Because I hate wearing hats!

Various color schemes are tempting... I hope our article will help you meet the cold season in full readiness.

This helpful video will help you learn how to wear a snood scarf like a pro. It can also be styled and tied in different ways!
A small gift for everyone who is partial to snoods. You can even make such a beauty out of a sweater!

And even a thin scarf can be tied as a snood! Fold the scarf in half lengthwise and tie the tassels together. Turn the scarf over so that the tassels are inside, wrap it around your neck several times.


If the video instructions made you want to urgently run for threads, there is nothing surprising. Show your friends a simple way to weave a warm scarf by telling them about this article. Comfort and warmth to you on these chilly days!
Guess if you can link beautiful scarf or a snood without knitting needles, a hook, a knitting machine and other tools? Do you have any doubts? But in vain! An ultra-fashionable accessory - a scarf-collar, otherwise called a snood, can be tied on your hands without much difficulty. Moreover, even if you don’t know how to knit, you can make such a scarf in literally half an hour.
How to knit a snood on your hands: materials and knitting techniques
To knit such a snood, you can use two types of yarn: thick and fluffy - to make a voluminous warm product, while with the help of a thin one you will get an openwork masterpiece of amazing elegance. For the cold season, it is better to choose the so-called mixed yarn, the composition of which is almost equal proportions of wool and acrylic.
For the snood shown in the photo you will need 3 skeins of yarn, each weighing 100 grams. As a result of the work, which on average takes only half an hour, the product will be one and a half meters long and 30 centimeters wide.
Work on a snood begins with a traditional set of loops, just not in the traditional way. The set of loops is carried out directly on the right hand.
By connecting the ends of all three skeins of yarn together, stepping back from the edge one and a half meters, form the first loop. It must be put on the right hand and tightened to a certain extent. Next, you should throw the rest of the thread over your left hand from bottom to top, take the working thread that was left behind with this hand, and pull out the loop. Following this algorithm, a dozen loops are cast on.
Having finished the set of loops, you can start knitting the first row of the product. For this purpose, the working thread is placed over the thumb of the right hand and a fist is clenched. It is necessary to pull off the loop located on the edge of the wrist from the fist. Thus, there will be another, already new loop in the fist. It should be worn on the left hand. Adhering to this description, knit all the remaining loops.
The second row of the snood is knitted like the first row, only in a mirror image.
The snood is knitted by alternating the right and left hands when creating even and odd rows, until the length of the skeins of yarn comes to an end. To complete the work you will need to leave four meters of thread.
The final stage of work in the last row is carried out as follows:
- two loops are knitted in the same way as in the previous rows;
- the next loop is removed from the hand, and the one following it is left on the wrist;
- Having knitted a new loop, remove the one preceding it from the hand;
- the end is threaded into the remaining last loop working thread and tighten it tightly.
All that remains is to sew the original snood. To do this, aligning its edge lines, through the loops of the two outer rows, you need to pull a loop from the remainder after knitting the thread. The next loop is pulled through the edge and working loops. Upon completion of the connecting seam, the loop is tightened and its end is hidden in the loops of the product.
Everyone knows that knitting is the process of creating a fabric from threads by making loops and joining them. A variety of tools are used for such needlework - knitting needles, hook, needle, fork, ruler, knitting machine. Did you know that there is also hand knitting without knitting needles or crochet? The technique is very simple, even a child can master it. Let's try to figure out how it is implemented.
Arguments in favor of this knitting technique:
- knitting without knitting needles or crochet does not require much experience in needlework, suitable for craftswomen of any age;
- due to the lack of sharp tools (knitting needles and hooks), this type of knitting can be done almost anywhere, even on an airplane;
- versatility of the yarn used. Although it is best to use bulky, textured thread;
- ease of changing thread colors;
- Hand knitting calms the nerves and brings pleasure.
Tips for beginners:
- right-handers place the knitting on the left hand, left-handers on the right;
- When tightening the loops, keep in mind that you will need to remove them from your fingers as you work. Therefore, allow for some comfortable slack;
- the thread must have a diameter of 3 mm or more. If you use thinner ones, knit in several folds.
Knitting on fingers
Knitting on four fingers
The finished fabric is obtained in the form of a narrow tube, the width of which is limited by the width of the knitter’s palm.
For this type of knitting, it is better to use thick, tightly woven threads.

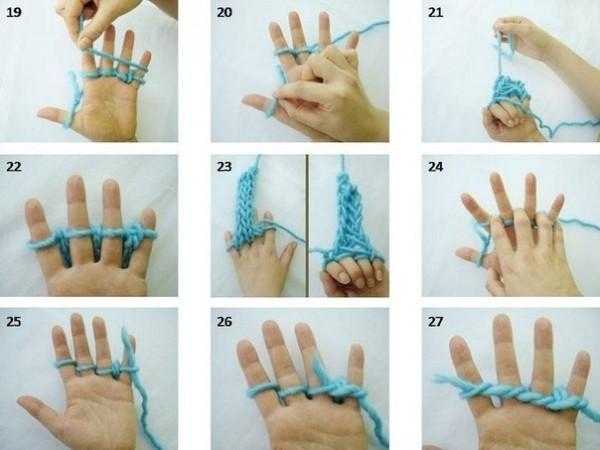
We place the end of the thread 5-8 cm long on the back of the hand, throw the working thread over the palm, holding it with the thumb.

Taking the thread in your right hand, we weave it around all fingers in a figure eight. At the same time, do not pull the yarn too tightly.

We wrap the little finger and make a figure eight binding reverse side.

Turning around index finger and weave up to the little finger. Then we repeat a similar figure eight pass again towards the index finger. There are four such passes with interlacing around the fingers.

We made a set of loops. We have two points on each finger. It is important to ensure that the collected points are not mixed up in height.
Let's start knitting. On the little finger, without moving the upper one, remove the lower one and throw it over the finger. We repeat the transfer of the lower points on the remaining three fingers.

The free end of the thread, located on the back of the hand, is drawn away from us between the index and middle fingers.

At this point we have 1 stitch on our fingers. We repeat the weave from the index finger to the little finger and in the opposite direction. Then knit the next row. To do this, having removed the lower pins, we throw them one by one over the fingers. Let's start with the little finger.

In this algorithm we knit to the desired height. Our finished strip is located on the back of the palm.

If you pause while working, then the loops need to be transferred to a knitting needle, pen, or pencil. In this case, you can easily transfer them to your fingers to continue mating.
How to bind off loops when knitting without knitting needles and a hook
To complete the final row, you should have 1 stitch on each finger. We transfer the loop from the little finger to the ring finger, getting 2 stitches on it.
We remove the lower part by moving it by the finger. We transfer the remaining top one to the middle finger, getting 2 stitches on it.
Then I proceed according to the previous scheme - moving the lower stitch by the finger. We transfer the remaining top one to the index finger, getting 2 stitches on it.
We remove the lower part by moving it by the finger. We get 1 stitch on the index finger. Cut the thread, leaving a small piece.
Having removed the stitch from the index finger, we pass the cut tail of the thread through it and tighten it tightly.
Similarly, we secure the end of the thread cut off at the beginning of knitting.
For example, you can knit an original scarf on four fingers.

Handmade blanket made from ZEFIR yarn: video master class
Knitting on two or three fingers
With this knitting, a chain is obtained in the form of a rope or braid. Schemes of work - see below.


Crochet on fingers
In such unusual technique you can make a chain from VP,

VP chain with double crochet,

Afghan knitting.

For example, in Japan this type of needlework is very popular. It's called yubiami. The working tool is one or two fingers, which replace knitting needles or a hook. This makes it possible to knit fabrics of any width. Look at examples of products knitted on fingers.
Snood scarf on fingers: MK video
Scarf woven from several stripes
The technique for making strips is described above. If you knit strips of different colors and intertwine them, you will get an original scarf.

Toys
Even a child can make such educational toys like a doll or a rabbit.


Interior decorations
You can make a cute ribbon curtain from separately knitted strips. If desired, they can be decorated with beads and knitted from multi-colored yarn.

Cushion
Knitted strips are attached to the fabric base. Then a pillow is cut out and sewn from this fabric.
Rug
From ready-made strips glued or sewn onto a chosen base, you can make a round or rectangular rug.

Stylish jewelry
Various bracelets and hair ribbons turn out to be very unusual.

Awnings

Various clothing models

Hand knitting without knitting needles or a hook can be useful for making not only small items. In this way it is quite possible to knit serious and voluminous things.
Hand knitting
With this method of knitting, hands play the role of knitting needles. The process is very simple and fast. Let's consider it using the example of making a scarf - a collar.

Dimensions finished product: width – 30cm, length – 150cm.
For work need to prepare:
- yarn, containing wool or acrylic, 100g per 100m – 300g.

Description
We start with a set of loops on the right hand. We make stitches with three folds of thread, leaving a free tail of threads of approximately 150cm. We throw the stitch on the right hand and tighten it. We throw a loop over the second hand in the direction of the top, and pull out a loop from the working thread located at the back. We transfer the new loop to the right hand and tighten it. So we perform 10 pets.


We begin knitting the 1st row. Place the thread on the thumb of your right hand and hold it in your fist. We remove the last loop from the right fist, having received a new loop in our hand. We put this loop on the left hand. We do the same with the remaining loops.


We knit the next row in the opposite direction in a mirror manner. So we transfer the knitting from one hand to the other until we get the desired length of the product. Expect that you will need about 4m of thread to knit the last row.


If you need to temporarily set aside the knitting, simply remove the loops from your hand. Then they will need to be carefully put on, avoiding twisting.
How to close loops
We knit 2 stitches in the usual way. Then remove the 1st stitch, leaving the 2nd stitch on the hand. Knit the next loop, remove the previous one. We pass the cut end of the working thread through the last loop and tighten.


We will also sew the ends of the clamp by hand. We combine the edges, pull the tail of the thread through the stitches of the last 2 rows, making a loop. Then we pull a new loop through this stitch and edge loops. We continue like this for all points. We tighten the last loop and hide the tip.