A wedding is a special day for every girl. During the day, when everything should be perfect. What makes a perfect day? It consists of little things, of memorable moments. One of the important moments at a wedding is the presentation of gifts to the newlyweds. To ensure that this process is not ordinary, so that the money in envelopes does not scatter across the tray, and certainly not get lost, the bride will need a money box (chest) for her wedding with her own hands.

Types and shapes of boxes (chests) for money
There are several most popular types and shapes of money boxes that can be used in their manufacture:
- regular box
- box
- box
- heart
- house
Let's look at each of them in more detail.
Regular box
This is the most simple form, which can easily be made from a shoe box. There is nothing unusual here, no complicated elements. Examples are shown in the photo.


Here small master class on how to quickly make such a money box with your own hands.
We will need:
- Shoe box
- PVA glue
- Scissors
- Lace
- Pearl beads for decoration
- Satin ribbon
- Colored wrapping paper
- Glue gun


Step one
Use scissors to make a slit in the top of the box for envelopes.
Step two
We cover the box with colored wrapping paper (preferably ivory or with an unobtrusive small pattern, or choose a color that will be a priority at your wedding) and let it dry. The main thing is to do everything carefully so that the paper does not gather anywhere and no bubbles form.
Step three
After we have covered the box with paper and it has dried, we can begin to decorate the box. We cover it with a satin ribbon around the perimeter, glue lace on top of the satin ribbon and decorate everything with beads. To do this, it is better to use a glue gun so that the decorations stick better. You can always make the design of the box to your taste: it can be satin bows, lace, beads, crystals, beads. That's all, in three simple steps you have a money box ready for your wedding.
Casket
This form means that it must open; most often it is made with ties or a lock. This is very convenient for storing envelopes; nothing will be lost during transportation.

You can see how to make a box in the video:
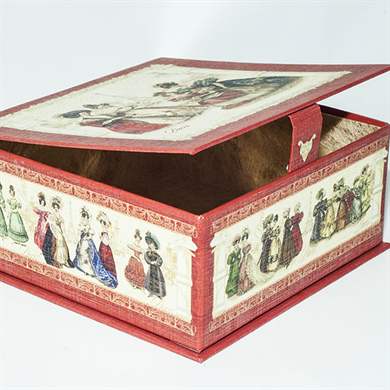
Box
The name here speaks for itself. It can either have a hole for an envelope or open like a box. It looks very impressive and looks very beautiful at the wedding table.


However, making it yourself is not so easy; to make a chest you will need to be patient and watch the video tutorial:
Cake
This money box is made in the shape of a cake. Usually they make two or three tiers. The main thing here is not to confuse it with a real cake.


A master class on making a cake-shaped money box is presented in the video:
Heart
Heart as a symbol eternal love is very suitable form for a money box at a wedding. This box will fit very succinctly into any wedding interior.

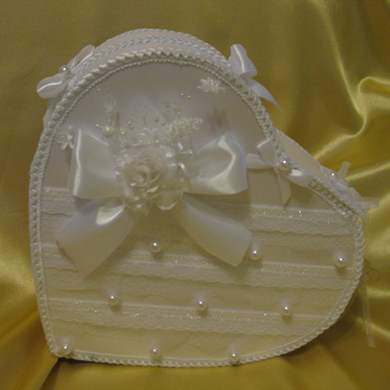
Let's see how to make a heart-shaped box:
House
The box in the shape of a house is a symbol of the hearth created by new family. It looks very cozy and unusual.

The stages of making such a house are shown in detail in the video tutorial:
When making your money chest, pay attention to the following:
- Choose thick cardboard so that it does not wrinkle when accidentally pressed.
- To glue the decor it is better to use a gun with good glue, otherwise something may fall off.
- There is no need to sculpt everything and more; try to make it not only beautiful, but also tasteful. It is best if you have one large decoration, and around it a scattering of smaller beads and crystals.
- Choose a color that suits your celebration or a neutral color (for example, white or ivory).
- Depending on the number of guests, choose the size for your casket so that all the envelopes fit.
So, a money box is an ideal solution for collecting envelopes with money that guests will give to the newlyweds. It is very important that it is beautiful and matches the style of the wedding. Making it with your own hands is not so difficult; there are many video master classes on the Internet on how to make such crafts with your own hands. If you don’t have enough time, you can, of course, order or buy a ready-made casket, but will it be as beautiful as if the bride herself had made it? And then, on finished goods The price they set is not even small, exceeding the cost of the product several times. Why overpay if you can do it yourself the way you need it, saving quite a bit of money?
Are you getting ready for your wedding and thinking about making your own wedding chest? This is cool! After all, the time has come to think about how to accept gift envelopes with money in an original and beautiful way.
The responsibility of collecting gifts lies with the bride and groom's witnesses. It would be good to think in advance about how to alleviate their plight. It is very important that this procedure looks aesthetically pleasing and is memorable for guests and newlyweds.
You creative person and love taking on an artistic challenge? If so, then you'll probably be happy to take advantage of any opportunity to fulfill your artistic fantasies. It is not at all necessary to purchase a ready-made money chest and spend a lot of money on it. You can make this wedding accessory yourself. A handmade wedding chest will add an unforgettable charm to this procedure and emphasize the presence creative taste young. After all, it’s original handmade always appreciated!
Master class on making a chest for wedding envelopes
Well, how do you like the creative challenge, are you ready to get to work? Look what a wonderful chest it will turn out to be.
What you will need to make this beauty yourself:
- Small cardboard box;
- Thick cardboard (in this case, you can use old unnecessary boxes or parts of them);
- Double-sided adhesive tape;
- High-quality hot melt adhesive;
- Ruler;
- Hot glue gun;
- Stationery knife;
- Regular measuring tape;
- Ball pen;
- Scissors;
- Masking or transparent tape;
- Satin or satin of a suitable shade;
- Beautiful lace;
- A small bouquet or individual small flowers;
- Decorative bow.
Please pay attention! For this part, it is important to use thick cardboard that lends itself well to shaping. Multilayer corrugated cardboard not suitable for the top. But he'll do just fine to create the walls of the structure.
- Carefully cut out the hole. We correct unevenness using scissors.
- We give the parts a semicircular shape.
- Cut two thin strips of double-sided adhesive tape. We glue the cover to the upper, wide walls of the structure.
- We find suitable cardboard parts; they need to be used to close the resulting semicircular holes in the lid. We cut it exactly to size. Apply and securely secure with tape. The tape should not have noticeable wrinkles or bubbles.
- Next, more enjoyable work - let's prepare the fabric and lace for work. They must be ironed thoroughly.
- We measure the chest to cut out a piece of the appropriate size.
- Along the perimeter of the lower part of the structure, we secure the fabric with double-sided adhesive tape. It should be well stretched and straightened. The fabric on the sides remains free.
- Carefully cut a hole, as in the photo.
- Generously coat the cardboard around the cut with glue and glue the fabric tightly.
- Carefully bend the corners inside the lid and fix them. Let it dry.
- Decorate the opening for envelopes with lace.
- Decorate the sides of the fabric beautifully. Use hot glue to secure.
- The remaining corner of the fabric is glued to the bottom structure.
- The money box is almost ready - the final stage remains to complete the composition. Cut three more strips of lace. We glue two strips so as to cover the edges of the money hole. The third is glued along the perimeter of the bottom of the chest. For fixation, use double-sided tape or hot glue.
- The composition is completed with a bouquet with a decorative ribbon.
The wedding money box is ready! We hope you liked this delicate chest. Before you make your final decision, here are seven more cash box options to consider.
So, where can you collect wedding envelopes?
1. Boxes for envelopes
Gift envelope boxes are the most popular option for this procedure. You can make a box various shapes and colors. Perhaps you will make it to match the clothes of the young people.
You can install a security system on the box, or leave it as is. Why this system? This simple technical solution will protect against unauthorized opening of the box. Let only the young know what is there! Here are some options for original boxes.
2. Wooden box
Why not use a wooden box to collect wedding envelopes?! In most cases these are small chests. Sort of like a pirate attribute. In case you don't want it to look "severe", decorate it with twine, cream lace or other materials. Attach a simple piece of cardboard with your names and memorial date on it.
Your wedding chest might look like this:
3. Metal cage
Newlyweds are increasingly using metal cages to collect money. They look very beautiful, elegant and sophisticated on wedding photos. After the wedding, such a cage can be used as an unusual and interesting decoration apartments. Look how beautiful they are:
4. Paper bags
Paper bags can be successfully used as an aid to wedding envelopes. Their advantage is that they can be made from start to finish with your own hands. It is better to use them at weddings with a small number of guests. A little imagination and paper bag will look festive. Don't believe me? Look:
5. Buckets and small barrels
Are you planning a vintage rustic wedding? Then for harmony you can use this advice. Just don't take this idea too literally. Of course, a 50-liter beer keg will not be useful. This is neither practical nor aesthetically pleasing. But small products will fit just right. After you refine them, they may look like this:
6. Retro suitcases
If you're in need of a retro-style accessory, you need to check your grandparents' attics ASAP. If you fail, visit the nearest flea market or online auction. The suitcase will have to be cleaned, slightly refreshed, and decorated with garlands, ribbons and lace. And now he is ready.
7. Wicker and iron baskets
Wicker and wire baskets are often used as "piggy banks" at weddings. It's quite convenient and beautiful. After the wedding, such an accessory can get a second life as a container for letters and papers, or a container for small purchases.
SimilarIn this master class I will create and show step by step in the photo how to make a wedding money chest with your own hands from an ordinary glass box, into which guests throw envelopes, postcards and bills at the wedding. It seems that such an accessory is optional, but on such a day everything should be perfect down to the smallest detail.
So, to create and decorate a wedding money chest we will need:
Box;
whatman;
PVA glue;
brush;
decorative paper;
organza;
corrugated paper;
satin ribbon;
glue gun;
regular and masking tape;
scissors;
ruler;
pencil.
First, let's take the internal partitions out of the box. Let's start forming the chest lid.

Next we draw a part of the circle (arc) on the side. On both sides we make indents of about 5 cm and draw a straight line. We do the same on the second side and connect all the lines on the front wall. It is important that all lines are parallel to the base of the box.

Cut out the top part with scissors.

It is necessary to make sure that the lid of the chest can bend freely. Otherwise, it will simply break and become deformed. Therefore, we make big (fold) lines at intervals of about 1.5 cm. It is necessary to push the lines under the ruler with the back of the scissors on the inside of the lid.

We cut the drawn lines on the front and side walls. On the inside of the back wall we draw a big (fold) line.

We fasten the top part to the side walls using regular tape. It holds firmly, but it is better to stick masking tape on top of it, since we will then cover the box with paper, and this is unlikely to be possible with regular tape.
We also cut off the excess cardboard to make even joints. Just don’t throw away the cut strip - we will need it in the future.

We fasten all sides with tape.


Put the lid on inside up and cut a hole for the envelopes in the center. The thickness is 1-1.5 cm, and the length is at your discretion.

It is necessary to cut off a few millimeters of cardboard along the bottom of the lid so that after pasting the chest can be closed.


WITH reverse side We make a cut in the hole so that we get allowances and glue them inside.

We cover the entire chest with some beautiful decorative paper in the same way as we covered it with whatman paper. Just do not glue it with PVA glue, but just glue the edges with a glue gun.


You can wrap the chest in organza or some similar material for greater effect. We take organza of such a size that it completely envelops the box. We wrap it completely to its full length, placing the chest in the middle of the material. We glue the allowances inside.

We make drapery on the sides and glue it to the inside of the chest using a glue gun.


Take a cut strip from the lid and cover it with decorative paper. Glue to the inside of the front wall. This protrusion will help the lid stay in place.

All that remains is to decorate the chest inside and out. Outside there will be voluminous flowers made from the material we used throughout the entire work. Cutting strips different lengths and width.

Fold the strip in half.

We bend the corner at the very beginning.

We begin to twist the ribbon to the end, holding it with our fingers at the base.


We glue the flowers with hot glue in a chaotic manner.

Let's make ties for the chest by gluing ribbons to the bottom and lid under the flowers.

Decorating the inside. Before gluing the entire surface, you need to secure the cover with tape. We glue one end of it to the lid, and the other to the side.

We paste over corrugated paper the entire inside of the chest.


This is the chest in which the newlyweds will collect their first family budget.


A money chest has become an almost integral attribute of a traditional wedding celebration. It can be purchased in many souvenir shops or wedding salons. However, the most interesting thing is to make this accessory yourself. This will give it a touch of originality and individuality. Let's look at how to make a beautiful wedding money chest with your own hands.
Purpose of the chest
Nowadays it is customary to give money to newlyweds for their wedding. For the convenience of collecting donated financial amounts, beautiful boxes or special chests are used. They are unique symbols of the future financial well-being of a young family.
With the collected funds, the newlyweds can independently purchase for themselves what, in their opinion, is necessary for their family life. Also, such a gift is very convenient because guests do not need to rack their brains over the question of what to present to the newlyweds for their wedding celebration.
According to an old belief, it is forbidden to give money to the newlyweds at a wedding. This may cause them financial trouble or bring them into some kind of trouble. Therefore, a special chest is useful for collecting money.
Where to begin?
To make a chest with your own hands, you will need your own imagination and some free time. Such an attribute must be done carefully and with love, as it will become the central element of the celebration and will symbolize the future treasury of the newlyweds. By putting your whole soul and good intentions into its production, you can attract financial well-being to the family.
Before you start making a money chest, you need to determine:
- The shape of the future wedding chest: square, rectangular, barrel-shaped, heart-shaped, etc.
- Product color and size.
- What materials will be needed to make this holiday attribute with your own hands?
- Related decor.

Choice of color and shape
A wedding chest can have any color design, from snow-white to black. It all depends on the wishes and preferences of the heroes of the occasion. However, if this accessory is made for a specific purpose, it is necessary to choose the right color:
- If the chest is used to collect money for a future son, this accessory should be made in blue or light blue.
- If you are collecting funds for your future daughter, you should give preference to shades of pink.
- If the money box is intended to raise funds for a honeymoon, it should be bright and colorful.
- If this attribute simply acts as a family bank, it is made in white or another neutral color.
 For my future son
  For my future daughter
In addition, depending on the purpose of collecting money, a certain shape of the chest for the wedding is chosen:
- For future children - in the form of a stroller or cradle.
- For travel - in the form of a car, plane or map.
- For a house, car, etc. - in an appropriate form illustrating the desired object.
Materials used
A wedding chest can be made from the following materials:

For  To decorate wedding chests, the following materials are needed:
- colored paper, thick foil, etc.;
- gold and silver strong threads;
- drapery fabric;
- beads, stones, shells, rhinestones and sequins.
Additional materials you will need:
- scissors;
- needles with strong thread;
- stationery knife;
- a simple pencil;
- high-quality glue;
- transparent tape;
- ruler.
In addition, the whole process requires inspiration and a good mood.
It is worth paying attention that the quality of the selected materials directly depends appearance and the durability of the wedding fundraising accessory.
For example, high-quality glue will allow you to securely fasten the decoration to the box, thereby preserving it not only for the duration of the celebration, but also for a longer period.
Once the desired shape of the future wedding box has been selected and all the materials have been prepared, you need to move on to the next stage - finding a pattern. It can be easily found on the Internet on specialized sites. Here are presented as diagrams of standard wedding accessories rectangular shape, as well as very unexpected and interesting options.

To save time, you can purchase a ready-made box from the material you like or simply use a regular small shoe box. By making a slot for banknotes and decorating it with ribbons, flowers and rhinestones, you can get a very attractive family bank for a wedding.
How to make a chest from a regular cardboard box
You can make an ATM out of a box with your own hands as follows:
- First you need to give the lid cardboard box convex. To do this, on its surface using stationery knife longitudinal furrows are carefully drawn. In this case, you must be careful not to cut through the lid, otherwise it will no longer be suitable for further use. Longitudinal grooves will allow the cardboard to bend and take on a semicircular shape.


- Both ends of the semicircular lid are secured to the sides of the box using tape and additional cardboard. As a result, the box should take the shape of a chest.
- Next, you need to close the side gaps of the box formed after bending the lid into an arc shape. To do this, cut out the necessary shapes from thick cardboard, the dimensions of which coincide with the dimensions of the resulting gaps. The cut cardboard is attached to the sides of the money chest using clear tape. The result is a composition in the shape of an arch. In addition to tape, you can use a stapler with paper clips to securely fasten the cardboard.
- The next stage is the easiest, but at the same time
most responsible. A cut 5–7 mm wide must be made in the middle of the concave lid. It is intended for cash, so its length should be sufficient for the bill to easily fit inside the box. It is best to calculate the cut in such a way that the envelope can pass through it freely.
- Now you can move on to the most enjoyable and creative stage - lining and decorating the wedding accessory.
- First you need to measure all the parameters of the box and the curved lid. Then, using the data obtained, you need to cut the required piece of fabric separately for the lid and separately for the bottom of the box.
- The lid is carefully covered with fabric, and then the rest of the cardboard chest is moved on. After this, it is necessary to cut the tissue at the location of the lumen for funds. You should not rush at this stage, since the appearance of the wedding chest will depend on the accuracy of execution.
- Next they check
 cut on the lid. To do this, you need to take an envelope and
try putting it inside. If this action is difficult, it is necessary to enlarge the incision. - After a gap has been made for the money, the edges of the fabric are processed using a lit match so that the threads do not unravel and arrows do not appear. In this case, you should be careful not to inadvertently burn the entire cardboard structure.
- The last stage in making a chest for a wedding with your own hands is decorating it. Here you can fully express your imagination and creativity.
- To decorate a box for a wedding you will need various materials: shiny threads, shells, ribbons, lace frills, rhinestones, small mirrors, sequins, etc. You can also use artificial precious and semi-precious stones for decoration. However, when performing this stage, you should be careful not to overdo it and not turn the box into a tasteless accessory, decorated with decorative elements that are incompatible with each other. Therefore, to decorate a chest with your own hands, it is advisable to choose no more than three elements, for example, lace braid, satin ribbons and decorative stones of compatible colors.
Wedding chest from a cardboard box - video
Chest decoration
A homemade wedding box can be monochromatic or combine several colors that look harmonious with each other. Among the most popular design options: the bottom of the product is made monochromatic, and the top is bright, with various decorative elements.
You should start gluing the box from its sides, smoothly moving to the lid. To do this, you need to take high-quality glue that can reliably attach fabric, metal and plastic to a cardboard or fabric surface. Do not neglect the quality of the glue, since a part of the chest that is not securely attached can fall off at the most inopportune moment.


When decorating a chest, you can use the following tips:
- It is recommended to decorate the sides and joints on the chest satin ribbons, the color of which is combined with the shade of the fabric for cladding.
- To decorate the chest, you can use ready-made options that are offered by wedding salons and handicraft stores.
- The lid of the jewelry box should not be too heavy, otherwise it will begin to sag inward.
- A winning option would be to use contrasting colors and shades, for example, white fabric for lining the product and red ribbons for decoration.
- The sides of the box can be decorated with photographs of the happy newlyweds.
- For decoration you can use original jewelry: small tree branches, dried grass, flowers, leaves and berries. Thus, you will not only get an interesting composition, but also be able to surprise your guests with your skillful handicraft.


You can make a beautiful and original chest for money for a wedding with your own hands. To save your time and protect yourself from possible failure, you can make a wedding accessory from a cardboard shoe box and decorate it with blanks purchased from a specialized store. It will take no more than two days to produce and decorate such an attribute.
A money chest is considered an important element at a wedding reception. It is sold in souvenir shops, but it is much more interesting to create this accessory yourself.
This will give the chest a touch of personality and exclusivity. Let's talk about how to properly make an original chest on your own.

Purpose
Today it is customary to give money as a gift to newlyweds on their wedding day. To make collecting finances as convenient as possible, attractive-looking chests are used, which are considered a sign of the well-being of the newlyweds.

With the money collected, the couple can buy everything they need to improve their home. In addition, such a souvenir is convenient, because the invited guests do not have to think about what exactly to give the bride and groom for their wedding event.
According to signs, finances should not be given into the hands of the newlyweds at a wedding. For this reason, a beautiful chest will come in handy. We’ll talk about how to make a chest for a wedding with your own hands in our article.

Where do you need to start?
To create a money chest with your own hands, you need imagination, as well as a little time.

It is important to make this attribute with the utmost care, because it will be the central detail of the banquet, symbolizing the treasury of the young people.

Before creating a chest, it is important to decide on some product criteria:
- shape;
- shade;
- material;
- decor.

Hue
A DIY money chest for a wedding can be in your favorite shade. Much depends on the tastes of the newlyweds.

But if this type of attribute is created for a specific purpose, it is important to choose the tone as competently as possible:
- If the accessory is intended directly to raise funds for the little son that a young couple will have in the future, then it is better to make it in a blue tint.
- If you are collecting money for your daughter, it is better to choose pink.
- If the money box will be used to collect funds for an upcoming trip, then best color will become catchy and attractive.
Manufacturing materials
A wedding chest can be created from such common materials as:

Cardboard is a frequently used material, from which it is not difficult to create a box for a wedding. But a wedding chest made from a cardboard box is short-lived due to exposure to moisture.

Natural wood. Accessories for a wedding event made from this material are strong and durable, beautiful view, as in the photo of a chest for a wedding on the resource.

But such an accessory can only be made by those who have experience working with arrays.

Glass. Glass boxes are attractive in appearance, but very fragile.

Money accessory diagram
Find a diagram of accessories for a wedding on RuNet or use a regular shoe box.


Make a special slot for money, decorating the box with buds or ribbons.
Creation from cardboard
Step-by-step production, as in the photo of a money chest at a wedding, is at your service:

Give the lid a bulge using a utility knife. Make sure that the lid is not cut through, otherwise it will simply be damaged.

The longitudinal grooves make it possible to bend the cardboard lid to give it a rounded appearance.

The ends of the cover should be attached with tape and cardboard to the sides of the future accessory. Ultimately, the box will look like a chest.

Using pre-cut cardboard, cover the gaps on the side using tape. You will get an arch. For secure attachment, secure the cardboard with paper clips.


Now you can start decorating the accessory.

Cover the lid and base of the chest with material. Cut the material where the bill gap is located.
Finish the edges of the material on the cut using a lighted match to prevent threads from unraveling.

Now start decorating. You can use rhinestones, ribbons, frills and much more. However, do not overdo it with decorations so that the chest does not turn into a tacky chest.


Decor
A chest for a wedding celebration can be created in a single color or combined in several shades.

Start gluing the accessory from the sides, gradually moving to the lid.

For these purposes, use glue to firmly attach the material to the fabric. Use glue good quality so that elements that are not firmly attached do not fall off.
It is quite possible to create an exclusive chest for banknotes for a wedding celebration with your own hands.

To save as much as possible free time, you can create this accessory from a shoe box, decorating it with blanks purchased in advance at the store. It will take less than two days to create and design this attribute.

Photo of a chest for a wedding


