It’s always nice to please your loved ones and do something new for your own, because they create a special atmosphere of warmth and love. Napkins, crocheted, have always been a decoration of our grandmothers’ apartments, they also find their response in. Today the craftswomen of the website editor will share simple and beautiful diagrams with a detailed step-by-step description, all you have to do is stock up on threads and start exciting process. Ours will inspire you to a completely new type of needlework, which is accessible not only to experienced knitters, but also to beginning lovers of handicrafts.
It is always difficult for beginning craftswomen to take the first step and decide on the design and choice of template. At first symbols they resemble Chinese letters, but once you knit one napkin, this type of needlework will become a new hobby for many years.
There is a huge variety of techniques that are constantly being updated thanks to the ideas of craftswomen. You can knit napkins of any shape and size using a continuous manufacturing method, or combine several motifs into one. The following techniques are especially popular.
| Illustration | Crochet technique |
 | Loin - alternating empty and filled cells. |
 | Vologda lace. |
 | Bruges lace. |
 | Irish lace. |
 | Napkins knitted from individual parts-motifs. These can be geometric shapes combined into one delicate canvas. |
Recently, crocheting napkins has become not only a favorite activity of craftswomen, but also the main source of income for many. They sell their works of art all over the world thanks to the developed Internet. Refined things become a wonderful gift women of any age. Having mastered different techniques knitting, you can start making garments and larger items, for example, or.
If you are inspired by handmade creativity, we suggest starting your collection with simple napkins, and our step by step guide with a photo description will help you understand complex circuits.

Master class on crocheting a simple openwork napkin
It is better for beginning craftswomen to master skills with simple jewelry, master simple ones and only then move on to more complex patterns. We will knit the first napkin in the shape of a flower from 9 petals.
For work we will need:
- white cotton yarn;
- hook 1.6 mm.
Legend:
- СС – connecting column;
- RLS, SC – double crochet;
- CH – double crochet;
- NZ – unfinished column;
- VP – air loop;
- PSN - half double crochet.
Let's get to work.
| Illustration | Description of action |
 | Secure the first loop, cast on 5 ch, insert the rod into the first and finish with a sl st. |
 | 1 row Cast on 3 VP rise + 2 VP, make a yarn over, insert the hook into the ring and knit a dc. Repeat 7 times: 2 ch, hook into the ring and dc. There should be a total of 9 columns, the first 3 VPs are considered a separate CH. |
 | 2 VP, insert the hook into the third VP of the lift and finish with a SS. |
 | 2nd row Insert the rod into the arch and knit SS, 1 VP rise, insert the hook into the arch and knit RLS, 2 VP + yarn over, knit SN in the arch, 2 VP knit RLS in the arch. Repeat rapport in all arches. |
 | 3rd row Insert the hook into the top of the sc, knit a sl, insert the hook under 2 ch, knit a sl, insert the hook into the column and knit a sl, 1 ch, insert the hook into the top of the column and knit the sc. |
 | 4 row Cast on 4 ch, insert the hook into the top of the column and knit a sc. Repeat knitting along the entire diameter of the napkin. When finished, insert the hook into the top of the column and finish with a SS. |
 | 5 row 1 VP, insert the hook under the arch and knit a sc. Yarn over and knit into an arch, repeat 4 more times. Insert the hook into the arch and knit a sc. Repeat all steps with all arches. |
 | Knit a row and insert the hook into the sc in the previous row, ending with a sl st. |
 | 6 row SS first to the first, then to the second peak, then 3 VP lifts. Rapport: yarn over, work a dc into the next vertex. Yarn over again and work a dc into the next stitch. 2 ch, yarn over, insert hook into top of sc and knit daisy chain. Yarn over, hook into the top of the sc, knit nc and join all the loops. 2 ch, skip one tip and insert the hook into the next one. Repeat all steps around the entire circle. |
 | Knit a row, insert the hook into the third lifting loop and finish with a sl st. |
 | 7 row 3 VP lifting. Rapport: 3 ch, yarn over, hook into the top of the joined stitches and work a dc. 3 ch, hook into the top of the central column and work a dc. Knit the entire circle, insert the hook into the third lifting loop and knit a sc. |
 | 8 row 3 VP lifting. Rapport: yarn over and work a dc in the same loop. Yarn over and work a dc into the same loop. Cast on 4 ch, yarn over, hook at the top of the column, work a dc. Repeat until the end of the row, insert the hook into the third ch of the lift and finish with a sl st. |
 | 9 row 3 VP lifting. Rapport: yarn over, work a dc at the top of the next column, yo, work a sc at the top of the next column. 5 ch, yarn over, hook to top of next dc. You should get 3 dc, a chain of 5 ch, dc and a chain of 5 ch. To close the row, insert the hook into the third ch and finish with a sl st. |
 | 10 row 3 VP lifting. Rapport completely repeats the previous row. |
 | 11 row 3 VP lifting. Rapport: yarn over, work 2 dc in the same ch. Yarn over and work a dc at the top of the next stitch. Knit 2 dc in the third stitch. 4 VP in CH. Repeat to the end of the row, close the SS row in the third lifting loop. |
 | 12 row 3 VP lifting. Rapport: yarn over, hook at the top of the column, dc. 2 ch, yarn over, work a dc at the top of the next stitch. 3 ch, yo, work dc at the same top. 2 ch, yo, work dc in next stitch. Yarn over, work a dc into the next vertex. 4 ch, yarn over, work dc in a column. 4 VP. Next, all actions are repeated to the end and closed in 3 VPs of lifting the SS. |
 | 13 row 3 VP lifting. Rapport: yarn over, hook into the top of the post and work a dc. 2 VP, yarn over, in an arch of three VPs, dial 9 CH. 2 ch, yo, work dc in next stitch. Yarn over, dc at top of next st. 3 ch, yarn over, pull dc in a column. 3 VP. Repeat until the end, ending with a SS in the third VP of the lift. |
 | The drawing at this stage should be clearly visible. |
 | 14 row 3 VP lifting. Rapport: yarn over, hook at the top of the st, knit a dc. 4 ch, yarn over, shank into top of first of nine stitches, work dc. In the second column, knit two dcs. Work one dc in the third stitch. 3 ch, yarn over, hook in fourth stitch, work dc. Yarn over, crochet two dc in the fifth stitch. Yarn over, dc in the sixth top. 3 ch, yarn over in the seventh stitch, work in a dc. In the eighth column we knit two dcs. In the ninth column, knit one dc. 4 VP, knit one dc at both vertices of the following columns. 2 ch, yarn over, work a dc at the top of the column. 2 VP, knit a double yarn over first to the first, then to the second top of the stitches. 4 VP. Repeat all steps until the end of the row, close the SS into the third VP. |
 | Rapport 14 rows. |
 | 15 row 3 VP lifting. H, rod to the top of the column, CH. Rapport: 3 VP, work RLS into the arch. 3 VP, hook in the next arch, sc. 5 VP, hook in the next arch, sc. 3 VP, insert the hook first into the first stitch, knit a sc, then repeat with the second stitch. Yarn over, insert the hook through one st into the next pair, knit one dc with each vertex. |
 | Row 15 rapport. |
 | 16 row Insert the rod into the top of the column, knit a SS. 1 VP of lifting, knit RLS in the same column. Rapport: 3 VP, knit RLS in the first arch. 3 VP, hook into the same arch and knit a sc. In the next arch: 3 VP knit stbn, 3 VP knit stbn. 3 VP, hook in the next arch, sc. 2 VP, knit a NC yarn over in the same arch, yarn over, knit a second NC yarn over in the same arch, combine all the loops. |
 | 3 VP, insert the hook into the first loop, knit a connecting stitch. |
 | Yarn over, work NC into the arch. Yarn over and knit NC again, bind off the loops. 2 VP, knit RLS in the same arch. Repeat all actions of this row according to rapport. Knit a row, insert a shank at the top of a single crochet, knit a sl st, pull out and cut the thread. |
 | This is the kind of lacy napkin you should end up with. |
Napkin “Bright Sun”
We will have the next master class only with a diagram and step-by-step description. We will knit a napkin in the shape of a sun with a diameter of 15 cm, for which we will need yarn and a hook according to the thickness of the thread.

In the process of work, you must adhere to the diagram, which describes in more detail the combination of loops and the marking of columns.
Dial 8 VPs, combine them into a ring.
- 1 VP rise, 16 St BN, finish row SS.
- Rapport: 1 PSN, 5 VP. Repeat 8 times.
- Arch: SS, 5 CH, 2 VP. Repeat 8 times, ending with a SS row.
- 2 dc, 3 dc, 2 dc, 2 ch. Repeat 8 times.
- Skip stitches 2 and 6, then knit rapport as follows: 5 dc from one top, 3 ch, under 2 ch of the previous row, knit 1 dc, 2 ch, 1 dc. Repeat 8 times and finish with a SS row.
- Under all the arches from VP, tie 1 CH, 2 VP, 1 CH, 3 VP. Complete row SS.
- Knit a ss under the arch, then knit a rapport: 1 dc, 3 ch, 1 dc, 3 ch. Skip one arch and repeat knitting until the end of the row. Finish row 1 VP, 1 PSN.
- Rapport: 1 sc under the arch, 5 sc under the next arch. Repeat until the end, ending with a SS row.
- Pull out the last loop, cut and fasten the thread.

Step-by-step description of the “Pineapples” pattern
Tender and beautiful pattern“Pineapple” is often used by needlewomen not only in knitting napkins, but also openwork blouses, so any craftswoman should learn to understand this scheme. Let's take a closer look step by step description By default, each row of the pattern ends with a SS, and at the beginning, instead of 1 SN, three VPs are knitted for lifting.
- Connect 6 VPs into a SS ring. Knit 3 ch and 19 dc.
- 1 VP, repeat: 3 VP, 1 RLS in the next stitch. When finished, knit 1 sc in the first ch.
- 1 VP, rapport: 5 VP, knit 1 RLS in the arch. When finished, knit 2 ch, 1 dc in the first ch.
- 1 VP, rapport: 7 VP, knit 1 RLS in the arch. When finished, knit 3 ch, then double crochet into the first ch.
- Knit No. 5 and No. 6 by analogy with No. 4.
- Knit rows 7 and 8 as follows. 1 VP, rapport: 9 VP, 1 RLS in the arch. Finish row 4 VP, 1 double crochet in the first VP.
- 9th and 10th rows: 1 VP. Rapport: 11 VP, 1 RLS in the arch. Finish row 5 VP, 1 stitch with 4 crochets in the first VP.
- In the 11th row, knit 2 SS to the arch, then rapport: 3 VP, 1 SN, 2 VP, 2 SN, 6 VP.
- The 12th row begins with rapport: in the first arch under 2 VP, tie 3 VP, 1 CH, 2 VP, 2 CH, 6 VP. Then in the second arch 7 CH, 6 VP. Repeat until the end of the row.
- At the beginning of the 13th row, knit 2 SS to the arch, then repeat the rapport in each arch: 3 VP, 1 SN, 2 VP, 2 SN, 6 VP. Next, move to the 7th column of the previous row, you need to knit 6 times (1 dc, 1 ch), then 1 dc, 6 ch. Repeat the entire rapport until the end of the row.
- At the beginning of the 14th row, knit 2 SS to the arch, then the scheme of work is as follows: 3 VP, 1 SN, 2 VP, 2 SN, 2 VP, 2 SN, 6 VP, 1 RLS under 1 VP. Next, you need to repeat 3 VP, 1 RLS 5 times and finish the repeat with 6 VP.
- 15 row: two SS, repeat: 3 VP, 1 SN, 2 VP, 2 SN, 3 VP, under 2 VP knit 2 SN, then continue the row 2 VP, 2 SN, 6 VP, 1 RLS under VP, repeat 4 times 3 VP and 1 RLS, 6 VP. Repeat until the end of the row.
- Row 16: two SS. Rapport: 3 VP, 1 CH, 2 VP, 2 CH, 9 VP, under 2 VP tie 2 CH, 2 VP, 2 CH, 6 VP, 1 RLS under 3 VP, 3 times (3 VP+1 RLS), 6 VP.
- The beginning of the 17th row is similar: 2 SS. Rapport: 3 VP, 1 SN, 2 VP, 2 SN, 9 VP, 1 RLS under the arch, 9 VP, under 2 VP tie 2 SN, 2 VP, 2 SN, 6 VP, 1 RLS under 3 VP, 2 times 3 VP and 1 RLS 6 VP.
- 18 row: 2 SS, rapport: 3 VP, 1 SN, 2 VP, 2 SN, 9 VP twice and 1 RLS under the arch, then 9 VP, under 2 VP tie 2 SN, 2 VP, 2 SN, 6 VP, 1 RLS under 3 VP, 3 VP, 1 RLS in an arch, 6 VP.
- The beginning of the 19th row is similar to 18. Rapport: 3 VP, 1 SN, 2 VP, 2 SN, 3 times 9 VP and 1 RLS under the arch, 9 VP, 2 SN under 2 VP, 2 VP, 2 SN, 6 VP, 1 RLS under 3 VP, 3 VP, 6 VP.
- We start the last row with two SS, then according to the pattern: 3 VP, 1 VP, 2 VP, 2 SN, then 4 times 5 VP, picot from 3 VP, 5 VP, 1 RLS under the arch. We continue rapport 5 VP, picot from 3 VP, 5 VP, under two VP knit 2 CH, 2 VP, 2 CH.
Friends, I present to your attention a selection of fabulous beautiful napkins crocheted, as well as patterns for them. In my opinion, crocheting napkins is truly the pinnacle of crocheting skills. This is beauty, subtlety of work, and all products are lightweight.
These airy snowflakes made of fabric are a kind of embodiment of flight and lightness. Napkins perfectly complement any interior and make it feel homey. And of course, this is an excellent basis - a motive for knitting large elements, such as a bedspread or, say, a tablecloth. In addition, sitting down and starting to knit a napkin is a great way to relax and get a charge of good mood.
Beautiful and simple crochet blue napkin for the table

I’ll start the selection with such a wonderful openwork napkin.

Increasing!
Oddly enough, this is both a training ground for beginners and a pedestal for professionals. You can both learn to knit and create masterpieces. For example, for beginners, small napkins are perfect for creating their first product. Well, the fact that knitting them is interesting allows you to captivate a novice needlewoman.
Beautiful classic crochet round napkin

A wonderful example of a napkin crocheted using the fillet technique.

Increasing!
The knitting technique is also perfected by the fact that almost the entire arsenal of all kinds of loops is used in napkins. These include half-columns, chain stitches, double crochets, and many others. This gives you a good skill, and also teaches you to understand circuits.
I would also like to draw your attention to the fact that these products also have different shape. Here we can mention the classic round napkins, which are knitted in the round.
Beautiful openwork crocheted napkin with floral patterns
An awesome crochet napkin - it captivated me with its elegance! The knitting pattern is below.
You can lay such a napkin on the table or put a vase of flowers on it.
When crocheting napkins, the method of using motifs is very often used. Motifs are square, round, triangular. There are also more complex polyhedra, such as hexagonal ones, but they are rarely used.
In addition to all of the above, there is also a wide variety of techniques for knitting napkins. For example Irish lace. Or Bruges lace - a Belgian technique. Creativity in knitting napkins is like art. Only the master creates not with the help of paints and a brush, but with the help of yarn and a hook.
Okay, I'm babbling about something. Next, see a selection of samples of various napkins. They have one thing in common - they are crocheted. All photos are enlarged. Just click on the image with your mouse. Good luck with your knitting! And come back often. I always have something interesting for you.
Knitting patterns are increasing!


Here's a wonderful one for starters: simplest option. Beautiful crochet napkin - amazing pattern geometry!


But this beautiful round crocheted napkin will fit well on the table. In general, we must admit that Japanese options are considered the most sophisticated of all. They are also presented in this collection.


Here's another nice example of a beautiful round crochet doily - the central web is of particular interest here.


And this napkin has a structure very similar to coral.


A beautiful classic crochet napkin that looks like a snowflake.


Pineapple patterns in a beautiful crochet napkin.


Beautiful round crocheted napkin with a spades pattern.

Crochet a tablecloth from napkins

Beautiful square napkin crocheted motifs can turn into a large enough tablecloth for the table. The advantage of squares is that they can be combined and ultimately get a large canvas.

These are the options. This is, of course, not all that could be shown. But be patient, we are in no hurry. Right?
How to starch a crocheted napkin
After reading many guides on starching napkins, I came to the conclusion that they are hopelessly outdated. In all of them it is proposed to cook a paste from starch, but why such difficulties? It is much easier and faster to soak a napkin in wallpaper glue, which consists of starch that does not cause yellowing. It applies quickly and is not visible after drying. Ideal, in my opinion.
Make the solution thinner and dip a napkin into it, give it time to dry, and now you have a beautiful copy in front of you, smooth, without creases or curls. Wallpaper glue easily soaks in water, so don’t be afraid of ruining the product.
Video master class - simple crochet round napkin
To conclude the collection, I would like to show a simple and clear master class from Anna Andrienko on crocheting a simple napkin for beginners. There is nothing complicated in the lesson, just what a beginner needs.
I hope you liked these patterns for crocheting beautiful napkins and will take something for yourself to work with! Well, that’s all I have for today... Happy crafting!
Good afternoon, dear needlewomen!
Crocheting napkins for beginners is not at all difficult, as it might seem at first glance.
Crocheting is an exciting, fascinating activity, especially if you see photographs and patterns of very beautiful openwork napkins in magazines and on the Internet, you just want to knit such beauty with your own hands! Often these ideas are published without a detailed description and it is not always clear how to knit.
Today we will learn how to knit napkins and read patterns using a simple small napkin as an example. I have prepared for you a detailed step-by-step description with photos.
Which yarn to choose for knitting napkins
Crocheting napkins for beginners is better to start with thicker yarn (but not very thick) so as not to get tangled in the threads. For example, half-wool or acrylic.
We select the hook according to the thickness of the thread. This is done by trial method: if you take very thin hook, then knitting with thick yarn will be difficult, almost impossible. A crochet hook with a very large number will result in a napkin that is too full of holes.
For knitting a thick napkin, a hook with number 2 - 2.5 is suitable. But, again, I repeat, do not strictly follow what is written. Try it, choose the option that you think is more convenient.
It’s better to start by choosing the simplest patterns for crocheting a napkin.
Crocheted small napkins can be used as... White or multi-colored napkins will look good on the table.
Well, in the future, for knitting openwork napkins, it is better to use thin cotton bobbin threads, such as those used for sewing (No. 0-10). The product will be soft and airy.
In this case, the hook should also be taken with the smallest number 0.5 or 1.
You can also knit napkins from thicker cotton yarn such as Iris, Violet and others; a hook size of 1.2-1.5 is suitable.
So, how to crochet a napkin?
Doily crochet tutorial for beginners
This is our napkin pattern. I chose a small one on purpose and simple diagram for beginners.
On the corresponding page you can always find those used in diagrams and text descriptions.

So, let's begin! I will write a description, and you will knit a napkin and ask questions in the comments.
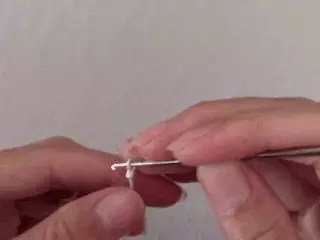
1 . IN the tongue of the round napkin begins always from its center: from a set of chain of air loops. (Conventionally denoted VP). In the diagram, air loops are indicated in the form of a small loop or a small circle (dot).
For this napkin we knit a chain of 12 chain stitches.
Then we connect the first and last loops with a half-column to make a ring.
We knit a napkin in a circle in one direction from right to left.
2 . Knitting each row usually begins with a set of several air loops, this is necessary to lift the row so that it is even and not beveled and crooked . The required number of loops is indicated in the diagram.
IN in this case in the first row we knit 3 air loops (VP) for lifting.

The icon following the VP in the diagram indicates a double crochet. But I decided to knit two yarn overs, so my further description will differ slightly from the diagram. But this is not important, you can knit with one or two yarn overs. And the designation C2H means two double crochets.

We tie the ring according to the pattern with 32 double crochets. We insert the hook inside the ring.

We connect the last column with a chain of 3 air loops (VP), cast on at the beginning of the row, with a half-column (PS).

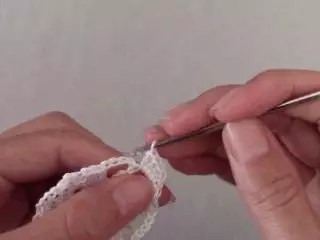
3 . We knit the remaining rows, looking at the diagram.
In the second row: 3 chain stitches (VP), 4 double crochets (C2H) in each stitch of the previous row and so on.
I made a little mistake here and at the beginning of the row I only knitted three stitches.


There is no need to connect the last loop of the row to the first, as is usually the case when knitting napkins. Starting from the third row to the 6th in this napkin, the air loops at the beginning of the row not only serve as lifting rows, but are also an element of the pattern, i.e. there is a smooth transition from the previous row to the next.

3rd row: alternate 4 air loops (VP) and 6 double crochets (C2H). We see in the diagram that when knitting the middle 4 columns, the hook must be inserted into the base of the columns of the previous row, and we knit the first and sixth column by inserting the hook under the chain of chain loops of the previous row.


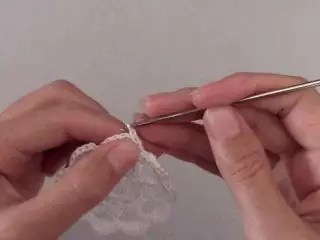
4th row: alternate 5 air loops (VP) and 8 double crochets (C2H).
5th row: we alternate 9 air loops (VP) and 10 double crochets (C2H).
6th row: alternate
11 air loops (VP),
4 double crochets (C2H) at the base of the previous row, 11 VP,
skip 2 stitches of the previous row and knit 4 C2H ( remember the designations - four double crochets) at the base of the last four repeat columns of the previous row ( rapport - a repeating part of a pattern),


at the end of row 5 VP, we connect the last one with an arc from VP connected at the beginning of the row, with a single crochet.

7th row:
* 5 VP,
15 double crochets (C2H) under the arch of air loops of the previous row ( those. we insert the hook under the arch from the VP),

single crochet under the arch from the VP of the previous row * .
At the end of the row, knit 6 VPs and connect them to the beginning of the row with a single crochet.

Noticed the sign * in recording? This means that the rapport knitting described between two * , you need to repeat several times (instead of the word “alternate”, which I used in the description of knitting the 3-6th rows).
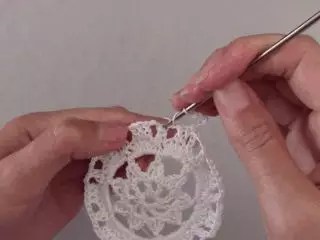
8th row:
double crochet (C2H) at the base of the first column of the previous row,
picot from 4 VPs (in we knit a chain of four air loops, then we connect the first and last loop together with a single crochet, you get a small ring, or rather not even a ring, but a small lump),
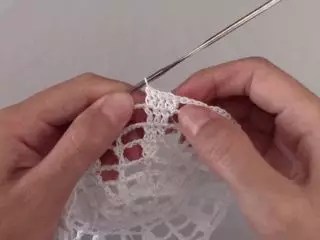
For clarity, watch the video tutorial from

C2H to the base of the third column of the previous row (we skip the second column of the previous row) and so on ( look at the diagram).

There will be 8 columns in total with picots between them.

single crochet under the arch from the VP of the sixth row*.
4 .We break and fasten the thread, carefully hide the end of the thread from the inside, pulling it with a hook under the posts.
Our little napkin is ready! The napkin needs to be starched, straightened and ironed.
I also made a video on crocheting this napkin with a voice analysis of the knitting pattern. Maybe this will make it clearer for someone.
Did you find crocheting napkins for beginners difficult or not very difficult? Write in the comments. I hope my photos, videos and detailed description they helped you. If you have any questions, ask, I will definitely answer everyone.
In addition, you can take a look at this video on knitting a hexagon with a very similar pattern.
By the way, the ring is made in a different way at the beginning of knitting.
Good afternoon
And again about napkins. If last time I imagined creative ideas, then today I offer you classic, very beautiful two-color crochet napkins with patterns.
Besides, in last days I was busy selecting interesting crocheted napkins and posted several new patterns:
- in the corresponding article "",
- as well as a new large one with a simple circuit,
- I found the diagram mysterious,
- added a few.
So, if you like to knit napkins and tablecloths, you can take a look and knit something new.
Crochet pink napkin
For this delicate two-color napkin you will need 10 grams of pink Iris yarn, 5 grams of white Iris yarn, hook No. 2.
We start knitting with a white thread from a set of 8 VPs and close them into a ring.
1st row: 3VP, 19 S1N.
2nd row: 5VP, *1S2N, 1VP*.
3rd row: 4VP, 1S2N, 1 VP, *2S2N, 1VP*.
4th – 10th rows: continue knitting according to the pattern with white thread.
11th – 14th We knit the rows with pink thread according to the pattern.
The napkin pattern is not very clear, but I found the only one in a magazine, so I placed another pattern for a similar napkin, all the rows of which are knitted in the same way, only they seem to be repeated twice. By the way, such a white napkin is also very impressive, but you can knit it with the addition of pink yarn.

I continue the description according to scheme 1 for the pink napkin.
11th row: fasten a pink thread into the arch of 3 VPs of the 10th row, 20VP, connect the 20th loop with the 8th, 7VP, RLS into the arch of 3 VPs of the 10th row, * 9VP, RLS into the arch of 3 -x VP of the 10th row, 19VP, connect the 19th and 7th loops, 7VP, RLS into an arch of 3 VPs of the 10th row *, 9 VP, finish with a connecting post.
12th row: 1 connecting post for the transition to an arch of 6 VPs (beginning of the loop) of the 11th row, 1 VP rise, 4СБН in an arch of 6 VPs of the 11th row, 17С2Н in a loop, 5СБН in an arch of 6 VPs 11th row, * 11 sc in an arch of 9 VPs of the 11th row, 5 sc in an arch of 6 VPs of the 11th row, 17C2H in a loop, 5 sc in an arch of 6 VPs of the 11th row* , 11СБН in the arch of 9 VPs of the 11th row, finish with a connecting column.
13th row: connecting posts for the transition to the 1st S2N of the 12th row, 4VP lifting instead of the first S2N, 1VP arches, * 17S2N, between S2N 1 VP, 2VP transition, 1SBN in the 6th SBN arches from 11 SBN 12 rows *, 2VP, connecting column with the top of the first C2H of three VPs.
14th row: connecting columns for the transition to the 2nd C2H of the 13th row, 4VP of lifting instead of the first C2H, 1VP of the arch, * 14 C2H, between the columns 1VP each *, finish with a connecting column at the top of the first C2H of their 4 VP.
15th row: fasten a white thread at the top of the second C2H of the 14th row, * 4VP (2VP instead of the first C1H, 2VP - arch between C1H), * 13C1H, between the columns of the 2VP arch *, 2VP, finish with a connecting column at the top of the first C1H from 2VP.
16th row we knit with pink thread: connecting stitches to the top of the first C1H of the 15th row, 1 VP rise instead of the first RLS, picot from 3 VP to the top of the first C1H of the 15th row, 2 SBN in the arch of 2 VP of the 15th row, * 1 RLS to the top C1H of the 15th row, picot, 2СБН in the arch of 2 VPs of the 15th row *, 2VP, finish with a connecting column in the first SC of 2 VPs.
Additionally, decorate the napkin with knitted flowers and leaves.
You can use this scheme:

Crochet green napkin

Materials for a two-color napkin with a predominant green: Iris yarn in green and white and hook number 2.
Knitting such a napkin consists of several parts.
Part A.
First we knit a ring in two rows of green.
In the 3rd row we attach a white thread and knit the 3rd - 10th rows in a circle according to the pattern.
Separately, with a green thread, we knit 12 leaves according to the pattern in reverse rows and during the knitting process we attach them to each other and to the round white part of the napkin.
Knitting a leaf
We collect 9 air loops.
- 1st row: 7SC (we knit the first stitch on the 3rd loop of the chain), 4VP, then turn the knitting and knit 6SC on the same chain on the other side.
- 2nd row: 2VP, 5SC for each column of the previous row and 2SC for the arch of air loops, 3VP, and in reverse order: 2SC for the arch of air loops, 6SC for each column of the previous row. One column of the 1st row remained unknitted.
- In the 3rd - 10th rows, knitting is similar to the 2nd row. Look at the diagram for the location of the columns in relation to the previous row: in each row the number of columns increases by one, while the column of the previous row is not tied to the outside of the leaf.
In the 10th row between the two halves of the leaves there are not 3, but 1 VP.
Separately, we knit 12 green circles, attaching them to the leaves.
Part B.
We knit a green transverse path according to the pattern, attaching it to the leaves and circles.
Part C.
We attach a white thread and finish knitting a napkin in the 11-12th rows.
If you liked two-color crochet napkins, write in the comments.
Yulia Vyrskaya sent her wonderful work, she even crocheted 2 of these beautiful two-color napkins and made adjustments to the knitting description, since during the knitting process it turned out that the magazine description was somewhat inconsistent with the photo of the napkin. I am very grateful to Yulia for her attentiveness and for sharing her experience with us.
Crochet is old good tradition, which is still supported by many craftswomen. The popularity and prevalence of such decor greatly simplifies the search for the desired pattern and description for it. However, there is also back side situation: crocheted napkins have become so boring for knitters that they have become a kind of synonym for banality. The situation is saved by the development of fresh schemes and the search for new areas of application of familiar objects.
Types of napkins
Despite the fact that the first association with the word “napkin” invariably becomes an openwork circle, there are square, pentagonal and hexagonal, rectangular, diamond-shaped and many other shapes of napkins.
In modern designs, the large one can be relatively solid or openwork) most often remains round, but squares are also often found. It must be said that decorative elements with right angles are easier to place on flat surfaces.
The basic principle of knitting napkins
Knitting work on almost any napkin begins from the center and, gradually expanding the fabric, ends with the widest row. The only exceptions are products assembled from several separately related motifs.
Both small and large (the circuit can be of any shape) requires the presence of several main components:

Depending on the specifics of the pattern, the main fabric of the product may include some elements. For example, the technique of duplicating stripes of a pattern is often used. They are placed at different distances from the center, interspersed with very openwork or, conversely, solid areas. This distribution of the ornament allows you to effectively expand the canvas while maintaining the overall harmony of the product.
Knitting napkins

This one is not large napkin knitted as follows:
- 3VP, *2VP, 1СН*, 2VP.
- 3VP, 31СН.
- *3VP, 1СБН*.
- 3VP, 5VP, *2СН with a common top, 5VP*.
- 3VP, *5VP, 1СН*.
- 3VP, *2СН, 5ВП, 2СН, 1ВП*.
- *4СН, 2ВП, 4СН, 1СБН*.
- *15VP, 1СБН*.
- *2Dc with a common top, 3Dc, 2Dc with a common base, 5VP, 2Dc with a common base, 3Dc, 2Dc with a common top*.
- *2Dc with a common top, 6Dc, 5VP, 6Dc, 2Dc with a common top*.
- *2Dc with a common top, 7Dc, 5VP, 7Dc, 2Dc with a common top*.
Dc - double crochet, sc - single crochet, VP - chain stitch.
The description from * to * must be repeated until the end of the row.
How to change napkin sizes
The technique of alternating stripes of patterns described in the previous paragraph can be extremely useful for craftswomen who want to change the size of the napkin. Individual elements can be repeated as many times as necessary or eliminated completely. An excellent example of how to crochet a napkin from several patterns is the product shown in the following photo.

There is a very wide strip connected by mesh. It is obvious that with its help the expansion of the canvas to the planned dimensions was achieved.
Circular crochet napkin patterns also allow you to combine different patterns. The height of skill can be considered the successful combination of several elements and the creation of your own unique napkin.
Large circuit and application
A large decorative element such as the one shown in the photo below has an extremely wide range of uses.

In fact, it's not even a napkin, but a real tablecloth. The size of such products depends significantly on the materials that the craftswoman chooses. The thicker the thread, the larger the napkin, but the pattern also looks rougher. Knitted from dense threads with tight twist, such a large crocheted napkin (the pattern is proposed below) becomes an interesting carpet, umbrella, blanket or bedspread.
If desired, you can complete only part of the circuit. By moving to the final binding immediately after the central part, you can get a napkin of a smaller diameter. The small motif without binding becomes convenient for use in pullovers, tops and bags. quite often placed on the yoke knitted dress or on its side.
For convenience, the napkin diagram is divided into two parts.

Central fragment.

And two stripes of patterns with binding.
Description: crochet napkins
Begin work by setting a chain of eight air loops. In the second row, perform 16 single crochets, and then continue knitting in accordance with the pattern.
The central part of the pattern contains the very popular “pineapple” elements. Here they are arranged in several rows and greatly decorate the napkin. “Pineapples” are good for expanding fabrics, which is why they are so often used in napkin patterns. The first section of the diagram ends with several rows of mesh, on which a simple pattern of “bushes” will then be placed. This geometric pattern is formed by systematically filling some grid cells with “bushes” of four double crochets. If you need to remove any element of the circuit, excluding this strip will be the most convenient.
The final part of a large napkin
The main decor of this large napkin is the wide border running along its edge. The peculiarity of the scheme is that several patterns are combined here:
- Simple triangles made of “bushes” against the background of chains of air loops.
- Double crochet zigzag stitch.
- Small "pineapples".
- Empty loin mesh with cells of different sizes.
All these ornaments are arranged simply masterfully. The beginning of one pattern is performed simultaneously with knitting the previous one. Thus, the developers managed to organically incorporate such seemingly different ornaments.
The patterns of formation of circular patterns and the principles of making decorative fabrics described in this article will be useful to those who are looking for information on how to crochet a napkin. Of course, it’s calmer to follow a detailed plan, but only improvisation can give you the feeling of true free creativity.