You can find a lot of interesting things for yourself in those areas of science that, it would seem, would never be useful in the usual life of a simple man in the street. For example, geometry, which most people forget about as soon as they cross the threshold of school. But in a strange way, unfamiliar areas of science become very fascinating when you get closer to them. So the geometric development of the polyhedron is completely unnecessary in Everyday life thing - can be the beginning of exciting creativity that can captivate both children and adults.
Beautiful geometry
Decorating the interior of your home by creating unusual, stylish things with your own hands is an exciting creativity. Making various polyhedrons yourself from thick paper means creating unique things that can just be an activity for a day or two, or can turn into designer interior decorations. In addition, with the development of technology capable of spatial modeling of all kinds of things, it became possible creation stylish and modern 3D models. There are masters who, by constructing patterns according to the laws of geometry, make paper models of animals and various items. But this is quite complex mathematical and drawing creativity. It will help to start working in such technology
Different faces - different shapes
Polyhedra are a special area of geometry. They can be simple - for example, the cubes that children play with early age, - and there are very, very complex ones. Construction development of polyhedra for gluing is considered a rather complex area of design and creativity: you need not only to know the basics of drawing, the geometric features of space, but also to have spatial imagination, which allows you to assess the correctness of the solution at the design stage. But you can’t get by with just your imagination. To do It's not enough to simply imagine what the work should look like in the end. You need to be able to correctly calculate it, design it, and also draw it correctly.

The very first polyhedron - cube
Most likely, every person who attended school, even in elementary school, was faced with work in labor lessons, the result of which was supposed to be a paper cube. Most often, the teacher handed out blanks -scans of a cube polyhedron on thick paper with special pockets designed for gluing the faces of the model into a single whole. With such work the students primary school could be proud, because with the help of paper, scissors, glue and their own efforts it turned out interesting craft- three-dimensional cube.

Entertaining facets
Surprisingly, much knowledge about the world around us becomes interesting not at school, but only when one can find in it something fascinating, capable of giving something new and unusual in everyday life. Not many adults remember that the same polyhedra are divided into a huge number of types and subspecies. For example, there are so-called Platonic solids - convex polyhedra, consisting only of only five such solids: tetrahedron, octahedron, hexahedron (cube), icosahedron, dodecahedron. They are convex figures without depressions. Star polyhedra consist of these basic shapes in various configurations. That's whyunfolding a simple polyhedron allows you to draw, or rather draw, and then glue a star polyhedron from paper.

Regular and irregular stellated polyhedra
By adding the Platonic solids together in a certain order, you can build many star-shaped polygons - beautiful, complex, multi-component. But they will be called "irregular stellate polyhedra." There are only four regular stellated polyhedra: the small stellated dodecahedron, the great stellated dodecahedron, the great dodecahedron and the great icosahedron. Developments of polyhedra for gluing will not be simple drawings. They, like the figures, will consist of several components. For example, a small stellated dodecahedron is built from 12 pentagonal isosceles pyramids, folded like a regular dodecahedron. That is, first you will have to draw and glue 12 identical pieces of regular pyramids, consisting of 5 equal faces. And only then can they be put together star polyhedron. Unfolding the smallest star dodecaer is a difficult and almost impossible task. To build it, you need to be able to fit 13 scans of different geometric volumetric bodies connected to each other on one plane.

Beauty is in simplicity
All volumetric bodies built according to the laws of geometry will look fascinating, including star polyhedron. The development of each element of any such body must be performed as accurately as possible. And even the simplest three-dimensional polyhedra, starting with the Platonic tetrahedron, are an amazing beauty of the harmony of the universe and human labor, embodied in a paper model. Here, for example, is the most multifaceted of Platonic convex polyhedra - the dodecahedron. This geometric figure has 12 absolutely identical faces, 30 edges and 12 vertices. To makeWhen developing regular polyhedra for gluing, you need to apply maximum accuracy and care. And the larger the figure in size, the more accurate all measurements should be.

How to build a scan yourself?
Perhaps, in addition to gluing a polyhedron - be it a star-shaped one or a Platonic one - it is even more interesting to build a development of the future model on your own, assessing your abilities in drawing, design and spatial imagination. Simple Platonic solids consist of simple polygons that are identical to each other in one figure. So, a tetrahedron is three isosceles triangles. Before constructing a net, you need to imagine how to correctly add flat polygons together to get a polyhedron. Triangles can be connected to each other along the edges by drawing one next to the other. For gluing The developments of the polyhedrons of the diagram must be equipped with special pockets or valves that will allow all parts to be connected into a single whole. A tetrahedron is the simplest figure of four faces. The octahedron can be thought of as a double tetrahedron and has eight garneis - isosceles triangles. A hexahedron is a cube familiar to everyone from childhood. The icosahedron is a combination of 20 isosceles triangles into a regular convex polyhedron. The dodecahedron is a three-dimensional figure of 12 faces, each of which is a regular pentagon.

Subtleties of work
Constructing a development of a polyhedron and gluing a paper model from it is a delicate matter. Of course, you can take a ready-made scan. Or you can, with some effort, build it yourself. But to make a full volumetric model polyhedron, you need to assemble it. The polyhedron is best made from thick paper that holds its shape well and does not warp from glue. All lines that need to be bent are best pressed through first, using, for example, a non-writing ballpoint pen or reverse side knife blades. This nuance will help to fold the model more accurately, respecting the dimensions and directions of the ribs.

If you make different polyhedrons from colored paper, then such models can be used as decorative elements to decorate a room - a children's room, an office, a living room. By the way, polyhedra can be called a unique find for decorators. Modern materials make it possible to create based on geometric shapes original items interior
A person never knows what he may need at one time or another. Today he thinks that creating a paper cube is useless, but tomorrow he might find it useful, for example, for work purposes. So for all those in need and just those who love to create with their own hands and want to make paper craft, there are several options for creating a cube from paper.
Creating a cube in a hurry
There is a way to quickly glue a paper cube. This scheme includes only five steps:

This is a simple and convenient scheme. By analogy, you can make a paper cube into a playing cube if suddenly the plastic ones get lost somewhere. Just draw dots with a marker! True, this miracle is not very bouncy, but for the first time it may be suitable.
Assembling a cube from paper modules
There is another option for creating a paper cube. If you use sheets of paper of different colors, the edges will turn out to be multi-colored. So, the following needs to be done:

Thus, you will get a cube whose structure will be somewhat more complex than the previous one..
Origami cube
The finished model turns out to be slightly unusual in appearance and beautiful. For this version of the paper cube you need 6 squares of paper. They can all be the same, and multi-colored. The creation scheme is as follows:
- thick paper or cardboard (preferably colored);
- ruler;
- pencil;
- scissors;
- glue (preferably PVA).
- capricious, brittle material
- requires high accuracy, attentiveness, and perseverance when working
- paper
- pencil
- ruler
- eraser
- scissors
- PVA glue or glue stick
- glue brush, preferably with stiff bristles
- compass (for some figures)
- We choose the dimensions of the square - one side of our cube. The piece of paper should be at least 3 sides wide of this square and slightly more than 4 sides long.
- We draw four squares along the length of our sheet, which will become the sides of the cube. We draw them strictly on the same line, close to each other.
- Above and below any of the squares we draw one of the same squares.
- We finish drawing the gluing strips, with the help of which the edges will be connected to each other. Every two edges should be connected by one strip.
- The cube is ready!
- Drawing a circle with a compass
- We cut out a sector (a part of a circle limited by an arc of a circle and two radii drawn to the ends of this arc) from this circle. The larger the sector you cut, the sharper the end of the cone will be.
- Glue the side surface of the cone.
- We measure the diameter of the base of the cone. Using a compass, draw a circle on a sheet of paper of the required diameter. We add triangles to glue the base to the side surface. Cut it out.
- Glue the base to the side surface.
- The cone is ready!
- We draw a rectangle on paper, in which the width is the height of the cylinder, and the length determines the diameter of the future figure. The ratio of the length of the rectangle to the diameter is determined by the expression: L=πD, where L is the length of the rectangle, and D is the diameter of the future cylinder. Substituting the required diameter into the formula, we will find the length of the rectangle that we will draw on paper. We finish drawing small additional triangles that are necessary for gluing the parts.
- Draw two circles on paper, the diameter of a cylinder. These will be the top and bottom bases of the cylinder.
- We cut out all the details of the future paper cylinder.
- Glue the side surface of the cylinder from a rectangle. Let the parts dry. Glue the bottom base. Waiting for it to dry. Glue the top base.
- The cylinder is ready!
- We select the dimensions of the parallelepiped and the angles.
- Draw a parallelogram - the base. On each side we draw the sides - parallelograms. From any side we draw the second base. Add strips for gluing. A parallelepiped can be rectangular if the sides are rectangles. If the parallelepiped is not rectangular, then creating a development is a little more difficult. For each parallelogram you need to maintain the required angles.
- We cut out the development and glue it together.
- The parallelepiped is ready!
- We select the dimensions of the pyramid and the number of its faces.
- Draw the base - a polyhedron. Depending on the number of faces, it can be a triangle, square, pentagon or other polyhedron.
- From one of the sides of the base we draw a triangle, which will be the side. We draw the next triangle so that one side is common with the previous one, and so on. So we draw as many triangles as there are sides in the pyramid. We finish drawing strips for gluing in the right places.
- Cut out and glue the shape.
- The pyramid is ready!
To make three-dimensional geometric shapes, the main thing is to have templates that can be cut out and then glued.
Can be made from white or colored paper. You can cut it out of paper with any designs or numbers.
I propose to make an unusual three-dimensional figure using the origami technique. Watch the video:
So that children can better remember what there are geometric figures, and knew what they are called, you can make them from thick paper or cardboard volumetric geometric shapes. By the way, you can use them to make beautiful gift wrapping.
You will need:
The most difficult thing is to develop and draw layouts; you need at least basic knowledge of drawing. You can take ready-made designs and print them on a printer.
To keep the fold line straight and sharp, you can use a blunt needle and a metal ruler. When drawing a line, the needle must be bent strongly in the direction of movement, almost laying it on its side.
This is a development of a trihedral pyramid
This is a cube scan

This is the development of an octahedron (tetrahedral pyramid)

This is the development of a dodecahedron

This is the development of an icosahedron

Here you can find templates for more complex figures (Platonic Solids, Archimedean Solids, polyhedra, polyhedra, different types pyramids and prisms, simple and oblique paper models).
Volumetric geometric shapes are the best way baby's exploration of the world around him. An excellent educational material/excellent teaching aid for studying geometric shapes is precisely three-dimensional shapes. This way, geometric shapes are better remembered.
The best material for making such three-dimensional figures is thick paper (can be colored) or cardboard.
For production, in addition to paper, you will also need a pencil with a ruler, as well as scissors and glue (cut and glue the developments).
You need to draw the scans in a similar way and cut them out:


After which they need to be glued edge to edge.
You should get the following type of volumetric geometric shapes:


Here are several schemes by which you can make three-dimensional geometric shapes.
The simplest one is tetrahedron.

It will be a little more difficult to make octahedron.

But this three-dimensional figure - dodecahedron.

Another one - icosahedron.

More details about making three-dimensional figures can be found here.
This is what three-dimensional figures look like not assembled:

And this is what the finished ones look like:

You can make a lot out of three-dimensional geometric shapes original crafts, including gift packaging.

Before you start making three-dimensional geometric shapes, you need to imagine (or know what it looks like) the figure in 3D dimension: how many faces does this or that figure have.
First you need to correctly draw a figure on paper along the edges that must be connected to each other. Each shape has edges that have a specific shape: square, triangle, rectangle, rhombus, hexagon, circle, etc.
It is very important that the length of the edges of the figure that will be connected to each other are the same length, so that no problems arise during the connection. If the figure consists of identical faces, I would suggest making a template while drawing and using this template. You can also download ready-made templates from the Internet, print them, bend them along the lines and connect (glue) them together.
Cone Pattern:

Pyramid template:

You will need to make three-dimensional geometric shapes both in school classes and for studying shapes with kids. This process can be turned into a game by making dense three-dimensional geometric shapes out of cardboard.
To make the figures we will need a pencil, ruler, colored cardboard, glue.

You can print out diagrams from the Internet, then apply them to thick paper, not forgetting about the fold lines that will be glued together.
You can use the following schemes:


But they are already in finished form.

This way you can spend time with your baby having fun and usefully studying geometric shapes.
By making three-dimensional figures from paper yourself, you can not only use them for entertainment, but also for learning.
For example, you can clearly show your child what a particular figure looks like and let him hold it in his hands.
Or you can print out diagrams with special symbols for training purposes.
So I suggest you familiarize yourself with this topic below dodecahedron, both simple and with small drawings, which will only attract the baby’s attention and make learning more fun and entertaining.


Also the diagram Cuba Can be used to teach numbers.


Scheme pyramids can help you understand the formulas that apply to a given figure.


In addition, I suggest that you familiarize yourself with the diagram octahedron.


Scheme tetrahedron Among other things, it will help you learn colors.


As you understand, the above templates must be printed, cut out, bent along the lines, and glued along special narrow strips adjacent to selected sides.
Volumetric geometric figures are simply necessary when teaching: they provide students with the opportunity to hold them in their hands and examine them, which is an important part educational process, they are simply necessary as a tool for studying Euler’s famous theorem - clearly demonstrating that even with deformations and curvatures, the number of faces of a polyhedron, and therefore Euler’s relation, will remain unchanged:
In addition, solid figures can be an excellent tool to help explain to students how to find the surface area of a polyhedron.
So, using the templates below you can easily make the following shapes:
Triangular Prism

N-gonal prism

Tetrahedron

The most complex and unusual forms of structures, devices, and mechanisms are based on elementary geometric figures: cube, prism, pyramid, ball and others. To begin with, learn how to create the simplest shapes, and then you can easily master more complex shapes.
Many modelers start their journey with paper models. This is due to the availability of the material (finding paper and cardboard is not difficult) and the ease of processing it (no special tools are required).
However, paper also has a number of characteristic features:
For these reasons, paper is a material for both beginners and real masters, and models of varying complexity are created from it.
In this article we will study the simplest geometric shapes that can be made from paper.
You will need the following materials:
How to make a cube out of paper?
A cube is a regular polyhedron, each face of which is a square.
Creating a cube consists of two stages: creating a flat pattern and gluing. figures. To create a diagram, you can use a printer by simply printing out the finished diagram. Or you can draw the development yourself using drawing tools.
Drawing a sweep:

After drawing, the development is cut out with scissors and glued with PVA. Spread a very thin layer of glue evenly with a brush over the gluing surface. We connect the surfaces and fix them in the desired position for a while, using a paper clip or a small weight. The glue takes about 30-40 minutes to set. You can speed up drying by heating, for example, on a radiator. Afterwards we glue the following edges and fix them in the desired position. And so on. This way you will gradually glue all the faces of the cube. Use small amounts of glue!
How to make a cone out of paper?
A cone is a body obtained by combining all rays emanating from one point (the vertex of the cone) and passing through a flat surface.
Drawing a sweep:

How to make a cylinder out of paper?
A cylinder is a geometric body bounded by a cylindrical surface and two parallel planes intersecting it.
Drawing a sweep:

How to make a parallelepiped from paper?
A parallelepiped is a polyhedron with six faces and each of them is a parallelogram.
Drawing a sweep:

How to make a pyramid out of paper?
A pyramid is a polyhedron, the base of which is a polygon, and the remaining faces are triangles having a common vertex.
Drawing a sweep:

Large selection of developments of simple geometric shapes.
Children's first introduction to paper modeling always begins with simple geometric shapes such as cubes and pyramids. Not many people succeed in gluing a cube together the first time; sometimes it takes several days to make a truly even and flawless cube. More complex figures, a cylinder and a cone, require several times more effort than a simple cube. If you don’t know how to carefully glue geometric shapes, then it’s too early for you to take on complex models. Do it yourself and teach your children how to do these “basics” of modeling using ready-made patterns.
To begin with, I, of course, suggest learning how to glue a regular cube. The developments are made for two cubes, large and small. A small cube is a more complex figure because it is more difficult to glue than a large one.

So, let's begin! Download the developments of all the figures on five sheets and print them on thick paper. Before printing and gluing geometric shapes, be sure to read the article on how to choose paper and how to properly cut, bend and glue paper.
For better quality printing, I advise you to use the AutoCAD program, and I’m giving you scans for this program, and also read how to print from AutoCAD. Cut out the development of the cubes from the first sheet, be sure to draw a compass needle under the iron ruler along the fold lines so that the paper bends well. Now you can start gluing the cubes.

To save paper and just in case, I made several unfolds of a small cube, you never want to glue more than one cube together or something won’t work out the first time. Another simple figure is a pyramid, its development can be found on the second sheet. The ancient Egyptians built similar pyramids, though not made of paper and not so small in size :)

And this is also a pyramid, but unlike the previous one, it has not four, but three sides.
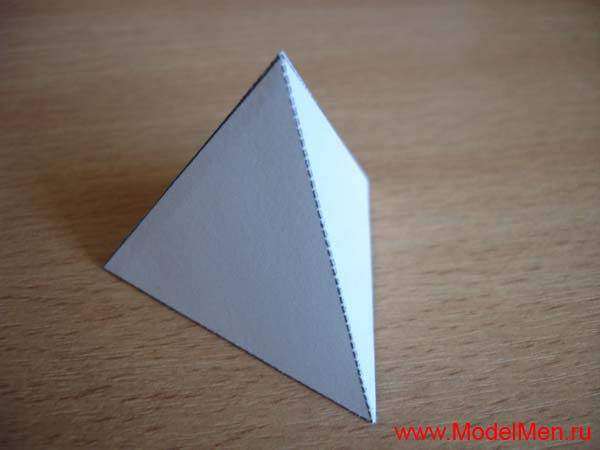
Development of a trihedral pyramid on the first sheet for printing.

And another funny pyramid of five sides, its development on the 4th sheet in the form of an asterisk in two copies.


A more complex figure is a pentahedron, although a pentahedron is more difficult to draw than to glue.

Development of a pentahedron on the second sheet.

Now we get to complex figures. Now you have to work harder, gluing such shapes together is not easy! To begin with, an ordinary cylinder, its development on the second sheet.

And this is a more complex figure compared to a cylinder, because at its base is not a circle, but an oval.

The development of this figure is on the second sheet; two spare parts were made for the oval base.

To accurately assemble the cylinder, its parts need to be glued end-to-end. On one side, the bottom can be glued without problems, just place the pre-glued tube on the table, place a circle on the bottom and fill it with glue from the inside. Make sure that the diameter of the pipe and the round bottom fit tightly together, without gaps, otherwise the glue will leak and everything will stick to the table. It will be more difficult to glue the second circle, so glue auxiliary rectangles inside at a distance of paper thickness from the edge of the pipe. These rectangles will prevent the base from falling inward, now you can easily glue the circle on top.

A cylinder with an oval base can be glued in the same way as a regular cylinder, but it has a smaller height, so it’s easier to insert a paper accordion inside, and put a second base on top and glue it along the edge with glue.

Now a very complex figure - a cone. Its details are on the third sheet, a spare circle for the bottom is on the 4th sheet. The whole difficulty of gluing a cone is in its sharp top, and then it will be very difficult to glue the bottom.

A complex and at the same time simple figure is a ball. The ball consists of 12 pentahedrons, the development of the ball on the 4th sheet. First, two halves of the ball are glued, and then both are glued together.

Quite an interesting figure - a rhombus, its details are on the third sheet.

And now two very similar, but completely different figures, their difference is only in the base.

When you glue these two figures together, you won’t immediately understand what they are, they turned out to be completely unresponsive.

Another interesting figure is a torus, but we have it very simplified, its details are on the 5th sheet.

And finally, the last figure of equilateral triangles, I don’t even know what to call it, but the figure looks like a star. The development of this figure is on the fifth sheet.

That's all for today! I wish you success in this difficult work!