I welcome everyone gathered on my blog on this sunny (or maybe not so sunny) day. If you want to learn how to make cool flowers from ribbons, then I highly recommend reading this article to the end.
Flowers made from satin (and other) ribbons can be used both to decorate gift packaging and as a gift itself.
Especially if you collect such flowers in an elegant bouquet.
The most amazing thing is that sometimes the most beautiful of these plants are so easy to make with your own hands that it takes 10-15 minutes even for a beginner (trust my experience).
Recently I have been making different flowers quite often and now I will share with you excellent master classes on making them
DIY flowers made from satin ribbons
I'll show you 15 cool (and easy) ways to create amazing flowers. You can “take” each of the photos from the master classes with you by copying the corresponding image.
Let's start with, perhaps, the most romantic and popular plants among girls - roses.
Ribbon roses
Stop buying expensive store-bought roses! Let's learn how to make them ourselves and save the lion's share of the budget.
We will have several roses today. The first of these is a rose, obtained by folding triangles as you go. To make it, prepare a piece of ribbon at least 2 cm wide and at least 50 cm long.
Unblown
Form a center by bending one end as in the photo. Twist and secure.

twisted rose
In terms of the method of creation, it vaguely resembles the previous one (at least the beginning). After forming the center, alternately turn the ribbon, twisting it and applying layer by layer. Secure at the end.

Kanzashi
The peculiarity of this rose is that all its petals are processed separately.

From braid
Finally, a rose, which is obtained by intertwining two wavy ribbons. After weaving, they need to be swept along the edge so that they do not fall apart. And then just roll it up.

Flowers from kanzashi ribbons
In general, kanzashi is originally a “hair decoration” from Japanese. It dates back to the times of geishas, who were distinguished, among other things, by their ability to skillfully do needlework.
Kanzashi has two petal shapes - round and pointed. The rest are already subspecies. So all flowers, to some extent, can be attributed to this type of art.
Hibiscus
An exotic guest, for which you will need a wide ribbon (about 5 cm wide), a base and stamens.

Just a flower with 5 petals
To make pointed elements, sew the center. Fold the future petal in half and hem it from the inside. Prepare 5 pieces, then string them on a thread. Decorate the middle.

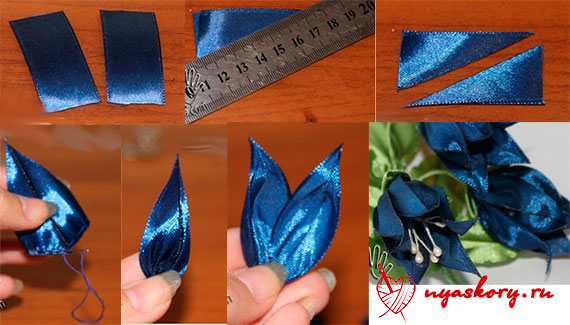
Bell
For the bell, prepare the petals according to the photo. To roll them, fold the petals with their tall, straight edges facing each other and sew around the edge (glue the top a little). Pull the thread, assemble the resulting parts, decorating with stamens or beads.
Semitsvetik
For it you need to prepare 7-9 petals using the classic method used in kanzashi. Then all the petals are collected on a thread and, if necessary, glued together on the sides.

Aster
Just a dream, not a flower in terms of ease of execution. To make an aster, take a ribbon and sew a line of zig-zag running stitches across the entire width. Pull, roll. All

Peony
For the peony, take three ribbons: two for the petals, one for the green leaf.
Please note that the peony consists of two parts - a more closed bud and opening petals.

Master classes on colors in video format
Not everyone likes to study photographs, so I have prepared for you several flower-making tutorials in video format.
Today we will make a hair decoration. This will be a kanzashi flower made of satin ribbons - a master class for beginners in step-by-step photos.
Even if this is your first time hearing about kanzashi, you will definitely succeed. To understand, we will make a hair decoration from satin ribbons.
Make the first hairpin, then the second, and look - you will become a master of kanzashi with your own hands. And you won’t have to rack your brains over what to give to your friend, sister or daughter.
About the kanzashi technique
Jewelry using the kanzashi technique is very popular. They are made traditionally from satin ribbons. The technique is that small identical squares are folded in a certain way and assembled into a beautiful flower.
In addition to decorative bouquets, this technique can be used to make decorations for dresses, hairpins, bags and wedding dresses.
There are only 2 types of kanzashi petals - sharp and round. We have already said that flowers that are very pleasing to the eye can be used as decoration for a hairpin, headband, comb, elastic band, as well as for interior decoration and so on.
Materials and tools for pinning kanzashi

To make a flower hairpin using the kanzashi technique, we will need:
- yellow satin ribbon 5 centimeters wide;
- pink satin ribbon 5 centimeters wide;
- scissors;
- barrette;
- bead;
- stamens for a flower;
- tweezers;
- lighter;
- glue (hot) gun.
Master class of kanzashi flower with sharp petals
To begin, cut the pink ribbon into 9 equal squares of 5*5 centimeters, since our flower has 9 petals. Bend one edge of the tape to the other to form a triangle and cut it with scissors.

From the yellow ribbon, cut out 9 identical squares in the same way.

Next, take one yellow square and fold it into a triangle.

Then fold the resulting triangle in half.

You do exactly the same procedure with the pink square. Place the resulting triangles together to yellow was on top and pink on the bottom.

Now wrap the 2 corners of the triangle towards each other.

Trim the edges of the petal so that it has an elongated shape from the side, and not a triangle shape.

Carefully melt the edges of the fabric using a lighter or candle.

Using this principle, you make 8 more petals.

Now you need to collect the flower. Using a glue gun, glue one petal to the other.

And so on in a circle so that the petals close into a flower.

From yellow satin ribbon cut out a small circle with a diameter of 1.5-2 centimeters.

Having melted the edges a little, glue it to the flower on top to cover all the irregularities.

Cut out a circle with a diameter of 4.5 centimeters from pink ribbon and glue it with reverse side flower. We do everything carefully and diligently. Untidy adhesive marks should not be allowed.

Thread the stamens for the flower into a bead and glue it together into the center of the flower. A very convenient gluing method for those who do not like to sew by hand.
For those who know how to handle a needle and thread, there is a field for activity. Sew discreetly and very firmly. All this beauty has no right to fall off at the most inopportune moment.

All that remains is to glue the magnificent flower to the hairpin. To do this, wrap the stationary part of the hairpin with a pink satin ribbon and glue our decoration to it.
Now we know how to make a kanzashi flower and decorate a simple hairpin with it. We really hope that our kanzashi flower made from satin ribbons in the master class for beginning craftswomen will work out for you right away and you will like this technique. You can use it to decorate your home, outfits, or give them as a gift.
And it’s even better to do everything together with the girls. Every skill will be useful in life. Who knows what talents you will discover in your daughter or granddaughter. You can still do it.
You can give a beautiful bright hairpin to a little fashionista who will be very pleased with such a decoration. Do-it-yourself kanzashi is very clear for beginning craftswomen, especially since each stage is illustrated with photographs. Everything should be clear.
Kanzashi handicrafts are very popular in our country today. The Internet is full of various articles, forums discuss the techniques of this handicraft, and there are many master classes on this topic. We couldn’t “stand on the sidelines” either, so in this article we’ll get acquainted with most interesting view art called kanzashi. Anyone who has the desire can master the technique of creating simple flowers with their own hands. The main thing is patience and over time everything will work out.
The main thing in the article
Set for kanzashi
As in any creative handicraft, for kanzashi you need to have a certain set of tools for work. Experienced kanzashi masters have their own exclusive set. Some people specifically buy a set of tools for kanzashi, while others use improvised tools in their work. In any case, to get started with this technique you need to have:
- Tweezers– it can be: surgical, anatomical, sewing, tweezers for eyebrow correction are also suitable.
- Scissors They can be of any size, the main thing is that their blades are not short.
- Glue must be transparent. Since kanzashi glues not only tapes, but also metal and plastic parts, a universal glue is needed. Those who already work in this technique recommend using the “Moment Crystal”. If you are planning to seriously practice kanzashi, then it is better to purchase a hot glue gun, it is much more convenient and practical to use.
- Threads must be durable and match the work being assembled.
- Needle for assembling the work, select a thin one: 5-8 cm in length. You should have a few pins on hand just in case.
- Candle. This tool is necessary for burning the edges of the tape. You can use it instead lighter, gas torch, burner etc.
- Satin ribbons of different widths, are the main material for work.
- Accessories used as flower centers. Here you can use intricate buttons, beautiful beads, small balls.
When using natural fabrics, be careful: they may burn rather than melt.
What kind of jewelry is made using the kanzashi technique?

Kanzashi is the name given to traditional Japanese jewelry used to decorate geisha hairstyles. They were worn with a kimono.
The decorations consist of fabric flowers. Historically, traditional Japanese women's attire has prohibited the use of necklaces and bracelets. Decorating hairstyles became the only decoration for Japanese women that gave them the opportunity to express themselves. Hairpins, combs, and sticks were decorated with flowers made from silk ribbons.
Today, the kanzashi technique is used all over the world, and not only for hair decoration. Kanzashi is used to make original accessories, jewelry, and even decorate clothes.
Kanzashi ribbons: how to choose materials
 At first glance, choosing a ribbon for decoration is easy. Take any one you like and work. But no, when choosing a tape for kanzashi, you need to pay attention to the density of the material. After all, the thicker the tape, the easier it is to work with.
If it is not possible to purchase a thick ribbon, take a soft one; at the end of the work, be sure to treat the product with hairspray so that the decoration holds its shape better. You should also pay attention to the fact that rhinestones lose their shine when exposed to varnish.
Look through the tape carefully: sometimes you come across a skewed tape or a tape with uneven thread tension. Such ribbons should be discarded, since the end result will not be an even and beautiful decoration.
Most often, a satin ribbon is chosen for kanzashi; rep ribbons are used less often. Beginning needlewomen should start with classic satin ribbons, while self-confident craftsmen can try ribbons of bolder materials and colors. Pay attention to the colors:
- strict stripes and frivolous polka dots are suitable for classic hairpins;
- ribbons with funny inscriptions can be used to create children's accessories;
- Floral prints on ribbons will make the decoration solemnly romantic.
Making flowers from kanzashi ribbons with your own hands

Working with the kanzashi technique is not difficult; to prove it, we will give an example of making a rose from a satin ribbon.
To work you will need:
- Pink satin ribbon 2.5 cm wide and 1.5 m long.
- Sewing threads in pink or white.
- Candle.
- Needle.
- Glue. You can use a pistol or a regular one from a tube.
Progress:
- For the rose, cut 6-7 cm strips from the pink ribbon. There should be 12 of them. We singe the strips of tape on both sides using a candle.

- Fold the corner of the ribbon and stitch it as shown in the photo.

- We carry out the same operation with the other corner and tighten the thread.

- You should get 12 neat petals.

- We take one petal and make the middle out of it. We wrap it tightly in a tube and secure it with a thread and a needle.

- We wrap the finished petals around the resulting center. The first ones can be sewn on, and the subsequent ones can be placed on glue. The main thing is that each subsequent petal slightly overlaps the previous one.

To make the rose more lush, you need to use more petals.
The photo below shows step by step work in making flowers using the kanzashi technique. 


Kanzashi for beginners: the basics of the art of making jewelry
There is no big secret in making kanzashi, the main thing is to learn how to make petals correctly. There are only two types of them in this technique:
- Round.
- Spicy.
For a beginner to work in this technique, it is enough to make the petals correctly, and the flowers will form by themselves. We will give the basics for beginners using the example of a 5x5 square of satin ribbon.
Round petal for kanzashi
- The square is folded in half diagonally.

- The corners of the triangle fold into the middle.

- Secure with thread and needle.

- Turn over and fold the corners toward the center again.

- Fold the future petal in half so that the corners are on the inside.

- Trim the bottom of the petal evenly.

- We solder the place where we cut it and level it.

- These petals can easily make a beautiful flower.

Spicy petal for kanzashi.
- As in the first case, fold a piece of tape in half diagonally.

- Fold this triangle in half again.

- Once again.

- We cut off the lower part evenly.

- We singe the cut part while it is hot, press it with our fingers to solder the parts.

- A cut is made from below and singed.

- The height of the petal depends on the cut line.

- The petal can be with or without a hole. In the first option, the lower cut is simply singed. In the second, this section is soldered.

- Such petals can be assembled into a beautiful flower without any special skills.

Kanzashi master class: crown for a girl
All little girls dream of being princesses, and, as you know, every princess should have a crown. Every mother can make a crown or tiara for a little fashionista with her own hands; it will take a minimum of time and a minimum of costs. A crown made using the kanzashi technique will be exclusive, made with love, and will decorate the little princess at any celebration. The video tutorials below will help you complete the task of making a crown for a girl.
Paintings of kanzashi in the interior
Eastern trends have affected not only hair jewelry; the kanzashi technique is actively developing in design solutions.
The most popular paintings now are kanzashi paintings made from satin ribbons. Carefully done work is something unique, delicate and very beautiful. Flowers in paintings in the Kanzashi style seem to be alive. Such paintings will serve as an excellent frame for any interior, be it a bedroom or a kitchen.
In addition to the oriental, they can be used in the following styles:
- classic;
- baroque;
- kitsch, etc.
Such paintings perform not only a decorative function, they optimize space. The main thing is to choose the right size, shape and color scheme.
In small rooms you should hang narrow three-dimensional paintings, for large rooms it is necessary to choose large paintings in massive frames.
DIY kanzashi ribbon of St. George: instructions for May 9
Today, the St. George ribbon is a sign of memory of the feat performed by our great-grandfathers. Walking down the street with such a ribbon means expressing your respect and solidarity to the soldiers who laid down their lives for the possibility of ours being born. And the St. George ribbon, decorated with the kanzashi technique, will become not only a symbol of the May 9 holiday, but also a stylish accessory. 
For a symbolic accessory, in addition to the work tools described above, you will need:
- St. George ribbon - 0.6-1 m.
- Beads, rhinestones or other accessories.
- Pin or brooch clasp.
- Cutting St. George's ribbon for 5 squares of 7 cm.

- From each square we make a sharp petal without a hole (how to do this is described above).

- We cut the tape 20 cm long, make triangular cuts at the edges, and singe them.

- Roll the tape and glue it.

- Using glue, we collect the made petals into a flower and decorate the top with the accessories that you have.


We secure the decoration with a pin to the clothing.
Kanzashi photo: examples of executed kanzashi
Kanzashi flowers 


Elastic bands and kanzashi hairpins 


Hoops using the kanzashi technique 


Kanzashi paintings 


Other kanzashi accessories 


Kanzashi video master class
Try, and you will certainly succeed, even if not the first time. Kanzashi is exciting process creating new beautiful jewelry. Don't stop, bring something of your own and good luck to you in all your endeavors.
In this material we presented 6 step-by-step master classes for beginners, following which you can make flowers from ribbons for making/decorating with your own hands:
- Artificial flowers (interior);
- Wall panels;
- Topiaryev;
- Decorative and wedding bouquets;
- Costume jewelry (rings, brooches, necklaces, bracelets);
- Hair accessories (headbands, headbands, barrettes, elastic bands);
- Boutonniere;
- Gift packaging;
- Decorative pillows;
- Caskets for jewelry and other little things;
- Albums and notebooks;
- Applications for clothes, bags and shoes;
- ...and much more! This selection of photos shows only a small part of the crafts that you can make once you have mastered various techniques making flowers from ribbons:

In addition to step-by-step instructions, you will find 30 photo ideas for inspiration, as well as a useful selection of videos.
Master class 1. Twisted rose from a solid ribbon
Let's start, perhaps, with the simplest and most fast way making roses from ribbons with your own hands. Once you master the technique of rolling roses from ribbon, you can make them while sitting in front of the TV. Depending on the width and length of the ribbon used, you can twist both small and lush buds. You can use a ribbon made of any material - organza, satin, cotton and even strips of linen fabric.

What you will need:
- Any ribbon - the longer and wider it is, the larger the bud will be. For a medium-sized rose, a 2.5 cm wide ribbon is enough.
- Thread and needle or hot glue gun.
- Scissors.
How to twist a rose from a ribbon:
Step 1. Straighten and place the tape in front of you, then bend one of the ends of the tape (either) along the bias, as shown in Fig. 1.

Step 2. Wrap the tip of the ribbon into a roll in two or three turns to form the core of the rose, fix its lower part with glue or simply sew it (see Fig. 2).
Step 3. Now we begin to form the rose petals. To do this, bend the tape again obliquely to the outer side (see Fig. 3) and wrap it around the core of the rose, holding (and, if desired, fixing with thread/glue) the entire workpiece from below (see Fig. 4).
Step 4. Next, continue to “build up” the layers of “petals” according to the scheme: bend the ribbon outward - wrap the bud - bend the ribbon outward - wrap the bud, etc. (see Fig. 5). Periodically fix the layers of tape at the base of the bud with glue or thread and a needle. Remember that the most important thing is not to let the ribbon unravel.
- Experienced decorators can twist a rose by fixing the layers of tape only a couple of times (at the beginning and at the end), but for beginners it is easier to stitch/glue the “petals” of a rose much more often.
- It is more convenient to roll a rose by holding the base of the bud between your index and middle fingers, so that the flower seems to be lying in your palm.
Step 5. When the rose reaches the desired size, press the end of the ribbon to the base and tie/glue (Fig. 6).
- Practice curling roses from ribbons of different widths and lengths, experiment with the angle of the ribbon, the number of folds per layer, or the tightness of the twist to achieve the effect you like best. So, for example, a rose twisted from ribbon can be very multi-layered or, conversely, softer, have sharper corners or, conversely, rounded.
If you have any questions, we suggest watching a video on how to make a flower from a satin ribbon with your own hands using this technique.
Master class 2. Realistic flowers from ribbons (peonies, roses or ranunculus)
Now we suggest you familiarize yourself with the technique, following which you can achieve the most realistic and elegant look of petals, which is only possible for flowers made by yourself. Take a look at this selection of photos and see for yourself.

Despite all the beauty and apparent complexity, even a beginner can make such flowers from ribbons with his own hands.
You will need:
- Candle or lighter.
- Ribbon 5 cm wide (for a medium peony) made of 100% polyester (it can be either rayon/satin or organza). Please note that the tapes are made from natural materials won't fit. If you want to make a large and lush peony, then you can use either more petals and/or a ribbon 7-8 cm wide.
- Scissors.
- Needle and thread to match the ribbon.
How to make a peony with your own hands:
Step 1. Cut the ribbon into squares in the following sizes and numbers:
- 5×7 cm (6-10 pcs);
- 4×6 cm (6-10 pcs);
- 3×5 cm (6-10 pcs);
- 2×4 cm (6-10 pcs).
As a result, you should have a minimum of 24 and a maximum of 40 squares. The more petals you make, the more magnificent and larger the bud will be.
Step 2: Now arrange the groups of squares into piles. Then cut out petals from each stack (the shape is shown in the picture below). Keep in mind that accuracy is not important here, everything can be done by eye, without measurements and without using templates. The main thing is that you get petals of different sizes: very large - large - medium - small.

Step 3. It's time for the fun part - giving shape and volume to our petals. To do this, light a candle or lighter and, holding the edges of the petal at a distance of about 2 cm from the fire, melt them (but do not scorch them!). Rotate the petal smoothly but quickly. This way you need to process all your workpieces.
- If you want the petal to become more rounded, hold it over the fire a little longer, but do not reduce the distance from the fire. However, sometimes petals slightly blackened by fire look quite organic.


Step 4. Take one of the smallest petals, roll it into a roll and make a couple of stitches in its lower part to secure it. You now have the core of your flower.

Step 5. Attach the second small petal and secure it with a couple of stitches. Continue attaching the petals one after another, maintaining a checkerboard pattern. When you are done with the small petals, start attaching the middle petals, then the larger ones, and finally the largest ones.


Flowers made from ribbons in two shades

Flowers made from ribbons of the same shade
Well, that's all, the peony is ready!


Using the same principle, but by changing the number, shape, size and color of the petals, as well as adding stamens from beads or floss threads, you can create roses, tulips, poppies or ranunculus.

Following our master class, you can make flowers not only from satin ribbons, but also from organza. Why not use old ribbons for baby bows?
Master class 3. Simple flowers from ribbons in 5 minutes
If you need to make flowers from ribbons with your own hands as quickly as possible, for example, for gift wrapping, then this step-by-step instruction will help you out.

What you will need:
- Any tape;
- Beads;
- Scissors;
- Hot glue gun.
How to make a flower from ribbon:
Step 1. Cut out a small circle with a diameter of about 5 cm from cardboard or thick paper. This circle will become the base of your flower and will be hidden under the petals, so it does not need to be cut out carefully.
Step 2: Start gluing the tape to the top edge of the circle, creating a pleat as shown in the photo below.

Step 3: Continue applying the tape in a spiral pattern in 3 or more layers. When you reach the center, cut off the excess tape, fold the end under, and carefully glue it in place.

Step 4: Place a large dot of hot glue in the center of the flower and quickly fill it with beads.

Master class 4. Small textured flower made from wave braid
If you want to decorate a ring, headband, brooch or necklace with a flower, then a rose made from wave braid is best suited. After all, it turns out so neat, strong, elegant and small.

What you will need:
- A wave braid of medium width and a length of 50-60 cm (for one rose) or two ribbons of different colors of the same width, 25-30 cm long (if you want to make a two-color rose). However, the length can be longer or shorter, it depends on what size you want to make the bud.
- Scissors.
- Sewing machine.
- Threads with a needle to match the braid.
Step 1. Take two wave braids of the same length and intertwine them together as shown in the photo. Before you start weaving, secure the two ribbons with some kind of clamp so that they do not unravel.

Step 2: Machine stitch along the edge of your piece to secure the weave.

If you don't have a machine, it doesn't matter. Just run large stitches along the entire length of the braid.

Step 3. To make the flower, simply start folding the ribbon at one end, securing the layers with hot glue in some places.

Step 4: When you're done, you should have a bud that looks something like this. Simply tuck the remaining end of the braid under the flower and secure it with glue.

Step 5. Glue a small circle of felt, cardboard or thick fabric to the base. In the future, you can glue anything to this base - from a hairpin to a ring.
Step 6. Have you noticed that all the petals of our flower are closed? In this form, it looks more like a peony or ranunculus. If you want the flower to become a rose, simply spread each petal outward one by one.

Master class 5. Poinsettia with leaves
It's time to tell you how to make poinsettias from ribbons, which can be used to decorate anything, for example, an autumn wreath as in the photo below.

What you will need:
- Ribbon 4-6 cm wide in red, cream or any other desired shade;
- Green ribbon (for leaves) 2-3 cm wide;
- Scissors;
- A needle and thread to match the ribbon for the petals or thin copper wire (jewelry);
- Beads;
- Hot glue.
How to make a poinsettia from ribbons:
Step 1. Cut three pieces of equal length from the ribbon. How long should the segments be? It depends on what size flower you need. If you want to make a flower with a diameter of 12 cm, then the segments should be exactly this length.
Step 2. Give the resulting rectangles a diamond shape. You can do this in the following way: stack the pieces on top of each other, fold the stack in half, then give the resulting square a triangle shape by cutting off the excess on the sides. Voila, you've got diamonds!
Step 3. Pinch each diamond in the middle and tie the folds with thread (you can do a couple of stitches) or jewelry wire.
Step 4. Place all three pieces next to each other, then tie them with thread or jewelry wire to create a flower. Adjust the petals if necessary.

Step 5. Glue several stamen beads into the center of the flower.
Step 6. Now let's work on the leaves. Cut two lengths of 6-9 cm from the green ribbon (the length of the pieces should be approximately three times the width of your green ribbon). Place one of the rectangles on the table, wrong side up. Bend its right side downwards along the bias so that the workpiece takes on an L-shape (see photo). Now fold your letter G in half to create a house-shaped piece with a roof. Gather the bottom of the “house” with a couple of stitches or glue.

Step 7. Now the leaves can be glued/sewn to the back of the poinsettia, to a felt round base (if you have one) or directly to a decorative object (headband, pillow, etc.).
Master class 6. Lace ribbon flower
And finally, we present another express method for making a simple, but beautiful flower with your own hands. The principle of operation in this technique is similar to that described in MK No. 3, but instead of glue, a thread with a needle is used to fix the craft, and instead of a satin ribbon, a lace ribbon is used. However, you can use any other one. Lace flowers make wonderful brooches and hair clips.


What you will need:
- Lace ribbon;
- Scissors;
- Needle and thread to match the ribbon;
- Beads;
- Hot glue.
How to make a lace flower:
Step 1: Baste the tape along the bottom edge using wide stitches.

Step 2. Once you are done sewing, gather the ribbon by pulling the thread and bring the two ends together to complete the circle and create the first layer of petals.


Step 3. Glue a small circle of felt or other fabric into the center on the wrong side of the flower. Sew the necessary accessories to it, for example, a pin, to make a brooch.
Step 4. Glue beads, rhinestones, stones or other decor to the center.

If you want to continue your acquaintance with the art of making flowers from ribbons with your own hands, we offer you to watch the following step-by-step video instructions.
In this video, you will learn how to make kanzashi flowers from 2.5 cm ribbon.
This video shows a method for making a rose from a satin ribbon, which differs from our master class No. 1.
Here is another master class on making roses in shabby chic style.
1. KANZASHI FOR MODERN NEEDLEWORKERS. THE ART OF MAKING FLOWERS FROM RIBBONS
As we already talked about in the previous article about kanzashi , the technique of making delicate flowers from fabric originated in Japan about 500 years ago and was in great demand among geishas. Crafts in the form of individual buds, branches with flowers, bouquets and other original compositions adorned the popular at that time hairpins for intricate Japanese hairstyles.
But kanzashi flowers have not lost their popularity among modern women from different countries. Today our needlewomen also do exquisite flowers from pieces of satin ribbons in the form of individual buds, fancy compositions, roses with intricate petals.
In this material you will find video master classes and step by step lessons with photos for beginners, with the help of which you will quickly learn how to make sharp and round petals with your own hands, as well as whole flowers from satin ribbon.
Not always the first crafts created by beginners from pieces of ribbon , they immediately turn out beautiful and neat. In order to correctly connect the petals to each other and form a symmetrical flower or an even bud, you need to get a little used to your hand. But if you show patience and desire to create original craft kanzashi for an accessory that decorates a hairstyle, then be sure to learn how to make the most different compositions for hairpins , hairpins, elastic bands. And annoying flaws and defects can be easily hidden using thin braid, silk thread or beads.
Many experienced craftsmen who make flowers using the kanzashi technique often spend a long time examining the structure of a living flower. so that the created crafts correspond as closely as possible to the natural original. Perhaps you will also like to make beautiful women's hair accessories and this hobby will develop into an exciting hobby for many years. It remains to add that some famous fashion designers and interior designers often use kanzashi products to decorate their works.
2. WHAT TOOLS AND MATERIALS ARE FREQUENTLY USED FOR MAKING KANZASHI PETALS
√
Materials:
satin ribbon (or other types of fabric - satin, silk, organza, from which you can cut neat strips to create petals), pateika, beads, seed beads.
√
Tools:
sharp scissors, pencil and ruler (for marking), soldering iron (can replace candles), lighter, “Moment-gel” (or glue gun), long tweezers.
You can cut the tape into pieces using a soldering iron, placing an unnecessary cutting board under it. You can also use chopping scissors. We will use them to form the outline of the petal according to the markings;
Use transparent glue so that there are no stains left after joining the parts of the craft;
You can burn petals cut from ribbon using either a candle or a lighter;
We need tweezers to twist the petals to give them the desired shape at the time of heat treatment over the candles.
3. HOW TO MAKE A SPICY KANZASHI PETALE. INSTRUCTIONS AND MASTER CLASS FOR BEGINNERS
General principle Making a flower using this Japanese technique consists of the following: cut even pieces - petals - from satin ribbon or fabric. They must be twisted in a certain way and connected to each other in the form of a kanzashi flower. The petals can be sewn or glued to each other. Ready-made crafts must be attached to a hair clip or any other hair accessory.
There are 2 classic petal shapes for forming a kanzashi flower - sharp (narrow) and round.
How to properly roll narrow petals for a flower from pieces of ribbon?
cut equal squares of 6 by 6 cm from the tape (focus on the width of the tape). The more petals, the more voluminous it will be a flower collected from them ;
We form triangular-shaped modules from squares. To do this, use tweezers to roll an equilateral triangle. Fold from above, apply the right corner to the left corner, then fold the workpiece again. Align the fold lines;
We trim the edges of the workpiece, cutting off the ends with scissors. Now you need to take the triangle with tweezers and, holding the edges, quickly move it over the candle flame. This action will help melt and seal the edges;
Sharp kanzashi petals can be made from ribbon different ways. Let's look at 4 ways you can make beautiful one-color and two-color fabric flower petals :
Using this principle, we form each sharp petal for the flower.
4. HOW TO MAKE A ROUND KANZASHI PETA. INSTRUCTIONS AND MASTER CLASS WITH PHOTO FOR BEGINNERS
roll a square piece of tape into an equilateral triangle. In the middle we assemble the sides, towards the bottom corner;
Folds are formed on the sides and top. Now you need to pull the side corners back. The edges should be evenly folded. Carefully trim all the ends with scissors;
The edges must be burned and glued together, pressing with your fingers. On the back side add a drop of transparent glue;
Lesson with photos for beginners. With this MK you can make with your own hands several options for round petals using the kanzashi technique:
We form the required number of petals from the ribbon.
5. HOW TO COLLECT A KANZASHI FLOWER FROM SHARP AND ROUND PETALS
◘ How to do