Egg trays are one of the suitable materials for various DIY crafts. Egg boxes come in 3 types: cardboard, plastic and foam. Due to the convenience of work, standard cardboard trays are most often used for papier-mâché crafts: to create a variety of flowers, animals, and even to decorate rooms.
From foam and plastic trays create original crafts for the home, for example, lamps.
Papier-mâché from egg cartons
Depending on where and how the products will be used, use different instructions making homemade.
Homemade products for being outdoors or in a humid environment
Instruction #1
For the first homemade, you will need the following materials:
- Egg trays.
- Large pot of hot water.
- Mixer.
- Facade putty.
- PVA glue.
Stages of work:
- Tear the egg trays into pieces and place them in a saucepan.
- Pour the prepared trays with hot water, put on medium heat. Boil for 20-30 minutes.
- After the time has elapsed, remove the mass from the heat, cool and beat with a mixer (use a kitchen or construction mixer). A mushy mass should form.
- Put the mass back on the fire, cook it for another 10-15 minutes.
- Beat with a mixer a second time. After the second whipping, the mass will become more homogeneous.
- Leave it to cool down.
- When the mass becomes warm, about body temperature, squeeze it through cheesecloth, mosquito net or cloth.
- Dilute the PVA with water, in a ratio of 2: 1, then add the putty in small portions until the consistency of liquid sour cream is obtained.
- Add the squeezed mass from the egg trays to the putty.
- Knead the mass well so that it is homogeneous.
- After kneading, the mass of papier-mâché is ready for use. Use it for one hour, after this time it will become unusable.
Instruction #2
The recipe for this mass for papier-mâché is used to create crafts with smooth surface. Such a mass does not shrink, products from it are not afraid of moisture. and it can be used to create tableware and decorative items.
You will need:
- 3 egg trays for 3 dozen eggs.
- Flour 2 tbsp. spoons.
- Corn starch 2 tbsp. spoons.
- PVA glue 2 tbsp. spoons.
- Mineral oil 2 tbsp. spoons.
- Acrylic white paint.
- Glue "Bustilat" 2 tbsp. spoons.
Mass preparation:
- Put them in a saucepan, pour hot water and put on fire. Bring to a boil and keep on fire for another 5 minutes.
- Allow the mass to cool to room temperature.
- Squeeze out the mass, but not much, it must be wet, otherwise the blender will not be able to grind.
- Put in a blender and grind it.
- It is good to squeeze out the mass.
- Place mixture in a bowl and add dry ingredients.
- Mix liquid ingredients separately, pour them into the workpiece.
- Mix the mass well, first with a mixer, then with your hands. It should be smooth and pliable.
- If the mass is solid - add PVA glue, if too liquid - starch or flour.
Instruction #3
This recipe is easier to prepare and suitable for making various crafts with children.
You will need:
- Egg trays.
- PVA glue.
- Finished putty.
Mass production:
- Tear the trays into small pieces.
- Place them in a container, pour boiling water.
- Wait until the water cools down and drain it.
- Kill the resulting mass with a blender.
- Add PVA glue.
- Knead the mass well, it should turn out soft and elastic.
- Add 1 tbsp. a spoonful of finished putty. Mix well.
- When it is smooth and elastic, you can start making crafts.
Craft ideas from egg trays for home
Crafts from egg trays with your own hands can be varied: from an elementary fish to a garden gnome or a chandelier.
Frame of egg trays
You can make an original photo frame using flowers made from egg trays and cardboard as the basis of the product.
To create a frame you will need:
- Thick cardboard.
- Scissors.
- Egg trays - 20 cells.
- Glue ("Titanium" or glue gun).
- Dye.
- The photo.

Stages of work:
- Cut out a frame from cardboard, the width of which will be 5 cm.
- Take egg trays, cut them into cells.
- Trim the edges of the cell so that you get a smooth edge. Prepare 15 cells.
- Cut the prepared cells into 5 parts, leaving the middle intact.
- Round off the resulting edges of the blanks.
- Take 5 blanks and assemble a flower. To do the first blank like this: connect the edge of two opposite petals with glue, attach the next petal on top, glue the remaining two. Do the second layer like this: connect the middle of the blanks, glue the petals to the center of the core of the flower. All subsequent layers are glued slightly lower than the previous ones, creating the volume of the flower.
- Collect 3 flowers, cut rose leaves from the remaining cells.
- Paint the rose flowers, its leaves and frame.
- When the flowers dry, glue them to the corner of the frame. Add decorative details: beads, sequins or others, if required.
Christmas flower wreath made from egg containers
To create a Christmas wreath you will need:
- Plastic container for eggs.
- Foam blank for a wreath.
- Red berry beads.
- Green sisal.
- White beads for decor.
- Glue gun.
- Red ribbon.
- Scissors.

Stages of work:
- Make lots of flowers out of plastic egg containers. Do like this:
- Cut trays into cells.
- Trim the corners, a small glass should come out of the cell.
- Cut the sides of the prepared cell into 4 parts - these will be the flower petals.
- Round off the petals. For one flower you need 4 such blanks.
- For the core of the flower, take the prepared cell, cut its walls and cut out the bottom. Get a plastic band.
- Flower shaping: twist the plastic ribbon, glue its ends; glue blanks with 4 petals together; glue the core of the flower in the center of the blank of 4 petals. When the flower is ready, glue the bead inside the core.
- When all the flower blanks are ready, glue them onto the foam base, close the gaps between the flowers with sisal and decorate with red berries.
Attach a red ribbon to the base. And the wreath is ready.
Papier-mâché vase
Using papier-mâché from egg trays, you can create an extraordinary a beautiful craft- decorative vase
This will require the following materials:
- Papier-mache from egg trays.
- A bottle made of glass or plastic with smooth sides and a wide neck.
- Styrofoam 50 mm
- Scissors and stationery knife.
- PVA glue.
- Toilet paper.
- Dye.
- Marker.
- Scotch.
Video of a master class on making a vase from cardboard (base) and papier-mâché:
Manufacturing:
- Take a bottle, circle its contours on the foam. Come up with an interesting shape for the vase and draw the missing contours on the foam.
- Cut out additional parts from the foam, attach them to the bottle with tape.
- Cover the resulting structure with a mass of papier-mâché in one layer and let it dry.
- When the first layer dries, cover the bottom of the vase with papier-mâché and shape the neck. Correct the shortcomings that appeared after the first layer.
- Decorate the vase with papier-mâché moldings and paper threads from toilet paper.
- Create paper threads like this: unwind a piece of toilet paper, fold it in several layers and cut the piece into three parts so that you get three long strips of paper; then twist the paper into a thin flagellum.
- Attach paper thread decor to PVA glue.
Let the vase dry well and only after that you can cover it with paint and varnish.
Crafts for the garden
DIY egg tray crafts can decorate any garden. From them you can create decorative figures, garlands, a decorative lamp for a gazebo.
Decorative figure for the garden "Cat"
To create a decorative garden figure, prepare:
- A mass of papier-mâché from egg trays for street figures.
- Plastic bottle 2 l.
- Newspapers, paper.
- Wire.
- Scotch.
- Cardboard.
- Putty.
- White acrylic paint.
- Lids from plastic bottles.
- Paints of different colors.

Stages of work:
- We take a plastic bottle - this will be the body, we attach a wire to it, from which we form paws and a tail.
- We wrap the entire structure with newspapers or paper, giving volume, fixing everything with tape.
- From the narrow side of the bottle we form the cat's head, fix it with tape.
- We attach ears cut out of cardboard, eyes and a nose from bottle caps to the head.
- When the cat's body is formed, we cover it with a layer of papier-mâché, giving Special attention muzzle: on it you need to shape the eyes, nose and form the “cheeks” of the cat.
- Let the first coat dry, then apply the second and leave to dry.
- After complete drying, cover the cat with two layers of white paint. Let it dry and you can paint the cat in the intended color.
Cover the finished figure with wood varnish. When the varnish dries, place in your garden and enjoy the work done.
Garland of plastic egg trays
Do beautiful garland from plastic egg trays and decorate your garden or gazebo with it.
To create a garland you will need:
- LED garland on the solar battery or batteries.
- Plastic tray for eggs.
- Scissors.
- Glue gun or any universal glue.
- Awl.
To create a garland, you need to make flowers from plastic egg trays. You will need as many flowers as there are LEDs on a garland.
Flowers are made like this:
- Cells are cut out of the egg tray.
- Each cell needs to be “ennobled”, all sharp corners removed, leaving a neat “cup”. One flower will require 5 cells.
- On each of the 4 cells, we make 4 cuts to the center of the bowl - these are blanks for the petals. Round each of the petals - cut off sharp corners. From cell 5 we make a plastic tape - cut out the bottom, this will be the core of the flower.
- flower assembly: we twist the plastic tape into a spiral and fix it with glue; glue the remaining 4 blanks together with the middle and glue the core inside.
 Crafts from egg trays can become a real decoration of the home and add zest to the overall interior.
 When the flowers are finished and dry from the glue, you need to make holes with an awl through which the LED can pass. Insert the LEDs from the garland into the middle of the flower and fix them with a glue gun. When all the flowers are attached, the garland is ready.
She can decorate the veranda, trees or gazebo.
Wind chimes from egg trays
You can create original and unusual wind music from cardboard egg trays.
To create it you will need:
- The foundation. It can be an ordinary twig, an old hanger, or the bottom of a plastic bottle.
- Egg trays.
- threads. You can use twine, yarn of bright saturated colors.
- Paints of different colors.
- Shilo (as needed).
- Needle.
- Bells-balls on the collar.
- Scissors.

How to do:
- Cut out cells from egg containers. Trim all the corners and cut the walls of the cells to the middle - you get the petals.
- Trim the petals of the blanks so that they are pointed and the blank resembles tulips.
- Paint the flowers in different colors, when the paint dries, cover the flowers with varnish.
- If the wind chime base needs to be painted, color it.
- When the flower blanks are dry, use an awl to make holes in the middle of the flower.
- Cut the threads so that they are different lengths.
- Attach a bell to the end of the thread and use the needle to pull the thread through the flower.
- Fasten all threads based on wind music.
Pull a few threads attached to the base up so that you can attach it to a tree branch or hang it from an arbor.
Crafts with children for the garden, school
Even small children can create crafts from egg trays with their own hands, often they are asked to make such crafts for an exhibition in a kindergarten.
Panel with tulips from egg trays
It will be interesting to create such a panel for both mother and child.
Materials:
- Cardboard for the base.
- Paints, brushes and sponges.
- Scissors.
- Glue.
- Egg trays.
- Buttons in different colors.
- Decorative green cord (can be replaced with a chain of air loops).
- Satin ribbon.

How to do:
- Prepare the base of the panel: take the cardboard for the base and paint it with a sponge, so the paint will lay down on the base with a beautiful texture.
- Cut out the cells from the egg trays, cut off all the corners.
- Divide the walls of the cell into 4 parts, make each part sharp - you get tulip petals.
- Paint the flower blanks in different colors.
- Cut the cord into 5 equal parts, fasten them with tape and glue to the base.
- When the flowers are dry, glue them on top of the cord "stems" to create a voluminous bouquet of tulips.
Glue a button of a contrasting color in the middle of each tulip and your panel is ready.
Crocodile from egg trays
To create a crocodile you will need:
- 2 egg trays with 10 cells each.
- colored paper.
- Green paint.
- Glue.
- Cardboard tubes.
- Scissors.

How to do:
- Remove the top lids from the egg trays.
- One of the trays will be the body, the second needs to be cut into 4 and 6 cells - this will be the jaw of the crocodile.
- Glue 4 legs made of cardboard tubes to the body of the crocodile. Leg height 5-7 cm.
- Glue the jaws to the body: from 4 cells - the upper one, from 6 - the lower one.
- Color the crocodile green color, let it dry and glue on the eyes, eyebrows and tongue.
Crafts from egg trays can be completely original and impressive. In the manufacture of such items, a piece of the author's soul is invested in each of them, so they turn out to be interesting and able to please others with their individuality.
Article formatting: E. Chaikina
Useful video clip about crafts from egg trays
Video about wall decor using papier-mâché made from egg trays:
From such a seemingly nondescript waste material like egg trays, you can make very beautiful items. Having made one craft, you will stop throwing egg trays in the trash. The first thing you can try to do with children is tulips. By cutting the tray into cells, you will get an almost finished tulip, it remains to slightly correct its shape, color it and make a stem if necessary.
For coloring, it is better to use acrylic-based paints. Flowers without a stem decorate objects home interior, postcards, invitations, etc.

Roses from their trays
You can also make roses. How to make a craft rose from a tray with your own hands? The answer is very simple. To do this, you need to prepare:
- egg cartons;
- scissors;
- green corrugated paper;
- paints and a brush;
- glue or glue gun.


Step 1. Divide the tray into cells (cones) with scissors. Make four cuts on each piece. It turns out a blank of four petals. For one flower they need four.

Step 2. Open the cone and process the edges of the petals: give them a rounded shape, cutting off sharp corners. Do this with all preparations.

Step 3. On each part, make cuts towards the center, this will simplify the process of gluing the flower. Using a wooden stick or brush handle, you can twist the edges of each workpiece.

Step 4. Paint the blanks in any color you like. To add naturalness, the middle of the petals can be covered with paint in a lighter tone. Let the workpiece dry.

Step 5. Gently bend the tips of two opposite petals in half, glue them together, as if the bud is closed. Glue another pair of petals to this base.

Step 6. Do the same with the second and third blanks. And the fourth is cut into separate petals, glued to the resulting bud. The master class on crafting a rose from trays is completed.

With the resulting roses, you can decorate a ready-made photo frame or create your own. Centered on cardboard base rectangular shape you need to glue the photo, leaving a few centimeters around the edges. Empty edges are filled with flowers. Similarly, you can make a wreath on the door.


crafts with children
Paper egg cartons are great for crafts with kids. It is not a pity to throw them out if something suddenly does not work out. But this activity develops perseverance, stimulates creative imagination.

An interesting option for crafts with young children is a caterpillar (centipede). To make it, you need to cut a row of 5-6 cells from the tray, paint, decorate with ribbons, threads. Antennae and paws can be made from chenille wire. A little imagination, bright colors and the toy is ready.


For those who like to draw, you can make a box for crayons. If the cells are colored according to the colors of the crayons, you can kill two birds with one stone at the same time. There will be a place to store crayons, as well as the ability to sort them by color, while developing logical thinking in children.

The cell (cone) from the tray serves as the basis for creating various animals, birds and insects. Can make penguin, hare, whale, turtle, ladybug, chicken and much more that the imagination tells.


Everything ingenious is simple. A tray for a dozen eggs is a ready-made base for a ship. Install the mast, sail and go!

From the egg box, you can make original boxes for jewelry or needlework. The boxes are first covered with white acrylic paint inside and out. Then they can be painted, covered with decoupage napkins.

papier mache crafts
Many use trays to create papier-mâché crafts. The boxes are crushed, soaked with water, mixed with glue (PVA, wallpaper, paste). It turns out an excellent mass for modeling. Having collected a large number of trays, you can make a figure for the garden, etc.


On the Internet you can find a large number of photos of crafts from egg trays. They can be used as:

- feeders;
- a bouquet of flowers;
- containers for growing seedlings;
- boxes and much more.

You'll never want to throw your egg cartons in the trash again. They can and should be used for creativity. Create beauty with your own hands!

Photo of crafts from egg trays


Recipe number 1 cooking mass for papier-mâché
To prepare the mass according to this method, we can use not only different types of paper, but also cardboard scraps and so on. We also need finely sifted ash, preferably from a strong tree, and flour paste. From these components, the mass for papier-mâché is prepared as follows:
1. Paper leftovers are torn into small pieces, and then thrown into a pot filled with water and the paper is allowed to soak. If this mixture is often stirred, the process will go faster.
2. The mass of paper that has softened is removed, and then the excess water is slightly squeezed out, laid out in a plate or mortar and rubbed properly. Next, put the mass in a linen tight bag and squeeze out all the remaining water.
3. The resulting lump is dried in an oven or in the sun, and after it has dried, rub it on a grater so that the paper flakes feel like cotton to the touch.
4. The mass rubbed in this way is mixed on a board with ordinary flour paste using a wooden spatula to a thick dough.
5. Then the lump, which we filled with flour paste, is rolled out on the board with a rolling pin and laid out so that it resembles a wreath.
6. Finely sifted ash is poured into the hole, in the middle, and then little by little water is poured over it with cool water and stirred until the ash is completely saturated with this water. Then the "paper wreath" and the ashes are mixed and thoroughly stirred.
7. We put the mass that we have obtained in a mortar or saucepan and mix thoroughly, after which the desired mixture for papier-mâché is obtained, which can be used immediately.
Recipe number 2 cooking mass for papier-mâché
1. To begin with, we take four kilograms of fabric scraps and soak them for several days in water, and then boil for three hours in the same water.
2. We transfer the mass into several different containers and turn it into a liquid, smooth slurry using a whorl processing.
3. We pour the gruel from small containers into a large one, and then add three kilograms of burnt, finely crushed magnesia, as well as three kilograms of flour (rye), one kilogram of quicklime, finely crushed lime and at least fourteen liters of hot starch paste. All this as it should, mix and leave for a couple of days.
4. After the mass has stood, drain the remaining water and again let the mixture stand for the same amount of time - this will make it even thicker.
5. When the mass is at the right time, it can be pressed into molds, and the objects finished after drying are processed on a lathe, sandpaper or glass paper, a file or just a knife.
6. To give the product greater strength, you can immerse it in boiling oil, and after it dries, polish it with pumice powder and varnish it.
RecipeNo. 3 pulp for papier-mâchéwith the addition of starch and wood glue
To prepare pulp for papier-mâché at home, paper is used, which, after getting wet, can be easily ground into a homogeneous mass - these are newspapers, toilet paper, paper towels.
Prepare: a mixer, newspapers, a bowl, PVA glue, glue consisting of starch and wood glue (it makes the product durable), a sieve or gauze in several layers (linen bag).
1. Tear the newspaper into small pieces about 1-2 centimeters.
2. Put the paper into the mixer, cover with water and mix, constantly adding pieces of newspaper. If there is no mixer, then pieces of paper can be poured with hot water (water should only cover the paper), after a few hours the paper will soften and it can be rubbed to obtain a homogeneous mass.
3. Transfer the resulting paper mass to a sieve or gauze to make water glass, then transfer to a bowl. At this point, you need to add a tablespoon of starch glue and a tablespoon of wood glue. Mix everything well until a homogeneous mass is obtained.
4. If the mixture is not sticky, then you can add a little more glue, but do not overdo it so that the mass does not crack much. For greater strength of the product, you can add wood sawdust.
Recipe number 4 with the addition of wallpaper glue and PVA glue
The recipe for paper pulp for papier-mâché is the same as in the recipe above, only instead of starch paste and wood glue, add a tablespoon of wallpaper paste and a tablespoon of PVA glue. You need to look at the mass, if there is little stickiness, then you can add more glue than a tablespoon.
Recipe number 5 with the addition of chalk, starch paste and wood glue
Pour boiling water over pieces of paper and leave for a day, boil until the fibers dissolve, wring out and loosen the resulting paper mass. Then add chalk and mix everything thoroughly. Add starch paste and wood glue to the pulp, stir to get the consistency of batter. Such a mass is poured into molds or applied in layers.
Recipe number 6 from egg trays
Grind the egg trays, pour boiling water over them and leave for a day. Transfer the resulting pulp to a mixer and beat. Wring out well and add two parts of wallpaper glue and one part of PVA glue.
Also, gypsum, clay, sawdust can be added to the paper pulp.
Video tutorial on cooking pulp for papier-mâché
Crafts from egg trays are a versatile way to spend a creative evening without the hassle of finding special clay. Such common objects allow you to create something of that kind at any time of the arrival of the muse and please your family.
original bottle
An elementary example of the use of egg trays is the decoration of a glass bottle. Often they choose wine containers, since the glass there is quite durable and already has a certain original shape.
To create papier-mâché from egg trays, you will need:
- several clean egg trays (depending on the volume of the bottle);
- high quality, not watery;
- good (fresh) acrylic paint;
- not very thick gouache;
- aerosol varnish;
- durable rubber gloves;
- clean dried bottle.
Cooking mass
Prepared egg trays must be torn into small pieces and pour completely with boiling water. They should be left to soak for 8-10 hours, then the mass will become perfectly obedient. After the time has elapsed, the pieces of paper must be carefully wrung out and folded into a high container. After the needlewoman should arm herself with rubber gloves and start kneading papier mache from egg trays.
The first step is to add PVA to the container with the workpiece. There should be a little glue so that the mixture remains thick. It is necessary to knead papier-mâché slowly and constantly, in circular motions. As a result, the mass should be thick and dense.
The process of making crafts from egg trays

The algorithm of actions is simple:
- it is necessary to lay out the mass in parts on the prepared dry bottle, gradually giving the container the intended shape;
- after the design, it is necessary to allow it to dry completely so that the laid out pattern adheres firmly to the glass and does not exfoliate during painting;
- after complete drying, papier-mâché can be painted white, creating a “canvas” for further decoration;
- after the acrylic base has dried, you can safely proceed to coloring;
- when the gouache dries, the product must be allowed to stand for a couple of hours, after which everything should be varnished.
Papier-mâché from magazines and trays
There is also an option how to make a mass of papier-mâché based on egg trays and This technique is more common in England. The material preparation process does not require long-term soaking, labor-intensive kneading, and, moreover, it advantageously eliminates littered publications.
To make a mass of papier-mâché, you will need:
- 10-12 clean egg trays;
- 1-2 medium glossy editions (not thicker than 50 pages);
- packaging (based on cellulose).

Mass preparation process

And what crafts from an egg tray can be made at home without any specific skills? The most common use of old trays is in the production of violets and bluebells. The edges of the trays fit perfectly along the contour, because they resemble flower petals. To create violets, you need to select undamaged cells, cut each one along its edges and color it in suitable color- purple or blue. Further, the heads of "egg" flowers can be fixed on a shiny thread and thus create a garland.
Beautiful wreath
Crafts from egg trays are a common option for creative activities with first graders. For the celebration of March 8, you can safely invite the children to create a wreath of daisies made from egg trays. To create such an attribute, you will need:
- 6-8 pieces of egg trays (for 10 eggs);
- decorative rope (you can paint any harness in green paint);
- pins for decor.
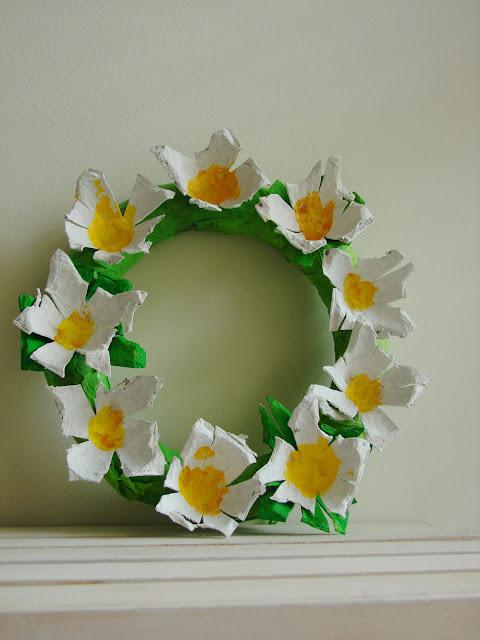
Making a wreath:
- The racks of egg trays that separate the cells must be slowly cut out of the total composition and cut neatly along the edge, leaving the base intact. Next, the blanks must be painted in a snow-white color, so that the flower eventually resembles Racks, after the paint dries, they are put on top of each other and fixed with glue. In the grooves between the petals, it is necessary to glue even strips of a green tourniquet - they will create volume and give the wreath spring freshness. From the remaining egg cells, you need to create smaller daisies. Each cell must be cut into petals, painted white.
- From pieces of trays, you need to create yellow heads of daisies and attach them to the petals using decorative pins. Next, dry flowers are glued to the wreath, combining them with green leaves.
Conclusion
Now you know how to make crafts from egg trays. The papier-mâché mass recipes are quite simple, it remains only to try to build something original from a banal egg tray. We hope that the information was useful to you.
Ekaterina Kalugina
To work in papier technique-mache we use egg cartons, water, PVA glue. How to prepare a mass for crafts is described in detail in the previous entry. blog: http://www.html

Basis for mushroom a 1.5-liter plastic bottle served, for stability, you can fill it with alabaster, something heavy, we only had water at hand, poured a little water into the bottle for stability. An oval was cut out of cardboard - the basis for a hat mushroom, attached under the cap of the bottle. A crumpled newspaper was placed on a cardboard base, shaping the future hat, glued with tape, any glue. We form a leg with newspapers and adhesive tape mushroom.

Then the longest process in creation: coating with the finished mass of everything mushroom. After the first layer, let it dry, then apply a layer of mass again papier mache, adjusting the shape of the stem and cap, reaching the desired shape. After the last layer and drying, glue the product with newspaper, napkins or toilet paper, dipping in PVA glue diluted with water (we do this to level the surface of the product, you can do this in several layers, letting each dry. Then we prime the product, we usually do this with simple white gouache.

The next stage of work is the most interesting, in our opinion, - coloring the product. It all depends on your desire and imagination. We were painting gouache mushroom: the top of the cap is brown, the bottom of the cap is yellowish, the leg is black-gray specks on white.

The last step is varnishing. After drying mushroom ready. Now lives in kindergarten, waiting for his exit to the matinee.

Related publications:
To work in the papier-mâché technique, we use egg cartons, water, and PVA glue. Finely tear the cardboard cassettes from under the eggs and.
Hello dear guests of my page! I bring to your attention a master class on making mushrooms using the papier-mâché technique.
Papier mache "Mushrooms for the plot"Free activities for children in senior group"Bee". To complete this work, we need: Newspaper, white.
As the wonderful approaches New Year's celebration, the children and I decided to make a New Year's plate using papier-mâché technique. Purpose: Formation.
Before the New Year, my group and I took part in the regional review - the contest "The Best Christmas tree decoration for the Christmas tree in Vorontsovsky Park. "(Yes.
Master Class. Co-creation of a teacher with children. "Papier-mâché Monkey". My children and I participate in the city competition every year.
The material is designed for music directors and teachers of preschool educational institutions. Purpose: making an attribute, for holding a surprise moment.