In kindergartens, with the onset of autumn, active work- teachers, together with children, actively use natural materials in classes. After all, you don’t need to purchase it - everything can be collected in the nearest park during a walk or even in your own garden.
Parents are also invited to show their imagination by making “Gifts of Autumn” crafts for kindergarten with their own hands, together with their child. Watching mom or dad create miracles from the most ordinary vegetables or fruits, the baby will also want to take part in this. Such activities increase perseverance, develop imagination and simply lift the spirits of participants in the creative process.
Ideas for autumn crafts “Gifts of Autumn” for kindergarten
Every year in kindergarten, starting from junior group, an exhibition-competition “Gifts of Autumn” is held. To participate, you only need a desire and a few available materials, which are often used as plant seeds, chestnuts, and cones:
- The youngest participants in the autumn crafts competition “Gifts of Autumn”, which they will carry to kindergarten, you can offer easy work. By placing an ordinary chestnut in front of your baby, you can invite him to dream up and imagine it in the form of some kind of animal. Using plasticine, which is often used to hold together the parts of crafts, it is easy to make a funny spider.
- But not only chestnut kernels can be used to make crafts. Its peel with needles is also suitable for this purpose. They will make an excellent hedgehog, which can be decorated with rowan berries and leaves.
- The chestnut theme is inexhaustible. From ordinary fruits lying under your feet, you can create a whole zoo. And for this you only need to take toothpicks and bright plasticine.
- And if with reverse side Glue a piece of yellow felt to the chestnut and an acorn to it, and you will get a very plausible moss mushroom.
- Little beauty creators will love working with paints. With their help, you can paint acorns in bright colors and fill a transparent container with them - such an unusual work will undoubtedly attract attention.
- It is easy to make people and animals from acorns collected in green form using toothpicks.
- if you have walnuts, chestnuts, acorns and pieces of moss, you can invite your child to make a decorative wreath for the front door of the group - it looks unusual and elegant.
- Don't forget about vegetables. With their help, stunning crafts are created for the garden for the “Gifts of Autumn” exhibition, and if you do them step by step, then even a child will not have any difficulty in the work. For example, ordinary potatoes can be an excellent starting material for various people. Thanks to its round or oval shape, the craftsman already has a blank of the desired shape. All that remains is to think of the scenery.
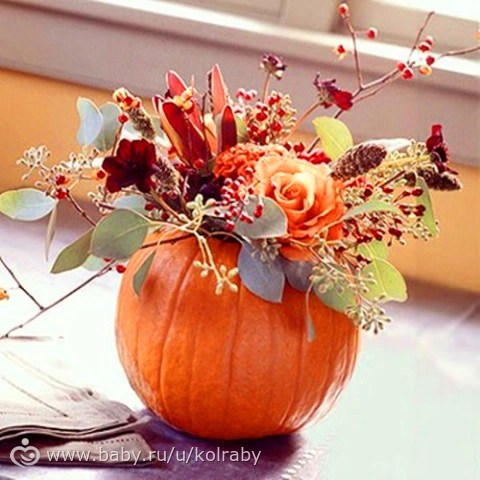
- On personal plot In addition to edible pumpkin, types of pumpkin are grown that are specially designed by nature for creating crafts. Some of them are very tiny in size and have a variety of bright colors. Taking advantage of this gift from nature, you can create a cheerful pumpkin family.
- With the help of plasticine and seeds you will get an excellent hedgehog. By planting it in a clearing of grass and moss and decorating it with mushrooms and acorns, we will get a realistic mushroom clearing.
- Round, red-sided apples are always associated with a cheerful caterpillar. In order for such a craft to look original and not hackneyed, you should complement it unusual decor- beads, feathers and flowers.
- Little children will be delighted that from a simple pine cone, a couple of leaves and a piece of plasticine they can make a beautiful swan.
- The pine cones make funny animals, such as squirrels. If there are pieces of chenille (fluffy) wire in the house, then it can be used as legs and a tail, and a pine cone will serve as the body.
- In the area where walnuts grow, you should not throw away their shells, because they are an excellent natural material. By painting them “mushroom-like” and planting them on wooden legs made from twigs, we get a whole mushroom meadow.
- And if you paint the nuts in different colors using gouache and place them in a basket of leaves, it will become an original decoration.


Sharing with your finds. All or almost all of us have to do crafts with children for kindergarten or school... You will also find fantasies here For home creativity
with kids.
Let's start with the trees...


And now - pumpkins...


You don't have to do everything for a specific master class... And strictly adhere to the proposed topic. Can just take a craft idea and remake it in your own way.
Fantasies about candles...


Accessories of the “Queen of Autumn”…


Papier-mâché... And not only...


Well I didn’t put the owls first again. They are always the first and most important for us...


There are, in addition to owls, other living creatures…


And again - improvised material. Not only the one found in the forest... But also the “home” one... For example, pistachio shells...


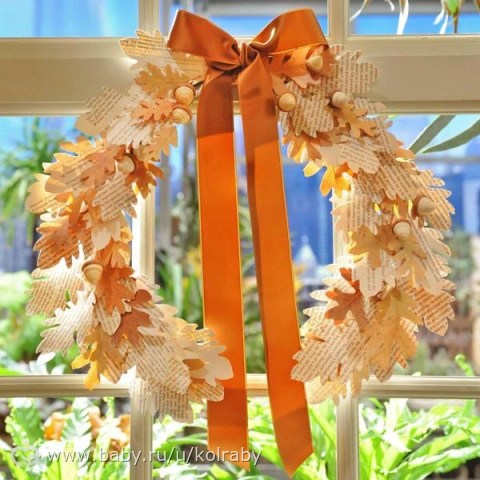
AND door (wall) wreaths... good not only for New Year and Christmas... In autumn they especially cozy and bright it turns out...


And again pumpkins... Some people have a lot of them in their dachas! I’m not a dacha lover (no, no): my mother just hands me buckets of vegetables. But my godmother gave me a pumpkin last year. Ahhhh... Maybe I'm Cinderella?


If you don't understand how cover with leaves or dough bowl from below, to get such beauty, watch the master classes...


Many people make baskets now. A very popular craft. On this topic "Gifts of Autumn"... Well, the baskets really turn out very colorful and juicy...


And again leaves... And again owls... And a lot of art...


In our kindergarten, Alice’s group is very talented, kind and hardworking teachers- Olga Grigorievna and Anna Sergeevna. They love children. And they adore them make all sorts of things V educational process...Or draw...


Us crafts for children in kindergarten teachers left on a large panel- attached to paper clips that hang on fishing lines... Now I’ll find a post in a magazine when we made such a panel (with owls, of course) for crafts...


Some parents ignore creative activities... They say that paints are a lot of dirt and stains - you can only get by with pencils or felt-tip pens... And all that comes out is a mess... But the child, they say, doesn’t understand the plasticine - he rejects it... Start small- just give the child the materials. A couple of lessons... Then again... And then start gradually advise and help... To encourage creativity, to create... I also don’t really like dolls and LEGOs covered with plasticine... But accuracy, diligence and imagination... they won’t come from anywhere from a child if you don’t work. Daily.


Of course, there is always not enough time. Of course, there is a lot of work and household chores. But the child is delighted what's his autumn work It is also on display in kindergarten or school. This - a source of pride yourself and your family...


Maybe this year... Maybe next... Your work will be recognized as the best at the exhibition. Even a prize. It will be a wonderful day. In the meantime, let family evenings warm autumn candles, and on the shelves there are photo frames decorated with leaves or acorns...
By the way, my friend and I once made of papier-mâché just made giant mushrooms... All the children made them as tall as a palm... And here we have... Giants. Mutants...)))


Who hasn't read mine yet? 100 ideas for autumn, be sure to read. And apply - partially...
We a lot of things have already been used and done with Alisa and Shura- I’ll tell you in other posts...
And I’ll show you not today or tomorrow... autumn video...And pictures. According to last fall. Ours is so beautiful There was a family shoot. It’s just so complicated for a video combination of video and photo...So I'm waiting for Shura will finish installation. For now he has a lot of work to do.
P.S. Yes, I show you very few personal and family photos. Otherwise you will get tired of me...


Children love to do something creative, they just need to be shown what can be made from certain materials.
Here you will find many interesting crafts made from colored paper or natural materials that you can make with your children.
All crafts are not at all complicated and making them will be a pleasure.
Crafts for kindergartens: coloring pebbles
If you have collected stones at sea, you should not throw them away. Arm yourself with acrylic paints or gouache and start painting them.
Such pebbles can be found in many places, then brought home or to the kindergarten and painted in all the colors of the rainbow. You can also draw different characters - the possibilities are endless.


DIY crafts for kindergarten from plastic caps
If you have plastic bottles lying around, don't throw them away. You can make a huge number of crafts from them.

Moreover, crafts can be made not only from bottles, but from their caps. Like these ones interesting crafts can be done with children. Arm yourself with colored paper, colored cardboard, glue and various decorations.


Autumn crafts from pine cones for kindergarten
Cones are a natural material from which you can make many interesting crafts.

You can connect several cones, for example. This can be done in several ways: using thread, wire or elastic; using glue or simply placing the pine cones on a stick.
There are many other natural materials that can be attached to the pine cones, such as various branches, acorns and grains.
If the buds are hard, you can soak them in water and after a couple of days they will become soft, which will make it easier for you to cut and pierce them (with an awl or nail).

Opened cones can be used to make the body of a camel or turkey, and closed ones can be used for limbs (legs, arms).
* First, you can make a bird - this is perhaps the simplest craft from pine cones.

* The “camel”, “deer” or “swan” craft will be a little more difficult. You will need to make a neck - use caps of acorns, which should be strung on bent wire. The head consists of an acorn.

* Also try making a forest tree with your children. It is made using green and ripe pine cones. Use wire to attach the arms and legs.

Attach the forest man's head to the body using glue.
Use the needles to make the whiskers, and use the scales from the pine cone to create the eyes.
What craft to make for kindergarten: “Apple”
You can make an incredible amount of colored paper bright crafts together with the children. One of them - volumetric craft"apple".

Children will do this simple work with great interest.
For it you will need: colored paper, glue, cardboard (colored cardboard).
Prepare a template and cut out a certain number of parts according to it.


Start gluing all the pieces together.
Glue the blank onto some kind of rod (ice cream stick).


Make a ponytail by cutting out an additional piece from paper.


Crafts for children in kindergarten: “Cloud and bright rain”
This craft also uses colored paper and glue.

You will need:
Colored paper
Scissors
1. First, cut out the outline of a cloud from white or blue paper.
2. Follow the pictures to understand how to make a raindrop.

3. By putting everything together, the baby will get a very beautiful picture.


Paper crafts in kindergarten: "Autumn leaves"
From colored paper you can make very beautiful leaves that take on the rich colors of autumn.

Look at the pictures to see how you can make these leaves. The craft is actually quite simple and kids will love working on it.


Autumn crafts for kindergarten: "Mushrooms - fly agarics"
You can make these beautiful mushrooms from old egg packaging. Although fly agarics are poisonous mushrooms, they can boast of a very beautiful color, which you will convey in your crafts.


Crafts for the kindergarten area: "Bull"
But what a beautiful bull can be made from an old one plastic bottle or container.

You will need:
2 cardboard toilet paper cylinders
Plastic bottle (not rounded)
Follow the photo instructions to make a beautiful animal.


Crafts for kindergarten (photo): “Sheep”
If you don’t mind cotton swabs, then you can make such a beautiful and fluffy sheep with your children.

You will need:
White cardboard
Cotton buds
Scissors
Clothespins
Black marker
Pink marker
1. Prepare a sheet of cardboard and cut out two elliptical shapes from it - one part will serve as the body, and the other as the head. Temporarily set aside the part for the torso.
2. Prepare cotton buds and cut off the tops of them about 1.5 cm long.
3. Start gluing these tops to the body.


4. Take two cotton tops and glue them on both sides of the sheep's head. For bangs, you can glue 3 cotton swab tips on top.
5. Draw eyes with a marker. You can also add some color part.


6. Prepare the ribbon and make a bow out of it. This bow needs to be attached to the sheep’s head.
7. Now glue the sheep's head to the body.
8. Take the body of the sheep and attach clothespins to it - they will act as legs. If necessary, you can apply glue to these clothespins.

Crafts on the theme "Autumn": "Spider"
You can make something like this from natural materials beautiful craft. Using autumn leaves, chestnuts and thread, try making a spider on a web with your children.

From the image you can understand how to do this. The craft is quite simple, but very interesting and original.


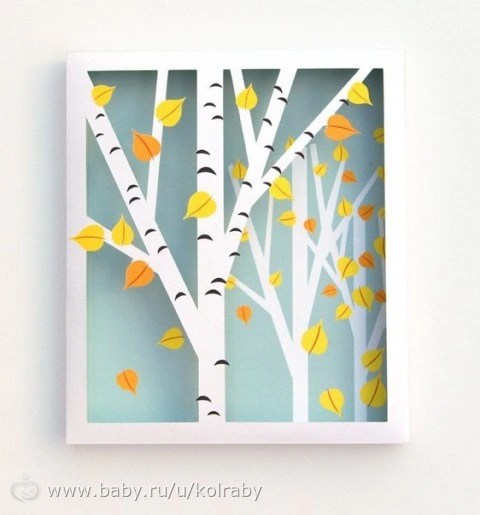
DIY autumn crafts: "Tree made of leaves"

You will need:
Leaves (red, yellow, green)
*you can choose leaves of different shapes
* do not choose leaves that are too dry
Several thin branches and one thicker branch
* a large branch may be of an unusual shape, with knots
Rowan (if desired)
Glue gun or superglue
The Autumn Festival is not just a crafts competition. This is a holiday of gratitude. Traditionally, at the beginning of autumn, peasants thanked nature for fertility and tried to do everything possible to next year was generous and abundant. And the work in the field was ending and it was finally possible to have a feast on the mountain and enjoy the results of hard daily work.
A lot has changed since then. There are more city dwellers than rural residents. But if you still have something to say “thank you” to the past summer, Say goodbye to summer and make fun crafts for the autumn holiday.
Decorating the autumn holiday with crafts
Garlands of autumn leaves
If your holiday takes place within the walls kindergarten or junior school, you can let autumn into the corridors and offices and bring in whole heaps of leaves.
Together with your children, make as many garlands as possible from fallen leaves. All you need is a catch from an autumn walk, needles and a strong thread. Alternatively, the leaves can be hung on clothespins.
Children love stringing and are able to cope with this craft for the autumn holiday completely independently. If the garlands are vertical, teach your kids how to make fastenings and hang a heavier bead on the end of the thread so that the garlands are less tangled.
Small garlands can be hung from a hoop (or made into an openwork “dream catcher” using the same hoop), or wrapped around poles or tree trunks.


Forest kings
Wonderful crafts for the autumn holiday - crowns and masks made of leaves. To make a mask, cut out a cardboard base and cover it with leaves, as shown in the master class.
The cardboard base of the crown can be decorated with leaves using a stapler - this is even easier.


Royal food
All participants of the autumn festival - both small and large - will be grateful to you if there is something edible among your crafts. Make caramel apples, “Thrifty Bear” cookies or cute “fly agaric” sandwiches. Most importantly, don’t forget to take pictures of the crafts before you show them to your little friends.


Autumn holiday crafts for exhibition
For the exhibition, dedicated to the holiday autumn, you can make a whole menagerie from natural materials: “cranks” from opened chestnuts, owls and hummingbirds from fir cones, a turtle with a shell surprisingly similar to the real one.
The collection of crafts will be complemented by people made from acorns or tree cuts and tiny boats made from shells - you can put a small toy in them and give it a paddle.


You should not perceive the message that you need to bring a craft made together with your child to kindergarten as another “strain” in life. At the first moment, such a thought may run through the parents’ ever-preoccupied head, but it won’t linger for long, that’s for sure.
Especially when you go online and look at what crafts you can make from the generous gifts of autumn. This is a whole fascinating world, you will definitely want to do something with your own hands together with your baby, and it will definitely be more than one craft.
This is a very correct tradition, organizing exhibitions of crafts in kindergarten on the theme of autumn with your own hands, going back to Soviet times. Psychologists have repeatedly noted the importance of this event and the active participation of parents and children in it.
We begin this most interesting work by preparing material for creativity. And where can you collect it in the fall, of course, on a walk! Together with mom and dad, on a day off, the child goes on a completely adult task, collecting the gifts of autumn.
A walk can be through the forest, or through a city park, or you can also take a walk on your property or dacha; everywhere will be incredibly interesting for both you and your child.
We definitely take bags for this important and pleasant event, because you will probably want to take as many natural gifts as possible and bring them into your home.

Don’t be afraid to add too much, from the remnants of the collected materials you can make something for yourself, this composition will delight your eye and warm your soul for a long time. If we briefly list what you need to collect for DIY crafts for kindergarten on the theme of autumn (photos), it will be something like this:
- leaves are bright, beautiful, fancy, of various sizes and colors;
- small pebbles, also of different sizes and colors;
- cones, acorns, chestnuts, nuts;
- several tree branches of different thicknesses and shapes;
- twigs of shrubs, such as boxwood, gooseberries, currants;
- Collect branches of coniferous plants and thuja in a separate bunch;
- moss, several plates;
- bird feathers, there will probably be a sufficient number of them in a wide variety.
You can significantly supplement this short list with attractive specimens that you like.
In addition, if you decide to make crafts for the kindergarten on the theme of autumn with your own hands from vegetables, then you should collect a small amount of them:
- apples, pears, quince;
- fruits of viburnum and chokeberry (not forgetting about the leaves), picking them along with the twigs.
- pumpkin and zucchini are also an excellent material for crafts, especially small ones and fancy shapes;
- cauliflower and broccoli;
- carrot.
You can also stock up seeds of various plants in advance; you already have some at home.

In addition, we prepare the materials at hand:
- a piece of cardboard from which you can then cut out the size you need;
- a couple of leaves of thick paper, maybe colored;
- braid of the thickness you need;
- threads;
- needle;
- scissors;
- PVA glue;
- cardboard box lid (where you can place the composition);
- pencils, felt-tip pens, paints with a brush.
We have provided the most basic set of tools; you can add or exclude something that does not correspond to your idea. Such basic lists are necessary for those who first decided to engage in such exciting creativity.

Crafts for kindergarten from natural materials
Surely, when you were walking with your child and discussing the topic of do-it-yourself autumn-themed kindergarten crafts (photo), you came up with more than one great idea. However, you can still use our advice, or take some details from the described process.
Composition with chestnuts
We put pieces of moss into a small cardboard box lid, or cover the bottom with beautiful leaves.
We carefully string large leaves onto wires and display them on the back wall of the composition. Decorate a wall of leaves by adding dried autumn flower or a sprig of viburnum.
We make a Cheburashka figurine from chestnuts, for which we string them one by one on toothpicks.

On one of the chestnuts from below we draw the face of a Cheburashka, having first covered the surface with white paint.
We assemble the entire structure of the figurine, as shown in the photo.
In the same way, we construct a figurine of a cat and dumbbells, placing everything on the existing improvised platform. You can start working on crafts for kindergarten on the theme of autumn from natural material do it yourself more creatively and add something of your own.
Chestnut caterpillar
We prepare a stand for our craft, it can be just a piece of cardboard. Cover the stand with leaves.
We pierce the chestnuts one by one with wire, the length corresponding to the intended length of the caterpillar.
We lay our stylized caterpillar on the leaves, giving its body some bend characteristic of movement.

We decorate the caterpillar with multi-colored plasticine rings, placing them between the chestnuts.
On the first largest chestnut we depict the eyes, nose and mouth of the caterpillar using plasticine.
We stick bright horns on top, also made of toothpicks and plasticine.
Hedgehog made of plasticine and sticks
On the surface for the craft we lay out a randomly original autumn still life of leaves, thuja twigs, viburnum berries or rowan berries. The red color of these berries will add a special flavor to the autumn motif depicted on the surface.
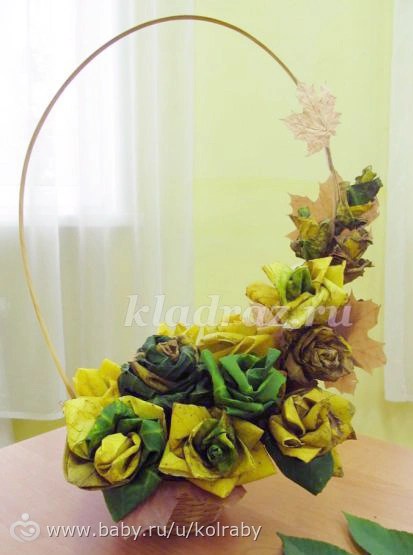
We make roses from large leaves. To do this, we simply bend them in half and roll them into a tube characteristic of a rose. We secure the structure by making a stitch at the bottom with a needle and thread.

Having prepared a stylized fragment autumn forest, let's start making the hedgehog itself, for which we sculpt it from plasticine.
Leaving the hedgehog's face untouched, we pierce the entire body with thin twigs; you can use toothpicks or matches, but with twigs it turns out more realistic.
You can place a small apple on the needles, real or made with your own hands, and you can also replace the apple with a mushroom, grape, or just a leaf, as you like.
Fragment of an autumn forest with inhabitants
On a cardboard for a DIY garden craft on the theme of autumn (photos) made from leaves, we lay out the autumn soil, as in the previous descriptions. You can create the composition simply on a blank sheet of paper.
We select beautiful leaves from various trees, place each leaf on a wire, which we wrap in brown plasticine, stylizing the tree itself.
On the prepared base, we randomly lay out the bases of the trees made of plasticine, into which we insert the trees. So it turned out to be an autumn forest easily and simply.

Now the most interesting thing is that from pine cones of various sizes and configurations, as well as multi-colored plasticine, we sculpt a variety of bizarre and bright characters of fairy-tale forest animals.
Your child’s delight will know no bounds, because modern children so lack communication with mom and dad, so for them this joint creativity will be a real holiday.
Vegetable crafts
If you don’t have enough time for a walk collecting gifts of nature, you can do crafts for the kindergarten at autumn theme from fruits and vegetables. There is also a large field for the application of your creative potential with your child.
Forest pumpkin hut
We depict a forest clearing using vegetables on a surface for a garden craft on the theme of autumn with our own hands (photos). To do this, we show our imagination, lay out moss, leaves, add flowers for brightness.
We sculpt one or two hedgehogs from plasticine and seeds, choosing a place for them in the foreground of the composition.

We place a figurine of a forest scarecrow, made of carrots and parsley, a little to the side; making it, like the whole composition, is very simple and quick.
We place a pumpkin in the center of the composition, having previously carried out some preparation. On the pumpkin, first make a cut on the side surface, then sharp knife a window is cut out.
We cover our forest hut on top with a bunch of straw, as shown in the photo.
Fruit bowl
Pumpkin is the most popular vegetable when making autumn crafts, it is a pleasure to work with it, and there is room for your imagination to run wild. It’s simply a fairy tale to see what masterly carriages you can create using it, but we offer the simplest crafts for the busiest parents.
We will make a vase in the shape of a chicken, for which we first peel and seed the pumpkin, and then make artistic cuts. We cut with a slight asymmetry on one side, the height of which should be less.

We don’t throw away the trimmings, they will make a tail for a chicken. Photos of our DIY vegetable craft for the garden on the theme of autumn are provided.
We fill our vase with various available fruits, preferably grapes and some berries.
Place a beautiful one on a small tray colored napkin and place the pumpkin with fruit, laying it on its side, long side down.
Stick in pumpkin scraps to create a beautiful tail.
On the short upper side of the pumpkin we attach a small white radish, peeled from the stems.
We stylize the radish as a chicken head with a scallop.
Place fruit on the remaining surface of the tray and our composition is ready.
Lamb with a bouquet of carrots
This is also an incredibly simple but very effective craft; you will need two heads of cauliflower, several carrots, and a pepper.
We cut four stems from one carrot, stick long toothpicks into each, and place the carrot pieces on a stand ready to go.
On other carrots we make longitudinal notches in four places. Then cut part of the prepared carrots, up to about half, crosswise.

We string carrot circles onto long toothpicks to create stylized flowers. We stick the other end of the toothpick of each flower into the remaining part of the carrot, we have a vase of flowers.
Having prepared a stand for the lamb, crafts from vegetables for the garden on the theme of autumn with your own hands (photo), we proceed to its implementation. First, cut off the stalks of cauliflower heads.
We place the largest and, preferably, slightly oblong head of cabbage on toothpicks in carrots. Next, we connect the second head of cabbage to the first using toothpicks.
At the junction we strengthen the pepper of any color and decorate the eyes in any way. Two reinforced leaves will serve as our ears.
Cheburashka from potatoes
You can also submit just a cute Cheburashka for the competition; it’s very simple to do, but the result is a rather touching craft.
Take two of the largest potatoes of any color and make a cut on one side.
From another large potato we cut the head and ears, and connect everything with toothpicks. On one side of the head we make a muzzle by inserting buttons and a bead.

We make the mouth from potato scraps.
We cut two small potatoes into two unequal parts, these will be the “handles” and “legs” of the Cheburashka, attach them to the body with toothpicks.
On one side we attach a bouquet of flowers, it’s just a miracle, what a cute creature!
Zucchini and carrot machine
You choose the size of the machine yourself, depending on the size of this vegetable you have. By the way, you can make such a machine from zucchini.
We start with carrots, cut them into four wheels and the rear design of the car.
We secure the wheels with long nails with caps. We carve the rear wheel to decorate the car.

From another fruit we cut a ring, 5-6 cm wide, cut it in half, clean out the seeds, place it on the top of the car as a body, and secure it with toothpicks.
We cut out windows in the “body” at the front and back, and attach half a small potato to the top.
A great craft for younger boys.
Cucumber caterpillar
This craft will turn out spectacular only from a long thin greenhouse cucumber.
Cut the cucumber and carrot into rings of equal thickness, then string everything one by one onto a thin wire.

We make eyes, a nose and a mouth, insert horns from green onion feathers. We place the caterpillar on a stand; you can also lay it out with leaves and moss.
Crafts from pine cones
Cones are also the most popular material for crafts; they are available and presented by nature in a wide variety. We recommend collecting pine cones while walking in the fall in as large quantities as possible, because there’s more to come. New Year, so they will still be very useful to us.
Hedgehog
From gray fabric we sew an oblong bag with one elongated end, which will be the face of a hedgehog. Turn the bag right side out and stuff it with cotton wool.
We decorate the hedgehog's face by sewing on the eyes - beads, the nose - a button, the mouth and antennae from scrap material.

Stepping back a little from the narrow part of the bag, we sew the pre-prepared cones to the hedgehog’s body one by one.
After the hedgehog is ready, we decorate it with autumn gifts, depending on what you have, so the hedgehog will be much brighter and more attractive.
You can leave the hedgehog as a completely self-sufficient craft for a garden of pine cones (photos) on the theme of autumn with your own hands. However, if you have the material and time, then it is better to additionally depict a fragment of a forest autumn landscape on the stand, where you can place our craft - a hedgehog made of cones.
Thematic composition
This craft is also very simple and quick to do, and is quite suitable for children in the younger group.
We cut out a circle from cardboard, you can lay out leaves and moss, put a sprig of rowan, make mushrooms from plasticine and distribute them in the clearing.
Stepping back 5 centimeters from the edge of the circle, we place a plasticine flagellum on our round stand, gluing it to the stand around the entire circle.

Glue the cones to the plasticine rope, pressing them tightly against each other. The result was a kind of fairy-tale forest clearing, surrounded by spruce trees. If you wish, you can also paint these spruce cones with green paint.
In the clearing you can place several large or small potato hedgehogs, which will not be difficult to prepare.
Forest inhabitants
Not only hedgehogs can be made from cones, although this is the most popular choice of authors in crafts. We offer simple craft from pine cones (photos) for a kindergarten on the theme of autumn with your own hands, a romantic scene in the forest.
The most the best option for the stand of this mise-en-scene there will be a wooden circle of any thickness, but if this is not available, just a piece of cardboard will do.
From 2 round-shaped cones and more massive ones we assemble a figurine of a forest hero, connecting them using plasticine.

From thinner and “slender” cones we assemble a figurine of a forest beauty, also using plasticine.
From twigs we select legs and arms for our forest inhabitants and attach them to the body, also using plasticine.
We attach the hero’s legs with an appropriate swing, symbolizing his kneeling state. Hands are sticks, they must be attached tightly to each other, between them we insert a beautiful autumn bouquet colors.
From clothes it is enough for him to attach a long leaf to the back and glue on the eyes.
You will have to work hard on the image of the beauty, choose slender stick legs, and attach them with plasticine. Hands should be open, but not for hugs, but out of surprise.
As much as our imagination allows, we dress up our beauty, and be sure to attach a rowan ornament strung on a thread to her neck.
We attach a cap to the head and set surprised eyes. What a beautiful romantic autumn scene in the forest!
Penguin family
An incredibly beautiful and very easy to do craft, it can very well decorate your home. It may seem that this topic is not exactly autumn, but this is only at first glance, nature gives us cones in the fall.
We select a beautiful stand for this craft, cut it out figuratively and decorate it at our discretion.
We paint two small cones with white paint, you can apply silver glitter. We paint two large cones and one small one with black paint.

After the paint has dried, apply white paint on one side - the chest of penguins.
On the stand we symmetrically strengthen two white cones - Christmas trees.
We attach arms, heads, eyes, beaks and mouths to the penguins, place them on a stand, add something fluffy and shiny, further decorating the picture.