 Matte manicure cannot be called newfangled - it has been considered relevant for several seasons. But with the advent of autumn and winter, when the craving for certain colors changes along with the mood, the demand for matte nail coatings increases significantly. A little strict or festive - they always look elegant, suitable even for short nails and last a little longer than their glossy counterparts, while you can create a matte varnish yourself from those that are in your manicure arsenal. All this does matte manicure It’s also very practical, so the topic of how to make nail polish matte is probably of interest to many fans of beautiful manicures..
Magic “chemistry” for nails
Even those who have financial freedom and can afford to buy several matte shades at once will probably be interested in learning how to make matte nail polish at home. For such a transformation, only two options are used, and with the most available means- steam (from boiling water) or starch.
Steam method
- Nails are treated and degreased with a special product (or nail polish remover)
- Cover with varnish base in one layer.
- Cover with the desired color (one or two layers).
- Leave over steam for several minutes.
It is important to note here that you need to keep your nails over steam immediately after painting. If they have time to dry at least slightly, the transformation will not occur, so it would be wiser to repeat the procedure with each newly painted nail in stages - this, in fact, is what reviews on this matting method advise.
Starch method
- Nails are treated as required and degreased.
- The topcoat is mixed with dry potato or corn starch. It can be added to a bottle of glossy polish of the desired color or applied with a brush to already painted nails. After the varnish has dried, in this case it is necessary to clean off the remaining starch using a dry brush or any suitable tool (sponge, sponge).
How else to make nail polish matte
Special matte coatings are sold. For example, matte top coat gels with a sticky layer. It is enough to apply this product to any varnish and it will become matte. But how to apply it is a separate question. If you read online reviews of such gels, you will notice that some complain that the process is somewhat complicated due to the special thickness of the product and its tendency to bubble. This usually occurs due to improper mixing.
The fact is that the bottle with a matte base cannot be shaken - it must be warmed a little in your palms, lightly rolling it between them. A couple of minutes will be enough and then it will allow you to easily make matte varnish at home. Or rather, a manicure:
- Nails are processed and degreased.
- Cover with the desired varnish in two or three layers.
- If desired, decorated with nail art.
- After the varnish has dried, apply a thin layer of matting agent in the classic way - from the nail hole to the edge with a light movement, first in the center, then along the edges.
Is it possible to paint your nails during pregnancy? This is what this article is about.

Small subtleties of matte manicure
- If you apply a matting agent to nails with nail art or glitter, you can get the effect of an “aquarium” or splashes.
- If you combine a matte and glossy finish on your nails, this will visually lengthen short nails.
- Matte manicure can only be done on perfectly straight nails, so before making matte nail polish and using it, you need to sand and polish the surface of the nail plates.

We've collected 30 tricks and tips for girls who love to take care of their nails on their own. How to dry your manicure quickly? How to make varnish? How to carefully draw a French jacket? About this and more - in our article.
1. Wash off the varnish carefully
To prevent the skin around your nails from looking like you killed someone or were poking around somewhere after removing red or other bright polish, apply a rich cream to your hands before the procedure.
2. Remove any remaining varnish from the skin

If you did not use the previous advice and the skin around your nails is stained, tape will help remove stains. Adhesive tape is great for collecting polish residue, especially silver.
3. We erase the varnish quickly

In the manicure departments of cosmetic stores they sell various products for quickly removing nail polish. They are bubbles with a sponge soaked in cleaning liquids. You don't need to run the cotton wool over your nails: just dip your nail into the bottle and wait a little.
You can make this product yourself. Take a small glass jar, place a sponge cut to size in it and soak it in nail polish remover. The principle of operation is the same.
4. Remove glitter polish

Soak cotton pads in nail polish remover, apply them to your nails, and wrap each finger in foil. After 10 minutes, the polish will come off easily, despite the glitter.
5. Whiten your nails

Sometimes colored varnish gets absorbed into nail plate, leaving behind an unsightly yellowness. You can get rid of it with whitening toothpaste. Take an old brush and brush your nails with it.
But to prevent such incidents from happening at all, do not forget to use a base coat before applying the main varnish.
6. Saving a broken nail
You will need a tea bag and clear nail polish. Apply the latter to the damaged nail, and then place a patch cut from tea bag. Re-coat the nail with clear polish.
7. We store varnishes conveniently

If you store your polishes in an opaque box, label the caps with the appropriate shades. This way you don't have to take out all the vials to find what you need.
8. We make our own varnishes
If you have few varnishes or cannot find the desired shade in the store, you can make what you want yourself. You will need clear varnish and mineral shadows. They dissolve perfectly in varnish, and you can adjust the color saturation.
You can also add various glitters to your homemade varnish.
9. Open a bottle of nail polish easily

If the varnish cap is glossy, tightly screwed and does not give way, rubber bands will help to cope with the problem. By wrapping them around the lid, you will get the desired grip and easily open the varnish.
10. Extending the life of manicure

If you want the varnish to last longer, before applying it and applying the base, the nail plate must be thoroughly degreased. To do this, wipe your nails with a cotton swab dipped in white wine vinegar.
11. Paint your nails correctly

12. Create an even coating

One thick layer will never lie as smoothly and neatly as several thin layers. Just be patient: let each layer dry.
13. Making a matte finish

Matte varnishes have been very popular lately. But if you don't have one, then just mix light loose powder with a clear polish. In this case, you should mix as shown in tip No. 8.
14. Making the polish brighter

Many girls know that if you apply shadows to the base, they go on more evenly and the color turns out more saturated. It's the same with varnishes.
If your colored nail polish looks faded, use a white matte polish as a base. You will get a bright manicure and will be able to avoid multi-layer application.
15. Apply glitter correctly
This video shows how to apply polish with large glitter so that it adheres well to the nail and does not bulge.
16. Protect your skin

Applying stamping or gradient to your nails can seriously stain the skin around you. We have already written that in this case, a special latex varnish will save you. But if you don’t have one, use PVA glue: it also forms an easily removable film.
17. Eliminate defects in manicure

Painting your nails without staining the skin around them, especially on your right hand, is quite difficult. But it doesn't matter if this happened.
Take a thin brush, soak it in nail polish remover and erase the blemishes. Unlike cotton swab, the brush does not cling to the varnish and does not leave lint.
18. Draw patterns on your nails

If your eyeliner has dried out or simply doesn't suit you, don't rush to throw it away. Her excellent elastic brush - as a rule, this is exactly what is there - can be used in nail design to draw fine lines.
Some girls even use ordinary stationery markers for nail art.
19. Create an animal print on your nails

If you cut the eraser on a pencil like this, you get a homemade stamp: dip it in black polish and make leopard print designs on your nails.
20. Making blanks for nail art
Apply silver polish to the clear backing and let it dry. From the resulting film you can cut blanks for nail design.
21. Making sliders for design
The principle is the same as in the previous case. Only here you need to make a film of transparent varnish and apply drawings on it. For example, using dots.
22. Replace dots

A dot is a stick with a tip in the form of a metal ball. With it you can create various designs on your nails.
If you don't have a dots, use available tools. For example, safety pins, toothpicks, empty ballpoint pens, and so on.
23. Doing a French manicure
French manicure looks feminine and suits almost any occasion and outfit. But not everyone can draw a smile line for a French jacket. The video shows several ways to do this carefully.
In addition, you can highlight the tips of your nails using a regular rubber band.

Just pull it around your finger and apply white polish. This is a budget alternative to special vinyl stencils.
24. Masking the unevenness of the French coat

If, despite all the tricks, you cannot get even stripes, you can use a trick. Draw a line under the white part with glitter varnish. Glitter will hide flaws, and you will get an original design.
25. Making stencils from electrical tape
This irreplaceable item in the household can also be used in nail art. For example, for the same drawing of a French jacket.
Insulating tape also makes excellent stencils, which, unlike adhesive tape, do not stick tightly and do not peel off dried varnish.
26. Dry your nails quickly

If you don't have special means for drying, and you are in a hurry, put your fingers in for a few minutes cold water. This way the varnish will set much faster.
27. Protect wet varnish

To protect freshly painted nails from small lint and dust, add a drop of cuticle oil on top.
28. Saving a manicure

If you have smeared the manicure you just did, do not rush to wash everything off. Just wet your finger with water and gently rub the damaged area. The varnish has not yet hardened and will easily return to the desired position.
29. Shake the varnish correctly

What do you do before opening a bottle of nail polish? Do you shake it well to make it less stringy? Great! Just do it right: place the bottle between your palms and roll it around.
If you shake and turn the varnish over, it may bubble up when applied.
30. Saving thickened varnish

Has your favorite polish started to thicken and doesn’t fit well on your nails? Place it in the refrigerator for 10-15 minutes and then shake well.
If you are not satisfied with the shade of varnish you have, add ink of any color to it.
Nancy Wave live/youtube.com
You can buy them specially at a stationery store, but gel or regular ink will also work. ballpoint pen. The main thing is not to overdo it and be careful.
2. Matte varnish
Using starch
Cornstarch can not only transform an ordinary glossy varnish into an elegant matte finish, but also make it lighter. Mix 4-5 drops of varnish with a small amount of starch. Apply this mixture on your nails. After drying, the varnish will become matte.
Using powder or matte eyeshadow
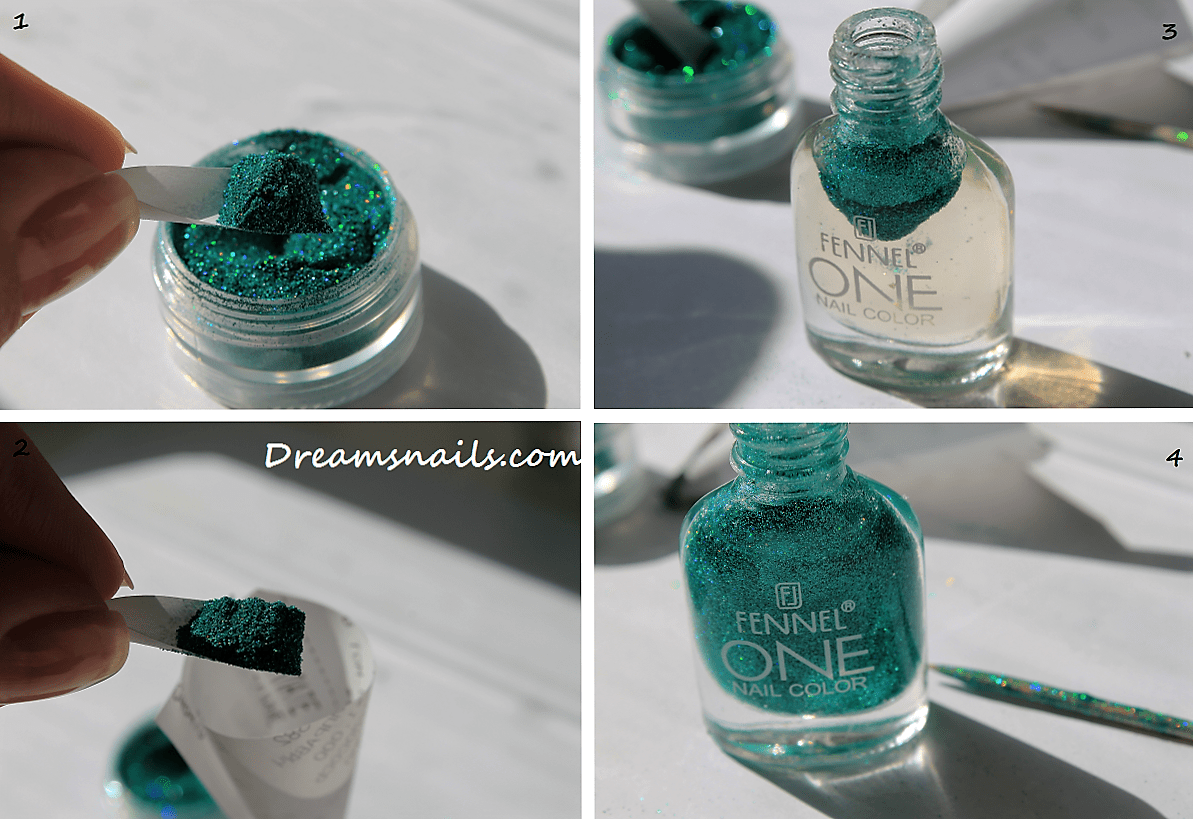
You can make the polish matte by adding loose powder or matte eyeshadow to the bottle. To make sure you don’t spill anything, roll up a small funnel out of paper. Along with powder or eye shadow, add a couple of small steel balls to the bottle to better mix the contents.
Mix light loose powder with clear polish to create a white matte polish.
3. Sparkling or pearlescent varnish
If you want it, add glitter to the polish or sprinkle it on your nails that are not yet dry. To add originality to your manicure, sprinkle glitter only on the tips of your nails.
 thegluegungirl.blogspot.ru
 You can achieve a pearlescent effect on your nails using ordinary eye shadow. Grind the shadows first. Crush them in any container with a hard object and turn them into powder. This will ensure an even coating. Then carefully add directly to the polish.
 3.bp.blogspot.com
 To get the exact color of the eyeshadow, mix it with a clear polish. If you apply the same shadow on your eyelids, you will get the perfect color combination.
 herbsofgrace.com
 If you hate to crush the shadows, apply them with an applicator to slightly damp nails. The same can be done with loose mineral shadows. Then simply blow off the excess and cover your nails with sealer or clear polish.
 www.thebeautycontext.com
 4. New varnish from several old ones
Choose two or more matching polishes and pour them into one bottle, adding a little nail polish remover if necessary. You can also place one bottle on top of another and go about your business while the contents flow. Shake the resulting mixture thoroughly. The new varnish is ready.
 wikihow.com
 By the way, if you gradually darken the resulting mixture, you can get an ombre effect - smooth transitions of colors into each other.
5. Glowing polish
Using acrylic paint
If you mix varnish and fluorescent acrylic paint, your nails will glow in the dark. Fluorescent ink from gel pens is also suitable for this purpose. All this can be found in art stores and in regular stationery stores.
 picmia.com
 A clear varnish base gives the best shine. If desired, it can be applied over colored varnish. With white varnish, also feel free to use fluorescent paint of any color.
Using glow sticks
For this method you will need a half-empty bottle of nail polish and one glow-in-the-dark stick. If you are using colored polish, make sure the shade matches the color of the stick.
Knead the glow stick well, especially if it is in the form of a thin bracelet or necklace. Sharp scissors cut one end of the stick. Dip the cut tip into the bottle and carefully squeeze out the glowing liquid. Cap the full bottle and shake well. After this, apply nail polish.
 wikihow.com
 Remember that when using sticks, the glow effect will only last a few hours. Don't forget to seal your masterpiece with clear varnish to make it last longer.
Every girl dreams of well-groomed hands With beautiful manicure, but life sometimes moves so quickly that there is not always enough time and money to visit the salon. However, this does not make the desire disappear, and then, with a sigh, I quickly buy a small bottle of varnish, and cosmetic procedure carried out independently. But what if this small joy cannot be achieved, and at home the transparent varnish has never been left untouched from former remnants? Many will sadly dismiss attempts at transformation, but this is a premature decision. Today we will talk about how to make nail polish at home and, by doing it yourself, cheer yourself up and do without going to specialists and without investing large sums of money.
DIY homemade varnish, preparation technology
Homemade varnish made by yourself?! How can it be? In fact, the technology is simple and has centuries-old roots, going back to the masters of painting and iconography, because, as you know, many and especially rare paints were created in meters visual arts on one's own. So why are modern girls worse, and why can’t you play a little alchemist and create an original varnish at home that you won’t be ashamed to show off to either your friends or colleagues. And so let’s look at the technology for creating such a masterpiece step by step.
First step
- The first step is choosing the main components. When working, it is impossible to do without a clear varnish that will serve as a base, eye shadow, blush or glitter needed to directly create the color, a toothpick, a knife and several sheets of paper.

Second step
- The second step is to mix the components. It is necessary to pour out a little liquid from the bottle of varnish in order to make room for adding coloring components.

We make a funnel out of paper, an example of which can be seen in the photo below.

Using a knife, peel off the eye shadow on the remaining sheet of paper and grind it to a powder. To make the varnish brighter and the tone darker, approximately 110 g of shadows are used per standard bottle of transparent varnish.

You can also use glitter instead of shadows.


Third step
- The third step is mixing. After introducing all the components, it is necessary to make the resulting liquid homogeneous; to do this, you need to actively roll the bottle of varnish in your palms for five minutes. Also, before each use, homemade varnish should be shaken thoroughly, since shadow particles, one way or another, leave a sediment. If the varnish turns out to be too viscous, you should add a little acetone to it, then it will be liquid and begin to lay down in a thin, even layer.

Also interesting are such types of varnish as matte and luminous. They can also be made at home.


To create a matte varnish, after applying a regular glossy varnish, you need to hold your hands over a steam bath of water.
But creating a glow-in-the-dark varnish will require a trip to a fishing store or the “everything for the holiday” department, because it is there that you can purchase the most important base - a fluorescent stick, the contents of which will become the “shadows” that were added to the transparent varnish earlier.
How to make an original manicure using homemade polish?
If you have eyeshadows of various shades at home, you can mix them to create an amazing palette for realizing the most daring manicure ideas at home. However, here some things should be taken into account color combinations, so as not to create ornately painted hands from paint, like ancient tribes ready to hunt.
- Monochrome range is a combination of shades of the same color. This image can dilute a strict manicure. business woman or give a classic touch to a girl.

- Complementary color scheme – this image is built on contrasts. Color combinations can be such as black and white, blue and yellow, pink and purple, and so on. Nails in this frame can give the owner of such a manicure different tones and easily adapt to her mood.

- Triadic gamma - combinations of three colors. Suitable for lovers of experimentation in manicure and relaxed representatives of the fair sex. Such a combination can be either contrasting or have a cohesive image.

In conclusion, we can say that even without visiting professional craftsmen manicure shops and expensive beauty salons, at home with minimal expenditure of money and effort, every girl can create an original nail polish and boast of an unusual manicure. And, undoubtedly, such a varnish will become the one in her cosmetic set, more than once surprising and astonishing her acquaintances and friends.
If you are making your own furniture or want to somewhat restore old furniture, at some point you will need to coat it with a good varnish.
The market today is full of different varnishes. However, this remedy can be created with your own efforts and at home. You can create different varnishes at home. The following are recipes for the most popular types.
Five minute
Designed for wood. Acetone is poured into a container (preferably 100 ml) (approximately 30% of the container volume). Then foam is added to it. It is better to take it from the electronics packaging. It should be finely chopped before adding. Its approximate proportion is 0.3 cubic dm. The end result will be a jelly-like mixture. It needs to sit for a while. Its color is transparent. After 2-3 hours you get a good moisture-resistant varnish. It is also characterized by decent ability to withstand impacts.
Oil types
In production, they are prepared from drying oils and expensive resins. Turpentine is also added to them. Typically, these types dry quickly, but are weak in terms of strength and service life. You can create a copal oil look at home. Take quality linseed oil(100 doses by weight) and cook it in a saucepan or cauldron. Heating should be gradual. The task is to wait for bubbles to appear and maintain an even flame. The oil should simmer slightly. At the same time, it is necessary to melt the East Indian copal (15 doses by weight) in a water bath and also bring this element to a boil until bubbles appear. At this moment, you need to immediately add hot linseed oil to it (it is also boiled in a saucepan at this time). You need to pour it in doses and constantly stir this mixture. Then pour this mixture into the oil that is being cooked.
The next element needed here is manganese borate (1 weight proportion). It also goes into this large container. The required cooking time is approximately 2 hours. If foam appears during this process, it must be eliminated. The varnish should be thick and smoothly come out as transparent threads with a golden tint. The fire can then be reduced. The created composition should slowly cool down to +60 C. This is not the end of the matter. Turpentine (70 doses by weight) is introduced into the mixture. It is poured in parts. After the next addition, you need to check whether the cooled drop has the required viscosity. If it is weak, then no more turpentine is needed. The varnish is ready. Signs of high-quality varnish: golden tone, smooth placement on the work surface, drying after 6-8 hours.

Dammar view
It is great for furniture in light colors. Components to create it:
- dammar resin (4 doses);
- turpentine (5 doses);
- white linseed oil (1/4 part).
This composition should be boiled until completely dissolved, then filtered. For straining, it is better to use a thin sieve made of metal. After which the mixture settles for 2-3 hours. After this time, the varnish can be used.
copal species
Required ingredients:
- soft, light-colored copal (1 dose);
- turpentine (2 doses);
- camphor (3%).
The third element is needed to give the varnish good elasticity. This composition is placed in three quarters of the bottle. The bottle is thoroughly corked and kept in a warm place, for example, near a radiator. The bottle needs to be shaken periodically. You should get a high-quality solution from all components. It settles and filters. Cotton wool serves as a filter here. If the resulting varnish is not transparent enough, concentrate the bottle in a water bath for 10-20 minutes.

Mastic look
Required elements:
- pure mastic (12 parts);
- Venetian turpentine (1.5 doses);
- powdered camphor (0.5 dose);
- carefully crushed glass (5 doses);
- thoroughly purified turpentine (30 doses).
The composition is placed in a water bath. Afterwards it settles. After a day, it is drained and filtered. Cotton wool is used for the filter.
Castro species
If castor oil is distilled dry, a residue similar to rubber is formed. If you dissolve it in gasoline or alcohol, you get a varnish with excellent resistance to moisture and ultraviolet radiation.
Asphalt view

Required components:
- asphalt (1 part);
- turpentine (2 parts).
The first element is melted, cooled and crushed. A second element is added to it.
Japanese view
Elements:
- turpentine (45 doses);
- dehydrated lavender oil (60 doses),
The first two components are mixed. The liquid part is separated from the sediment and then heated. While this process is going on, you need to add camphor (1 part) and copal resin (15 parts) to the mixture. After 20-30 minutes, the composition can be filtered.
These are the basic recipes for homemade varnishes. Surely every master has a dozen more interesting recipes.