It is customary to decorate interiors and clothing with crafts made from ribbons. Manufacturing technology has been improving for many centuries. Nowadays, techniques such as kanzashi and quilling are popular. Creating ribbon flowers is an interesting activity for girls and women. Some do it professionally, making videos with master classes. Using the advice of experienced craftsmen, you can create a small masterpiece for your room or a gift to a loved one. With the help of handicrafts you can not only pass the time, but also improve your appearance apartments, as well as learn something new and bring your ideas to life. All work is done in several stages. The first of these is tape preparation and processing. Then the main part of the flower is created. The next stage is the formation of the base and securing the petals to it. After this, the finished composition is decorated.
Advantages and disadvantages of making flowers from ribbons with your own hands
There are many more benefits. Firstly, creating ribbon flowers helps preserve wildlife. The crafts look like real ones - this is the main plus. Making flowers from ribbons is a simple and low-cost way to decorate your interior. They will not wither and will last as long as necessary. Ribbon flowers will be an excellent gift for March Eighth or Valentine's Day. The products are designed in any colors - this is another advantage over living plants. Both adult women and little girls will be interested in experimenting with the shape of flowers and the appearance of the finished composition. Craftsmen have the opportunity to use any decorations at their discretion and create interesting, unique shapes. Products made from tapes have some disadvantages. Beginners need to spend a lot of time to make a bouquet of a large number of flowers. The lack of its own smell is also a disadvantage. Fresh flowers create a special atmosphere due to their aroma, while artificial ones lack such qualities.
Solid ribbon rose
You can use a narrow one and a half centimeter ribbon, then the product will turn out to be small in height and with a dense texture, with a lot of bends. But the best option involves using a relatively wide 4-centimeter tape. First, the protruding threads are torn off from it, and one of the edges is melted with a lighter. The main part of the work begins on this side. The end is folded in half, creating a diagonal fold. The corner is bent downwards, and the process of twisting the core of the rose begins around it. When the diagonal bend is practically no longer visible, you need to turn the ribbon upside down. The folded part is pasted over, after which the strip is turned over again. Then you need to continue to “collect” the flower, repeating these steps after each full revolution. Towards the end of the ribbon, the lower part of the flower begins to form. The tail is pasted over and curled. The product is fastened with thread.

You should not put too much tension, otherwise the craft will not be as fluffy.

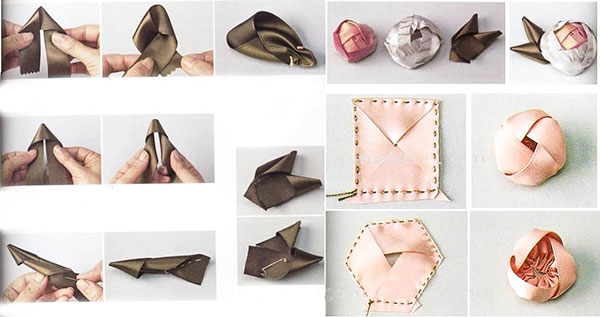
The simplest manufacturing method involves the use of scissors, a thread needle, nylon thread, and nylon fabric. The rosette is folded starting from the core. The central part is formed by bending one of the ends of the tape and wrapping it with the opposite, free edge. The resulting layers are pierced with a needle. The remaining free segment is wrapped around the center. With each turn, three folds are made outward. Each of them will form a separate petal. To fix the product, the flower must be treated with thread. There is also a more complex implementation option, for which you will additionally need a sponge, acrylic paints, padding polyester, oval or round shapes, several pieces of wire. The pieces of wire will be the bases of the individual petals. The molds are wrapped, and fragments of nylon fabric are stretched on top. They are attached with thread. The center is made of colored padding polyester. All that remains is to attach the stem.

Kanzashi (kanzashi) is a type of Japanese jewelry, mainly for women, as well as the name of the technology for making it. Finished goods usually consist of flowers and leaves, but other plant-related variants are also found. In total, there are about 5-10 main subtypes of this technique, including tsumami-kanzashi, birakan, mimikaki kanzashi. Not all of them look like a typical modern kanzashi. This method involves using a fire source to give the petals and leaves a characteristic shape. Satin is used as a material for products, and, less often, fabrics with similar parameters are used. In the process of work, you will need such devices as scissors, a glue gun, elastic bands, hairpins, stamens, pins, tweezers. Temperature effects are necessary for manipulating the edges of the molds, as well as for joining them. Small length fragments, most often rectangles, are cut out of satin material. Their corners are connected or trimmed (smooth or rounded).

Simple cinquefoil flower
Since the product will consist only of a cup with petals, it is better to make several pieces. Squares 5x5 or 6x6 cm are cut out of satin material. They are folded diagonally. Then, by bending the corners, a square is made from the triangle. Then it is folded into a triangle again, and from the side with the largest number A strip 2-3 mm wide is cut off from the free edges. The processed side is grabbed with tweezers, and the workpiece is brought to the candle. The cut edge is melted. Immediately after this it needs to be flattened. You need to wait about ten seconds and begin to give the mold a convex appearance. Then the base is made: an elastic band is installed on the round blank. You need to make cuts and secure it with glue and another circle. Petals are attached to the flat part of the structure, also using glue.
It is better to make flowers in different colors:
- orange;
- pink;
- yellow;
- blue;
- red

Bell
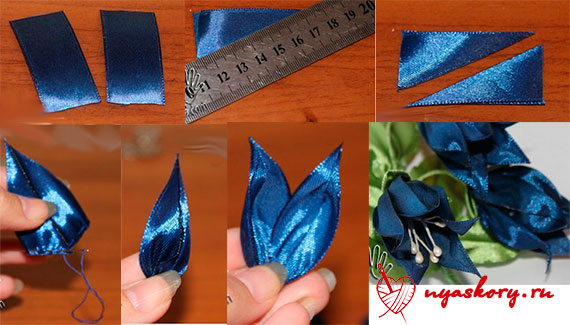
In addition to the main component - satin ribbon, you will need:
- candle;
- wire;
- stamens;
- sewing equipment;
- suitable glue;
- ruler;
- glass;
- burner.
A 2.5 cm wide ribbon is cut into fragments of 5 cm each. Two pieces are applied to each other with the wrong side. Next they are placed on the glass. Use a ruler to highlight a diagonal line. All fragments are cut with a hot knife. After this, they are soldered along the cut line. The short edges are first stitched separately with thread and then joined together. After this, the front side of the sharp part of the connected petals is melted with a candle. Deformation due to temperature effects should not be allowed. Next, the end is quickly twisted so that it bends outward. It is necessary to make five such elements to create one flower. Then you need to work with the stamens: they are bent in half, covered with wire and twisted. The tops of the stamens are smeared with glue and five petals are attached to them.

Aster
You will need: thread and needle, several beads, lighter, scissors, green mesh, satin ribbon, thick cardboard, glue gun. It is not necessary to choose natural tones to create a flower; any bright shades will do. First of all, the tape is cut into a large number of segments: thirty or more. Its width should be 2.5-3 cm, the length of the fragments should be 6-7 cm. Each piece is folded in half - into narrow strip. Then a small fragment is cut off from one end with scissors. This should be done at an angle of 45°. The cut edge is melted with a lighter and glued together. Two opposite corners are folded inward and melted by fire. And so 30 petals. Then a small circle is cut out of cardboard. It is covered with satin material. Two rows of petals are glued to this base. Some add variety and create another row in the middle, in a different color. The finished composition is decorated with beads.

Peony
You will need: a base for a brooch, a ribbon, a large bead, a needle, beaded or monofilament, scissors, tweezers, a candle, matches. Circles of different sizes are cut out of the tape. The splendor of the final product depends on their quantity. All elements are melted by candle fire. It is necessary to achieve a wavy outline along the entire perimeter of the future petal. After this, they form a bottom. To do this, make a small cut so that approximately 1/5 of the circle is a straight line. The next step is to sew several petals into groups. The circles are combined in sequence from largest to smallest. Next, the central part of the flower is created using a thread: a large bead is attached to the base under the brooch. After this, petals are attached to the product. Now it can be used as a brooch or hairpin, or made into an elastic band.

Hibiscus
You will need:
- Scissors;
- Candle;
- Super glue;
- Template with side 6 cm;
- Thin floral wire and two satin ribbons of different colors - one will imitate a flower (it is better to choose pink), and the other a stem.

You will also need stamens to match the color of the pink ribbon. First of all, cut out a 6-centimeter rectangle from green tape. On one side, it needs to be given the appearance of a leaf: two corners are cut off with scissors. One such element is enough. You need to make five petals from the pink one. Using a template, the required number of pieces is measured and cut. Molds resembling a drop are cut out of the fragments. One of the edges is rounded. Ideal shape It is difficult to cut, so you need to put all the pieces together or use another template in the form of the desired petal. Next, the flat side of the leaf is melted. The petals are treated with fire along the entire perimeter, the rounded part is then stretched by hand. Then all the fragments are put together and fastened. The stem is decorated with green ribbon. A leaf of the same color is attached to it - the product is ready.

Flower made from wave braid and zigzag braid
Very original products are created from wavy braid. You will need a needle and thread, scissors, one wave braid 50 cm long or two 30 cm long (preferable). First of all, the two sections are intertwined, like curls in a braid. This blank is sewn on a machine. Then a bud is made: the braid is rolled up and secured with glue in several places, preferably once for each turn. The end is tucked in and also fixed with glue. In this form, the product will imitate a peony, and if you turn out the petals, it will resemble a rose. A very original non-standard product will be made from zigzag braid. A segment with 20 bends is required. The ends of the fragment are sewn together. For this, an allowance is left in advance. Then, using a thread, you need to sew 10 elements (one at a time). Then this ring is assembled into a compact circle and secured. Then it is made flat, and as a result all the petals will be directed clockwise or counterclockwise.

You will need a fastener (elastic band, hoop or hairpin), thread to match the color of the lace, a fleece circle of the same color, 2 meters of lace. The first step is to prepare the material and fastening. Then on level ground decorative edge The lace is sewn with a double thread needle. A “forward needle” stitch is used. The thread stretches and the lace fabric tightens. The folds are distributed evenly along the entire length of the tape. There is no need to separate the needle and thread. They are attached to the end of the lace for a while. Next, you will need a second needle and thread: it is sewn to the fleece circle in a spiral. It is necessary to ensure that the lace “looks” face up. The core of the flower is decorated to your taste: with buttons or beads. From the remaining lace fabric you can make a mini-bud and sew it to the central part of the product. The first thread is now secured and cut - the job is complete. It is worth special mentioning the appearance of the products. Flowers made from a thick lace ribbon with decorations with ornamental stones look very original.

Many remember them from childhood: birthdays, New Year and the Feast of St. Nicholas was rarely done without these decorations. They are easy to do. On paper sheet 9 strips 1.5 cm wide are drawn. They are cut out and then reduced to required sizes. You need 3 pieces with a length of 25 cm and the same number of 22 cm, two of 19 cm and one strip 9 cm long. The shortest one is bent into a ring and fixed with a stapler. All the rest are twisted in a figure eight and also secured. The fragments are stacked on top of each other. There will be small “eights” inside the bud. A ring is placed in the very center. Pieces double sided tape can be used both before starting to create a bud to create an adhesive surface on the fragments, and after, for reliable fastening. The paper itself can be different: simply colored or decorative with various stripes.

To create such a product yourself, you will need to use:
- paper;
- scissors;
- ruler;
- pencil;
- stapler;
- Double-sided tape.

You will need eight ribbons, four blue and the same number of purple. Each should be 15 cm long and 0.6 cm wide. First, the purple strip is folded in half, and the top of the folded end is smeared with glue and attached to a soft round base, exactly in the center. Then the remaining purple ribbons are glued on. This is done in such a way that there is an equal distance between the ends of all strips. After this, 8 drops of glue are applied to the central parts of these “rays”. The end of one protruding strip is attached to the center of the adjacent one and so on throughout the circle. This part of the work must be done very slowly, otherwise the petals will not be the same. Next you need to work on the blue stripes. They are attached on top of the purple ones, and then their edges are drawn through the loops. Then the blue ends are twisted in the same way as the purple ones.

Packing tape for making flowers
To create this craft, you will need a needle, floss, tailor's pins, a round metal template with protruding knitting needles, and the packaging tape itself (you can choose simple transparent tape). First, a template is taken and a ribbon is gradually wound around it. The stitches should be placed on the opposite edge of the needle. When the tape is completely wound, the center is highlighted. To do this, you need to connect the petals in the middle using a needle and thread. The center is darned in a circle. The free edge of the tape is cut to fit the central part. The petal is removed from the needles - all that remains is to decorate the flower. The craft should be decorated with decorative elements. You can spray paint it. A monotonous color will look best, but it’s worth trying to use different molds and color the flower in an original way, for example “polka dots”. There are also a variety of colored packaging tapes on sale - regular and festive.
It’s worth trying to make a complex craft using ribbons of different widths and thicknesses and with different weaves.

Rep ribbon flower
Such products can be found on children's clothing: sundresses, dresses. Creating a craft from grosgrain ribbon will be easy even for a beginner. You will need thread, scissors, pencil, glue gun, candle, grosgrain ribbon. First, 5 strips of the same length are cut out (approximately 5-6 cm). The edges are processed over fire. Then the fragments are shaped into a bow by gluing the opposite edges in the middle. All bows are folded in half. After this, they are stitched with thread on the flat side and gathered into a circle of five petals. The bud they create is fastened and decorated with a button. The petals are given volume. There are even simpler methods. The tape can be applied several times, creating a thickening in the center. Then you need to fasten everything with threads and decorate the product with a button. Another interesting way is to create petals from several turns of different sizes.

Making flowers from polypropylene tape
Both small flowers and large ones with a diameter of more than half a meter are created from this material. The latter are created from foamiran (isolon) - polypropylene fiber. You will need large round sheets with a density of 30, paint, a glue gun, and a hair dryer. You can cut the blanks yourself from a large canvas. Thanks to the pliability of the material, this will not be difficult. First, two rounded petals with a long side of about 30 cm are cut out. The core will be made from them. All other fragments should be larger: 35, 40, 45 cm, etc. The lower parts of all elements are cut noticeably narrower. During the work process, these segments are pasted over with a gun and bent. If on the first petal the bottom is twisted and secured, then on the next petals it wraps around the already created structure. The desired shape is given by hand and after each change it is fixed with a hairdryer. When all the petals are ready, you will need to make a core from a spool of thread. Then the flower is painted.
It is necessary that the air from the hairdryer be as hot as possible, otherwise the flower may begin to quickly lose shape or may not turn out at all.

Application of ready-made colors
Such crafts decorate everyday and festive hairstyles. To do this, flowers are attached to elastic bands, headbands, hairpins and decorated with beads, brooches, and various small elements. Ribbon flowers with pins are used to decorate wardrobe items. They decorate lapels; put in pockets, attached to hats. Ribbon flowers will become bright gifts on different occasions - birthday, New Year, religious holidays, angel's day. These crafts are used to decorate various homemade compositions, topiaries, gift boxes. Decorated handmade rooms are a great place to decorate with bouquets and photo frames with ribbon flowers. You can also trim floor lamps and tulle. Recently, boutonnieres and duplicate bouquets made of satin material have become popular. They are bought not only for special occasions.

Conclusion
Flowers made from ribbons are sometimes difficult to distinguish from real ones. Beautiful composition can be created from a simple paper or lace ribbon, or using the kanzashi technique from a satin one. Ribbon flowers are mainly intended for decorating hair - they can be given to women and girls. To create a flower, you need to go through a few simple steps. First, the ribbons are prepared for processing. Excess threads are torn off from them, and uneven edges are trimmed if necessary. Next, the process of twisting or stitching begins. This is done in different ways, depending on the technique of execution. The resulting shape is usually held together with threads, glue or wire. Flowers are decorated with brooches, beads or left untouched to imitate real flowers. The color is selected at the discretion of the master. The result is a “self-sufficient” decoration that can also be used as a decorative element.

Very beautiful artificial flowers can be made from fabric or regular tapes. Using some tools that are easy to find in any sewing department, you can make beautiful roses and wildflowers.
By following step-by-step instructions, you can make unique artificial flowers with your own hands, which can be used to decorate your interior, gifts, cards, clothes, and even your hairstyle.
Beautiful decoration of flowers made of satin ribbon
1:1333

You will need:
- satin ribbon
- burlap or felt
- scissors
- pencil
- thread and needle
1. First you need to make a round base with which you can twist the flower.


This base can be made from burlap or felt:
- draw a small circle on the burlap (diameter from 6 to 10 cm)
- cut out a circle
- cut out a small segment in a circle
* The larger the segment, the higher the cone will be.
- connect the ends of the circle to form a cone.
2. Start applying the tape to the base. Secure it with thread.


Follow the photo instructions to make a rose.
6:1256 6:1266
7:9


3. Several of these roses can be combined into a bouquet.
10:95 10:105A bouquet needs its own base.
Prepare a handle for a bouquet or any sticks that need to be folded into a bun and secured with tape and then tied with a satin ribbon.
You need to glue a foam ball to the base of the sticks. If you don't have it, you can use crumpled paper wrapped in tape.
Now you can glue roses to the ball.

* The bouquet can be inserted into a pot.
11:1304 11:1314How to make a flower and a wreath from ribbons
11:1394
12:9


15:9 15:19
DIY braid flower
15:99 15:109
You will need:
- braid or narrow satin ribbon
- scissors
- button
- ruler
- lighter or matches
1. Prepare a narrow ribbon and cut it into equal strips.

17:9
* To make one flower you will need about 6-8 strips.
17:123* Petal length = 1/4 strip length.
17:195 17:2052. The edges of each tape must be treated with fire.
17:294 17:304

3. Apply hot glue or superglue to the middle of each strip and attach both ends to it.
19:15084. All ribbon blanks now need to be glued together to make a flower.
19:1515. You can glue a button into the middle of the flower.
19:238 19:248How to make simple flowers from ribbons (master class)
19:353
You will need:
- satin ribbon
- scissors
- lighter or matches
- a simple pencil
- glue gun or superglue
- thread and needle
1. Prepare a satin ribbon and cut it into equal pieces. In this example, 5 strips are used.
* The petal has a length equal to 1/2 the length of the strip.


22:9
2. Use a lighter to trim the edges.
22:693. Using a simple pencil, draw the middle of each strip.
22:1824. Use a thread and a needle to carefully grab two opposite edges (see image).
22:3555. Each strip needs to be folded in half.
22:437 22:447
6. Apply a little glue to the inside back of the piece and glue the stitched area.
23:11257. Start stringing the petals onto the thread and stitching them together.
23:1230*You can decorate your flower with a button.
23:1311 23:1321
24:9


Calico roses - photo master class
26:1117

You will need:
- green felt
- chintz
- thin wire (preferably floral)
- ribbon
- glue gun or superglue
- thread and needle

1. Prepare green felt and cut out a cup for the rose.
28:9642. Prepare chintz and cut out 6 petals for each rose.
28:1086 28:1096
3. Take the wire and wrap it with satin ribbon, securing it with glue.
29:136 29:146
4. Fold each petal in half.
30:7285. Gather the petals on a thread (along the cut).
30:809 30:819
6. Using glue, assemble all the processed petals as shown in the image. Wait for everything to dry.
31:154831:9


7. Making a bud.
33:1072To do this, you need to glue a rose to one end of the wire and then put the lower part of felt through the hole.
33:1280 33:1290
34:9
* You can put together a bouquet from several similar flowers.
34:116 34:126 34:136Simple flowers made of organza or nylon ribbons
34:237

You will need:
- synthetic fabric (organza, rayon)
- thread and needle
- candle (lighter, matches)
- decorations (beads, beads, rhinestones)
- cardboard
- scissors
- pin
- a simple pencil
1. Prepare cardboard and cut out 2 shapes from it as in the image (different sizes).


37:9
2. Place each shape on the fabric and trace with a pencil. You need to cut 6-8 pieces of each size.
37:1963. Use a lighter or candle to carefully trim the edges. Hold the fabric higher to avoid scorching.
37:382 37:392


4. Start collecting petals. Use thread for this. You can stitch 3 petals. Start with the larger petals and then the smaller petals.
41:277 41:287

* Fan all the petals so that the flower is symmetrical and looks natural.
43:1473 43:1483
44:9
5. All that remains is to sew the beads into the center of the flower and fasten the clasp on the back side.
44:163 44:173
Making flowers from ribbons: poppies
45:767

47:9
Satin ribbon pansies
47:87


50:9


Beautiful flower made from ribbons
52:1100
You will need:
- green satin ribbon (width 5 cm, length 10 cm)
- satin ribbon of any color (length 1 meter)
- thread and needle
- scissors
- candle, matches or lighter
- a sheet of paper for a pattern
- pin, hair clip or hair tie

Optional:
54:1038Glue gun
54:1081Small piece of felt
54:1133 54:1155 54:11651. Make a petal pattern. You can see the dimensions from the images (5 cm high, 2.5 cm wide). The width at the base is no more than 2.5 cells.
54:14232. Since the width of the tape is 5 cm, the petal should have a slightly smaller height. Fold in half and cut out the pattern.
54:163454:9


3. Place the pattern on the tape and cut out the shape. Cut off the top edge of the ribbon; you may have to lower the pattern. It is worth noting that the base of the petal has an edging.
56:1345 56:1355

58:9

4. You need to cut out petals from the ribbon. You can fold the ribbon and cut out several petals at once. For convenience, you can fasten the tape with office clips.
59:8095. Reduce the pattern by 0.5 cm on all sides except the base.
59:930*You can make a new pattern.
59:998* You should end up with 3 rows of petals, which means you need to prepare 3 patterns of different sizes.
59:1184 59:1194

61:9

6. Once you have cut out 3 groups of 6 petals, begin to carefully burn the edge of each petal. There is no need to scorch the bottom edge.
A universal selection of gift ideas for any occasion and occasion. Surprise your friends and loved ones! ;)
I welcome everyone gathered on my blog on this sunny (or maybe not so sunny) day. If you want to learn how to make cool flowers from ribbons, then I highly recommend reading this article to the end.
Flowers made from satin (and other) ribbons can be used both to decorate gift packaging and as a gift itself.
Especially if you collect such flowers in an elegant bouquet.
The most amazing thing is that sometimes the most beautiful of these plants are so easy to make with your own hands that it takes 10-15 minutes even for a beginner (trust my experience).
Recently I have been making different flowers quite often and now I will share with you excellent master classes on making them
DIY flowers made from satin ribbons
I'll show you 15 cool (and easy) ways to create amazing flowers. You can “take” each of the photos from the master classes with you by copying the corresponding image.
Let's start with, perhaps, the most romantic and popular plants among girls - roses.
Ribbon roses
Stop buying expensive store-bought roses! Let's learn how to make them ourselves and save the lion's share of the budget.
We will have several roses today. The first of these is a rose, obtained by folding triangles as you go. To make it, prepare a piece of ribbon at least 2 cm wide and at least 50 cm long.
Unblown
Form a center by bending one end as in the photo. Twist and secure.

twisted rose
In terms of the method of creation, it vaguely resembles the previous one (at least the beginning). After forming the center, alternately turn the ribbon, twisting it and applying layer by layer. Secure at the end.

Kanzashi
The peculiarity of this rose is that all its petals are processed separately.

From braid
Finally, a rose, which is obtained by intertwining two wavy ribbons. After weaving, they need to be swept along the edge so that they do not fall apart. And then just roll it up.

Flowers from kanzashi ribbons
In general, kanzashi is originally a “hair decoration” from Japanese. It dates back to the times of geishas, who were distinguished, among other things, by their ability to skillfully do needlework.
Kanzashi has two petal shapes - round and pointed. The rest are already subspecies. So all flowers, to some extent, can be attributed to this type of art.
Hibiscus
An exotic guest, for which you will need a wide ribbon (about 5 cm wide), a base and stamens.

Just a flower with 5 petals
To make pointed elements, sew the center. Fold the future petal in half and hem it from the inside. Prepare 5 pieces, then string them on a thread. Decorate the middle.

Bell
For the bell, prepare the petals according to the photo. To roll them, fold the petals with their tall, straight edges facing each other and sew around the edge (glue the top a little). Pull the thread, assemble the resulting parts, decorating with stamens or beads.
Semitsvetik
For it you need to prepare 7-9 petals using the classic method used in kanzashi. Then all the petals are collected on a thread and, if necessary, glued together on the sides.

Aster
Just a dream, not a flower in terms of ease of execution. To make an aster, take a ribbon and sew a line of zig-zag running stitches across the entire width. Pull, roll. All

Peony
For the peony, take three ribbons: two for the petals, one for the green leaf.
Please note that the peony consists of two parts - a more closed bud and opening petals.
Master classes on colors in video format
Not everyone likes to study photographs, so I have prepared for you several flower-making tutorials in video format.
Chamomile
To create a daisy, you will need many, many burnt petals (pieces of tape 0.6 cm wide and 3.5 cm long), as well as a base - a circle of cardboard.
Calla lilies
One of the simplest plants in this article. The only thing easier, perhaps, is the aster.
Sunflower
According to the principle of creation, it is very similar to a chamomile, but here you will have to tinker with the petals a little more.
Star
An elegant flower consisting of 5 elements and a center.
Snow fairy tale
A flower of extraordinary beauty, made from a wide ribbon. It was difficult to attribute it to any species, so let it be called that
A wonderful effect will be achieved if you combine several types of ribbons from the same series. This is easy to do with the help of modern sets, including up to several dozen ribbons in the same style.
With this I say goodbye to you. See you soon! Be sure to tell us if you know any other ways to create flowers.
P.S. Subscribe and learn how to give cool gifts
Sincerely, Anastasia Skoracheva
What could be more beautiful than flowers? Only unfading flowers! That is why today in this article we will look at several simple examples, which may inspire you to master more complex techniques.
DIY ribbon rose

Small flowers, animals and various fabric figures always look very interesting and unusual. For many girls and women, roses are their favorite flowers. However, you can not only grow them in the garden or buy them in a store, but also make them yourself. Small roses made from braid will look cute, light and elegant, and will also serve as simple, pleasant home decorations that will create a calm, cozy atmosphere. In addition, such cute artificial flowers have another pleasant plus - this is a fairly economical option, since large expenses are not required.
To make a large rose you will need about 50 cm of zig-zag braid, also called snake and bindweed, and for a smaller flower about 45 cm, a thin needle, scissors, matches or a lighter to singe the edges of the braid, and glue, but be sure to check that so that it securely glues the tape. Another important and necessary detail is the threads, which must be the same color as the braid.

So, first, we need to fold the long braid in half.

Then, carefully weave the halves of the braid together (without cutting!). You need to do this from start to finish and try to get it smooth.


Afterwards, both ends of the resulting ribbon must be cut and carefully set on fire so that the edges of the fabric do not crumble or deteriorate.

Now we twist the resulting ribbon into a bud of the future rose and fasten it with a thread from below so that it is not visible from the other side. That's why the threads should be the same color as the braid: then the end result will look neater and more pleasant.


Well, the final touch - straighten the flower petals, bending the very first ones a little.

That's all: simple, but beautiful rose, made with your own hands, is ready.

Satin ribbon flower
We present a step-by-step instruction-master class for making a flower from a satin ribbon yourself.
To begin with, take a ribbon of any color about 4 cm wide in your hands, and then cut off 5 pieces about 7.5 cm long and 5 pieces 9 cm long from it, while not forgetting to lightly singe the edges.

Now we fold one of the small pieces of tape in half, aligning the edges, and sew small neat stitches along the cuts, leaving a small distance of 2-3 mm. It is advisable to match the thread to the color of the ribbon.

Pull the stitched piece as tightly as possible.


Similarly, we assemble into a five-leaf clover and segments bigger size. Now we glue the resulting flowers together, and as the center we sew or glue a beautiful button or bead - whatever you like best.

Sew a small circle of felt on the wrong side. You can also use a circle made of cardboard or plastic bottle, having previously covered it with fabric in color.

A satin ribbon flower can be used in the manufacture of elastic bands, brooches, headbands and other items of fittings and accessories.

Curly braid flower
In addition to roses, you can make another flower yourself, for example, one that looks like a daisy. It can be attached to hairpins and elastic bands, and then you will get an excellent hair decoration. And, despite the fact that now store shelves are full of various accessories, jewelry is much more pleasant to wear if it is made with soul and love with your own hands.
For this wonderful flower, like for a rose, you will need a zigzag braid, a thin needle (it’s even better if it is long - it’s easier to sew with it), good glue or a glue gun, and most importantly, threads that match the color of the braid. Perhaps the last requirement should be memorized, since it is necessary for any needlework, be it sewing a dress or making a small decoration.

Let's start the work by making a circle from the braid of the required length, and carefully sew the ends together with a single-color thread.

Now we are working with inside ribbon circle. You need to sew the “hills” of braid (it resembles a wave, so it kind of “hills”) loosely with wide stitches so that you can later, when we return to the beginning, pull them together. 


You will get a kind of round “accordion”.

This “accordion” will need to be glued to the hairpin.

To do this, you will need to first attach a piece of paper to the flat end of the hairpin, and then apply glue to it. In this case, the flower will stick more firmly and will hold on much better.


All that remains is to add a small “core” of the flower on top. This could be a custom-sized button or matching light rhinestones.

Flowers made from ribbons for a hairpin
Hairpins with flowers add tenderness and romance to your look. Such jewelry will be appropriate for both a baby and an adult lady.
Little flowers
You can decorate hairpins and elastic bands, headbands and brooches yourself by making cute small flowers from multi-colored pieces of narrow satin ribbons. Any girl will love such a stylish and original accessory, and, meanwhile, the manufacturing process will not take much time and effort.

In addition to the satin ribbon itself, 5-10 mm wide, you will also need a flower template, a needle and thread in the color of the ribbon, transparent strong glue (for example, moment-gel), the hairpin or elastic band itself that you want to decorate with flowers, any accessories for jewelry, lighter or matches and scissors.
The template will be useful to us for creating a flower. We advise you to cut it out of cardboard or any plastic packaging in the shape of an arbitrary polygon. However, take into account the diameter and number of corners, make sure that the purchased ribbon is enough for decoration.
Now you can start the main work on the bow. We pull one end of our ribbon through the hole cut in the center of the template, and begin to braid each corner so that each time the ribbon passes through the center. If you pass the ribbon in a circle in 2-3 layers, the flower will turn out to be very unique and multi-layered. To avoid confusion in the order in which the tape passes through the corners, they can be pre-numbered.

Be sure to make sure that the tip of the tape does not slip into the hole in the template and does not move arbitrarily to the sides. To do this, hold the ribbon while you wrap it around the corner, and then use a needle and thread to make a few stitches at the base. Then, without breaking the thread, carefully remove the flower from the pattern and trim the rest of the ribbon, lightly singeing the ends with fire.

Now it is advisable to add rhinestones, buttons or beads to the center of the resulting decoration - both for beauty and to hide the stitches holding the ribbon together. Don't forget to straighten the petals themselves! The decoration can be of a specific tone or multi-colored, by combining and sewing several bows together. This flower can be glued to any elastic band or hairpin, gift packaging- in a word, wherever you want.

Dahlias made from hair ribbons
It’s no secret that all the girls absolutely love to do a variety of hairstyles for themselves and decorate the resulting “masterpieces” in every possible way. And on beautiful, shiny and silky hair of any length stylish accessory- whether it’s a hairpin with a flower or a headband decorated with beads and rhinestones, it will look incredibly beautiful. And who said that decoration for your braids can only be bought in specialized stores? Make them yourself, based on your own desires and preferences!

Of course, stores are always filled with shiny and attractive all kinds of accessories that perfectly complement the image, but homemade decoration it will be much more pleasant for you to wear. And if you use your imagination, it will look much more original and certainly unique. A flower can be made from anything - use leftover organza, mesh or satin ribbon, tulle - whatever you have on hand!
IN in this case, you will need a ribbon 2-3 cm wide, scissors, glue (hot glue is also possible), a lighter, matches or a candle to singe the edges, buttons, beads or rhinestones - whatever you want, and a base for decoration - such as a hairpin or an elastic band. Now have a little patience.
Cut the ribbon into several pieces of 5 cm each. There should be at least fifty of them, and the more magnificent you want the flower, the more pieces you will need. Don't forget to cut the top edges into a tapered shape, giving them the appearance of petals. The edges and bottom of the petal must be scorched with fire, but not too much, so as not to spoil the ribbon.

Wrap the remaining piece of tape around a small circle of cardboard or plastic - this will be the base. Then carefully glue the petals one by one, squeezing them at the base, placing them from the edge to the middle. The diameter of the flower will depend on the width of the circle you choose.

The core can be decorated with any fittings that you like. At the final stage, attach the resulting dahlia to a hairpin or headband using glue.
So you have a wonderful hair accessory that will decorate any hairstyle and give your image an original touch.
DIY carnation flower
Carnations are a favorite among florists due to their unique sweet scent. The carnation flower has also been and remains one of the most favorite decorations for girls and women of any age. It is quite possible to make such an accessory yourself with just a little diligence and imagination. A flower made from a silk ribbon folded on the bias can easily be given a “live” and natural look using a wide straight stitch. No one argues that a bouquet of live carnations looks wonderful, but what prevents a boutonniere made of ribbons from becoming no less beautiful and stylish decoration for hats, handbags, jackets and hairpins?
As an example, a carnation can be made using a silk ribbon of a light cream shade, 2-3 cm wide and half a meter to a meter long - depending on the intended splendor of the future flower.

First, let's give the edges of the carnation the proper textured look. Gently fluff one of the edges of the ribbon with your fingers or a needle, and on the other side, pass a straight line, stepping back from the edge of the ribbon about 2 mm. Tighten the tape, but not all the way, but so that you get an “accordion” 2-3 cm wide and secure with a knot.
Now we twist the gathered piece of tape inwards like a “snail”. We tighten the base of the assembly tightly with thread and secure it. We straighten the upper edge of the resulting bud, giving it the shape of a carnation with our fingers.
Try it ready flower dip (only the very edge) into fabric dye or a natural dye such as tea leaves, red wine or onion peel- you will get the effect of uneven color, typical of garden carnations. Greater waviness and mobility can be given to the petals if the ribbon for the product is cut on the bias.
The next step is to plant the bud on the stem. To do this you will need thick wire - painted or covered with braid or corrugated paper(we place a strip of fabric or paper overlapping in a spiral). The stem is inserted into the stretched base and additionally fixed with a drop of glue. The length of the stem depends on the end goal - longer for a bouquet, shorter for a small boutonniere or threading into a buttonhole.
Perhaps the first flower will take you quite a lot of time, but once you get the hang of it and get the hang of it, you will create exclusive designer jewelry that will attract attention and cause admiration.
Flowers made from satin ribbons look very beautiful. Every person who sees such a decoration will want to repeat it with their own hands. This activity is exciting and addictive. At first, things may not work out, but after a while you can learn everything. They will help with this step by step instructions on folding flowers from ribbons with your own hands.
Making satin flowers
Making flowers from satin ribbons is no more difficult than learning to knit. The main thing is to carefully study the patterns for creating crafts. Then everything will work out. For work you will need the following materials:
1. Ribbons of different widths and colors.
2. Threads of various shades.
3. Scissors.
4. Needles.
5. Sequins.
6. Fishing line.
7. Glue gun.
8. Tweezers.
9. Ruler.
10. Beads.
11. Candle.
12. Desk lamp.
13. Chalk or soap.
There are two ways to make flowers from ribbon - melting or the kanzashi technique.
The second manufacturing method came to Russia from Japan. In this way the locals are studded. Several types of petals were used: sharp, round and long. Hairpins, clothes, hairpins or headbands are decorated with this craft.
Color scheme made from ribbons using the kanzashi method
1. First, prepare the workplace.
2. You will need a table and a lamp with bright light.
3. Take a tape 6 cm wide.
4. It is cut into identical squares.
5. The square is folded diagonally, after which the two corners are lowered to the central fold.
6. Thus, a rhombus is obtained.
7. The side corners are bent back, the cut point is clamped with tweezers.
8. It is straightened with scissors and then pollinated by fire.
9. The result is a round petal.
10. You will need several blanks.
11. The resulting parts are assembled using thread.
12. A bud is obtained, which is glued to the base.
13. The middle is glued on top.
Flowers made from satin ribbons using the kanzashi method are ready!
Fused petal flower
Another common method for making crafts is the reflow method. Typically, the method is used for a large composition, for example, for a basket of flowers. When making crafts using this technique, some nuances are taken into account:
1. Kanzashi petals look more neat than those made using the melting method.
2. This method is labor-intensive, so it may not work the first time.
3. Not all ribbons are suitable.
4. Only ordinary ones, made of brocade, satin or nylon, are used.
First, a blank is drawn on a sheet of paper. The template is cut out. A minimum of 12 petals are made. The template is applied to the tape, outlined with chalk, and then cut out. Each petal is made smaller in size than the previous one. The flame pollinates the edge of each piece.
Finished crafts are assembled into a bud. The work is done carefully so that the flower turns out symmetrical. The base of the craft is pinned with a needle or pin, and a sequin or bead is sewn into the middle. The flower is ready by melting. Such flowers made from satin ribbons fit well into bouquets.
Chamomile made of satin ribbons
Chamomile has always been a symbol of sincerity and tenderness. This craft can be used to decorate a bag or clothing. Chamomile is done different methods. To do this you will need ribbons of different widths.
Take a ribbon 1.5 cm wide. To make a flower you will need scissors, a satin yellow ribbon, a fabric base, a ribbon 1.5 cm wide, matches and a glue gun.
1. The tape is cut into 28 rectangles.
2. The length of each is taken to be 4 cm.
3. The top of the segment is cut out so that a semicircle is formed.
4. The resulting workpiece is melted with a flame so that the edges are bent.
5. The lower front corners are wrapped towards the center.
6. The same is done with the remaining segments.
7. The base is prepared, a circle with a diameter of 2.7 cm is cut out of thick fabric.
8. 14 petals are glued onto the prepared base.
9. Several more pieces of blanks are glued under them.
10. From tape yellow color the middle of the craft is twisted.
11. It is secured with a glue gun to the resulting product.
The beautiful chamomile is ready!
Ribbon flower 5 cm wide
To make the product beautiful and symmetrical, you need to follow the diagram on how to make a daisy from a satin ribbon. There are two ways to form a flower. First option:
1. For the DIY ribbon daisy master class, you will need the following tools: matches, satin ribbon, tweezers, scissors, glue gun, white satin ribbon 5 cm wide.
2. White satin ribbon is cut into 14 pieces.
3. Each craft is cut 5 cm wide.
4. A round petal is made using the kanzashi method.
5. They stick together.
6. Then the middle is made: a loop is made from a satin cord, and another one is placed on it.
7. The loops are held with tweezers.
8. The right end of the cord is punched through 3 holes.
9. A nodule forms. The edges are singed with a candle.
10. The finished center is attached to the chamomile. The flower is ready!
To make crafts using the second method, you will need a needle, matches, scissors, threads, yellow and white satin ribbons, a glue gun and a candle.
The ribbon is cut into thin strips. The length of the workpiece is 7 cm. The edges are singed with a candle or matches. Each piece is folded in such a way as to form a corner. The petals turn over and the two sides are reconnected. It turns out one big one. You will only need 5 blanks.
The center of the bud is made; for this, a circle of small diameter is cut out of cardboard, and a yellow satin ribbon is glued to it. Now the flower is put together. The petals are placed one on top of the other and sewn on with a needle and thread. The middle is attached with a glue gun. The product is ready.
Craft made from ribbon 0.5 cm wide
To complete the work you will need a white satin ribbon 0.5 cm wide, fabric for the base, a glue gun, scissors, matches, and yellow beads.
The white ribbon is cut into 24 pieces. The length of each piece is 8 cm. Each product is folded in half, with a fold formed in the middle. The edges are melted with a candle. All workpieces are made in a similar way.
Then the base is made, for this a circle is cut out of thick fabric. Diameter 2.5 cm. 8 petals are glued to the base. The rest of the workpieces are fixed between them. After this, the middle is made. The workpiece is coated with glue, and yellow beads are poured onto it. When it is sealed, the remnants are shaken off. Use a toothpick to form a circle.
Satin roses
Crafts made from satin ribbon and buttons
To complete the work you will need a ruler, scissors, small tape, buttons, matches and a glue gun. For the manufacture of simple flower The tape is cut into 6 or 8 thin strips. The edges are pressed with a match. The ends of the future flower are glued to the center of the workpiece with a glue gun. The elements are glued together to form a bud. A button is glued to the center of the joints.
simple flower
To work you will need scissors, matches, a pink satin ribbon, a needle and thread, a pencil and a glue gun. The pink ribbon is cut into 5 identical strips. The edges of the workpiece are melted by the flame. Using a pencil, make a mark in the center of each part. The edges of the workpiece are fastened with a needle and thread.
The strips are folded in half. A few drops of glue are applied to the inner surface of the product and the sewn part is glued. The petals are strung on a thread and sewn together. A button or large beads are used to decorate the core.
Felt roses
Flowers are made not only from satin ribbons, but also from felt or felt. For such a rose you will need a needle and thread, super glue, ribbon of blue color, chintz, felt Green colour, wire
A loaf of the future product is cut out of green felt. Six petals are made from calico. The wire is wrapped with green tape, the edges are glued with a glue stick. The blanks are folded in half. Along the cut they are strung on a thread. When the fabric is dry, it can be used for work.
Next, they begin to make the bud. To do this, an inflorescence is attached to the end of the wire, and a stem is put through a hole in the felt. The finished petal craft is glued into the center. You can make several flowers and combine them into a bouquet. Tie everything up with a beautiful ribbon. This blank is well suited for a gift.
Pansies
Making pansies is very simple - the craft is done using the kanzashi method. For pansies you will need:
1. Ribbon 3, 4 and 5 cm wide, purple.
2. Tweezers.
3. Beads.
4. Glue.
5. Hairpins.
Squares are cut out of fabric and folded diagonally. The resulting triangle is folded in the middle twice. The edges of the fabric are trimmed and melted with a flame. It turns out to be a petal. Several pieces are strung on a thread and tied together. This method produces a petal acute form. To make a round petal, the corners are folded towards the center. The same is done on the other side.
