Download video and cut mp3 - we make it easy!
Our website is a great tool for entertainment and relaxation! You can always view and download online videos, funny videos, hidden camera videos, feature films, documentaries, amateur and home videos, music videos, videos about football, sports, accidents and disasters, humor, music, cartoons, anime, TV series and many other videos are completely free and without registration. Convert this video to mp3 and other formats: mp3, aac, m4a, ogg, wma, mp4, 3gp, avi, flv, mpg and wmv. Online Radio is a selection of radio stations by country, style and quality. Online Jokes are popular jokes to choose from by style. Cutting mp3 into ringtones online. Video converter to mp3 and other formats. Online Television - these are popular TV channels to choose from. TV channels are broadcast absolutely free in real time - broadcast online.
You will need:
Tools
Before you start making various models and figures, you need to choose high-quality and durable balls - this is one of the most important points in our business!
You will also need a two-way pump. Important additional tools that may also come in handy include scissors, a small tube tube and a marker.

Also, before you start working with the balloon (inflating, twisting, tying), you need to stretch it a little.
Stretch it with your hands several times so that the latex warms up a little. As a result, pumping will be much easier.
We inflate, as usual, through the neck. A tail remains so that air can pass through when twisted. The length of the main part depends on what kind of figure we are going to make.

Poodle dog
This is the most popular type of twisting. At one time, such a choice was called “losharik”.
- After the ball is inflated, we make one twist on it - this will be the muzzle.
- We fix the first bubble with our fingers; on average, its size is 3-4 cm.
- Next we make 5 identical bubbles, which will be used to make the muzzle. As a result, in the initial part we will get a certain chain of 5 bubbles. Place them together and twist them separately, about 3 times. It turned out to be the face of an animal.
- Next we need to make the legs. But don’t forget to leave 12-13 cm for the future neck.
- Twist the ball so that a bubble emerges approximately in the center, in other words, a sausage.
- Fold it in half vertically, press down both parts and twist them together.
- The front paws are already there. Now there is only a place left from which we will make the hind limbs and tail.
- Fold the ball in half, watch the proportions and twist the back part.

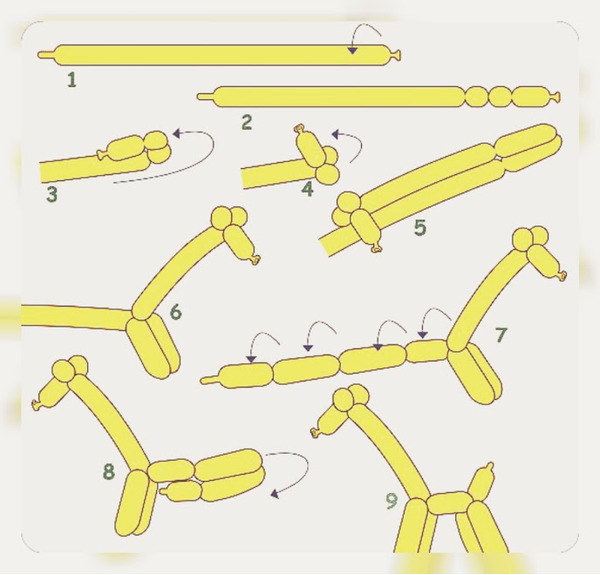
DIY giraffe
We repeat almost the same steps that we described in the previous version. But in this case the head will be slightly smaller.

Here we leave about 2-3 cm on the muzzle, and construct it not from 5, as was the case with the dog, but from 4 sausage bubbles.
We make the neck longer, and therefore the legs. The result will be a short body and tail.
Swan: master class
- We use most of the ball and make a ring out of it.
- Then we take the remaining part for another ring, but this time a little smaller, leaving a little space for the neck and head.
- We press the second ring, which is smaller, into the first.
- Then we create the head and neck - this will be something between the actions that we carried out earlier when making the dog and the giraffe.

You can add more eyes for a more impressive and believable look. A regular marker will do for this.
When performing many twisting and tying actions, there is no need to be afraid. The ball is durable and will easily withstand such a load.
Bunny made from sausage balls

Making a snake


How to make a tiger/leopard
On average, we should get 11 pimples or sausages.

And bubbles 4 and 6 will become the ears of the future animal. Next, we create the torso and legs according to the already familiar pattern. The ends of the ball must be tied with a double knot and divided in half.
 3. The ball folded in half is twisted at the ends. This makes three compartments. One with a loop and one on each edge.
1. Inflate the “sausage” balloon, leaving 15-20 cm uninflated, and tie a knot.
2. Start from the dog's head with a knot. Twist three bubbles. Twist the last two together - these will be the ears.
3. Make a 2.5-centimeter neck and, following it, following the example of the head with ears, twist the front legs.
4. Make about a 10 cm body, followed by the hind legs.
5. Leave a small ball of air at the base of the tail and drive the rest of the air to the end of the tail.
How to inflate an animal's balloon?
The main principle is to inflate from top to bottom.
How to make tiger eyes step by step on a balloon?
The easiest way is to draw with a marker or felt-tip pen.
How to make a realistic bunny face from shdm?
Fill one balloon and tie the end with a knot. Determine the middle of the ball and fold it in half. Twist to form a loop, and in turn, divide this loop in half and twist to form a bow. Fold the free ends of the bow together, retreat to the length index finger and twist.
How to make an ear out of a ball?
Pinch about 4 cm, releasing a little air. Twist it. Then pinch the bubble about 3 cm, also releasing a little air from the bubble. Twist it. Connect both ends of the bubble and twist it together. At this point the bubble takes the shape of an ear.
How to make a figure made of balls stand?
You just need to tie some heavy object that will hold the figure.
How to make a swan neck from a balloon?
1. Twist the first soft bubble 2-3 cm long. This bubble supports the swan's neck in a given position.
2. Lock both ends of the first bubble into one lock.
3. Twist a second bubble about 30 cm long.
4. Lock both ends of the second bubble into one lock.
5. Twist a third bubble about 20 cm long.
6. Lock both ends of the third bubble into one lock.
7. Push and secure the third bubble through the loop from the second bubble (Pic 8-9). The rest of the ball will be the fourth bubble, this is the head and neck of the swan. Bend the fourth bubble to create a swan neck shape. The deflated part will be the beak. Draw eyes with a felt-tip pen.
Undoubtedly, many people love balloons, they cause delight and good mood, but somehow the aerial figures from them look special. The celebration looks more elegant and colorful, and the impressions from it are unforgettable.
Over time, such a direction as twisting appeared - from English word“twist”, which is the modeling of air figures from special balls created specifically for these purposes.
You can really learn how to twist balls and create aerial figures; you just need to be patient, durable balls and a special pump. Balloon figures can become holiday decorations, gifts, or simple decor in the room. It will be especially interesting to learn the art of twisting with children: the process itself will teach perseverance, patience and accuracy, and the result will certainly please the child.
What you need for twisting
You should start by selecting the basic materials that you will need to learn how to twist and create shapes from long balls. To begin with, you will only need a few items, and after acquiring certain skills, the set can increase:
- Long Balloons or ShDM (balls for modeling). The choice of balls must be taken seriously, since the quality and strength of the figure depends on it.
- A two-way piston pump is an important tool when working with long balloons because it is almost impossible to inflate strong balloons without a hand pump. Sometimes the pump is sold as a set with a ShDM.
- Scissors, marker and other auxiliary items.
Before inflating a long balloon, it is recommended to stretch it a little - stretch it several times with your hands to warm up the latex material, then it will be much easier to work with the balloon.
Rules for strong figures made from long balls
After heating, the ball needs to be stretched in length and put with a hole on the tip of the pump. Inflate the balloons slowly and evenly. Be sure to leave a small tail so that air can escape there and the ball will not burst when twisted, usually about 10 cm. The thickness of the ball depends on the type of figure, you can follow the step-by-step instructions.
Once the ball reaches the desired length and width, it must be carefully removed from the pump and the tip tightened with a knot. Threads are not suitable for ShDM.
An important rule for a strong figure: twist it only in one direction, for example clockwise. Be sure to hold the twisted places with your fingers, since at any moment the figure can unwind and the time spent on it will be in vain.
Types of twisting
To get an airy figurine in the form of an animal or flower, a long inflated ball is twisted into bubbles different lengths, and then connects to the lock. Depending on the type of figure, the following types of twisting are distinguished:
- Regular twist- twisting a small bubble on the ball. The size of the bubble is determined and squeezed by hand at this distance, then twisted to one side about 3-4 times. Subsequent bubbles curl in the same direction.
- Twisting with a lock- fixing 3 consecutive bubbles into a specific figure. The 2 outermost bubbles are folded at the point of their connection, then twisted around with the next one in the same place 3-4 times.
- Twisting with a lock (another method). Two bubbles are twisted and the ball is bent at the place of the last twist, the working part is compressed and the next bubble is outlined, and only then is twisted together.
- Twisting with bend- securing three consecutive bubbles into a figure, where the two outermost ones are not twisted, but simply bent. The bubble is twisted, the ball is bent and twisted 2-3 times.
Types of twisting can be practiced on balls before committing to twisting in order to gain manual dexterity skills. Once the twisting technique has been practiced, it will be much easier to understand and follow the instructions for forming shapes.
Long balloon figures
Some aerial figures are not difficult to make, you just need to stick to them step by step instructions. Also, each figure has its own characteristics, so attentiveness and perseverance are required - it may not work out right away, but don’t despair, twisting loves perseverance.
Dogs
The most common long ball shape is the poodle. Making a dog is not difficult, following the following instructions:
- Inflate the balloon using a pump and leave an uninflated part of approximately 8 cm.
- Make three bubbles about 4 cm in size, the first one is the poodle's muzzle, fix it with your fingers (so as not to unwind).
- Pull back one bubble and twist with a lock.
- Make three more twists of the same size and twist them with a lock so that you get a loop - these are the poodle's legs.
- Twist 4 more bubbles.
- Retreat one bubble, make another lock.
- The result is a dog, but upside down, all that remains is to unfold the muzzle and lift the tail up - the figure is ready.

If you lower the ears down and lengthen the body a little, you get a dachshund.
Flowers
Making a flower from long balls is a little more difficult. Here you will need three balls:
- Shade of petals: red, pink, orange, white, etc.;
- The color of the stem and leaf is usually green, but you can experiment;
- Flower center color: yellow or orange.
It is better to start creating a flower with the petals.
- Inflate the bright balloon with a pump, leave a tail 3-4 cm in size, and tie the hole with a knot.
- Close the beginning of the ball and its end - tie them together to form a circle.
- Fold the circle in half and twist three pairs of bubbles so that it resembles a double row of connected sausages.
- Now you need to fold this bundle like an accordion, as shown in diagram 5-6.
- Squeeze in the middle with your fingers and twist into a common twist, you get 6 petals.
- You can start at the stem, inflate the entire green ball with a pump, but do not make it too tight, because there will be two more leaves on the stem.
- You should step back about 10 cm from the tied knot and twist it, and then bend the resulting twist in half and twist it again, so that you get a double twist.
- You can insert the resulting twists of the stem into the petals, or you can inflate a yellow ball (or another color) and make a core out of it, after cutting off the excess part after twisting.

A round ball is also suitable for the core, if you inflate it also not completely, and fasten it to the stem with a regular knot.
- To create leaves on the stem, just twist with a bend and align the resulting leaves - the flower is ready.
Bouquets of airy flowers look more impressive; they are quite large, so 5-7 of these flowers, tied with a beautiful wide ribbon, will be enough for a holiday.
If you leave the petals at the accordion stage, as in diagram 6 of figure 4, and then link them to the stem, you will get charming tulips that can be given as a gift on March 8th.
Now there are many variations on how to make flowers from long balls, there are different patterns and methods that are not available to every beginner, but you can quite easily make charming lotuses or water lilies that will look spectacular in the water or on the table.
So, in order to create a beautiful lotus, you will need:
- Two balls of pink/white/red or other colors - for petals;
- One ball yellow color for the core;
- One dark green ball;
- Pump and scissors.
Before inflating the balloons, you need to stretch and stretch them a little, because there is a lot of twisting to be done for the lotus.

Animals
If you get a dog, you will get other little animals. The technique of twisting a giraffe figure is very similar to modeling a dog, there are some differences:
- When making a giraffe, you need to model the head smaller, and leave only 2-3 cm on the muzzle;
- After the muzzle there will be not 5 twists, but 4;
- The giraffe's neck will be longer and this must be taken into account when twisting;
- The body will be shorter and the tail smaller.
It’s not difficult to model a bunny; the technique is very similar to a dog. For the bunny you will need one balloon, a pump and a marker to complete the look.
- Inflate the balloon with a pump and leave about 8 cm of uninflated tail.
- Twist the first bubble, 8 cm long - this is the head of a hare.
- Twist two more bubbles for bunny ears.
- Twist the next bubble, about 13 cm in size, and repeat this action again.
- Connect the two ends of the chain of the two outer twists into a lock.
- Twist the next bubble, only 2-3 cm long - this will be the animal’s neck.
- Further twisting will be done for the front legs of the hare: twist the bubble about 5 cm, the next 2-3 cm, the next the same 2-3 cm, and another one - 5 cm.
- Connect the chain of the last 4 twists into a single lock - the front legs are done.
- Twist a bubble 5 cm in size - this is the body of the animal.
- All that remains is to twist the bubbles for the hind legs: make a twist 15 cm long and connect both ends into a lock.
- Another bubble is a small tail.
To complete the modeling of the bunny, all that remains is to unfold all the parts of the body into place, assembling them into the figure of a hare. For complete completion, you can paint on the eyes, nose and antennae - the bunny is ready.
It's also not particularly difficult to make a tiger or a cat. These animals have the same modeling scheme, but the colors change.
- Inflate the balloon with a pump, leave the tail 13-14 cm unfilled with air, remove it from the pump and tie the hole into a knot. There will be 11 twisted bubbles in total.
- Twist 7 small bubbles, holding with your hands.
- Between the 2nd and 3rd twist, make another one, between 4th and 6th the same one.
Modeling the forehead, jaw, ears and cheeks of a tiger/cat:
- Take the first bubble and stick the tiger's muzzle inside, holding it from the outside, wrap this bubble between the 8th and 9th bubble - the nose and mouth of the tiger will appear, and the 4th and 6th bubbles are the ears.
- The body and paws of the animal are modeled together. Tie the ends of the ball with a double knot and divide in half, leaving two bubbles - these are the hind legs.

The resulting figure of long balls will look more like a tiger if you add a marker to the image: draw eyes, nose, mustache and characteristic stripes.
A cat is modeled using the same technique, only the colors will be different.
Birds
From long balls you can make anything and anyone, including birds. Swans are especially common. To model a swan, you only need one ball, white or light yellow.
- Inflate the ball using a pump and leave a small tail of about 6 cm, it is needed for twisting and for the future beak of the bird.
- Form a ring from most of the ball and hold it with your fingers; with the other hand, bend the ring in half.
- Twist each ring separately and insert one ring into the other, forming it into the body of a bird.
- The remaining part is the neck and head, it must be carefully bent and held for a while so that the ball takes shape.
- Finish the swan's eyes and decorate its beak - the bird is ready.

Don’t be afraid to twist, even if there are a lot of similar actions in the scheme, the balloon will not burst: firstly, there is room for air, secondly, the balloons are made of latex and have high elasticity, and thirdly, before inflating, the balloon must be warmed up and stretched .
Conclusion
As you can see, if you have a diagram and description, it is not difficult to make figures from long balloons. Gradually, from easy figures, you can move on to more complex modeling patterns, acquiring more and more twisting skills and sleight of hand.
In Japan, there lives an incredible master of twisting, who creates entire masterpieces out of balloons, but he also once started with dogs and flowers.
Decoration of the school assembly hall To last call should consist of wall compositions, floor bouquets, and hanging decorations. So that balloons are everywhere - they perfectly fill the space and make the room solemn!
To make such a chain you will need the following materials:
· Balloons 12"/30cm Mother of pearl WHITE 072 – 4pcs
· Balloons 5"/13cm Mother of Pearl WHITE 072 – 16pcs
· Balloons 12" Pastel YELLOW with 1 piece of drawing. Smile (silk) – 3 pcs.
· polysilk metallized turquoise – two pieces 70x70cm
· ribbon for balloons – 7-10m
The total cost of this composition (excluding the cost of helium and fishing line - since the length of fishing line you need depends on your specific premises) will be 60 rubles.
Let's start by making decorative weights for our composition. Take 5'' white Balloons– you will need four balls. First, take two balloons and, without inflating them, place one balloon inside the other, then take two more balloons and also place one balloon inside the other. Fill the inner balloons with water and tie the water-filled balloons together with the outer balloons in one knot. So you have two weights, which now just need to be decorated.
To do this, take a piece of polysilk and wrap one weight in it. Secure the polysilk with balloon tape. Also decorate the second weight.
Next, let's make blank collars for our smiling balloons. For this you will also need 5'' Balloons. Inflate all remaining 5'' balloons with air - 12 pieces. Tie the inflated balloons with a simple knot. Now tie the balloons in pairs to each other by their tails. And intertwine the resulting pairs of balloons with each other in the center so that you form three bundles of four balloons each.
Now we need inflate helium balloons: links (all three balls) and balloons - emoticons (also all three balls). Tie the inflated balloons with simple knots. Now tie the balloons together in pairs by their tails - linking and balloons - smileys. To do this, for linking balloons, use the tail on the top of the balloon.
Next, on each resulting figure you need to “put on” a collar of 5’’ balloons. To do this, take one bunch of four 5” balloons, spread two adjacent balloons, put the bunch on the knot of the linking and smiley bunch and twist those 5” together several times. Balloons, between which there was a knot of linking and a smiley.
Also “dress” the collars on the remaining two figures.
All we have to do is secure the balloons and figures to the fishing line. First, cut the length of line you need. Attach weights to both ends of the fishing line, as we did at the very beginning. Next, tie the balloons and figures to the fishing line one by one, alternating them with each other. In order to Balloons did not slide along the fishing line, it is important to tie them using the tail of the balloons, and not the ribbon.
After tying all the balloons to the fishing line, tie small pieces of ribbon around their tails and curl the free ends of the balloon ribbon using scissors. Your composition is ready!
As you can see, such a chain of balloons is very easy to make with your own hands - it doesn’t take much time at all. And the fact that this composition is attached with just two attachment points, its height and length depends only on the needs of the design - all this makes it universal. We are sure that you will find a place for it in your hall! And if you want to experiment with color scheme compositions and choose other balloon designs, our balloon catalog!
There are a lot of ways to decorate rooms using balloons, and new ones are constantly appearing. For example, now in our online store you can buy chains of helium-filled balloons! The result is a decoration similar to an arch, although the principle of its manufacture is different.
Here the balls are tied to a special ribbon. And as they fill with helium, the ribbon rises to form an arch. It looks very beautiful and unusual, especially since the colors of the ribbon and the balls themselves, as well as their shape, can be anything you want, so you can come up with a lot of cool decorative elements for any holiday!
You can buy inexpensive chains of balloons from us
We try to differentiate ourselves from our competitors, so we offer you good prices on chains of balls, photos of which you can see on this page. There are several product options here, and you can:
- Select one of the ones you like, indicate the colors that we use in making the composition, and other attributes, and send the item to the cart;
- Call us or leave a request for a call back, and order your option over the phone if you haven’t found anything similar in the catalog.
What types of balloon chains are there?
In fact, they can be absolutely anything in appearance, because there are a lot of varieties of balls! For example, we use both regular latex and foil balls, as well as linkballs (or linking balls) - they have “tails” on both sides, which allows you to tie them different ways. The results are varied and very colorful compositions.
At the same time, you can leave a distance between the products by simply tying them to a ribbon, or you can not leave them (this happens when using linkoluns). You can additionally decorate the resulting arch with mini-compositions of small balls and shdm balls.
We are waiting for orders for chains of helium balloons!
Place your order through the website around the clock, every day, or by phone during the hours specified in the “Contacts” section. When ordering a call back, don’t worry, you won’t have to wait long – we will call you back within a few minutes.
You can pick up your purchase yourself, and if this is inconvenient, then order delivery, which can be carried out at any time of the day! You will find the cost and delivery options in the appropriate section.
We hope that you will like our range, and we are waiting for you among our regular customers!