From the "Country of Masters"
further words of the author


Dear needlewomen, I suggest you knit such a cute tooth together with a toothbrush and a tube of paste. This toy will help your child learn to take care of his teeth and will bring pleasure and joy.
I will be very glad if you get such a tooth.
This is my original work and idea, and therefore if you knit such a Zubik according to my author’s pattern and post your photos on the Internet, please be sure to indicate my name as the author of the idea and the pattern you knitted using. Thanks for understanding.
Happy knitting!!!
The toy is quite large (30 cm), but you can take a thinner thread and a smaller hook and the Zubik will also be smaller.
Acrylic yarn.
Yarn consumption: white - 200 g, a little orange (for the skirt and flower), yellow (for the middle of the flower), red and pink (for the paste and brush), blue (for the face).
Hook No. 4.5.
Top part of the tooth (4 identical parts):
Link 3 ch. close in a ring.
3. Knit a row, doubling through 1 stitch.
4. Knit a row, doubling through 1 stitch.
5, Knit a row doubling through 1 stitch.
6. Knit a row without changes.
7. Double every 3rd column.
8. Knit a row without changes.
9. Knit a row without changes.
10. Double every 5th column.
11. Knit a row without changes.
12. Knit a row without changes.

So 4 identical parts are ready.

8
Now you need to sew all 4 parts together (as in the photo).
Stitching is done with the same thread as knitting.

9.
10.
11.
We start knitting from the top of the tooth to the body of the tooth.
Tooth body:
1. Reduce 8 columns - along the edges of the clove - 4 pcs. and between the parts of the top of the tooth - 4 pcs.
2. Knit a row without changes.
3. Decrease every 6th column.
4. 5. 6. 7. 8. Knit rows without changes.
9. Decrease every 5th column.
10. 11. 12. 13. 14. Knit rows without changes.
15. Decrease every 5th column.
16. 17. 18. 19. 20. Knit rows without changes.

12
This is what happened.

13.
14.
Next we knit a circle and stripes for the bottom of the tooth:
Circle:
Link 3 ch. close in a ring.
1. Double the number of st.b.n. (6 pcs.)
2. Double the number of st.b.n. (12 pcs.)
3. Double every 2nd column (every other).
4. Double every 2nd column (every other).
Stripes (4 pcs.):
1. Tie 10 ch.
Knit an additional 4 rows.

15
We sew the stripes to the circle - in the same way as in the photo.

16.
Sew the other sides of the stripes to the body of the tooth (as in the photo). We try to sew it so that the holes for future legs are approximately the same.
We secure all sides except one (in the photo one side is not secured - where the needle is), so that it would be convenient to stuff the tooth.

We stuff the tooth with padding polyester and give it a shape. Then we sew on the remaining unsewn edge of the strip (as in the photo).
34.
35.
36
We begin to knit the legs (directly from the body).
Legs (4 pcs.):
1. We knit 30 st.b.n. around the hole (this amount should knit itself).
If you end up with 29 stitches in one leg and 31 in the other, it’s not scary - you just need to add or subtract 1 or 2 stitches. so that all 4 legs are the same during further knitting.
7. Decrease every 6th column.
13. Decrease every 6th column.
14. 15. 16. Knit rows without changes.
Stuff the legs (as in the following photos).
17. Decrease every 2nd column (every 1) (until the very end).
.
37.
38.
39
This is what happened.

40
Here is the body and our little tooth is ready.
.
41
Eyes:
Protein:
Link 3 ch. close in a ring.
1. Double the number of st.b.n. (6 pcs.)
2. Double the number of st.b.n. (12 pcs.)
4. Knit without changes with a blue half-stitch.
Blue pupil:
Link 3 ch. close in a ring.
1. Double the number of st.b.n. (6 pcs.)
2. Double the number of st.b.n. (12 pcs.)
3. Double every 2nd column (after 1)
Black pupil:
Link 3 ch. close in a ring.
1. Double the number of st.b.n. (6 pcs.)
2. Double the number of st.b.n. (12 pcs.)
Blue and black pupils are knitted more thin thread and crochet number 3.
Nose:
Link 3 ch. close in a ring.
1. Double the number of st.b.n. (6 pcs.)
2. Double the number of st.b.n. (12 pcs.)
3. Double every 2nd column (every 1).
4. Double every 2nd column (every 1).
.
42.
Sew the pupils of the eyes onto the whites, gather the nose with a needle and thread along the edges, tighten, stuff and sew to the tooth (eyes and nose).
Then embroider the eyelashes and mouth with the same threads (blue).

43
Handles (2 pcs.):
1. Tie 20 ch. close in a ring.
2. 3. 4. 5. 6. Knit rows without changes.
7. Reduce 3 columns - evenly.
8. 9. 10. 11. 12. Knit rows without changes.
13. Decrease every 4th column.
14. 15. 16. 17. 18. Knit rows without changes.
19. Decrease every 4th column.
20. 21. 22. 23. Knit rows without changes.
24. Decrease 1 column.
Palms (2 pcs.):
Link 3 ch. close in a ring.
1. Double the number of st.b.n. (6 pcs.)
2. Double every 2nd column.
4. Decrease every 2nd column.
Then stuff it.
5. Reduce each column to the end.
Fingers (8 pcs.):
1.Tie 3 ch. close in a ring.
2. Double 2 stitches (5 sts).
3. 4. 5. Knit a row without changes.
The fingers are knitted with a thinner thread and crochet number 3.
.
44. Sew palms to hands, fingers to palms. There is no need to stuff your fingers.
Then stuff the handles, give them a shape (bend them in the right place and secure the shape with threads - sew them) and sew them to the tooth 
45
Brush:
3. Double the number of st.b.n. (12 pcs.)
Then knit rows without changes to the required length, take a wooden stick, wrap it with padding polyester (if it is too thin), put it in a knitted “case” and then decrease the stitches until the very end.
Then knit 2 rectangles - red and pink, the size of a brush head.
For me it turned out like this:
I dialed 8 v.p. and then knitted 8 rows.
see the following photos.
Then you need to sew a red rectangle to the edge of the brush on 3 sides, then fill the resulting pocket with padding polyester and sew the 4th side to the brush. Sew the pink rectangle on top (on the red one).

46.
47.
48.
49.
50
We begin to attach the pile (threads) to the brush according to this principle: Every 2 threads must be hooked onto the loops of the head in the same way as you usually attach the piles to a scarf.
I made a pink stripe in the middle of the brush and white stripes along the edges.
And you can do it to your liking.
.
51.
We knit a pink stripe and sew it around the brush pile (as in the photo).
Tube of paste:
1. Tie 37 vp. and close in a circle.
2. 3. 4. Knit rows without changes.
5. Decrease every 6th column.
6. 7. 8. 9. 10. 11. Knit rows without changes.
12. Decrease every 6th column.
13. 14. 15. 16. 17. 18. Knit rows without changes.
19. Decrease 2 columns.
20. 21. 22. 23. 24. 25. Knit rows without changes.
26. Decrease 2 columns.
27. 28. 29. 30. 31. 32. 33. 34. 35. 36. 37. Knit the row without changes.
38. Decrease 2 columns.
39. - 49. Knit a row without changes.
50. Go pink. Reduce 2 columns.
Then sew the tube at the bottom and stuff it.
51. Decrease every 3rd column.
52. Reduce every 2nd column - to the end.
Tube cap:
1. Link 3 ch. close in a ring.
2. Double the number of st.b.n. (6 pcs.)
3. Knit a row without changes.
4. Knit a row without changes.
5. Add 1 column.
6. Add 1 column.
7. Knit a row without changes.
Fill the cap and sew it to the tube.
You can also knit a red stripe, sew it to the tube and embroider the name of the paste/child’s name or something else on it (I embroidered the word Zubik in English). You can also decorate the tube differently - according to your taste.
I made my little tooth a skirt and a flower on his head, and of course you can decorate your little tooth as you like - for example, you can give him a bow tie or a hat - make him a boy.
10 years spent by the company " RegAdvisor" in the Moscow market of legal and accounting services allowed the company to identify the most pressing needs business people and provide on the highest level These services are in demand, in particular - to create a catalog in which you can choose ready-made LLCs at a reasonable price, with the necessary package of documents and the opportunity to start work the very next day! See screenshots below.


Another idea from my niece :)
Here's a stylized tooth. Just in case anyone wants to repeat it, I’ll attach a schematic description of the work.

For the “crown”, white cotton thread Lily or Iris was used in 2 folds and hook No. 3. I just had small leftovers from balls of yarn.
We start with 4 identical elements. This will be the top part, the “crown” of the tooth. taken from https://www.site

On the last (fourth) element we leave the working thread to continue knitting, and on the rest we cut it and fasten it.
You get 4 protruding parts of the tooth crown. taken from https://www.site


The diagram shows the first 2 rows; continue knitting in the following way:
3rd row - like the second taken from https://www.site

4th row - instead of single crochets, we knit half-columns
Row 5 - like row 2.
For the sixth row, we decrease the loops to narrow the root of the tooth even more. Of the 32 loops, 24 will remain.
Row 6 - 1 chain lifting loop + *(1 WITH Double crochet in 2 previous rows, i.e. decrease + 2 sc)* 8 times + 1 WITH connecting column in the first sc of the row.
Row 7 - 1 VP + 24 RLS + 1 SS
By the eighth row, the working thread should be approximately in the middle between the 2 protruding parts of the “crown”; if it is far from the middle, then bring it in with a SS. The next step is to cast on 6 VPs and attach it with a SS to the opposite side. This results in the division of the base into 2 parts of the root.
Now we continue knitting only 1 half in a circle. First, 1 VP lifting and sc in a circle, including a chain of VP. In the second row of posts on the jumper chain, it is important to tie the posts to only 1 of the 2 threads of the braid, so that you can then attach the second half of the root to the second one.
For greater clarity, I show this moment in the photo below. taken from https://www.site

In the next rows I decreased 1-2-3 loops according to my mood, focusing on the desired length of the root. At the end there were about 4 loops left, I pulled them together with a working thread into 1 loop, secured them and cut the thread.
I attached the thread to the second open half and knitted it in the same way as the first. taken from https://www.site

Then, through the hole in the crown, I stuffed a tooth model with padding polyester, leaving all the unused tails inside. Don't forget to stuff the protruding parts too. taken from https://www.site

For the last element in 1 thread:
1st row - knit an amigurumi ring 1 VP + 8 RLS + 1 SS
2nd row - 1 VP + *(2 RLS in 1 last row)* 8 times + 1SS
3rd row - 1 VP + 16 RLS + 1 SS.
Fasten, cut the thread with a long tail for sewing.
Place the resulting circle in the center and sew the loops of the central circle and those free from protruding elements. For sewing, a “gypsy” needle or baby set embroidery taken from https://www.site

From the "Country of Masters"
further words of the author
Dear needlewomen, I suggest you knit such a cute tooth together with a toothbrush and a tube of paste. This toy will help your child learn to take care of his teeth and will bring pleasure and joy.
I will be very glad if you get such a tooth.
This is my original work and idea, and therefore if you knit such a Zubik according to my author’s pattern and post your photos on the Internet, please be sure to indicate my name as the author of the idea and the pattern you knitted using. Thanks for understanding.
Happy knitting!!!
The toy is quite large (30 cm), but you can take a thinner thread and a smaller hook and the Zubik will also be smaller.
Acrylic yarn.
Yarn consumption: white - 200 g, a little orange (for the skirt and flower), yellow (for the middle of the flower), red and pink (for the paste and brush), blue (for the face).
Hook No. 4.5.
Top part of the tooth (4 identical parts):
Link 3 ch. close in a ring.
3. Knit a row, doubling through 1 stitch.
4. Knit a row, doubling through 1 stitch.
5, Knit a row doubling through 1 stitch.
6. Knit a row without changes.
7. Double every 3rd column.
8. Knit a row without changes.
9. Knit a row without changes.
10. Double every 5th column.
11. Knit a row without changes.
12. Knit a row without changes.
So 4 identical parts are ready.
8
Now you need to sew all 4 parts together (as in the photo).
Stitching is done with the same thread as knitting.
9.
10.
11.
We start knitting from the top of the tooth to the body of the tooth.
Tooth body:
1. Reduce 8 columns - along the edges of the clove - 4 pcs. and between the parts of the top of the tooth - 4 pcs.
2. Knit a row without changes.
3. Decrease every 6th column.
4. 5. 6. 7. 8. Knit rows without changes.
9. Decrease every 5th column.
10. 11. 12. 13. 14. Knit rows without changes.
15. Decrease every 5th column.
16. 17. 18. 19. 20. Knit rows without changes.
12
This is what happened.
13.
14.
Next we knit a circle and stripes for the bottom of the tooth:
Circle:
Link 3 ch. close in a ring.
1. Double the number of st.b.n. (6 pcs.)
2. Double the number of st.b.n. (12 pcs.)
3. Double every 2nd column (every other).
4. Double every 2nd column (every other).
Stripes (4 pcs.):
1. Tie 10 ch.
Knit an additional 4 rows.
15
We sew the stripes to the circle - in the same way as in the photo.
16.
Sew the other sides of the stripes to the body of the tooth (as in the photo). We try to sew it so that the holes for future legs are approximately the same.
We secure all sides except one (in the photo one side is not secured - where the needle is), so that it would be convenient to stuff the tooth.
We stuff the tooth with padding polyester and give it a shape. Then we sew on the remaining unsewn edge of the strip (as in the photo).
34.
35.
36
We begin to knit the legs (directly from the body).
Legs (4 pcs.):
1. We knit 30 st.b.n. around the hole (this amount should knit itself).
If you end up with 29 stitches in one leg and 31 in the other, it’s not scary - you just need to add or subtract 1 or 2 stitches. so that all 4 legs are the same during further knitting.
7. Decrease every 6th column.
13. Decrease every 6th column.
14. 15. 16. Knit rows without changes.
Stuff the legs (as in the following photos).
17. Decrease every 2nd column (every 1) (until the very end).
.
37.
38.
39
This is what happened.
40
Here is the body and our little tooth is ready.
.
41
Eyes:
Protein:
Link 3 ch. close in a ring.
1. Double the number of st.b.n. (6 pcs.)
2. Double the number of st.b.n. (12 pcs.)
4. Knit without changes with a blue half-stitch.
Blue pupil:
Link 3 ch. close in a ring.
1. Double the number of st.b.n. (6 pcs.)
2. Double the number of st.b.n. (12 pcs.)
3. Double every 2nd column (after 1)
Black pupil:
Link 3 ch. close in a ring.
1. Double the number of st.b.n. (6 pcs.)
2. Double the number of st.b.n. (12 pcs.)
Blue and black pupils are knitted with a thinner thread and crochet number 3.
Nose:
Link 3 ch. close in a ring.
1. Double the number of st.b.n. (6 pcs.)
2. Double the number of st.b.n. (12 pcs.)
3. Double every 2nd column (every 1).
4. Double every 2nd column (every 1).
.
42.
Sew the pupils of the eyes onto the whites, gather the nose with a needle and thread along the edges, tighten, stuff and sew to the tooth (eyes and nose).
Then embroider the eyelashes and mouth with the same threads (blue).
43
Handles (2 pcs.):
1. Tie 20 ch. close in a ring.
2. 3. 4. 5. 6. Knit rows without changes.
7. Reduce 3 columns - evenly.
8. 9. 10. 11. 12. Knit rows without changes.
13. Decrease every 4th column.
14. 15. 16. 17. 18. Knit rows without changes.
19. Decrease every 4th column.
20. 21. 22. 23. Knit rows without changes.
24. Decrease 1 column.
Palms (2 pcs.):
Link 3 ch. close in a ring.
1. Double the number of st.b.n. (6 pcs.)
2. Double every 2nd column.
4. Decrease every 2nd column.
Then stuff it.
5. Reduce each column to the end.
Fingers (8 pcs.):
1.Tie 3 ch. close in a ring.
2. Double 2 stitches (5 sts).
3. 4. 5. Knit a row without changes.
The fingers are knitted with a thinner thread and crochet number 3.
.
44. Sew palms to hands, fingers to palms. There is no need to stuff your fingers.
Then stuff the handles, give them a shape (bend them in the right place and secure the shape with threads - sew them) and sew them to the tooth
45
Brush:
3. Double the number of st.b.n. (12 pcs.)
Then knit rows without changes to the required length, take a wooden stick, wrap it with padding polyester (if it is too thin), put it in a knitted “case” and then decrease the stitches until the very end.
Then knit 2 rectangles - red and pink, the size of a brush head.
For me it turned out like this:
I dialed 8 v.p. and then knitted 8 rows.
see the following photos.
Then you need to sew a red rectangle to the edge of the brush on 3 sides, then fill the resulting pocket with padding polyester and sew the 4th side to the brush. Sew the pink rectangle on top (on the red one).
46.
47.
48.
49.
50
We begin to attach the pile (threads) to the brush according to this principle: Every 2 threads must be hooked onto the loops of the head in the same way as you usually attach the piles to a scarf.
I made a pink stripe in the middle of the brush and white stripes along the edges.
And you can do it to your liking.
.
51.
We knit a pink stripe and sew it around the brush pile (as in the photo).

Tube of paste:
1. Tie 37 vp. and close in a circle.
2. 3. 4. Knit rows without changes.
5. Decrease every 6th column.
6. 7. 8. 9. 10. 11. Knit rows without changes.
12. Decrease every 6th column.
13. 14. 15. 16. 17. 18. Knit rows without changes.
19. Decrease 2 columns.
20. 21. 22. 23. 24. 25. Knit rows without changes.
26. Decrease 2 columns.
27. 28. 29. 30. 31. 32. 33. 34. 35. 36. 37. Knit the row without changes.
38. Decrease 2 columns.
39. - 49. Knit a row without changes.
50. Go pink. Reduce 2 columns.
Then sew the tube at the bottom and stuff it.
51. Decrease every 3rd column.
52. Reduce every 2nd column - to the end.
Tube cap:
1. Link 3 ch. close in a ring.
2. Double the number of st.b.n. (6 pcs.)
3. Knit a row without changes.
4. Knit a row without changes.
5. Add 1 column.
6. Add 1 column.
7. Knit a row without changes.
Fill the cap and sew it to the tube.
You can also knit a red stripe, sew it to the tube and embroider the name of the paste/child’s name or something else on it (I embroidered the word Zubik in English). You can also decorate the tube differently - according to your taste. Work by Maria Lebedeva. Connected according to my MK.

If you knit such a Zubik according to my author’s pattern and post your photos on the Internet, please be sure to indicate my name as the author of the idea and the pattern you knitted using. Thanks for understanding.
Knitted gnome - the work of Tamara Novak. Tamara lives in Germany. I became interested in knitting toys a year ago and since then I have knitted almost nothing but toys. Now she already has more than a dozen designer toys with descriptions of their knitting.
Tamara brings to your attention a description of knitting a wonderful gnome. When using another color range he might as well be a Christmas gnome. Knit with pleasure for the joy of yourself and those around you!
The gnome is crocheted from acrylic (100 g/300 m) with a crochet size of 1.75.
Height – 11.5 cm.
The mouse tooth is knitted quickly and easily, stands and lies well. He doesn't know how to sit, but this can hardly be considered a disadvantage - your child will love him with all his heart.
 |
- interesting selection for the site!!!
- Introductory article to knitting amigurumi. Basic techniques and simple toys.
Materials
- yarn: flesh-colored, white, raspberry, green, purple
- several cm of black iris
- suitable hook
- beads or ready-made eyes ø 5-6 mm
- 2 buttons ø 5 mm for pants
- filler
- pieces of plastic folder/cover for insoles
- sewing needle.
All parts are knitted in a spiral and filled with filler during the manufacturing process.
Abbreviations used
- VP - air loop
- ss – connecting post
- sc - single crochet
- dc - double crochet
- pssn – half double crochet
- inc – 2 sc in one loop
- dec – 2 sc knit together
Flesh-colored yarn.
3 ch, 4 dc with one top in the last loop.
Finish by tying both ends of the thread tightly together, leaving a few cm for sewing.
Head, torso, legs
2nd row: 6 inc (12)
3rd row: (inc, 1 sc) x 6 (18)
4th row: (inc, 2 sc) x 6 (24)
Row 5: (inc, 3 sc) x 6 (30)
Row 6: (inc, 4 sc) x 6 (36)
Row 7: (inc, 5 sc) x 6 (42)
Row 8: (inc, 6 sc) x 6 (48)
Rows 9-16: 48 sc
Row 17: (dec, 6 sc) x 6 (42)
Row 22: (dec, 5 sc) x 6 (36)
23rd row: (dec, 4 sc) x 6 (30)
24 row: (dec, 3 sc) x 6 (24)
Row 25: (dec, 2 sc) x 6 (18)
Fill very tightly with filling.
Let's start designing the face.
We tighten the eyes. I use dental floss or strong, thin cotton floss. Insert the needle into the open hole and withdraw it between rows 9 and 10. Count 3-4 loops to the side, insert the needle and bring it out into the open hole of the head.
Now you need to take both ends of the thread and pull them as tight as possible, while simultaneously pressing thumb to the tightening place. You may need someone's help.
Tie the ends of the threads into 2 knots. Don’t be afraid to overtighten, the tension will still loosen when the knot sinks into the stuffing. It would be a good idea to repeat the procedure again.
Now you can glue the eyes/sew on the beads.
I placed my eyes together, I find this position the most attractive.
Sew on the nose, embroider the mouth and eyebrows. We hide all the knots and ends of the threads in the hole in the head.
Row 26: (dec, 1 sc) x 6 (12)
Row 29: (inc, 1 sc) x 6 (18)
Row 30: 18 sc
Row 31: (inc, 2 sc) x 6 (24)
Rows 32-34: 24 sc
Row 35: (inc, 3 sc) x 6 (30)
Rows 36-39: 30 sc
41 row: 36 sc
Here I knitted a chain of ch along the border of the color transition, piercing the fabric with the hook and catching the thread from the inside of the part. I don’t know what it’s correctly called, and if you don’t know either, then you can simply knit a chain of ch, equal to the circumference of the torso, and sew it to the pants, as if it were a pants belt.
Fill the part with stuffing. Divide the knitting in half and finish each leg separately. Each pant leg will consist of 18 loops and 4 rows, and in the 4th row, knit every 2nd and 3rd loops together. Finish, leave a few cm of thread for sewing.
 |
  |
 |
 |
 |
Hands
Start with flesh-colored yarn.
1st row: 6 sc in amigurumi ring
2nd row: 6 inc (12)
3-4 rows: 12 sc
5th row: 4 dc with one vertex in 1 loop,
7th row: (2 sc, dec) x 3 (9)
Rows 8-17: 9 sc
Fill the fist tightly, the hand lightly, do not stuff the upper part of the hand. Fold the piece in half and knit 3 sc through both halves, thereby connecting them.
Finish, leave a few cm of thread for sewing.
 |
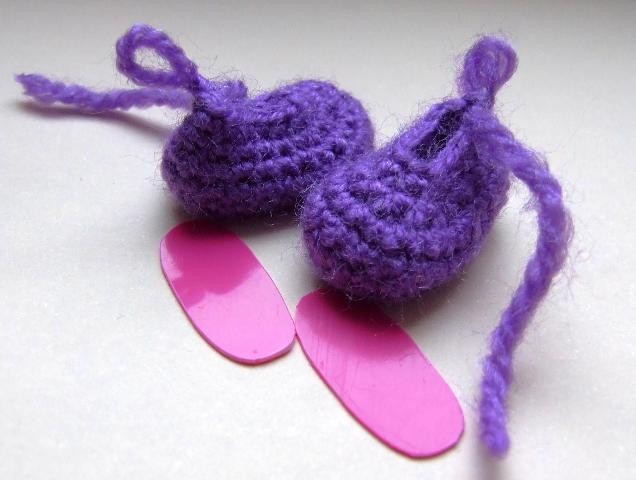
Shoes
Violet yarn.
Dial 7 ch.
1st row: 1 sc in the 2nd loop from the hook, 5 sc, 5 sc in the last loop, turn work: 5 sc, approx.
2nd row: inc, 5 sc, 5 inc, 5 sc, 3 inc (26)
3rd row: 26 sc
4th row: 26 sc behind the back walls of the loops of the previous row
5-6 rows: 26 sc
If you want the shoes to be larger, you can knit another row.
7th row: 4 sbn, 6 dec, 4 sbn, 2 dec, 2 sbn (18)
8 row: 3 sbn, 4 dec, 7 sbn (14)
Along the contour of the sole, cut out insoles from a piece of thin plastic and place them in the shoes. Fill tightly with stuffing.
Sew the shoes to the feet. Sew the arms to the body between the first two strips.
 |
 |
| On the side of the back, to the VP chain, which in our case represents the belt of the pants, attach a thread and tie a VP chain, which will represent one strap. Make an additional 7-8 ch for the loop and fasten a sl st into the 7-8th loop from the hook. We cut the thread and hide the tip using a sewing needle. We do the second strap in the same way. |
 |
 |
 |
Cap
Raspberry colored yarn.
 |
1st row: 6 sc in amigurumi ring
2nd row: 6 sc
3rd row: (2 sc, inc) x 2 (8)
4-5 row: 8 sc
Row 6: (3 sc, inc) x 2 (10)
7-8 row: 10 sc
Row 9: (4 sc, inc) x 2 (12)
Row 10: (2 sc, inc) x 4 (16)
11th row: 16 sc
Row 12: (3 sc, inc) x 4 (20)
Row 13: 20 sc
Row 14: (9 sc, inc) x 2 (22)
Row 15: 22 sc
Row 16: (10 sc, inc) x 2 (24)
Row 17: 24 sc
Row 18: (7 sc, inc) x 3 (27)
Row 19: 27 sc
Row 20: (8 sc, inc) x 3 (30)
Row 21: 30 sc
Row 22: (9 sc, inc) x 3 (33)
23rd row: 33 sbn
24 row: (10 sc, inc) x 3 (36)
Try it on! If the size already fits the head, then knit further without any increases.
Row 25: 36 sc
Row 26: (11 sc, inc) x 3 (39)
27 row: 39 sbn
28 row: 39 sc, 2 ch, turn
Row 29: 37 hdc
Finish the work, cut the thread.
If you wish, you can equip the gnome with a beard.
This yarn is ideal for all beards.