There are more and more requests on the Internet on the topic of how to crochet a napkin "Grape Bunch", a diagram with a description of which you can find in today's article. We decided to deal in detail with all the intricacies of the work, so that in the future it would be much easier and more pleasant for you to work, since most of the other articles offer only one scheme, which is difficult for a novice craftswoman to figure out.


Let's go to the lesson
A description of the entire process of making a crochet napkin of a bunch of grapes can be traced on the example of a master class with step by step photos. For this job, you will need to stock up on a little patience, and you will also need a few free evenings. If you are a professional craftswoman, then we are sure that such work will not take more than two evenings.
Stock up on yarn, it is best to choose acrylic in three colors - white, green, and purple or blue, and crochet number three.

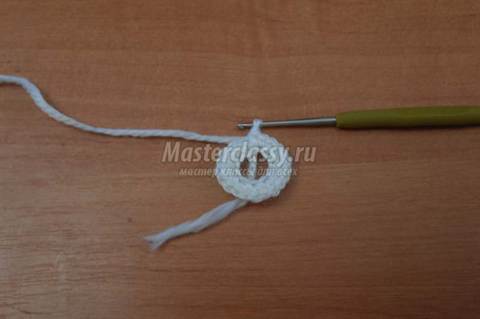
In order not to waste your time, we will quickly move on to making the napkin itself. The first step is to knit a chain of ten air loops from white yarn, which we close into a ring using a connecting post. The second row is knitted simple columns without a crochet. You must knit two new columns in each loop of the previous row. In total, we got twenty loops in the second row. Well, it's definitely too simple and easy.

After that, knit a chain of ten air loops and secure it with a double crochet to the second loop of the previous row, that is, through one. The result should be a small arch. In order to completely finish the third line, you need to knit nine more arches, but the number of air loops in them should not be ten, but seven. In the fourth row, we knit two double crochets in each arch, but at the same time, four air loops must be knitted between the columns. And in the next row, we knit two columns with the same single crochet from each double crochet. In total, four columns should be obtained above each arch. And we also knit four air loops between the columns.

The sixth row is knitted in exactly the same way as the previous one, only in this case six loops must be knitted over the arch (of which two double crochets are considered extreme) and also four air loops. In further rows, you need to add two columns in each arch.

In the case when there are already ten columns in one line, we proceed to the process of decreasing. To do this, you need to make new petals so that the canvas does not pull in the future. Knit eight double crochets instead of 10, and first knit three air loops instead of 4 over the arch. After that, a single crochet and again three air loops.

The new row is knitted according to the following scheme: six double crochets over a large petal, then three ch, over the arch we knit three single crochet stitches again three air loops. We continue to knit to the end of the row.

Then we do this: over a large petal we already knit four double crochet stitches, after that we make three air loops, then we knit 6 dc over the arch (we knit two stitches into each loop) and again 3 ch. We repeat this pattern until the end of the circle.

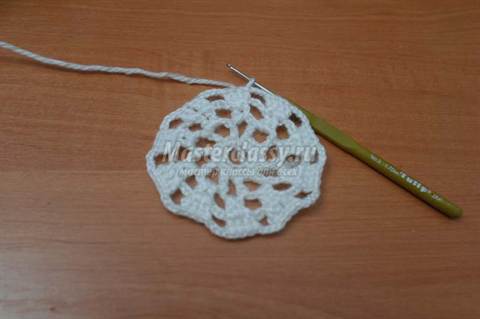
Next row: three dc and the same number of air loops, then 12 double crochet over the arch, and three ch.

The photo shows what the napkin looks like at this stage before we started knitting the base under the bunches.

We knit the next row in the same way as the previous one, but in this case we knit not 12, but six single crochets above the arch.

In the next row, in place of the fan, ten arches of five air loops are knitted; attach the last loop to the arch using a double crochet. Cut off the white thread.

Only after that, take the grape-colored yarn, attach it to the arch and wind eight elongated loops. Pull the hook through them and secure with a half-column. Knit a couple of air loops and proceed to knitting a new berry.


In total, for one bunch we knit nine berries. Cut and fasten the thread.

On each fan we knit the first tier of berries. Then with green thread, knit three double crochets, two air loops, three double crochets.

To move to a new bunch, tie three air loops. We tie the bunch with connecting posts. We knit them between the berries themselves.

After that, do three ch, three dc, two ch and again three double crochets. And repeat this combination to the end of the row.

Only after that we begin to knit the second row for each bunch.

We make it with a green thread, add a column for the leaves on each side. They should end up being wide. We do this until we knit the whole bunch. We cut off all ends of the threads and hide.
The napkin is ready.

Video on the topic of the article
We offer you to watch a selection of videos on how to create a crochet doily.


Napkin*GRAPE*

Steel hook No. 7
Napkin 41 cm in diameter.
MID NAPKINS
Start in the center with a white thread, 8ch. SS for ring shape.
1 circle: 3VP, 15 CCH in the ring. Join.
2 circle: 4VP, 2 С2Н in the same place as the SS; 3 C2H in each CCH around. Join.
3 circle: 4 VP, 4 С2Н in the same place as the SS. * skip 2 dc, 5 dc in the next dc. Repeat from * around. Join.
4th round: sl-st in the next 2 dc, ch 4, 3 dc in the same place as the last sl-st, * skip 4d2h, 7 dc in the next dc. Rep from * around, ending with 3 dcs in the same place where the first 3 dcs were made. Join.
Round 5: Ch4, 3 D2D in the same place as SS, 7 D2D to the center D2D of each group of D2D around, finish 3 D2D in the same place where the first 3 D2D were made. Join.
Round 6: Ch4, 4 D2D in the same place as SS, 9 D2D in the center D2D of each group around, finish with 4 D2D in the same place where the first 4 D2D were made. Join.
Round 7: Ch4, 5 dc in the same place as sl-st, 11 dc in the center dc of each group around, finish 5 dc in the same place where the first 5 dc were made Join and break.
8 circle: Attach a green thread, in the same place SS, 6 VP, * in the same place do (С2Н, 2VP) 6 times and С2Н; 5VP, skip 3 С2Н of the next group, 5 С2Н in the next С2Н, 3VP Skip 3 С2Н, 5 С2Н in the next С2Н, 5VP, С2Н in the central С2Н of the next group, 2VP. Repeat from * around, join and break.
PERFORM SEPARATELY BUNCHES OF GRAPES
1 row: Attach the thread for the grapes to the first arch of 2CH of any C2H group, 4CH, 7C2H in the same arch, remove the loop from the hook, insert the hook into the top of the 4CH arch, pull the thread into the left loop and the loop on the hook (popcorn is made) , (2CH, 8 dc in next arch, slip a loop from the hook, insert into the first dc, pull the thread through the left loop and the loop on the hook - the second popcorn is made) 6 times. 3VP, turn.
2 row: RLS in the first arch, * 3VP, RLS in the next arch. Repeat from * next. Turn
3 row: sl-st in the first arch, ch 4, popcorn in the same place * ch 2, popcorn in the next arch. repeat from * across. 3VP, turn.
Beautiful napkin "Light grapes" crochet decorate any corner in your home. The shape of the napkin is round, the edge itself is uneven, therefore, when measuring, we took the most extreme points as a basis. The size of the napkin is 43 centimeters. To obtain such a napkin, you will need a little perseverance, since knitting grapes is not done quickly. But the end result will definitely please you. Difficulty: medium.
For work you will need:
- 65g yarn Pekhorka "Successful" yellow color(100% cotton; 50g - 200m);
- Hook 1.75mm.
Legend:
- repeat from *... to *;
- SS - connecting column;
- VP - air loop;
- CCH - double crochets;
- RLS - single crochet;
- PSSN - half-column with a crochet;
- CC2H - a column with 2 crochets;
- Prib - 2SSN in one loop;
- Popcorn is a group of 5 complete (finished) CCHs, which we knit from one loop of the base and connect in a special way: we connect the upper loop of the 1st column with the loop of the last one, forming a three-dimensional element similar to a grain of corn.
Part 1 of the video tutorial on crocheting a round napkin "Light grapes":
Description of the process of knitting napkins "Light grapes" from the 1st to the 9th row:
To begin with, we give you a napkin knitting pattern so that those who can read or would like to learn how to read from a video lesson can save and use it.
Crochet pattern for a beautiful round napkin "Light grapes":

We replace the first column with air loops.
We finish each row with SS, unless otherwise indicated in the text.
- At the beginning of knitting, we collect 6VP and connect it into a ring.
- 1 row: (a group of 3 dc with a common top, 3ch) x 8 times. We finish - 1VP, 1PSSN to the top of the group of columns;

- 2nd row: (we dial 12VP and from the 6th loop from the hook - 4СБН, 2PSSN, 1СН, in the arch 1СБН) x 8 times. Cut the thread.

- 3rd row: we attach under 6VP of the previous row - * (popcorn, 3VP) x 2 times, popcorn, 7VP) *. We finish the row - 3VP, 1С2Н to the top of the popcorn;

- 4 row: * (1SN, 3VP, 1SN) in one loop, 2VP, under the arches we knit - (popcorn, 3VP, popcorn), 3VP, (popcorn, 3VP, popcorn), 2VP *;

- 5 row: SS * (1SN, 3VP, 1SN) - ticked, 2VP, knit under the arches - (popcorn, 3VP, popcorn, 3VP) x 2 times, (popcorn, 3VP, popcorn) - 1 time, 2VP *;

- 6 row: SS * under the tick - 5SSN, 3VP, in the next 5 arches - (popcorn, 3VP) x 5 times *;

- 7th row: * at the tops of the double crochets we knit - (Prib, 1SSN) x 2 times, Prib, 3VP, in arches - (popcorn, 3VP) x 4 times *;

- 8 row: * Prib, 3SSN, 3VP, 3SSN, Prib, 3VP, under the arches we knit one popcorn, 3VP *;

- 9th row: * 5SN, 7VP, 5SN, 4VP, popcorn, 3VP, popcorn, 4VP *;

Part 2 of the video tutorial on crocheting a round napkin "Light grapes":
Description of the process of knitting napkins "Light grapes" from the 10th to the 22nd row:
We continue knitting napkins. We made the hardest part out of the popcorn, i.e. grapes themselves, now the knitting process will accelerate.
- 10th row: * 5 dc, 3 ch, on a chain of 7 mi ch we knit a shamrock from the 3rd loop - (1 SBN, 3 VP, 1 SBN, pico from 3 VP, 3 VP, 1 SBN, 3 VP), 5 SN, 5 VP, popcorn, 5 VP *;

- Row 11: *5 dc, 5 ch, 1 sc in the center of the pico, 5 ch, 5 dc, 5 ch, 1 sc in the top of the popcorn, 5 ch *;
- 12 row: * 5SN, 3VP, on the next 2 arches we knit - (trefoil with 2nd VP, 3VP), 5SN, 4VP, 1SN, 4VP *;

- 13th row: * 5 dc, (5 ch, 1 dc in pico) x 2 times, 5 ch, 5 dc, 3 ch, (1 dc, 3 ch, 1 dc) - in one loop, 3 ch *;

- 14th row: * 5SN, 3VP, 3 shamrocks on three arches, 3VP, 5SN, 3VP, 7SN in a tick, 3VP *;

- 15 row: * 5 dc, 3 ch, (1 dc in pico, 5 ch) x 2 times, 1 dc in pico, 3 ch, 5 dc, 3 ch, (1 dc, 1 ch) x6, 1 dc, 3 ch *;
- 16 row: * 5 dc, 3 ch, trefoil in each arch, 3 ch, 5 ch, 3 ch, (1 dc, 2 ch) x 6 times, 1 dc, 3 ch*;
 22nd row: * 10 dc with a common top, picot from 5 VP, 5 VP, 1СБН in an arch, (3 VP, 3 СН, at the top of each column of picot from 3 VP, 1 СБН under the next arch) x 7 times, 5 VP *.
We cut the thread, hide the tip on the wrong side, fix it.
Photo of a non-steamed product.

We steam, fixing the edges of the napkin with needles.
The napkin is ready!

There are more and more requests on the Internet on the topic of how to crochet a napkin "Grape Bunch", a diagram with a description of which you can find in today's article. We decided to deal in detail with all the intricacies of the work, so that in the future it would be much easier and more pleasant for you to work, since most of the other articles offer only one scheme, which is difficult for a novice craftswoman to figure out.


Let's go to the lesson
A description of the entire process of making a bunch of grapes napkins crochet can be seen on the example of a master class with step-by-step photos. For this job, you will need to stock up on a little patience, and you will also need a few free evenings. If you are a professional craftswoman, then we are sure that such work will not take more than two evenings.
Stock up on yarn, it is best to choose acrylic in three colors - white, green, and purple or blue, and crochet number three.

In order not to waste your time, we will quickly move on to making the napkin itself. The first step is to knit a chain of ten air loops from white yarn, which we close into a ring using a connecting post. The second row is knitted with simple single crochet. You must knit two new columns in each loop of the previous row. In total, we got twenty loops in the second row. Well, it's definitely too simple and easy.
After that, knit a chain of ten air loops and secure it with a double crochet to the second loop of the previous row, that is, through one. The result should be a small arch. In order to completely finish the third line, you need to knit nine more arches, but the number of air loops in them should not be ten, but seven. In the fourth row, we knit two double crochets in each arch, but at the same time, four air loops must be knitted between the columns. And in the next row, we knit two columns with the same single crochet from each double crochet. In total, four columns should be obtained above each arch. And we also knit four air loops between the columns.
The sixth row is knitted in exactly the same way as the previous one, only in this case six loops must be knitted over the arch (of which two double crochets are considered extreme) and also four air loops. In further rows, you need to add two columns in each arch.

In the case when there are already ten columns in one line, we proceed to the process of decreasing. To do this, you need to make new petals so that the canvas does not pull in the future. Knit eight double crochets instead of 10, and first knit three air loops instead of 4 over the arch. After that, a single crochet and again three air loops.

The new row is knitted according to the following scheme: six double crochets over a large petal, then three ch, over the arch we knit three single crochet stitches again three air loops. We continue to knit to the end of the row.

Then we do this: over a large petal we already knit four double crochet stitches, after that we make three air loops, then we knit 6 dc over the arch (we knit two stitches into each loop) and again 3 ch. We repeat this pattern until the end of the circle.

Next row: three dc and the same number of air loops, then 12 double crochet over the arch, and three ch.

The photo shows what the napkin looks like at this stage before we started knitting the base under the bunches.

We knit the next row in the same way as the previous one, but in this case we knit not 12, but six single crochets above the arch.

In the next row, in place of the fan, ten arches of five air loops are knitted; attach the last loop to the arch using a double crochet. Cut off the white thread.

Only after that, take the grape-colored yarn, attach it to the arch and wind eight elongated loops. Pull the hook through them and secure with a half-column. Knit a couple of air loops and proceed to knitting a new berry.

 In total, for one bunch we knit nine berries. Cut and fasten the thread.

On each fan we knit the first tier of berries. Then with green thread, knit three double crochets, two air loops, three double crochets.

Beautiful vine.
Hanging bunches of fat grapes.
And enjoy my eyes
A wonderful view of juicy berries.
Green leaves gentle openwork
Plays with the naughty wind.
Caresses the bunch like a fiery cupid
He is passionate, like a hot summer ...

There are a lot of such napkins - in different years, on different sites and forums, so we just have to choose our knitting option. Although, of course, there is no limit to perfection, perhaps we will come up with something of our own. Thanks toall the craftswomen whose photos, descriptions, translations and videos were used when writing the post.
I found several knitting options:
1. in one color without tearing off the thread in a circle.
2. two or three colors with a thread tear in a circle.
3. two or three flowers with a thread tear - each bunch separately, leaves - separately.
You can also tie another middle and leaves. Berries can also be knitted different ways: lush columns or popcorn. I will knit according to the scheme: the middle - in green in a circle, then separately each cluster in a different color, and the leaves - in rotary rows, filling the space between the clusters according to the scheme. Grapes - popcorn pattern. The yarn must be chosen NOT thin so that the napkin keeps its shape, it is better to use voluminous acrylic for grapes, then the berries will turn out to be expressive and not heavy. The consumption of yarn for bunches is about 50 grams, for everything else - 30-40 grams. So let's get started...
Let's look at the diagram:

First, we knit the middle: close 6 air loops into a ring and then according to the scheme up to 10 rows inclusive. There should be no questions here. I crochet 1.5 mm with 400 m / 100 grams of yarn so that it is tight and neat. Instead of three air loops between groups of double crochets, she knitted two air loops. Here's what happened:
You can tie another middle (and leaves), thanksTatunchik
from Osinka for the scheme of the middleWe will deal with the scheme of the leaves later. By the way, I like this one better. A translation of the description can be found here:

Next stage- bunches in rotary rowspopcorn pattern, each bunch is knitted separately.
We attach a thread of a different color to the first arch and knit a popcorn element in each arch - a total of 9 berries in the 11th row, between them - 2 air loops (according to the diagram).
In the above diagram, "popcorn" consists of five columns with one crochet, if necessary, you can increase the number of columns, you can try to knit columns with two crochets.
Then we turn the knitting, make a connecting column in the first arch of two air loops and knit a grape in the same arch - 3 air. lifting loops + 4 double crochets, remove the hook from the loop and insert it into the 3rd lifting air loop, tighten the thread, make 2 air. loops and in the next arch we knit the next berry.
To form popcorn on the front side, you need to insert the hook into the loop in front of you, and on the wrong side - from behind and towards you. If this is the first berry, then the hook is inserted into the 3rd lifting loop. Thus we knit all the bunches. The number of columns for each berry depends on the thickness of the yarn. The linked bunch should look something like this:
how to crochet popcornYou can watch a short video here:
As I wrote above, there alternative way knitting bunches with lush columns (in a circle with a tear off the thread for the bunch), watch the video and decide which option suits you best. I will not dwell on this method in detail, since there is detailed video in three parts (author - Natalia Korneeva