I continue to introduce everyone to needlewoman Anya Kirdyasheva. You can see how to knit a fairy house for a teapot


To make a needle bed you need to be able to: knit a single crochet, a connecting stitch (half-stitch), make increases, decreases and knit in a spiral. It is also advisable to know how to knit an amigurumi ring - we wrap yarn around a finger (two turns), and tie the resulting ring with single crochets. Tighten by pulling the free end of the thread. We close the row by knitting a single crochet into the first loop of the row.
If any of the above are unfamiliar to you, then I recommend watching training master classes, of which there are a lot on the Internet.
Materials:
- green yarn;
- white and brick orange yarn (or other suitable shade) for mushrooms;
- black sewing thread;
- thin yarn for embroidering blades of grass and flowers (cotton is best - “Iris”, “daisy”, “coco”, “rose”, etc.);
- beads (for the middle of the flowers);
- filler;
- PVA glue;
- universal glue (I used Moment “Crystal”).
Tools:
- crochet hooks;
- sewing needle;
- scissors;
- glue brush.
- decrease - knit two loops together;
- sc - single crochet.
We knit all the details of the needle bed in a spiral (without lifting loops).
Stages
Needle bed base
For the base of the pincushion, I took a screw-on canning lid, 9 cm in diameter (standard). If you like very miniature things, then choose a smaller lid. I recommend taking a new lid, since used ones can retain the smell of canned food for a long time.
To knit the hummock on which the mushrooms will grow, I used Alize ecolana yarn (100% wool, 220 m/100 g) in dark green color. In fact, you can take yarn of almost any composition and thickness. Just the number of connected rows will be more or less. Medium weight yarn is best.
1. Using single crochet stitches, we knit a flat circle with a diameter equal to the diameter of our lid (in my case, 9 cm).
It is assumed that you already know how to knit a flat circle in a spiral. But, just in case, I provide a diagram (diagram from the Internet). Please note that the increases in each row (6 increases in each) are knitted with an offset relative to the increases in the previous row. This is done so that we really get a circle and not a hexagon. 
2. When the circle is knitted, knit a few more rows without increasing, forming “sides”. The height of the sides should be equal to or slightly greater than the height of the sides of the lid itself. While knitting, try the knitting on the lid. If desired, you can knit another row with connecting posts.
We got a cup that follows the shape and dimensions of the lid. 
We choose the side that will be the surface of the hummock. I liked the texture of the wrong side of the knitting better, so I made it the “front” side.
3. Decorate the hummock. We embroider branches (chain stitch, using a needle or hook) and flowers (simple stitches from the center). We sew beads in the middle of the flowers. There is a lot of information on the Internet on how to make a chain stitch. 
4. Decorate the bottom of the needle bed. For the bottom, it is better to choose a plain fabric of medium density. I took a piece of flax.
Cut out a circle of fabric the size of the diameter of the lid + double the height of the sides of the lid. My circle turned out crooked, but that's not a big deal.
Apply glue to the bottom of the lid around the perimeter. Spread the glue in a thin layer (so that the fabric does not become saturated with glue and stains do not form) and glue the fabric to the bottom.
We also lubricate the outer surface of the sides of the lid with glue and glue the fabric. We try to distribute the folds evenly.
Lubricate the inner surface of the sides of the lid with glue and glue the fabric. Dry everything thoroughly.
We put the knitted blank on the lid. 
5. Sew the upper part of the needle bed to the bottom. For sewing I used monofilament, but you can use thin threads to match the yarn.
We sew the upper part of the needle bed by inserting the needle between the posts of the last row and at the same time grabbing several threads of fabric on the bottom (photo a). We tighten the thread. Then we bring the needle out between the next pair of stitches (photo b) and tighten the thread. And again we insert the needle between the posts in the opposite direction, grabbing the fabric. This creates a neat, invisible seam (shown schematically in red). 
Leaving a small hole unsewn, fill the needle bed and sew it up to the end.
For stuffing I used holofiber. But, you can take another filler (sintepon, foam rubber, wool) whichever you like best.
This is the hummock that forms the basis of the pincushion. 
Boletus
For the boletus, I used Alize Felicita yarn (45% wool, 45% acrylic, 45% polyamide, 370 m/100 g).
You can take yarn of a different thickness - the mushrooms will turn out smaller or larger in size.
Big mushroom.
2-6th rows: 6 increases in each row = 36 sc
7th row: 3 increases = 39 sc
8-9th rows: 39 sc each
We finish knitting with a connecting stitch, but do not cut the thread.
The leg of boletuses is variegated, white and black. In order for us to get the same one, we knit the leg in two threads - to the white yarn we add regular black sewing threads.
1st row: 6 sc in amigurumi ring
4th row: 3 increases = 21 sc
Rows 5-16: 21 sc each
Rows 17-19: 1 decrease in each row = 18 sc
23-25th rows: 6 increases each = 36 sc
26th row: 3 increases = 39 sc
We finish knitting with a connecting stitch. We cut the thread.
I chose the wrong side of the knit as the outside for the mushroom cap. And the front side of the knitting looks prettier on the leg.
We stuff the leg. 
3. Place the top of the cap and the stem together. Insert the hook under the loop of the bottom of the cap and grab the remaining loop. Let's pull her out

4. We make a lifting loop and knit the edge with single crochets, connecting the top and bottom parts of the hat. Don't forget to leave a hole for stuffing

5. We stuff the cap and close the hole. We finish the row with a connecting column. We hide the tail in the thickness of the canvas

Little mushroom
1st row: 6 sc in amigurumi ring
2nd-4th rows: 6 increases each = 24 sbn
5-8th rows: 24 sc each
9th row: 2 decreases = 22 sc
We finish knitting with a connecting stitch. Cut the thread.
1st row: 6 sc in amigurumi ring
2nd-3rd rows: 6 increases each = 18 sc
4th row: 2 increases = 20 sc
5-10th rows: 20 sc each
3. Stuff the leg and put a lump of filling into the cap. We put the hat on the leg (can be secured with pins). Sew the hat to the leg using monofilament or thin thread to match the yarn 
The aspen boletuses are ready 
Assembling the needle bar
Before you start sewing on the mushrooms, try arranging them in different ways, see how it looks prettier, and only then start assembling.
1. We crush the stem of the mushroom so that it is positioned vertically on the mound 
2. Pin the mushroom to the hummock with pins and sew it on. Using a needle, we alternately pick up a couple of threads of the leg and a couple of threads of the hummock. After each stitch, tighten the thread well. Thus we sew the leg in a circle. You can, to be on the safe side, make one more circle.

3. Sew on the second mushroom in the same way.

4. Making blades of grass. For the blades of grass, I took a piece of thick yarn and divided it into individual fibers. You can also take wool for felting.

5. Attach the yarn to the base.
For clarity, I separately photographed the method of attaching the yarn to the knitted fabric. We also attach our yarn fibers. 
I made three curtains of grass (on the sides and back of the mushrooms), three bundles of yarn in each curtain. 
6. Form blades of grass. To do this, moisten the yarn with water and use a needle to separate it into separate bundles.
We wet each bunch with PVA glue and twist it with our fingers to form blades of grass. Dry it. 
Similarly, we make blades of grass on all sides. Please note: on the left side my blades of grass are thinner than on the right, since on the left I twisted the tufts more strongly. When the blades of grass are completely dry, you can trim off any stray hairs. 

Materials:
- tin screw lid for canning (base of the pincushion);
- green yarn;
- yarn of different colors for mushrooms;
- thin yarn for leaves and flowers (cotton is best - “Iris”, “chamomile”, “coco”, “rose”, etc.);
- beads (for the middle of the flowers);
- filler;
- piece of fabric. It is better to take medium-weight fabric, green or neutral colors (I used linen);
- monofilament or thin threads to match the yarn;
- PVA glue;
- wire
- universal glue (I used Moment Crystal).
Optional:
- acrylic paints;
- black acrylic outline;
- snail shell;
- two beads for snail eyes;
Tools:
- crochet hooks;
- sewing needle;
- bead needle;
- scissors;
- brushes for glue, paint, varnish.
Terms and abbreviations in the text:
increase - two stitches in one loop;
decrease - knit two loops together;
sc - single crochet.
We knit the base of the needle bed and the details of the mushrooms in a spiral (without lifting loops).
We discussed how to knit the base of a needle bed in the first part of the master class. For these needle beds the base is knitted in the same way. We only sew on the leaves and flowers after the hummock base is completely ready.
If you still find it difficult to knit small parts from... fine yarn, then you can decorate the pincushion in the same way as you decorated the pincushion with boletus flowers - embroider flowers and twigs.
Pincushion with fly agarics
I knitted fly agarics from Alize baby wool yarn (175 m/50 g, 40% wool, 40% acrylic, 40% bamboo).
Big fly agaric
2-5th rows: 6 increases in each row = 30 sc;
6-9th rows: 5 increases in each row = 50 sc;
10-12th rows: 50 sc.
1st row: 6 sc in amigurumi ring;
5-8th rows: 24 sc each;
9-10th rows: 2 decreases in each row = 20 sc;
11th row: 20 sc;
12-13th rows: 2 decreases in each row = 16 sc;
14-16th rows: 16 sc each;
17th row: On the near (front) half-loops, knit a collar (photo a, front half-loops are marked in pink). We knit 2 double crochets into each half loop. We close it by knitting a connecting post. We cut off the thread and hide the “tail” in the thickness of the fabric. The collar is ready (photo b).
We attach the yarn and knit 16 sc on the far (purl) half-loops (in photo a, b, purl half-loops are indicated in green).
18-19th rows: 1 decrease in each row = 14 sc.
If you want the lower part of the cap to be more clearly separated from the stem, then knit the first row with increases on the nearest half-loops (in our case this is the 20th row). Then knit as usual, using both half loops.
20-24th rows: 6 increases in each row = 45 sc;
25th row: 5 increases = 50 sc;
The leg is ready (photo c).
We collect fly agaric in the same way as we collected large boletus (photo d). 
We embroider specks on the hat. 
Little fly agaric
1st row: 6 sc in amigurumi ring;
2-4th rows: 6 increases in each row = 24 sc;
5-8th rows: 24 sc each;
9th row: 4 decreases = 20 sc.
1st row: 6 sc in amigurumi ring;
2-3rd rows: 6 increases in each row = 18 sc;
4th row: 2 increases = 20 sc;
5th row: 20 sc;
6-7th rows: 2 decreases in each row = 16 sc;
8-9th rows: 16 sc.
We collect the fly agaric in the same way as we collected the small boletus.
We embroider specks.
The mushrooms are ready. 
Flowers, twigs, leaves
The simplest flower can be knitted according to the pattern shown in the figure below.
If you want a larger flower, then instead of two lifting loops, knit three loops, and for the petals, knit stitches with not one, but two crochets.
The flower will be even larger if you knit four lifting loops, and for the petals you knit stitches with three crochets.
The leaves are also very easy to knit. If you want to make a larger leaf, then increase the number of loops in the initial chain and, accordingly, the number of double crochets in the middle of the leaf.
The diagram shows a fragment of a branch. You can tie a branch of the length you need by simply adding the required number of leaves. You can also reduce or increase the distance between the leaves by tying more air loops between them. 
Assembling the pincushion
Sew on twigs and flowers. How to sew on mushrooms and make blades of grass is described in the first part of the master class. 
The pincushion is ready. 
Pincushion with toadstools
Although all inedible mushrooms are called toadstools, none of them are, of course, nasty, but very cute!
We have three mushrooms with caps that are slightly different in shape and size. Below is a description of all three hats.
You can knit all the hats differently, or you can make the same ones.
2-5th rows: 1 increase in each row = 9 sc;
Rows 6-12: 3 increases in each row = 30 sc.
1st row: 5 sc in amigurumi ring;
2-3rd rows: 1 increase in each row = 7 sc;
4-6th rows: 3 increases in each row = 16 sc;
7-11th rows: 4 increases in each row = 36 sc.
1st row: 5 sc in amigurumi ring;
2nd row: 1 increase = 6 sc;
3-9th rows: 3 increases in each row = 16 sc;
10th row: 24 sc.
At the end of knitting, cut off the thread.
The hats are ready (photo a).
I decided to tint them with acrylic paint.
To do this, I moistened the caps and dipped them into red paint diluted to ink.
I turned the hats over and left them to dry. The paint itself spread over the wet canvas as needed (photo b). 
Bottom of the cap
For hat 1
1st row: 6 sc in amigurumi ring;
Rows 2-5: 6 increases in each row = 30 sc.
For hat 2
1st row: 6 sc in amigurumi ring;
Rows 2-6: 6 increases in each row = 36 sc.
For hat 3
1st row: 6 sc in amigurumi ring;
2-4th rows: 6 increases in each row = 24 sc.
For the leg, twist the wire leaving a loop (photo a).
We put the lower part of the hat on the stem (photo b).
Bend the end of the wire into an G shape.
Using a needle, thread the tip of the yarn into the middle of the circle (do not cut it off from the ball) and sew a wire loop with this tip (photo c).
Lubricate the wire with glue and wind the yarn. We try to wind it turn by turn, without overlaps. I made three layers of winding. Before each new layer, lubricate the leg with glue (photo d). 
We connect the cap and the leg.
When we knitted boletuses (and fly agarics), we turned the mushroom with its stem towards us and inserted the hook under the loop of the lower part of the cap. With this method, the edges of the cap are slightly turned inward.
We don't need the toadstool's cap to wrap up. Therefore, we turn the mushroom with the upper part of the cap towards us and insert the hook under the loop of the upper part of the cap (photo a).
Pull out the loop (photo b).
We make a lifting loop and connect the parts of the hats by knitting a row of single crochets (photo c).
You can additionally knit the second row.
Don't forget to leave a hole for stuffing. We put the filler only at the top of the cap, otherwise the lower part of the cap will stick out unsightly. 
We knit a collar.
We knit 15 double crochets into an amigurumi ring. We close the circle by knitting a connecting post. 
We put the collars on the legs and sew them on.
The toadstools are ready. 
Sew flowers and leaves to the base. 
We choose a place on the pincushion where the mushrooms will grow.
Using a knitting needle or toothpick, make holes in the needle bar.
Lubricate the curved ends of the legs with glue and glue them into the needle bed.
Dry it.
We sew the legs to the needle bed with monofilament thread, alternately picking up the threads at the base of the leg and on the needle bed.
I decided to tint the lower part of the legs and collars of the mushrooms a little brown paint. I think it turned out more lively this way.
Let's launch the snail. The pincushion with toadstools is ready. 
Snail with real shell
I think it’s clear from the photographs how to make such a tiny snail. But, just in case, I’ll clarify some points.
Preparing the Sink
We will need empty shells of land or aquatic snails. I collected shells from the forest, washed them well and dried them. Then I covered it with three layers of varnish, drying each layer in between. Varnish is needed not only for beauty, but also to enhance strength, since the shells of land snails are quite fragile.
I filled the sink with holofiber. The white filler shines through the translucent walls and the pattern on the sink stands out beautifully. Well, again, additional strengthening. In the widest part of the sink (the mouth), I coated the inner surface of the wall with glue so that the filler would stick well and sealed the mouth with a piece of fabric. 
snail body
I knitted the body from Tulip YarnArt yarn (250 m/50 g, 100% microfiber).
Since your shell may be a different size and the yarn of a different thickness, you may have to change the number of increases and rows:
If you need to make the body wider, then simply increase the number of rows with increases in the front of the body (indicated by a red bracket in the photo).
If you need to lengthen the snail, then increase the number of rows in the middle part of the body (marked with a blue bracket).
Knit the “tail” according to the description given (green bracket), its dimensions will change themselves, according to your changes in the pattern.

Snail eyes
Any white or colored, light beads are suitable for the eyes. You can also paint wooden beads with acrylic paint, or make eyes from polymer clay.
Before inserting the wire into the snail's head, make holes with a knitting needle or toothpick, otherwise the filler will cling to the ends of the wire (photo a, b).
Place the bead so that the hole is completely closed (photo c). Don't forget to coat the tip of the wire with glue.
I made the eyes from acrylic beads, and drew the pupils with a black acrylic outline (photo d). 
Glue the shell onto the snail's back.
This is how the little one turned out. 

If you don’t have real shells, then the snail can be made completely knitted
Knitted snail
I knitted the snail shell from “Rose” Vita yarn (100% cotton, 150 m/50 g).
The body is made of “Iris” yarn (100% cotton).
Sink
Attention! We knit for distant half-loops!
1st row: 5 sc in amigurumi ring;
2-4th rows: 1 increase in each row = 8 sc;
5th row: 8 sc;
6th row: 1 increase = 9 sc;
7th row: 9 sc;
8th row: 1 increase = 10 sc;
9th row: 10 sc;
10th row: 1 increase = 11 sc;
11th row: 11 sc;
12-26th rows: 1 increase in each row = 25 sc;
27th row: 3 increases = 28 sc.
We get a cone with a ribbed pattern due to the unknitted half-loops (photo a). We finish knitting with a connecting stitch.
We unfold the knitting and knit connecting stitches on the unknitted front half-loops (photo b).
When all half-loops are knitted, cut the thread leaving a long “tail” (photo c). 
We thread the “tail” into the needle and pass it along the entire length of the shell, from the top to the base (photo d).
We fill the sink, but not completely, but only two-thirds.
We tighten the thread so that the cone bends and secure the thread (photo e).
Fill the shell to the full.
Next, we twist the shell as needed and secure the turns with the same “tail”. I didn’t photograph this stage, but from the photo of the finished snail, I hope everything is clear. 
snail body
1. We knit two parts of the snail’s body according to the patterns

2. We fold the parts with the wrong sides facing each other and connect them by knitting a row of single crochets. Don't forget to leave a hole for stuffing. We stuff the body and finish the binding.

For the eyes I took pearl-like beads.
1. We make eye stalks from thin wire (photo a). I took beading wire.
2. We knit a hemisphere for the back of the eyes. I give a description for my beads. The sizes of your beads may differ - you will have to adjust the number of increases and rows. Try knitting on the snail's eye.
1st row: 6 sc in amigurumi ring;
2nd row: 2 increases = 8 sc;
3rd-4th rows: 8 sc per row.
We finish knitting with a connecting stitch and leave a long “tail”.
Using a needle, drag the “tail” from the inside to the front side.
In the same place we pierce the knitting with a wire stem and put the hemisphere on the eye (photo b). 
3. Draw the pupils with black acrylic paint.
4. Bend the ends of the stems into an L shape (as we did with mushrooms) and glue them into the front end of the snail’s body.
5. Lubricate the stems with glue and wrap them with “tails” of yarn. I made three layers of winding. Using a needle, we bring the ends of the yarn to the underside of the body and secure it.
Sew the shell to the snail's body. 
The snail turns out to be quite miniature. If you find it difficult to knit with thin yarn, you can take thicker threads. But then the snail will turn out larger. This snail has not yet found its hummock and its mushroom, so it is crawling along the palm of your hand. 
WE CROCHET A NEEDLE CASE “BY MUSHROOMS”. Materials: tin, screw-on lid for canning (base of the pincushion); green yarn; yarn of different colors for mushrooms; thin yarn for leaves and flowers (cotton is best - “Iris”, “chamomile”, “coco”, “rose”, etc.); beads (for the middle of the flowers); filler; piece of fabric. It is better to take medium-weight fabric, green or neutral colors (I used linen); monofilament or thin threads to match the yarn; PVA glue; wire universal glue (I used Moment Crystal). Optional: acrylic paints; black acrylic outline; snail shell; two beads for snail eyes; varnish Tools: crochet hooks; sewing needle; bead needle; scissors; brushes for glue, paint, varnish. Terms and abbreviations in the text: increase - two columns in one loop; decrease - knit two loops together; sc - single crochet. We knit the base of the needle bed and the details of the mushrooms in a spiral (without lifting loops). We discussed how to knit the base of a needle bed in the first part of the master class. For these needle beds the base is knitted in the same way. We only sew on the leaves and flowers after the hummock base is completely ready. If it is still difficult for you to knit small details from thin yarn, then you can decorate the pincushion in the same way as you decorated the pincushion with boletus flowers - embroider flowers and twigs. Pincushion with fly agarics I knitted fly agarics from Alize baby wool yarn (175 m/50 g, 40% wool, 40% acrylic, 40% bamboo). Large fly agaric 1) Hat 1st row: 6 sc in amigurumi ring; 2-5th rows: 6 increases in each row = 30 sc; 6-9th rows: 5 increases in each row = 50 sc; 10-12th rows: 50 sc. 2) Leg 1st row: 6 sc in amigurumi ring; 2-4th rows: 6 increases in each row = 24 sc; 5-8th rows: 24 sc each; 9-10th rows: 2 decreases in each row = 20 sc; 11th row: 20 sc; 12-13th rows: 2 decreases in each row = 16 sc; 14-16th rows: 16 sc each; 17th row: On the near (front) half-loops, knit a collar (photo a, front half-loops are marked in pink). We knit 2 double crochets into each half loop. We close it by knitting a connecting post. We cut off the thread and hide the “tail” in the thickness of the fabric. The collar is ready (photo b). We attach the yarn and knit 16 sc on the far (purl) half-loops (in photo a, b, purl half-loops are indicated in green). Next we knit in both half loops. 18-19th rows: 1 decrease in each row = 14 sc. If you want the lower part of the cap to be more clearly separated from the stem, then knit the first row with increases on the nearest half-loops (in our case this is the 20th row). Then knit as usual, using both half loops. 20-24th rows: 6 increases in each row = 45 sc; 25th row: 5 increases = 50 sc; The leg is ready (photo c). We collect fly agaric in the same way as we collected large boletus (photo d). We embroider specks on the hat. Small fly agaric 1) Hat 1st row: 6 sc in amigurumi ring; 2-4th rows: 6 increases in each row = 24 sc; 5-8th rows: 24 sc each; 9th row: 4 decreases = 20 sc. 2) Leg 1st row: 6 sc in amigurumi ring; 2-3rd rows: 6 increases in each row = 18 sc; 4th row: 2 increases = 20 sc; 5th row: 20 sc; 6-7th rows: 2 decreases in each row = 16 sc; 8-9th rows: 16 sc. We collect the fly agaric in the same way as we collected the small boletus. We embroider specks. The mushrooms are ready. Flowers, twigs, leaves The simplest flower can be knitted according to the pattern shown in the figure below. If you want a larger flower, then instead of two lifting loops, knit three loops, and for the petals, knit stitches with not one, but two crochets. The flower will be even larger if you knit four lifting loops, and for the petals you knit stitches with three crochets. The leaves are also very easy to knit. If you want to make a larger leaf, then increase the number of loops in the initial chain and, accordingly, the number of double crochets in the middle of the leaf. The diagram shows a fragment of a branch. You can tie a branch of the length you need by simply adding the required number of leaves. You can also reduce or increase the distance between the leaves by tying more air loops between them. Assembling the pincushion Sew on twigs and flowers. How to sew on mushrooms and make blades of grass is described in the first part of the master class. The pincushion is ready. Pincushion with toadstools Although all inedible mushrooms are called toadstools, none of them are, of course, nasty, but very cute! We have three mushrooms with caps that are slightly different in shape and size. Below is a description of all three hats. You can knit all the hats differently, or you can make the same ones. Hat 1 1st row: 5 sc in amigurumi ring; 2-5th rows: 1 increase in each row = 9 sc; Rows 6-12: 3 increases in each row = 30 sc. Hat 2 1st row: 5 sc in amigurumi ring; 2-3rd rows: 1 increase in each row = 7 sc; 4-6th rows: 3 increases in each row = 16 sc; 7-11th rows: 4 increases in each row = 36 sc. Hat 3 1st row: 5 sc in amigurumi ring; 2nd row: 1 increase = 6 sc; 3-9th rows: 3 increases in each row = 16 sc; 10th row: 24 sc. At the end of knitting, cut off the thread. The hats are ready (photo a). I decided to tint them with acrylic paint. To do this, I moistened the caps and dipped them into red paint diluted to ink. I turned the hats over and left them to dry. The paint itself spread over the wet canvas as needed (photo b). Bottom of the hat For hat 1 1st row: 6 sc in amigurumi ring; Rows 2-5: 6 increases in each row = 30 sc. For hat 2 1st row: 6 sc in amigurumi ring; Rows 2-6: 6 increases in each row = 36 sc. For hat 3 1st row: 6 sc in amigurumi ring; 2-4th rows: 6 increases in each row = 24 sc. Leg For the leg, twist the wire leaving a loop (photo a). We put the lower part of the hat on the stem (photo b). Bend the tip of the wire into the letter G. Using a needle, thread the tip of the yarn into the middle of the circle (do not cut it off from the ball) and sew a wire loop with this tip (photo c). Lubricate the wire with glue and wind the yarn. We try to wind it turn by turn, without overlaps. I made three layers of winding. Before each new layer, lubricate the leg with glue (photo d).

These wonderful needle cases were made by craftswoman Anya Kirdyasheva. On cloudy winter days, such a pincushion will remind you (or the person to whom you give it) of the sun, the forest, the smell of the forest floor and mushrooms. In addition, this is a very useful thing on the table of every needlewoman. Watch it detailed master class to create such a cute miracle!
1:1135 1:1145Today you will learn how to knit a fly agaric pincushion
See the beginning in the topic:
1:1365 1:1375Materials:
1:1404tin screw lid for canning (base of the pincushion);
1:1544green yarn;
1:44yarn of different colors for mushrooms;
1:107thin yarn for leaves and flowers (cotton is best - “Iris”, “chamomile”, “coco”, “rose”, etc.);
1:348beads (for the middle of the flowers);
1:406filler;
1:435piece of fabric. It is better to take medium-weight fabric, green or neutral colors (I used linen);
1:642monofilament or thin threads to match the yarn;
1:717PVA glue;
1:739wire
1:763universal glue (I used Moment Crystal).
1:879 1:889Optional:
1:919acrylic paints;
1:957black acrylic outline;
1:1008snail shell;
1:1044two beads for snail eyes;
1:1103varnish
1:1116 1:1126Tools:
1:1159crochet hooks;
1:1197sewing needle;
1:1227bead needle;
1:1262scissors;
1:1283brushes for glue, paint, varnish.
1:1340 1:1350Terms and abbreviations in the text:
1:1415increase - two stitches in one loop;
decrease - knit two loops together;
sc - single crochet.
1:9
We knit the base of the needle bed and the details of the mushrooms in a spiral (without lifting loops).
1:144We have discussed how to knit the base of a needle bed
1:291 1:301For these needle beds the base is knitted in the same way. We only sew on the leaves and flowers after the hummock base is completely ready.
1:539If it is still difficult for you to knit small pieces from thin yarn, then you can decorate the needle case in the same way as you decorated the needle case with boletus flowers - embroider flowers and twigs.
1:855 1:865Pincushion "Fly agarics"
1:919

I knitted fly agarics from Alize baby wool yarn (175 m/50 g, 40% wool, 40% acrylic, 40% bamboo).
2:15842:9
Big fly agaric
2:561) Hat
2:86 2:1492-5th rows: 6 increases in each row = 30 sc;
2:2326-9th rows: 5 increases in each row = 50 sc;
2:31510-12th rows: 50 sc.
2:355 2:3652) Leg with collar
1st row: 6 sc in amigurumi ring;
2:478 2:5615-8th rows: 24 sc each;
2:5999-10th rows: 2 decreases in each row = 20 sc;
2:67911th row: 20 sc;
2:70912-13th rows: 2 decreases in each row = 16 sc;
2:79014-16th rows: 16 sc each;
2:83017th row: On the near (front) half-loops, knit a collar (photo a, front half-loops are marked in pink). We knit 2 double crochets into each half loop.
2:1146We close it by knitting a connecting post. We cut off the thread and hide the “tail” in the thickness of the fabric. The collar is ready (photo b).
2:1387 2:1397We attach the yarn and knit 16 sc on the far (purl) half-loops (in photo a, b, purl half-loops are indicated in green).
2:1650 2:5818-19th rows: 1 decrease in each row = 14 sc.
2:139If you want the lower part of the cap to be more clearly separated from the stem, then knit the first row with increases on the nearest half-loops (in our case this is the 20th row). Then knit as usual, using both half loops.
2:51720-24th rows: 6 increases in each row = 45 sc;
2:60225th row: 5 increases = 50 sc;
2:652 2:662The leg is ready (photo c)
2:714 2:724We collect fly agaric in the same way as we collected large boletus (photo d).
2:885 2:895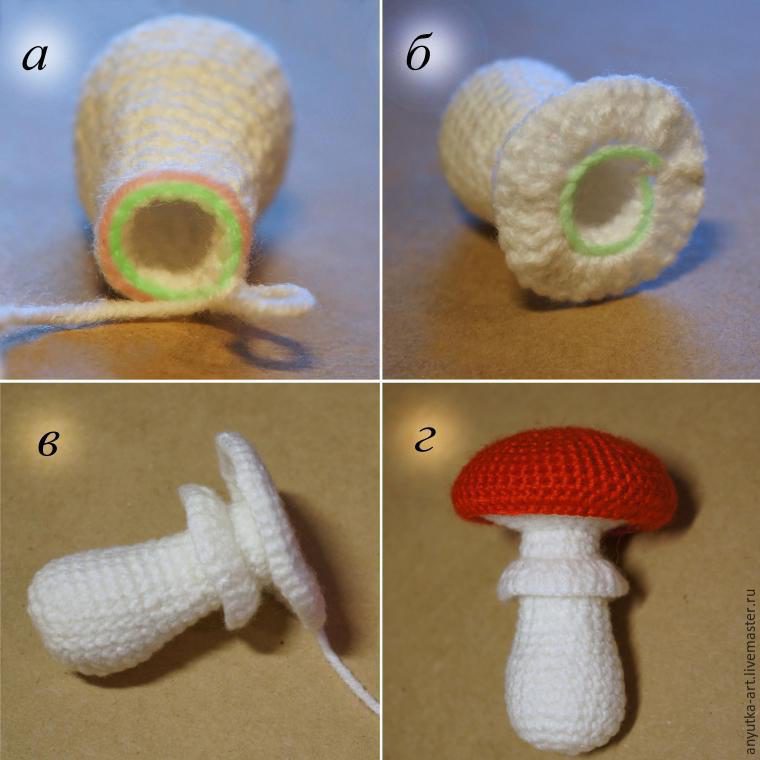
We embroider specks on the hat.
3:1470 3:1480
Little fly agaric
4:52
1) Hat
4:821st row: 6 sc in amigurumi ring;
4:1512-4th rows: 6 increases in each row = 24 sc;
4:2345-8th rows: 24 sc each;
4:2729th row: 4 decreases = 20 sc.
4:317 4:3272) Leg
4:3501st row: 6 sc in amigurumi ring;
4:4132-3rd rows: 6 increases in each row = 18 sc;
4:4964th row: 2 increases = 20 sc;
4:5455th row: 20 sc;
4:5746-7th rows: 2 decreases in each row = 16 sc;
4:6538-9th rows: 16 sc.
4:691 4:701We collect the fly agaric in the same way as we collected the small boletus.
4:827We embroider specks.
4:867 4:877The mushrooms are ready!
4:911 4:921
Flowers, twigs, leaves
5:1488
The simplest flower can be connected according to the diagram shown in the figure below.
5:1632If you want a bigger flower , then instead of two lifting loops, knit three loops, and for the petals, knit stitches with not one, but two crochets.
5:284The flower will be even larger , if you knit four lifting loops, and for the petals you knit stitches with three crochets.
5:521 5:531The leaves are also very easy to knit.. If you want to make a larger leaf, then increase the number of loops in the initial chain and, accordingly, the number of double crochets in the middle of the leaf.
5:904 5:914The diagram shows a fragment of a branch. You can tie a branch of the length you need by simply adding the required number of leaves. You can also reduce or increase the distance between the leaves by tying more air loops between them.
5:1413 5:1423
6:9
Assembling the pincushion
6:54Sew on twigs and flowers.
6:112How to sew on mushrooms and make blades of grass is explained
6:270 6:280
Materials:
- tin screw lid for canning (base of the pincushion);
- green yarn;
- yarn of different colors for mushrooms;
- thin yarn for leaves and flowers (cotton is best - “Iris”, “chamomile”, “coco”, “rose”, etc.);
- beads (for the middle of the flowers);
- filler;
- piece of fabric. It is better to take medium-weight fabric, green or neutral colors (I used linen);
- monofilament or thin threads to match the yarn;
- PVA glue;
- wire
- universal glue (I used Moment Crystal).
- acrylic paints;
- black acrylic outline;
- snail shell;
- two beads for snail eyes;
- crochet hooks;
- sewing needle;
- bead needle;
- scissors;
- brushes for glue, paint, varnish.
Optional:
Tools:
Terms and abbreviations in the text:
increase - two columns in one loop;
decrease - we knit two loops together;
sbn - single crochet.
We knit the base of the needle bed and the details of the mushrooms in a spiral (without lifting loops).
We discussed how to knit the base of a needle bed in the first part of the master class. For these needle beds the base is knitted in the same way. We only sew on the leaves and flowers after the hummock base is completely ready.
If it is still difficult for you to knit small pieces from thin yarn, then you can decorate the needle case in the same way as you decorated the needle case with boletus flowers - embroider flowers and twigs.
Pincushion with fly agarics
I knitted fly agarics from yarn Alize baby wool(175 m/50 g, 40% wool, 40% acrylic, 40% bamboo).
Big fly agaric
1) hat
2-5th rows: 6 increases in each row = 30 sc;
6-9th rows: 5 increases in each row = 50 sc;
10-12th rows: 50 sc.
2) Leg
1st row: 6 sc in amigurumi ring;
5-8th rows: 24 sc each;
9-10th rows: 2 decreases in each row = 20 sc;
11th row: 20 sc;
12-13th rows: 2 decreases in each row = 16 sc;
14-16th rows: 16 sc each;
17th row: On the near (front) half loops, we knit a collar ( photo A , facial half-loops are indicated in pink). We knit 2 double crochets into each half loop. We close it by knitting a connecting post. We cut off the thread and hide the “tail” in the thickness of the fabric. The collar is ready ( photo b ).
We attach the yarn and knit 16 sc on the far (purl) half loops (on photo a, b , purl half loops are indicated in green).
18-19th rows: 1 decrease in each row = 14 sc.
If you want the lower part of the cap to be more clearly separated from the stem, then knit the first row with increases on the nearest half-loops (in our case this is the 20th row). Then knit as usual, using both half loops.
20-24th rows: 6 increases in each row = 45 sc;
25th row: 5 increases = 50 sc;
The leg is ready ( photo V ).
Collecting fly agaric similar to how a large boletus was collected ( photo G ).

We embroider specks on the hat.

Little fly agaric
1) hat
1st row: 6 sc in amigurumi ring;
2-4th rows: 6 increases in each row = 24 sc;
5-8th rows: 24 sc each;
9th row: 4 decreases = 20 sc.
2) Leg
1st row: 6 sc in amigurumi ring;
2-3rd rows: 6 increases in each row = 18 sc;
4th row: 2 increases = 20 sc;
5th row: 20 sc;
6-7th rows: 2 decreases in each row = 16 sc;
8-9th rows: 16 sc.
We collect fly agaric just like they collected small boletus.
We embroider specks.
The mushrooms are ready.
Flowers, twigs, leaves
The simplest flower can be knitted according to the pattern shown in the figure below.
If you want to flower larger, then instead of two lifting loops, knit three loops, and for the petals, knit stitches with not one, but two crochets.
The flower will be even larger if you knit four lifting loops, and for the petals you knit stitches with three crochets.
Leaves They are also very easy to knit. If you want to make a larger leaf, then increase the number of loops in the initial chain and, accordingly, the number of double crochets in the middle of the leaf.
N and the diagram shows a fragment twigs. You can tie a branch of the length you need by simply adding the required number of leaves. You can also reduce or increase the distance between the leaves by tying more air loops between them.

Assembling the pincushion
Sew on twigs and flowers. How to sew on mushrooms and make blades of grass is described in the first part of the master class.

Skilled dressmakers, knitters, and hardworking needlewomen always need crocheted needle beds on hand. Diagrams and descriptions will help you choose the cutest style to suit your taste and knit the right thing to decorate your everyday life.

A young but already experienced craftswoman, Ksenia Zaikina, posted an original pincushion on her blog. She recommends meeting Grandma Kindness and adopting the idea. This sweet granny is knitted from several parts and filled with holofiber, the handles are movable and held on by a thread fastening. The hair is made from wool for felting, and the face is drawn acrylic paints. The idea is brilliant in its simplicity and will definitely decorate the desktop of any skilled needlewoman.


Crocheted needle beds: patterns and descriptions
To begin with, you can try to knit the simplest classic version of a pincushion.


Using hook No. 2.5, a chain of 5 air loops is collected and closed in a circle. Next, 3 lifting loops and 11 s/n tables are performed in the central ring. Next, strictly according to the pattern, 2 parts are knitted, between which a filler is placed - wool, cotton wool, padding polyester. The parts are connected to each other using a contrasting thread, and the finished needle bed is decorated with lush airy bows. It is recommended to make a loop during knitting to hang the accessory on sewing machine or to any convenient place.
Crocheted pincushion – turtle
It's nice when a cute girl decorates your desktop crocheted little thing. This could be a turtle pincushion made from the remnants of bright acrylic yarn.


How to create such a cute turtle, will tell you step by step description works:
- According to pattern A, the belly is performed, 6 repeats are knitted in the round between arrows a and b.
- Similarly, according to scheme B, a shell of 6 repeats is made between arrows a and b.
- The next step is connecting the two parts. The belly and shell are sewn or tied together, leaving a small hole for the stuffing and head.
- According to pattern C, the head is knitted in the round; before closing the work, the part is stuffed with cotton wool or synthetic padding.
- Next, according to scheme E, 4 legs are made and carefully sewn to the body.
- All that remains is to make small, cute details - according to pattern D, 8 armored scales are knitted, and you will get a bright hat if you knit it according to pattern F.
- If desired, according to schemes G and H, the needlewoman can make and add flowers and leaves to the hat.
The result will be real knitted magic that will decorate your desktop and bring a lot of positivity to the interior of a cozy room.
Pincushion – watermelon: crochet
 Needlewomen have invented many ways to knit ripe, bright watermelons.
You can knit a striped Amigurumi ball and add a dry tail to it. Or make a cute watermelon slice by knitting in the round, then fold it in half, sew and stuff it with stuffing.
But one foreign needlewoman came up with unusual model, she “cut” the watermelon in half. A short and interesting video tutorial will show you how the cute halves turned out.
On a note! The video is accompanied by captions in English, but this does not interfere with the work. Any beginning knitter will understand how to knit a watermelon pincushion and at the same time be able to learn a few useful words in English.
Fly agaric fungus: fairy pincushion
A magnificent pincushion with fly agaric mushrooms creates a real fairy-tale mood in the workplace.


To create such a beautiful thing, just knit the stems and caps of mushrooms according to the proposed pattern. First, a round base is made - 6 non-woven stitches are knitted into an Amigurumi ring, then the piece is knitted in the round with increases. In the 8th row there should be 24 b/n columns, and in the 16th row with decreases there should be only 16 b/n columns.
In the 17th row, a ruffled mushroom collar is made; it is knitted in a circle with s/n stitches behind the front wall of the loop. Next, the thread is cut, the hook clings to the other wall of the loop, and the leg is tied in height.

The caps are made separately according to a simple cap pattern, stitched with white thread, stuffed with filler and attached to the legs.
The most interesting part of the work is creating the base for the mushrooms. Two identical circles are performed from suitable yarn, stitched around the perimeter and filled with padding polyester. All you have to do is add flowers and petals using easy patterns, sew on bright fly agaric mushrooms and use this great little thing every day.


The pincushion house: just a sight for sore eyes!
To knit such a wonderful pincushion house, you must first master knitting an African motif.


Advice for beginning craftswomen! It is advisable to collect the remains of bright yarn and work on creating one fragment. Having mastered this motif, knitters will be able to give napkins, pillows, and even large baby blankets to loved ones.
So, if 6 colored motifs for the roof are ready, you need to prepare a lining for them from the same plain fragments, and move on to knitting the hut.


First, a regular circle is made using non-woven stitches, and then, using increases and decreases, a part in the shape of a vase is knitted. The house is stuffed with filler, connected to the roof and decorated with cute details according to the imagination of the needlewoman.
Pincushion “Hedgehog”: quick and easy!
The craftswoman will get a cute plump hedgehog-pincushion if she turns her attention to simple diagram execution.


To work you will need yarn of two colors, a hook No. 2.5-3, beads and any filler. The knitting process begins with the muzzle, the first 6 rows are performed in a circle using light threads. Next, the work switches to dark yarn and circles are knitted strictly according to the pattern with decreases in 6-10 rows.
Before closing the work, the body is stuffed with filler. Using the “Ear” and “Paw” patterns, additional details are knitted and sewn to the needle bed. As a result of painstaking work, you will get a wonderful hedgehog that will serve its owner for many years and lift her spirits every day.
Crochet a cactus pincushion
The following simple, but truly brilliant idea will appeal to all novice needlewomen. To work you will need only 5 things - a pot, leftover yarn, a hook, filler and a good creative spirit.


A chain of 20 air loops + 1 lift is made. Knit a simple rectangle raised columns b/n behind the back wall. Thus, 36 rows are knitted; if desired, the size of the cactus can be increased by adding additional rows.
Note to beginners! The first stitch of the b/n is always knitted into the second stitch of the chain!
The result is a soft ball, which it is advisable to decorate with additional details - a flower and embroidery on the face. And the pot will serve as an excellent supply for a pincushion and storage for large pins.
Strawberry – knitted pincushion
A bright pincushion in the shape of a strawberry will create a warm summer mood in the workplace. Knitting such a beauty is easy and simple, and it will serve its owner for many years!

To work you will need hook No. 1, filler and threads of red, white, green and yellow colors.
According to the diagram, the first ring is created from four loops. 6 rows are knitted with increases for volume, and from the 12th row a smooth decrease begins. The strawberry evenly decreases towards the tip, and already on the 17th row you can put a little synthetic polyester in it. After the 20th row, the needlewoman gradually narrows the berry to one loop and closes the work. It is advisable to stitch the finished strawberry with white threads and decorate the top with green leaves. For convenience, the craftswoman suggests tying a flower and a loop so that the pincushion can be easily placed in a prominent place!
Ladybug on a flower – original pincushion
Pincushion on a loop in the form ladybug will serve well both beginners and experienced craftswomen. According to an accessible scheme with decoding symbols It's easy and simple to knit!
To work, you will need a No. 2 hook, acrylic yarn of appropriate colors and a neutral base made of thick cardboard.


The body of the bug is knitted in the shape of a hat and stuffed with padding polyester. According to the diagram, the needlewoman makes the heads of the cows and attaches them to the body. The insect is decorated with small spots and beady eyes. For the base, according to the drawing, a flower is knitted from bright threads with a loop in the middle. As an improvisation, the flower can be replaced with a green leaf.
A cow is sewn to the base, after which the craft can be glued to cardboard. The charming pincushion is ready and will serve the craftswoman for many years!
Frog or little frog: pincushions of different sizes
Toys in the Japanese style Amigurumi will be useful to their mistresses as convenient pincushions.

For example, a frog princess, knitted in the form of a flattened ball, with a crown and languid eyes, will become faithful friend and an assistant for a hardworking needlewoman.

A chain of 3 air loops is cast on and closed in a circle; 6 single stitches are made into a ring. Next, the piece is knitted in the round with even increases in each row +6 stitches. A total of 6 rows are knitted, and the last one should have 42 single stitches.
Three identical multi-colored parts are connected to each other, as in the photo, and until the last loop is closed, the body is stuffed with padding polyester. Be sure to add paws and eyes to give the frog a finished look.
Heart as a gift: a simple pincushion on a pendant
An easy and fun activity is recommended to all beginning craftswomen - creating gift crafts in the shape of a heart. There is a universal pattern for knitting two pieces of a heart, but the craftswomen add their own touches and present original author’s patterns.


Any novice needlewoman can make a cute little heart, like in the picture. First you need to stock up cotton yarn, hook No. 2.5 mm, synthetic down or cotton wool, various buttons and ribbons.


The work begins with a chain of 17 air loops + 3 lifts. In the first row, 3 s/n stitches are knitted into the second loop, then regular stitches follow, and in the center of the chain 5 s/n stitches are knitted in one loop.
At the end of the row, 5 s/n stitches are worked into the last stitch, the work is turned and knitted in the opposite direction.


Next, focusing on the drawing, any craftswoman can cope with creating the part. Two identical halves are sewn together and stuffed with filling; the finished hearts are complemented with buttons and a silk pendant. The result is real charm!
Funny pincushion – snail


Lovers of cute toys are recommended to knit a cute snail with a pink shell. The master class presents step by step photos work. They are accompanied by detailed descriptions and additional diagrams to make it easier for needlewomen to navigate the intricate knitting process.
Crochet teapot-pincushion
An original teapot for needles and pins will be made from leftover wool yarn.


You need to choose the right one color combination and connect a few small details:
- The bottom is knitted in the round from two parts and reinforced with plastic or cord laid in a spiral.
- The main side of the teapot is made with embossed non-woven stitches and knitted in straight and reverse rows. The part is fastened with a side seam and sewn to the base; to give it a rounded shape, one tightening row is knitted along the upper edge.
- The spout and handle are reinforced with a wire frame and sewn to the main part.
- The lid is assembled from two parts - a small base and a cap. Before stitching, it is stuffed with padding polyester and decorated with flowers and beads.
- At the end of the work, the kettle is filled with soft filler, and the lid is connected to the main part. The connection point is masked with a cord or figured binding.
It turns out to be a real treat, and the original toy pincushion will definitely appeal to the little needlewoman.
Heart as a gift: knitting a Valentine pincushion
To create such a magnificent heart you will need cotton threads, a hook No. 1.5, soft fabric and filler for the base, and additional delicate decorations. First, according to the scheme, 2 central parts are made, and then 4 side sprockets. The parts are connected to each other as shown in the easy diagram.


Next, the finished halves must be immersed in a starch solution, stretched and left until completely dry. During this time from soft fabric prepare a bright heart with filling. Place the smoothed parts on the base and tie along the contour with a connecting seam. Be sure to decorate with beads and ribbons, then the finished holiday pincushion will be an excellent spring gift.
Video: Lesson on how to knit a funny pincushion hat

The kind needlewoman Olga Mitusova in her author's MK will tell you in detail and show how to knit a bright pincushion hat. The craftswoman works professionally and in her lesson gives a lot of useful tips. With its help, even novice needlewomen will find it easy to create a beautiful and bright little thing.
In conclusion, a short video for inspiration and finding new ideas for knitting original and practical needle beds.
Video: Ideas for inspiration for needlewomen
A selection of patterns for crocheting needle beds


