The cartoon Cat Simon from the animated series of the same name has been closely integrated into our lives for several years now. How could it be otherwise if this cat is so real and funny? We invite you to try making this cute character yourself. Simon" is attached to the article.
What do you need for sewing?
Scroll necessary tools and materials for sewing the “Simon the Cat” toy:
- pattern (large, small, any);
- paper (preferably thicker);
- pencil, marker, pen (whatever you have on hand);
- fabric for the “body” of any color (you can use any, but the softest toy will be made from fleece);
- white cloth for the eyes (use the same material as for the whole body);
- black thread for the face (preferably floss or just thicker yarn);
- any filler (sintepon, padding polyester, holofiber, grain, and so on);
- sewing thread (preferably to match the body color);
- tailor's scissors (or regular ones);
- beads for pupils;
- pins.
Pattern "Simon the Cat"
So, to sew any thing, you need a form. The most common “Simon the Cat toy” pattern is shown below.
It must be printed on any paper using a printer. Remember that the size of the finished Simon the Cat toy depends on the size of the pattern. The pattern, enlarged compared to the original or, conversely, reduced, allows you to make a whole family of cats. The easiest way to change the size of the form is to select page parameters when printing from a computer (for example, set “Print on A4 page”).
After printing, we see that the “Simon the Cat” pattern consists of three parts: the body, the tail and the eyes. It is advisable to transfer the printed version to thicker paper (for example, cardboard). This option will remain for a longer period.
- Cut out all the details of the paper pattern along the contours.
- Fold the main fabric in half. In this case, the front side must be on the inside, and the fabric must stretch to the sides, as in the picture of the pattern. If the color of your toy’s body and eyes match, then take another piece of white fabric (for the eyes).
- Attach the paper pattern to the fabric and pin it carefully with pins.
- Trace the outline of the paper pattern with a marker, pencil, or pen. Unfasten the paper pattern from the fabric.
- Pin the two layers of fabric together or gently baste them together.
- Cut out the planned details of the future toy.
Sewing toy body
The “Simon the Cat toy” pattern will no longer be needed. It can be put aside so as not to interfere.
Now let's start sewing the parts together. It is convenient to use for this sewing machine, if it is not there, then you can use a simple needle and thread.

1. Sew all the parts, except the eyes, clearly along the marked contours. This way the toy will turn out neat. There is no need to leave holes for turning inside out. Below is why.
2. Cut out all the sewn parts, stepping back from the seam by about a couple of millimeters, if you are sewing a toy from a toy, or from another - a little more.
3. Make small cuts in the indentations in the area where the ears, fingers and paws meet the muzzle. This will save ready product from unsightly constrictions.
4. Now you need to turn out the sewn, but not yet finished product. To do this, make small cuts in the following places:
- on the muzzle where you plan to sew on the eyes;
- on the tail, on the side where it will be sewn to the main body.
5. Carefully turn all the parts inside out so that the cuts do not come apart. You can use reverse side pencil or wooden stick.
6. When all the parts are turned out, you need to stuff them. To do this, we push small portions of stuffing inside the body and tail. It is necessary to stuff it tightly enough. Particular attention should be paid to the far corners of the ears and fingers, and don’t forget to highlight the cat’s belly.
7. After you have stuffed and smoothed everything, the cuts need to be sewn up. Don't forget to use thread that matches the fabric. Should be darned hidden seam.

Stitching parts
When all the parts are stuffed and the cuts are sewn up, you can completely sew the toy.
Tail
It is sewn to the body with the side where there was a cut for turning and stuffing. It is best to sew it in a circle. This will be more reliable and aesthetically pleasing.
Eyes
- We apply two circles to the muzzle and secure them with pins.
- We put a little stuffing under the circles so that the eyes are embossed.
- Sew on the eyes with white thread. It is better to sew in the “over the edge” style.

4. Make pupils from beads. To have less thread, sew on the beads with one thread, then bring the knot to the place where the nose will be.
Simon the cat's face
There is very little left to complete the creation of the toy - make the muzzle. But this step also requires great accuracy in actions, like all previous work.
You will also need a little imagination. After all, your cat can smile, frown, or even stick out his tongue!
To get a face like the one in the picture below, follow these instructions:

- Mark the main points of the future muzzle. To do this, you can use pins or a special disappearing marker, if you have one.
- Take a thick thread, preferably floss. Insert two layers of thread into the needle. Then fold it over again. As a result, you will sew four layers of thread.
- Contour the eyes. To do this, sew each eye with a thread using a “back needle” stitch.
- Next, use a new thread to sew the nose. Each new stitch should fit tightly to the previous one.
- Now “draw” a mouth with a thread. Also use the back igloo style.

The toy is ready!
Cat Simon for adults
For variety, you can make a boy toy. The pattern of Simon the cat with eggs differs from the usual one only in additional elements.
Instructions:
- We cut out two additional round pieces, which will be no smaller in size than the eyes.
- Then we sew them over the edge and tighten them.
- We fill the middle of each “bag” with filler.
- Sew two “bags” in a circle on both sides of the tail.
The boy cat is ready!
Some practical advice which may be useful to you:
- From the A4 size pattern you will get a finished toy about 20 centimeters in height.
- In order to make a Simon pillow cat, you will need the same pattern as the one above. Just use more material to pad the torso.
- For beauty, you can sew pads on the paws (you need to use the same thread as for the muzzle) and make a belly.
- The given “Simon the Cat” pattern is also suitable for making small keychains or magnets. Just sew a special fastener between the ears of the toy or glue a magnet onto the back of the cat.

5. You can also sew suction cups to the paws. Thus, you will get an original suction pad for the car.
Simon the cat has thousands of fans around the world! And I myself was convinced of this, almost daily receiving requests to send, which is on. I myself love this cat very much, so today’s master class will be devoted to creating a Simon’s Cat toy with your own hands. Photos for the master class were taken from Katrin Black. On her website www.katrinblack.com you can see an original master class on making Simon the cat and many other charming toys. In addition, on the site you can buy all this beauty from Katherine. Take a look, the toys are really cool!
In order to sew a Simon cat toy we will need:
– material (white fleece)
- black floss threads
- white threads
- paper blank - sketch
- 2 beads or buttons
- padding polyester or other filler
- scissors
- sewing needle
- pins
- pencil
We print out a paper blank of a suitable format.
.jpg)
Fold the white fleece in half and secure with pins. Using a pencil and paper blank, we transfer the contours of Simon the cat onto the fabric. We supplement the pattern with two circles - eyes and a tail.
.jpg)
We follow the marked lines with a machine stitch or manually sew them together using a needle and white thread.
.jpg)
We cut out the figure with scissors, leaving a margin of 2-3 mm from the seam line. Then we make small cuts on the paws between the toes so that the toy looks neat when turning it inside out.
.jpg)
We make a small incision on the head, where the eyes will be sewn on later, and on the tail where it joins the body. Turn it right side out and stuff it with padding polyester or other fillings. We help stuff the padding polyester into narrow elements with the back of a pencil.
.jpg)
We sew up the slits in the head and tail with a hidden seam.
.jpg)
Sew the tail to the body.
.jpg)
We sew a decorative seam on the legs with black floss threads.
.jpg)
Sew on the eyes with black floss threads along the contour. Before finally sewing them up, we stuff them with padding polyester. Sew black beads in the center of the eyes. We also embroider the nose and mouth with black floss threads.
How to sew Simon the cat?Sewing Simon the cat really couldn't be easier! It can be sewn not just by a beginner, but even by a child or someone who has never held a needle and thread in their hands. I myself learned to sew toys using a similar pattern, only about hares. But perhaps my photo report will somehow be of interest to more experienced craftswomen. I don’t know if I’ll reveal big secrets, but there will be a couple of tricks that may have already been described somewhere by someone, but I figured them out on my own solely through experience.
Especially for this MK, I sewed a cat based on a picture from the cartoon, since my cats Simon are still slightly different from the cartoon character. And not just eggs. I will explain everything on it, but having mastered the MK, you can easily sew Simon the cat using other patterns. And not only Simon the cat!
Pattern. I couldn’t resist and completely redrew the picture even for this case, but in fact, you can get by by simply compressing the original picture in one of the directions so that later, when stuffing the toy, it won’t warp due to stretching of the fabric. You can neglect it, but then don’t be surprised why the cat turned out to be so fat or skinny! Or first fat, and then skinny, when I sewed according to the same pattern :)
To get a cat about 30 cm, you need to print the pattern on an A3 sheet 
What will you need? Yes, actually quite a bit. Difficulties can arise, by and large, only with stuffing, since it is better to look for padding polyester, comforter or holofiber for this matter (there are many names - the essence is the same) and, as a last resort, stuff it with padding polyester. And so... 
1. Fabric - white fleece. If you sew a cat according to the picture below, you may need another tiny piece of black fleece or felt.
2. Pillow stuffing - synthetic down/comforel/holofiber.
3. Needle.
4. White simple threads and black floss.
5. Scissors large and small.
6. Pins preferably have flat heads.
7. A disappearing fabric marker, but if you don’t have such a miracle, you can easily replace it with a regular gel pen.
8. A steamer can come in handy if you mess up :)
9. And a sushi stick, oddly enough:))) Although you can of course replace it with a pencil or pen, a sushi stick is ideal for turning out and stuffing toys! 
So, we have everything we need, or almost everything... Let's begin!
1. Transfer the pattern to fabric. We measure out the required piece of fabric and fold it in half, facing inward. Look at the fleece CAREFULLY and don’t confuse its face with its back! On the front side the pile is thicker and longer. And pay ATTENTION to whether it is stretching in the right direction! Should match the arrows on the pattern.
Attach the pattern and trace it with a marker/pen. You can pin the pattern to the fabric with a couple of pins to prevent it from slipping. And I recommend that for the future, those patterns that you plan to use more than once are made from cardboard. They will be more convenient to work with and will last longer.
We traced, removed the pattern, smoothed the fabric with our hands, and pinned two layers together. You can sweep it away to be safe, but due to the presence of lint, fleece does not slip and the layers adhere well to each other. 
2. Sew down the parts. Using small stitches, sew CLEARLY along the lines of the body and tail parts. Just DO NOT Rush!!! The cat's fingers are almost jewelry work! Be patient :) Of course, it is advisable to sew on a machine. Doing this with your hands is such a thankless task that it’s easier, in my opinion, to find someone who has a typewriter and come to visit him or get some kind of rarity like the Seagull or Singer from your grandmother :)
And now I’ll say something probably strange... If you forgot to leave holes for turning out, then you did the right thing! I'm being smart here... 
3. Cut it out. Fleece is a wonderful fabric! It does not crumble at all around the edges and the allowance can be left literally 2-4 mm.
ATTENTIVELY! Don't forget to make cuts between the fingers and ears so that there are no ugly constrictions on the toy later. 
You can leave an even smaller allowance at the tips of the ears so that they look more beautiful after turning them inside out. 
We simply cut out two circles - future eyes - along the lines. 
4. Turn it inside out. To do this, we make two small slits: at the place where the eyes will later be sewn and at the end of the tail with which it will be sewn to the cat’s body. This way we will avoid the tedious mending of ugly holes like a hidden seam. Maybe some people do it well, but it was easier for me to come up with workarounds.
In short, this is how we cut through. 

And then, as if by magic... a sushi stick appears :))) The different thicknesses of its ends are very convenient for turning out (especially narrow long parts) and for stuffing all sorts of hard-to-reach places. 
5. Stuffing. Small pieces. A sushi stick to the rescue :) Stuff it TIGHT!!! We don't skimp on the stuffing. We carefully work on every finger, every ear. We stuff our paws more tightly. We give appetizing shapes belly. Try to stuff the toy so as to smooth out all the wrinkles. 
6. Sew up the holes. It’s probably not very clear from the photo what a hidden seam is, so take a look on Google if you need anything. 
Somehow it has to work out this way. It's scary, of course, but it's temporary :) 
7. Sew on the eyes. We figure out where it is best to identify them, pin them and sew them with small, neat stitches with a seam “over the edge”. This is where it is IMPORTANT to leave a hole! We fill the eye a little and sew it up. I recommend taking a larger thread at once so as not to create knots. 
8. Pupils. Large beads or small beads. You can sew both pupils with one thread, and bring the knot to the place where the nose will later be. But for some reason he’s not there in the photo... Ah! I hid it under the corner of my eye. By the way! We hide all the ends of the threads under the fabric! So that no protruding stumps!
You can, of course, make the pupils just knots of black threads, but there won’t be that fire in the eyes :))) 
9. Embroider the muzzle. I use floss for this (2 strands folded in half). Using a “back needle” stitch, carefully outline each eye. It’s convenient to mark the nose and mouth with a disappearing marker, and if you don’t have one, you can stick pins in key places like beacons. We embroider, trying to make the knot as invisible as possible. 
10. Pads on the paws. It is very convenient to mark them with a disappearing marker. 
The same floss, the same “back needle” stitch. 
11. Tail! Personally, I sew such details with a hidden seam, as if in a circle. Like this. 

12. We admire:))) Well, you can also make his ass with a knot or a cross or sew on his manhood, but in general our cat Simon is ready! We did it! 
13. Afterword. If you have any questions (and they probably will), suggestions, comments, write everything! About the navel, balls and suction cups can be read in a special addition to this MK.
Add photos of your cats to the Gallery! And don’t forget about gratitude to the author in the form of a link to the master class and a gallery banner! 
So good luck everyone! And I look forward to your wonderful creations!!!
Your Catherine Black ;)
Accessories for a cat
1) How to make a belly button for a toy cat?
2) How to make and sew a harness on a cat?
3) How to sew suction cups to the paws?
Everything is actually incredibly simple, but since I have been asked these questions more than once, I will now tell you everything and show you in great detail! 
First, we need a cat :) For those who don’t have a cat, let’s quickly sew one using the master class! Work there for two hours.
How to make a cat's belly button? The easiest way is to make both his navel and butt at once. They secured the thread to the belly, pierced the cat right through and brought the needle to the place of the future butt. The body was slightly squeezed to create a slight tension on the thread inside, and secured with a double knot. The end of the thread was hidden inside the cat. Ready! 


How to sew eggs on a cat? Here I can’t help but tell a joke! I went into the search with this question to see if anyone was interested in it... I really am! But only owners of live neutered cats :))) Damn, how do they imagine this??? Oh, people... But fortunately, our cats are fleece, so this operation is not difficult!
We cut out a couple of circles from the same fabric as the cat itself. The size is at least the size of his eyes, maximum... Well, this is limited only by your imagination :) They trimmed it over the edge, pulled it together, stuffed it. In my case, just synthetic down, although you could probably use some kind of grain - you will get such anti-stress eggs :))) The sewing process was difficult to photograph, but its essence is very simple - we sew each egg with a hidden seam in a circle. For convenience, you can secure them before sewing with a long pin or glue from a glue gun. 


How to sew in suction cups? Although the first question that arises is “Where can I get them?” :) I have long given up trying to find the suction cups themselves for sale, so I suggest you do the same as I do - buy a pair of plastic soap dishes at the nearest hardware store :) The suction cups from soap dishes have just the right shape for our purposes. 

Sewing them in is also very easy. A small incision is made on each paw. The back of the suction cup is inserted into it. Then the hole along the edge is stitched with a “forward needle” seam and tightened. To be safe, I do this twice with each suction cup. That's it! 

The cat is completely ready! You can hang it in your car and shock passers-by! 

I propose to sew a very funny cat, Simon.
It's quite easy to sew. I found the pattern on the Internet, just saved the photo, then printed it on A3 sheet. I printed it at a copy center, the cost of printing on A3 sheet is only 10 rubles. You can simply print it on a printer. Then the kote will be smaller in size. I have in finished form turned out to be 30 cm tall.

The fabric is fleece. IKEA has such wonderful fleece blankets. Fleece can also be purchased at any fabric store.
The red one is a blanket from IKEA, and the orange one is store-bought fabric.


The filler looks like this, it is also sold in the fabric store.

And so we proceed to the pattern of the cat. We fold the fabric with the right side inward, position the pattern so that the fabric stretches along the tummy (following the arrows on the pattern). Flashing

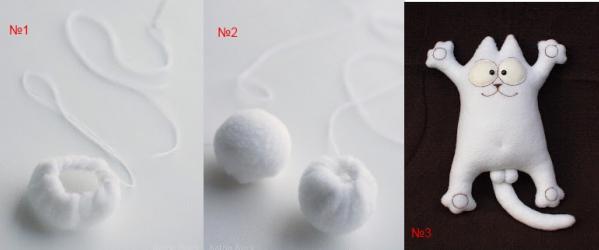
At the bottom of the tummy we leave an open edge for stuffing with padding polyester, like this. We cut it out, make notches on the paws between the toes and between the ears so that there are no folds on the front side. We sew the tail, also leaving room for turning it inside out. We cut out eyes from white fleece and “pieces” and testicles from the main fleece. We turn the workpiece inside out and stuff it with filler. We try to make it tight, especially the paws, so that the product holds its shape.

We sew the hole with a hidden seam. Let's start decorating the muzzle. We attach the eyes, sew them on with a seam over the edge, lightly stuff the eye and sew it up.

Sew on the pupils - beads. We embroider the eyes along the contour and the muzzle with black threads (floss is better, but plain ones are also possible). I first drew a muzzle with a pencil. You just need to make sure that the pencil is not visible because of the threads.
Let's move on to the essentials :) Sew along the edge with a “forward needle” seam and pull it together a little.

Also fill the eggs with filler.

Sew at the bottom of the tummy with a hidden seam, close to each other. Sew the tail onto the back. Basically, Simon is ready. But you can also sew on suction cups. And then your cat will be able to guard the car.
We make small cuts on the paws (about 5 mm, so that the suction cup fits in a little tightly.

Sew along the edge of the hole with a “forward needle” seam, insert a suction cup, tighten, secure, sew in a circle again. Also with the rest of the suction cups. Suction cups can be found in hardware stores or supermarkets, in departments where they sell bathroom accessories. Here are the photos of the cat that turned out in the end.
Every year more and more new cartoons appear, which are gaining enormous popularity. That is why store shelves are filled with a large number of soft toys, which cost a lot. One of these characters is the cat Simon; on the Internet you can find toys, various crafts and souvenirs with his image. Most often they are made by craftsmen and then resold. Unfortunately, prices for such work are usually inflated, but you also have hands, you can do everything yourself. In this article, we propose to consider several ways to make Simon the cat with a pattern. One option would be crocheting.
Let's start with sewing
The process of sewing a cute cat Simon from felt can be traced using the example of a master class with step by step photos and a short but clear description.
In order to make a toy, we will need: fleece (take two colors, one will be the main one - gray, red, and the second color - white), any filling for toys (it can be padding polyester, down, holofiber, etc.), scissors, needles, threads, floss in the color of the main fabric, beads and two large beads for the eyes. We also need a paper pattern.

The first step is to see if the cat pattern is given in life size or not. If it is normal, then simply transfer the drawing to tracing paper, and then draw allowances on top. In our case, we will have to increase the pattern to 40 cm. By the way, it is best to print the template on A3 format.
It is also worth remembering that you can take either an enlarged pattern or a reduced one. This method will help you create a whole family of Simon cats.

If you want to hang a toy in your car, you should buy or find four suction cups at home. They can be purchased at any hardware store.

Fold the fabric right side inward. Then we place the pattern on the fabric so that the toy will stretch across the tummy in the future. We secure the pattern with pins.

We outline the pattern with a bright marker.

We completely sew the toy with a small stitch so that there are no holes in the future during stuffing. If you are a beginner, leave a little room for turning, which you will then need to sew up with a blind stitch.

We cut out the toy, leaving a little allowance, the width of which is literally five mm.

Then we must make notches on the ears and paws as shown in the photo.


Then we apply the tail pattern, trace it and stitch it (completely or leave room for turning).


On the toy we mark where the eyes will be located and make a small hole with scissors. We do this to turn the toy inside out. For those who left a separate place, no cuts need to be made.

On the tail we do exactly the same as indicated in the photo.

We turn the blanks inside out.

At this stage, take the filler and fill the toy with it. We do this very carefully so that the animal’s fingers and ears are completely filled.

Sew all holes with a blind stitch. Don't worry if it's a little visible, we'll still sew the eyes on top.

Well, the body of the future cat Simon is already ready. Now you need to start making the muzzle and working with the eggs.


We place our eyes, pin them (on the seam that was formed during stuffing) and sew the circles with a seam over the edge.

Then we leave a little space, fill the eye and sew it up until the end. We repeat exactly the same manipulations with the second eye.

Then we sew on the pupils. For this we took black beads.

We embroider the cat's face, hiding all the knots in place of the nose.
Then we move on to the next part. Along the edges we sew the seam forward with the needle.

The next step is to stuff them and tighten the thread.


Sew the tail with a hidden seam.


Now we need to sew on the suction cups. To do this, we make very small cuts on the paws, maximum 5 mm.

We sew the needle along the edge with the seam forward, insert the suction cup and tighten the knot, sew the edge again and hide the thread.


We do this on all legs, and Simon the cat is ready.

