Knitted products always attracted the attention of others with their unusual knitting, style and use of threads of different colors and fiber composition by needlewomen.
Bags made from thick yarn have long been trendy. What yarn is suitable for creating exclusive carry-on luggage, and what types of thread exist? This is our story.
Varieties
Knitted yarn is available in several types. The volume of the bag will be given by a thread of the appropriate width and thickness.

Tape
The yarn is a ribbon approximately 0.7 cm wide. Acrylic or cotton thread is dyed in various colors. This allows you to create multi-colored products, ideal for creating a complete female image. Viscose thread is one of the three above-mentioned yarns.

Knitted
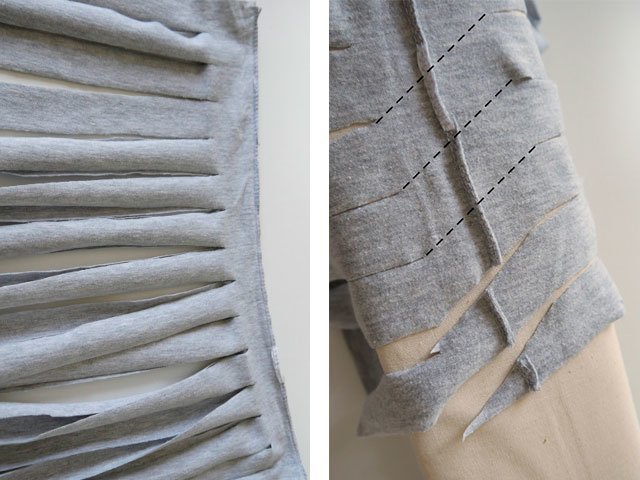
This type of thread is obtained from knitted fabric (the thread is very similar to T-shirt material). Many craftswomen create knitted yarn themselves, skillfully using old items that are no longer suitable for wear.
To do this, an old T-shirt is ripped open and cut into ribbons. The width of the stripes can be chosen at your discretion. Open cuts do not need to be processed. They allow the edges of the strips to curl slightly.
If girls want to achieve a velvet effect on a knitted bag, they need to choose chenille yarn. Short pile will add softness and fluffiness to the product. The composition of chenille includes acrylic and cotton. Very often you can find acrylic chenille on store shelves.

Pompom
Craftswomen prefer this option for making children's things. But in in capable hands thread with pompoms will create stunning women's bag. The pompoms will then act as decoration for the product.

Volumetric thick fantasy
Fancy yarn came to us from America. Its volume will reduce the time it takes to make a bag. For such a thread you need to choose a thick crochet hook.

Design features
No matter what kind of needlework the girls do, they are always sure that the things they create with their own hands have no analogues.
Knitted yarn allows you to knit a bag of any shape. The result of crocheting from such yarn can be an amazing clutch or a spacious bucket bag, a travel bag for everyday life.
Needlewomen can use yarn of any color. Handbags made of plain thread will easily fit into everyday women's looks.

Bags that are combined from several colored threads also look original, bright and positive.
There are a huge number of patterns that are made using a crochet hook.

If knitting the pattern produces a dense fabric, then carry-on luggage can be created without a lining.
The openwork pattern has always won the hearts of girls with its incomparable appearance. However, any openwork knitted or crocheted has small holes. You can use such patterns when making a bag, but you need to make the product on a lining, which is most often matched to the tone of the main thread.

How to decorate a bag made of knitted yarn?
The decor on things definitely makes the product unique and memorable for everyone.
What decorative elements should I take to finish the product? These can be wooden handles, large and medium-sized buttons. A zipper with a pendant, in addition to performing its main functions, is also an excellent decoration for women's luggage.
You can safely match the knitted bag with metal fittings. The girls' flight of fancy and creative approach when working on decoration will tell you what to buy.


Creation methods
Crochet - exciting process creating any clothes, bags and socks. Girls who are just starting to master this type of needlework should learn how to perform the simplest steps: knitting a chain loop, making double crochets and single crochets.
How to knit an air loop - the photo illustrates the entire process of creating a loop.

In the photo below you can see how a single crochet is knitted. You need to knit a chain of several air loops. Insert the hook into the loop, pick up the thread and bring it back.

A double crochet is knitted as follows. First of all, you need to know what a yarn over is in knitting. Yarn over is an additional thread pick-up that allows you to make a pattern.
A double crochet is worked exactly the same as a single crochet. The yarn over needs to be done after the first pick up of the thread. Bring the hook back out of the loop.

Half single crochet (connecting stitch) - complete knitting instructions are shown in the photo.

How to do it yourself?
Knitted bag
Model dimensions: 29x19x2 cm. And you will need:
- Yarn: 2-3 skeins (90 meters per skein);
- Hook No. 6.
Legend:
- VP – air loop;
- PST - half-column.

The work flow is as follows:
- Crochet a chain of 18 VPs. Tie the PST chain without double crochet (one arm of the loop should be free). Make 3 loops along the edge of the resulting knitting.
- Next stage: creating a pattern (alternate a simple stitch and a stitch that goes through the loop of the previous row).
- Next, knit in the round to the desired height of the bag.
- Knit the last row with connecting posts and decorate the joint.
- The product is almost ready.


For the handle and clasp prepare:
- 2 chains (length 20 cm);
- Two carbines;
- Rings;
- Yarn;
- Connect the carabiner to the chain.


- Weave the handle according to the following pattern.
- Hide the ends of the threads in a pen.
- This is what the finished strap should look like.


For the lining prepare:
- Fabric matching the color of the knitted thread;
- Lightning (tractor);
- Measure the bag and cut out a rectangle.


- Dimensions geometric figure must match the size of the bag.
- Line the lining with non-woven fabric. Sew pockets onto the lining. Sew in a zipper and rings for the strap.
- Insert the lining into the bag and sew it to the base. This can be done with a needle using hand stitches. All that remains is to fasten the belt on your shoulder.


Round bag
Summer bag round shape– a stylish and comfortable accessory to wear. Of course, you can’t fit a lot of things in there, but the girls will always have all the cosmetics, a mirror, a comb and other little things at hand.
For those craftswomen who have decided to knit such beauty, we invite you to look detailed master class from the popular YouTube channel. It belongs to Anna Sakhno.
Making carry-on luggage comes down to a simple crochet skill. Above are complete instructions on how to start crocheting.
Bag
Its shape has always aroused increased interest among fans of original things self made. The bag has a drawstring closure that will ensure the safety of all items in the bag.
How is a sack bag knitted? Detailed video course - cheat sheet for knitting a bag.
Marshmallow bag
A small glamorous briefcase looks ultra fashionable and incomparable. To create it, you need to prepare knitting yarn, a hook the right size and a metal clasp.
This pattern is knitted in puffy stitches. How to do it? Attached video master class - step-by-step instruction creating a portfolio. The color of the yarn is chosen at the discretion of the needlewoman.
How to care?
A knitted handbag requires some care. Compliance simple recommendations will keep the product in its original condition. Since the bag is made of jersey, it can be washed in a machine at a special temperature: 30° (delicate wash).
If there is no such mode in the car, hand luggage can be washed in a basin with laundry soap or powder. It is not recommended to diligently wrinkle or crumple the product; it should be soaked and left in water for some time.
After soaking, gently rub the bag and rinse in cool water. Excess water will go away if the product is wrapped in a towel.

Knitted items should be dried flat on a horizontal surface. This will prevent things from stretching out and changing their shape.
Knitted yarn gives products volume and its unique beauty. Interest in knitted bags does not disappear over the years. Today, many craftswomen are engaged in making things in the “Hand made” style.
Good luck to all girls!
Knitted bag can amaze the imagination with both implementation options and areas of application. Bags are knitted and big size for economic, purely practical needs. And small decorative bags for carrying daily little things. You can knit a bag - a clutch, on festive event, How fashion accessory. Now the trend is to knit bags for a variety of gadgets - phones, tablets, e-books.
Thanks to such a variety of applications and sizes, there are both simple knitting patterns for bags for beginner needlewomen, as well as professional products of the highest class. Beginning needlewomen are experimenting with bags - phone cases. They can be applied a lot and changed daily. Decorate with patterns, flowers and rhinestones. Professional needlewomen they knit richly decorated bags and sets. Such knitted bags get a lot of feedback and sell successfully if the bag is knitted to order.
Some are experimenting with knitted bags. For example, they knit bags from bags. The idea is original. A bag made from bags is extremely practical and does not easily stain. Also knitted backpacks can be classified as knitted bags..
We are sure that you have either already knitted bags or will definitely knit them in the future. Feel free to send a photo of your bag, description and knitting pattern if you have one..
Knitted bags different models with description and diagramKnitted bags of different models with descriptions and diagrams
Knitted bags always attract attention, like any other handmade item. The beauty of them is that they always match the tone of things, since they are usually knitted from threads of the same shade. Bags can be made according to different patterns, but in this article we will look at the simplest ones, designed for novice needlewomen.
Method No. 1
Let's make the most with our own hands a simple handbag. Let's look at the main picture:
- 1r. – 1 LP, 2 stitches removed (thread in front) – repeat this combination, finish the row 1 LP;
- 2p – all drugs;
- 3r and all subsequent ones are a repetition of rapport 1-2r.
We knit quite tightly - for a square of 10 by 10 cm - approximately 15 stitches and 26 rows.
We knit with knitting needles. We start from 31p. the main work is the main pattern, how to knit it is described above. After 40 cm you need to close the loops. The result is a rectangle 22*19 cm. We sew the handbag on the sides. For the handle we weave a braid of threads in several folds. Its length is about 80 cm. Before finishing weaving, try on the handle so that it is comfortable for you to carry the handbag. The bottom of the product is decorated with tassels. To do this, we take threads in two folds about 40 cm long. Using a hook, the threads folded in half are sewn to the bottom edge of the product. Each relief strip should have a tassel. Beads of different colors are also perfect as decoration.
Method No. 2
We knit a rectangle 29.5*10.5 cm. This will be the bottom. This can be done either by knitting or crocheting.
When the bottom is ready, cast on 180 stitches along its perimeter using circular knitting needles. We must try to cast on the same number of stitches on each side to obtain a symmetrical pattern.
The “Braid” pattern is used here as a knitting pattern. This is a very simple drawing, so any needlewoman can make it with her own hands.
Schemes of the central (a) and side (b) patterns are presented in the photo below.
The height of the bag can be adjusted at your discretion. On average, it is 26-28 cm. Once the height has reached the desired level, the loops close.
Do not forget that for knitted For handbags, it is best to sew a lining. It is enough to simply cut out the bottom and side parts of the lining from a special material and sew everything on a sewing machine.
Handles can be purchased at the store and sewn onto the bag, or you can sew them yourself.
Method No. 3
Knitted bags with ruffles will become a great addition and to summer dress and for evening wear. The handbag in the photo measures approximately 30*25 cm. For it you will need 300 grams of yarn in the main color and 50 grams of a different color for finishing, knitting needles No. 5.
We will knit with a density of 17p*22p per square measuring 10*10 cm.
The pattern used in this pattern is called "Rice". It is performed as follows:
- 1p – 1LP, 1IP along the entire length;
- 2p - above each LP you need to knit an IP, above every LP we knit a LP (pattern 2p will be repeated in subsequent rows).
Bottom. We cast on 112p, knit in a circle about 5 cm with the main pattern. Finish work 1 r IP. For now, set the bottom aside.
Ruffles. On round knitting needles cast on 168 stitches in a non-primary color. The first row is purl only. Change the color to the main one, continue knitting 8 more circles with facial loops. Knit the next circle like this: 1 LP, 2 LP together, 1 LP, 2 LP together - and so on throughout the circle. Next - again a whole series of individual entrepreneurs. The first frill is ready. It must be connected to the bottom of the bag. To do this, we knit each bottom loop with a ruffle loop.
We continue to knit the main pattern - we go up 5 cm. Next is the turn of the second ruffle. The knitting patterns for all ruffles are the same. Tying them with your own hands will not be difficult. You can prepare 3 ruffles in advance, and then just attach them to the canvas. We attach 2, 3 and 4 frills, knitting between them again approximately 5 cm with a “rice” pattern.
After we managed to knit and stitch 4 ruffles, we knit 1p. We finish the top of the product as follows: 2 LP, 2 LP together, 2 LP, 2 LP together - and so on throughout the circle. As a result, you will be left with 84p. We knit the next 5 cm with knitting needles according to the pattern. The penultimate row is all knit stitches, the last one is purl stitches. Then close it.
All that remains is to make the handles for our knitted handbag with our own hands. Their width is 6 points. The pattern is the main one, “rice”. Length – whatever is most convenient for you, usually about 35 cm. In total, you need to make 2 handles and sew them on.
Method No. 4
Knitted bags in bright colors perfectly complement any wardrobe and attract the attention of others. Knit them a hat and scarf in addition - and you will be simply irresistible.
Another interesting model made with knitting needles. The dimensions of the finished bag are 30*30 cm. It will use 250 grams of thread.
To begin, we dial 43p. Next is the main drawing according to the diagram. Thus we knit 81 cm.
The side part will turn into a handle, so its length is approximately 150 cm. The width of the side panel is 7p. We collect them and make a pearl pattern: 1LP, 1IP. In every 2nd row the pattern shifts by 1 stitch.
Let's start collecting our knitted handbag. From the wrong side we sew the first side panel to both sides of the shelves. Sew the side panel on the other side. Then it’s the bottom’s turn. We decorate the product with a beautiful clasp.
Knitted bags are an interesting detail in a woman's wardrobe. Don't neglect it. Be creative and you will always look your best.
Video: Knitting a summer bag with knitting needles in a honeycomb pattern
Crocheting bags has always been considered a very difficult and painstaking task. This kind of do-it-yourself work has been recognized as one of the most common types of needlework. Young needlewomen were inspired beautiful photos fashion bags from magazines and began to create unique masterpieces themselves. It has become not just an ordinary accessory, but a way of self-expression. Such a stylish and unusual piece of “wardrobe” can tell a lot about its owner. Now unique knitted bags You can create your own crochet!
Crocheted bags patterns and descriptions, photos
As you can see in the photo below - crochet knitted bag – these are not just another cute knitted trinkets. This is real art. Such elegant accessory can be linked absolutely any shape, color, use elements such as: flower for decoration(it can also be linked), satin decor (ribbons), pattern(make a pattern as you knit).
The most interesting thing is that it can be done not only from ordinary yarn/thread, but also easy to make from garbage bags (bag), from motifs - squares, over the shoulder, making two knitted handles. Products from knitting yarn. In addition to the fact that they are suitable for both girls and women, they look very good due to their unusual texture.
Crochet bags patterns and descriptions
Now we will look crocheted bags for summer with patterns and descriptions
. In our case, this is bag(very similar to a bag) with a round bottom and “pineapple” walls. A detailed step-by-step MK will help you spend little time on production, but also get a lot of positive and vivid emotions. Its shape will look like a bag - a great option for summer!
Bottom products – S.B.N. up to a circumference of 44 cm, this is approximately 8 R.:(the row number corresponds to the serial number)
- First row: 14 P.
- 28 P.
- 42 P.
- 56 P.
- 70 P.
- 84 P.
- 98 P.
- 112 P.
At this step we finish the bottom. Side part
: "pineapple" pattern according to the diagram. 8 horizontal repeats(44 centimeters). We knit 18 R. up to a height of 15 cm. Top of the bag
: 112 P. according to the scheme. Pens
10 should come out about 10 centimeters. They need to be connected together. Tie S.B.N.
This completes the process! Now you can sew the lining if you want, but you can do without it! 
How to crochet a bag
Crochet bags - very good way keep yourself busy free time. It is not necessary to do all the work at once; you can knit a little before dinner, a little on the weekend. You yourself will not notice how your bag collection will grow to incredible proportions! You can make not only a bag - a basket, but also a clutch, beach, summer and other various knitted models. Now we will connect small accessory 15 by 15 centimeters made of brown thread + caramel shade.
Popular articles:
Rear end: 40 V.P. (cor. color) S.B.N. rotary R. Make 50 R. + 2 R. S.B.N. (in the corners 2 S.T. from 1 S.T. of the previous R.). Likewise before bags.
Each piece is tied around the perimeter on three sides with S.B.N. – 4 R.
(alternating shades of yarn). To make a beautiful valve to close
– 13 V.P. chain P.R. (turning rows) S.B.N. In total, do 25 R. Sew the valve to the product. 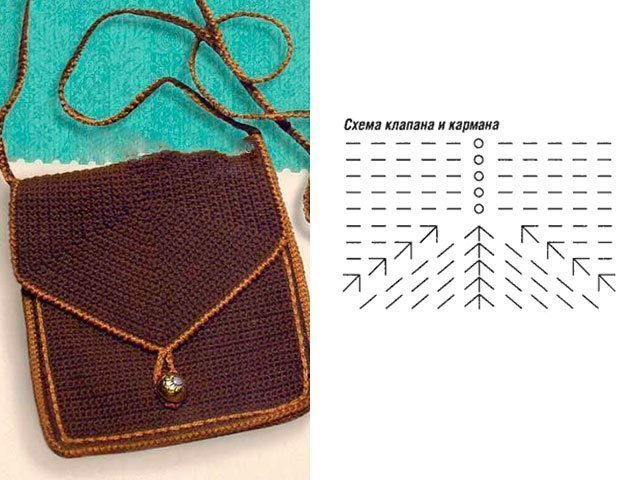
Next follow pens brown color - chain V.P. 102 centimeters. Do it here two rows : the first - S.S., the second - “crawfish step”. You can see crocheted bags in the photo selection below.


Crochet bags patterns and patterns for free
Crocheting bags is not complete without a pattern and description, just as our daily life is not complete without a bag.
It is simply impossible to imagine a modern woman without her. All the things a girl needs, sometimes even unnecessary ones, are stored there. If you go to a party, take it with you clutch, Great for a picnic in nature bag - mesh, in which it is convenient to carry food. And for little fashionistas - handbags with funny animal faces: an owl, a lion cub, a cat. 

So let's get started beauty from flower motifs of purple, green, white and gray shades. Pens in this case they will be wooden. The entire product requires 28 motives according to scheme 1 and 4 motives according to Agricultural 2. In this case, you need to alternate colors with white 5 V.P. in a ring, 12 S.B.N., 1 R.: white, 2, 3 R.: purple, 4, 5, 6 – gray, 7, 8 – green.
Tie the perimeter with 2 R.S.B.N. green thread . Sew the motifs together according to the layout. For handles – 2 loops. For one of them – 10 V.P., 8 R.S.B.N. . Insert handles. If necessary, you can lay a piece of cardboard on the bottom.
Crochet bags from crochet motifs
We offer you a very simple master class for beginners on crocheting bags from square motifs
. We recommend choosing yarn composition for work: 100% cotton. Selected colors for the product: yellow, blue, white, emerald, light green, orange and crimson. You can choose any different colors, or just one shade. In addition to the above materials, you can use two purchased handles for the finished bag, but if you don’t want to make them yourself, it’s up to your taste. Hook for work No. 5. Size about 36 * 26.5 centimeters. 
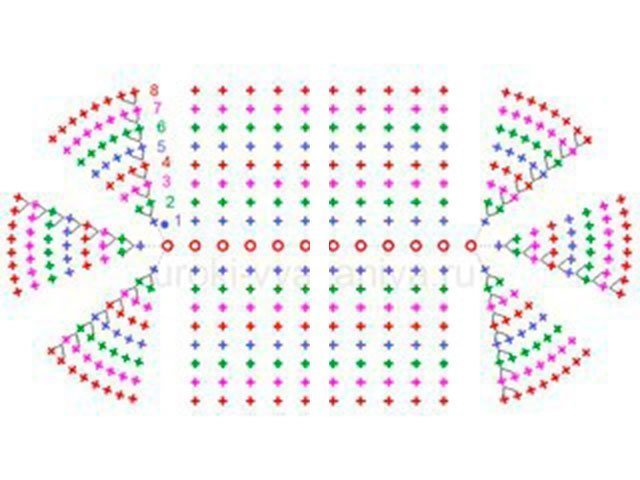
The most important pattern in our master class is hexagon- the motif from which the entire future bag is created. How to do it: ring of 6 S.B.N. (single crochet) close S.S. Further along A/H 1. Using circular R. Do 1 time from 1 to 7 K.R. (after 2, 3, 4 and 6 R. change the thread).
To do half of our hexagon
, easy to use diagram 2.
When the first row is completed, make rows in forward and reverse directions. Make 1 – 7 R., alternating thread colors. In order for the bag to be completed in the end, 15 motifs will be needed. They will need to be sewn together at the back of the loops. 
Tie the entire product 2 K.R. with the help of S.B.N. For this step we chose emerald thread. Use it to sew on the handles. This is a simple solution for beginning needlewomen, since there is no need to make a single piece of fabric - all parts are simply sewn together according to the pattern. By the way, you can choose the size of the bag yourself. Depending on what the accessory is intended for.
Master class crochet bag
The following master class shows how to create a wonderful accessory in a matter of minutes - a crocheted beach bag! Enjoy and learn!
Crochet video bags video
Detailed video lessons on how to crochet a bag for beginners in our section on knitting:
Crochet bag owl
Handbag for a little girl crocheted according to the pattern below
, there is also a description of the process. The pattern is a very simple pattern, the “owl” is very easy to make. It can be knitted for summer or any other time of the year. It will come in handy for children - they simply adore animals! Find nice, bright threads to knit so that the pattern can look good. Bottom we make according to the diagram below, the product itself using S.S.N., stomach –S.B.N., tie 1 S.B.N., 5 S.S.N. into one base. Eyes and nose in amigurumi ring –
6 S.B.N., 12 S.B.N. (2 S.B.N. in each P. of the first R.). We further knit as many R. as needed for a beautiful beak. You can fill it with filler to add volume. 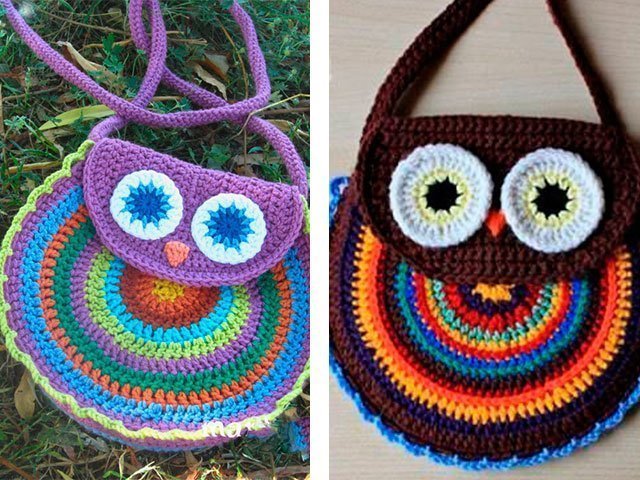


Make ears from ribbon Don't forget the zipper or rivet! Fine knit all the loops so that the pattern is even.
Crochet bag made of knitted yarn
Let's start knitting our product with 8 V.P., collected in a chain, 1 S.B.N. in 4 V.P.
Next, the numbers in order correspond to the number of the knitting row: 

- 4 S.B.N . in every V.P. chains, V.P., S.B.N. in 1 V.P., 6 S.B.N. in each V.P. in reverse direction. V.P. + S.B.N. in 6 V.P., V.P., S.S. 14 S.B.N. and 4 V.P.
- In each P. of the previous R.according to S.B.N. Total 18 S.B.N. This is what will happen bottom our product.
- 7 S.B.N., V.P., S.B.N., V.P., 8 S.B.N., V.P., S.B.N., V.P., S.B.N. All S.B.N. in S.B.N. previous R. Close with S.S. ( 18 S.B.N., 4 V.P.).
- 8 S.B.N., V.P., S.B.N., V.P., 10 S.B.N., V.P., S.B.N., V.P. 2 S.B.N. R. we finish similarly to 3 R. (22 S.B.N., 4 V.P.).
- 9 S.B.N., V.P., 2 S.B.N., V.P., 12 S.B.N., V.P., 2 S.B.N., V.P. ., 3 S.B.N. At the corners 2 S.B.N. in one S.B.N. previous R. Finish with S.S. ( 28 S.B.N., 4 V.P.).
- 10 S.B.N., V.P., 3 S.B.N., V.P., 14 S.B.N., V.P., 3 S.B.N., V.P. ., 4 S.B.N. We knit S.B.N. in S.B.N. in V.P. the previous R. At the corners - 3 S.B.N., perform in 2 S.B.N. previous R., S.S. (34 S.B.N., 4 V.P.).
- 11 S.B.N., V.P., 4 S.B.N., V.P., 4 S.B.N., V.P., 16 S.B.N., V.P. , 4 S.B.N., V.P., 5 S.B.N. All S.T. by analogy, as in R. above. At the corners 4 S.B.N. in 3 S.B.N. previous R., S.S. (40 S.B.N., 4 V.P..).
- 12 S.B.N., V.P., 5 S.B.N., V.P., 18 S.B.N., V.P., 5 S.B.N., V.P. ., 6 S.B.N. At corners 5 S.B.N. in 4 S.B.N. 7 R., S.S. (46 S.B.N., 4 V.P..).
- Each P. of the previous R.S.B.N. (total 50 S.B.N.).
- . (total 50 S.B.N.).
- Each P. of the previous R.S.B.N. (total 50 S.B.N.).
- U.B.: in the corners 2 S.B.N. together. (48 S.B.N.).
- Without W.B.
- In 2 corners, 2 S.B.N. together (46 S.B.N.).
- Without W.B. (46 S.B.N.). On each side above 7 S.B.N. in the middle make 13 V.P. - pen.
- Every S.B.N. and every V.P. according to S.B.N. Total 58 S.B.N., S.S. All!
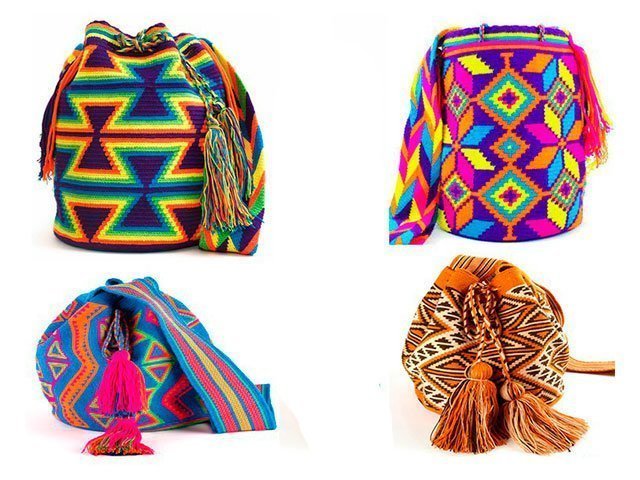
Colombian mochila - crochet a jacquard bag


If earlier crocheted bags were relatively rare, then in last years fashion has changed. Nowadays, many catwalks are firmly occupied by hand-knitted items, especially for jewelry and bags. Now the trend is a simple beach bag, a sack bag, a bag, a mochila, and so on. Crochet bags made of thick acrylic are very popular for every day. Knitted bags should not stretch much - it is better to crochet them using thick yarn and a hook that is not too thick. A DIY crocheted bag with patterns is a great option for the summer.
How to crochet a bag? The first master class with a description is designed for those who are not very good at crocheting. A crocheted beach bag for beginners, in which the openwork stripe is repeated all the time - it’s not at all difficult. This crocheted bag made of yarn with acrylic in a simple style resembles mochila in its shape. This summer beach bag crochet can be carried in the hand or put on the shoulder.
To work you will need:
- Yarn 100% acrylic (100 m / 50 g) - 100 g each. blue, yellow and white.
- Hook 4.5 mm thick.
- Rope 95 cm long, 0.9 - 1 cm thick.
Cotton is also suitable for a summer handbag, but acrylic yarn is much lighter and cheaper. We take the knitting density: 18 p. / 7 r. equals 10/10 cm. We knit alternately all the time: with yellow, white, and blue yarn.

Half column (PST): knit 1st r. VP, then we start with the 2nd row. insert the hook only at the rear. walls of section 1 of the river Each row begins with 2 VP lifts and ends with one half-column. in the second VP of the rise of the previous river.
Main (main) pattern:
The number of loops should be divisible by 5, plus two edge loops. Let's look at the diagram: repeating rapport of 6 points. Start with VP and end with it. We do it once from the first to the fourth rows, then repeat the 3rd and 4th rows. And then just knit the pattern with the 3rd and 4th rows.
Bags, crocheted, they usually do this: first the bottom of the bag, then the top. It is better to knit from strong twine or nylon thread: this way the bottom will be solid and stronger. You can knit this pattern:

Or like this:

Or any structural one. We begin to knit the bottom with yellow yarn from a chain of 18 VP and 2 VP rises. To make the shape of the bottom beautiful, add 1 PST on both sides at a distance of 2 cm from each other. The total should be 22 sts. We knit with a pattern of 33 cm. Next, after 33 cm from the beginning of knitting, decrease 1 pst on both sides in two rows. As a result, 18 stitches should remain. We finish the bottom 38 cm from the beginning of knitting.
You can make a semicircular bottom like this in a circular row. from SSN.

Choose any option.
We knit the walls
For the top of the bag, we tie the edges of the bottom with the main pattern (see the alternation of colors). Beginning of the river should be in the center short. sides.
1st row: perform 33 repeats (198 sts) + start and end sts.
Pens
We need the knitted handles for the bag to be non-stretchable - the best option— insert a thick cord or rope into the handle. Using yellow yarn, make 1 chain of 9 VPs and 1 VP rise. We carry out p. RLS, despite the fact that each subsequent p. start with 1 add. initial VP. We finish 1 sc in the 1st sc of the previous row. We finish knitting after 47 cm from the beginning. We cut the rope into two parts, insert it into the knitted strips of the handles and sew them along. We sew the base of the handles to the wrong side of the product so that the distance between the handles is 19-20.5 cm.
Knitted bags are very popular now. I present to you a master class on knitting such a bag from nylon threads, thick acrylic yarn, and even from garbage bags. If you take black bags and , then you will get a bag made from crocheted bags, and no one will guess that such a bag is made from garbage bags! Knit yourself a cool thing - diagrams and descriptions are included.

Nylon, cotton, jute threads of any colors are suitable for this handbag. The pattern is called lush columns. Look how cool knitted bags look:

In this model we will need one, or better yet 2 thin straps for the handles - they are cut, pierced with an awl and sewn with threads to the handbag. Each strap has a length of 65-67 cm. Let's begin our master class.

To work you will need:
- Yarn (nylon, bags, threads, jute).
- Metal hook 3.5 mm thick.
- Hand strap.
- The pin is colored.
- Fabric for lining (any).
To tie the bottom, you need to dial 43 VP. The bottom is knitted in the round, in the pattern you end up with 9 rows of sc (dc/no)


We begin to make the bottom of the product: we tie 43 VPs in a circular sc.

We make increases in the corners (in pink in the diagram). The video below will help you tie the bottom.

The end result is the bottom of the product. For those who don’t understand, there is a video below from the author, everything in it is detailed and clear.
And one more bag for the summer, however, if you knit it from dark yarn, it will be quite suitable for autumn. It is very easy to knit, it is all made with sc. First you need to knit the solid bottom, and then the walls of the RLS.

We knit the bottom in a circle, following the arrow in the diagram. Knit 12 rows according to the pattern. The result should be 66 sts. The bottom will look like a round bowl.

And this simple diagram shows how to knit the main part from RLS. The video from the author shows everything in more detail, and although the language is Japanese, it is not difficult to understand.

On video: detailed knitting small crocheted summer bag.