Greetings to everyone gathered now on the blog! Today I will tell you how to decorate your life and the lives of those around you with the help of such a simple item as a handmade bag.
There are a lot of bags, handbags, clutches, etc., etc. sold in stores. But it’s so great to do something like this yourself, to experience the process of creating a product, right? Many will agree with me, I think. Therefore, today we will make a bunch of handbags, cute and funny)
How to sew a bag with your own hands
First of all, I suggest you sew a cute fluffy handbag that you can give to a little girl or girl.
List of materials:
- faux fur (for the outer part of the bag);
- fleece (for lining and for covering buttons);
- threads in the color of the fabric;
- two round buttons;
- two small white rhinestones or half beads;
- padding polyester;
- paper for patterns;
- needle;
- second glue;
- pencil;
- pins (for pinning patterns);
- scissors.
You can download patterns for the future bag here: eyelet And the basis. Let's deal with them.
What kind of patterns are there:
- one-piece bag pattern (lid + back) - the entire pattern area;
- the front of the bag is everything below the side insert;
- width of the side insert - we will sew the side part into the bag, this is its width. The length is the length of the outline of the front (excluding the straight top).
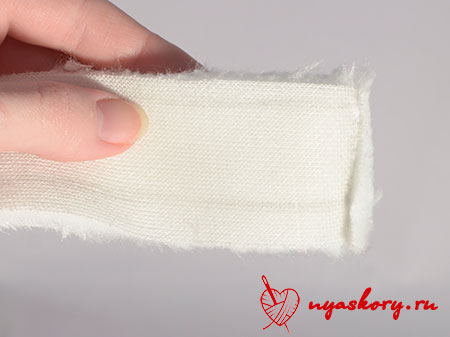
As for the side insert: it should consist of two equal parts, the direction of the pile of which will be directed against each other. But this is only for fur! From fleece, simply cut one strip of the required width; you can ignore the direction of the pile.
How to sew a bag: a detailed master class
First of all, we will work on the side of our product.
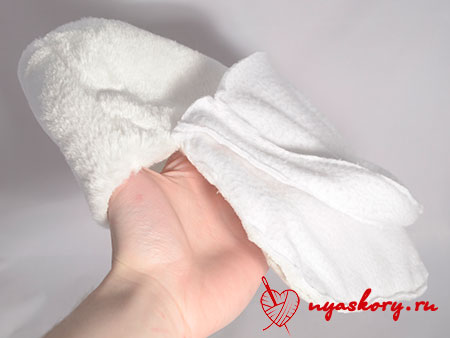
Take two pieces of fur side and sew them together along the edge. Sew them so that the pile of the pieces is directed towards each other.
Why do I suggest doing this? I answer: fur has a long pile, which should go in one direction. And this can be achieved just by sewing two pieces together
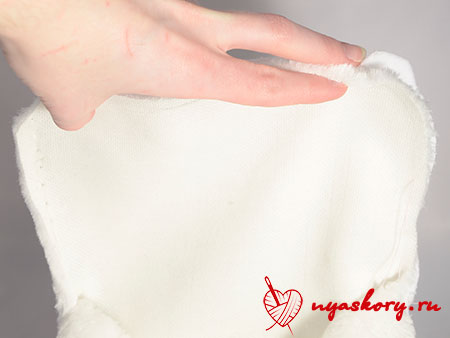
Trim off any excess. And sew the side part to the front of our future bag.


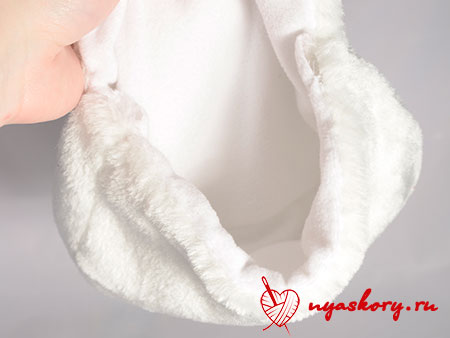
Now let’s sew on the back of the bag! The lid is already in sight
Trim the edges of the seam allowance. See why:

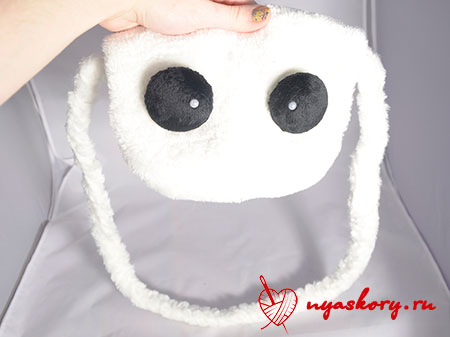
By the way, here's the back view of the bag:

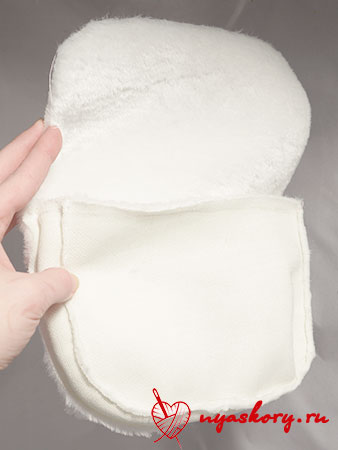
Sew a fleece “handbag” in exactly the same way. This will be the lining - the inside of the bag.

How to sew a lining to a bag? To begin, place the fleece and fur parts with the right sides facing inward.

This photo seems to make it clearer
And just sew the covers of both parts together.
Screw the inside into the bag.

Sew the remaining edges hidden seam.
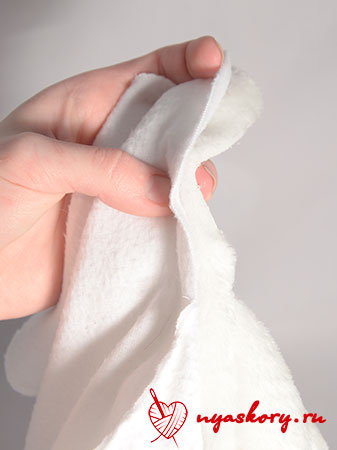
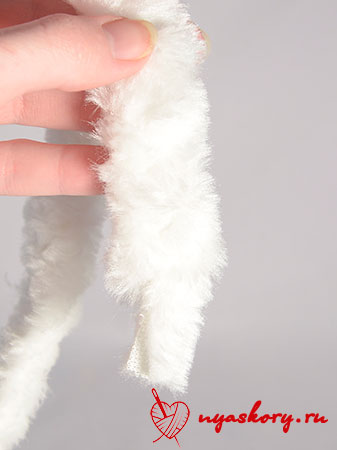
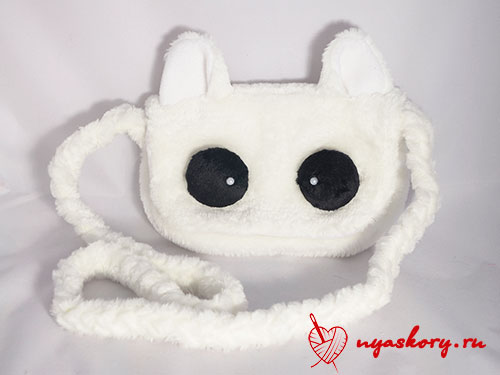
To decorate our bag, I suggest you cut out these ears:

This is how you should get them:

Now let's make a strap for the bag. To do this, cut three strips of fur of such length that it will be convenient for you to then put the strap on your shoulder. Weave them into a braid (tie at the end and at the beginning so that it does not come apart).

Remember we left holes for fasteners? Now you need to insert the resulting braid into them and carefully sew it up with a hidden seam.

But our bag doesn’t have fastenings yet! There are several options: you can sew in a zipper (which is better to do earlier), you can use Velcro and buttons.
I decided to go with the last option.
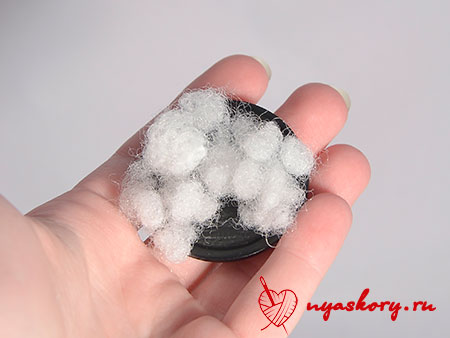
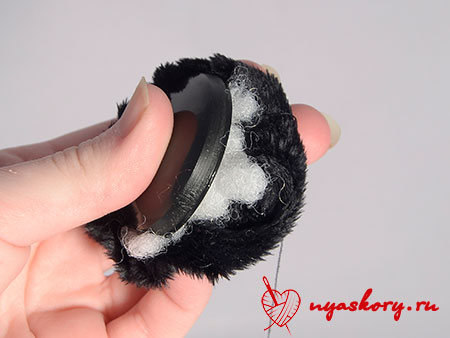
Cut two black circles larger in diameter than the button from black fleece and take the button.

Place a little padding polyester on the button.
And into a fleece circle, along the edge of which run a running stitch without securing:

Put them together.
And pull the thread.

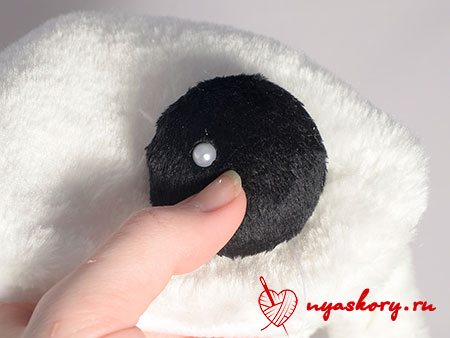
The button to secure the bag at the back should look something like this:

Glue a small rhinestone highlight on the front.

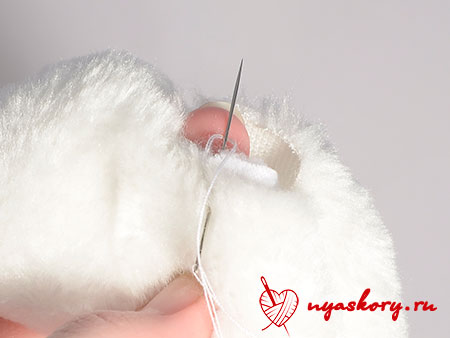
Now place the clasp on the lid of the bag to see where you will need to cut the loop.
Draw a line down the center of where you want the button to be. Make a cut along the drawn line.

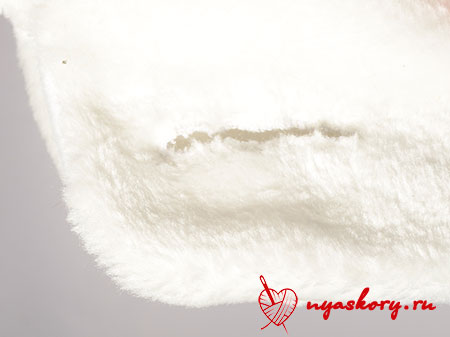
To make the cut beautiful and neat, sew it with a buttonhole stitch so that each stitch fits as closely as possible to the previous one.
This is what the bag will look like after finishing:
Sew button eyes to the bag:
Well, now let's get back to the ears! Fold and hem their edges.

And sew them where you would like them to be.

Ta-dam! The bag is ready. It turned out to be a cute kitty)
DIY leather bags
Leather is one of the most interesting and durable materials for sewing bags. Therefore, I present to your attention several master classes using this material.
Bag - cat
For this simple but very cute model (somewhat reminiscent of the previous one), you will need leatherette, scissors, an awl, thread and a thick needle.
This can be worn by both a young girl and a small child.

The simplest leather bag
No, you definitely need to get one. You will need leather, scissors, a strap, tape, a marker and (optional) a special tool for cutting several holes in a row (you can get by with an awl). All you really need to do is cut out a circle, make holes, pull the ribbon through them and attach a strap. All)

Envelope
Reminds me of the processing method of a cat bag.

Chanterelle
A lovely model)) Prepare leather or thick leatherette, braid and rivets for it. You don’t have to sew the chanterelle, just glue it along the edges and hide these places under the braid.

DIY jeans bags
However, the following models can be made from both jeans and old jeans.
Network
For this, cut the jeans into strips and weave the fabric, as in the photo. Sew it together in a bag (folding a piece of fabric in half) and sew on the handles.

Simple Denim Bag
If you have a denim leg, go ahead and make a bag! You'll need another buckle leather belt, scissors and thread with a needle.

Elegant handbag made of jeans
Here you will need two trouser legs, scissors, thread with a needle and a zipper.

DIY fabric bags
Rectangular
For it, take several pieces of cotton fabric, a zipper and accessories.

Clutch
An interesting idea is to use thick pieces of processed cardboard for the lining. I would recommend using plastic boards from Fix Price or juice packaging as a thick base.
Present such a handbag to your mother - she will definitely be happy))

Clutch in a semicircle
Cut two round pieces of cotton fabric and a circle of padding polyester from the fabric. Fold them into a “sandwich” and sew several times at right angles. Sew around the edge with bias tape. Fold the piece in half and sew a zipper into the bag. Decorate.

Handbag
This will come in handy cotton fabric, lining, fastenings and floral decorations. A young lady, say 17 years old, will definitely appreciate such a gift.

Sportswear bag
For it, prepare thick fabric, braid, scissors, pins, fasteners, zipper and thread. In addition to sportswear, you can also put camping things in this bag.

Mini handbag
Using the scheme described below, you can make both a very miniature accessory and a larger item.

Remaking old things
For the first of two photo workshops you will need a long cloth bag of soft fabric, and for the second - an old T-shirt.


Photos of handmade bags
I want to show you how using the same patterns you can get many bright and unusual products.
Sandwich bag
Cute handbag made of fleece. It's quite simple! And this design can easily be implemented into a cat bag.

Panda bag
Cute panda design

Simple and elegant bag
The handbag is quite simple and is made according to similar patterns from the very first one.

Knitted bag
Although this bag is knitted, its design can easily be implemented in fabric.

Leather bag

Octopus bag
The bag, again, is knitted. But it is very similar to the first one (at the beginning of the article). You just need to add tentacles to it and remove the ears.

By the way, I bought fleece for the eyes of the “cat” bag Here. You're unlikely to see one like this in a store.
This concludes the article. I hope you enjoyed looking at all the bags and took something interesting for yourself. See you soon!
P.S. Subscribe to updates!
Sincerely, Anastasia Skoracheva
Women cannot do without such an accessory as a bag. You can never have too many bags; you can sew another bag from fabric with your own hands. Our ancestors long ago understood one simple truth: pockets alone are not enough. It all started with the fact that ancient people sewed bags from animal skin, which they carried over their shoulders or in their hands. Today a person simply cannot imagine himself without the accessory he needs.


As for fashion 2015: the good old classic rectangle has returned to us. The “messenger bag”, large or small, with a long shoulder strap, will also be fashionable in 2015.
The bags amaze with their variety. They play not only a decorative role, but also a practical one. Bags are not only sewn, but also crocheted and knitted. Bags can be large: (suitcase, shopping, beach, travel). These are the bags that should hold large volume of things). Youth: (backpack, sports bag, bag - pouch, briefcase, laptop bag). For celebrations: (Bentley, clutches, ladies' and theater) handbags. A reticule also belongs to the theatrical category - this is a bag that imitates ancient bags in which coins were carried.
I would like to focus on a laptop bag. Such a bag should protect your laptop from damage and scratches, and, of course, have an attractive and not too gloomy appearance. Below we will sew such a bag. To summarize, I would like to point out that a woman or girl needs a comfortable, fashionable bag. When choosing a bag, we pay attention not only to practicality, but we also need it to please the eye and lift our spirits, and it does not necessarily have to match the color of our clothes; this is not the main thing this season. Let her help you create yours, unique style. We will try to help you choose.
We sew a comfortable laptop bag. Please note that the bag is more suitable for carrying and traveling with a laptop. If you need to turn on your laptop and work on it, it is better to take it out of your bag.

To work on the bag you will need:
- denim or any other thick fabric
- padding polyester
- lightning
- threads
- scissors
- sewing machine
- lining fabric
Making a bag
Fold the main fabric in half, wrong side up. Fold the padding polyester in half. We also fold the lining fabric. We outline the outline with a pen, making a seam allowance of 1.5 cm.

We cut out the blanks. We fold it into a sandwich (fabric + padding polyester) and machine quilt it. We quilt with diagonal stripes at an angle of 45*. You can quilt with diamonds. It will be good if you sew a patch pocket on top for various small items.

Fold and baste the zipper to the workpiece.

Unfasten the zipper and sew it on the machine.

We sew handles. Wrap fabric around this braid, stitch it and sew it to the bag.

Hand sew the lining inside the bag. In the right place inside we sew a black elastic band in several places. This is done to secure the laptop.

Sew on the handles.

The bag is ready.


Convertible Messenger Bag
We are sewing a fashionable bag, very trendy this year. A bag with a long handle, worn over the shoulder or diagonally.

You can cut it out of any thick material; old jeans or any thick fabric will come in handy. If you want a more elegant option, you can decorate it with appliques made of leather, suede, or fabric. There is room for imagination here.
Pattern

Making a pocket on the folding flap of a bag.


Bag made from old jeans
A bag made from old jeans is small in size, as it is based on such a detail of jeans as a pocket. The pattern of the bag is built around the pocket. The larger the pocket, the larger the bag size.

If you want to make a bag bigger size, open the pocket and stitch it to the part you cut.
Pattern

Additionally, 2 strips are cut out for the bag handles. The width of the strips is 4 cm and the length is 50 cm. And 2 parts for processing the top are 20 cm long and 4 cm wide. When cutting, take into account seam allowances of 1-1.5 cm.
Making a bag
1 Take the main fabric and the lining fabric. We put them together, apply the pattern, trace them with a pen and cut them out. Then we cut out 2 strips for the handles and 2 parts for processing the top. We should get:
- bag detail - 2nd detail
- bottom of the bag - 1 piece
- strip for handle - 2 parts
- strip for processing the top - 2 parts
- Cut out the bottom from thermal fabric or oilcloth (for strengthening).
- Sew the bottom of the bag to the sides.
- Baste and stitch the sides.
- Sew the lining in the same way.
- Place the lining inside the bag inside out.
- Baste the top edges.
- Take 2 parts to process the top and attach a zipper to them.
- Baste and stitch the handles of the bag. You can cover the upper parts of the handles with leather.
- Process the top of the bag by basting it first.
The bag is ready.
“Mailman bag” made of fabric
This fashionable “messenger bag” made of printed fabric will be very useful for any needlewoman. Of course, it will take a lot of time to make, but the result is worth it.

To work you will need:
- fabric size 34/27cm, 34/35cm, for valve 2 pieces 27/13 cm
- fabric for lining and pocket
- lace scrap 34 cm long
- hard doublerin
- a small piece of leather (can be fabric)
- half rings 2 pieces
- carabiners 2 pieces
- magnetic button
- leather bag belt (length at your discretion)
- ruler
- scissors
- threads
- pins


Since the bag is textile, the fabric needs to be strengthened. We glue the fabric going to the front side of the bag with doublerin. Then the bag will keep its shape. Glue from the inside out, through gauze, when high temperature, through gauze.
Let's get started
Fold 2 pieces of fabric right to right sides 34 cm. It’s okay if one end is larger than the other. We will simply form the bottom further and the floral motif will only be on the front wall of the bag.

Sew, leaving a seam allowance of 1.5 cm. Press the seam, pin the lace on the front side and topstitch on both sides, press.

We got a rectangle 60/34cm. Fold the fabric right side to right side. Stitch side seams, leaving an allowance of 1.5 cm.

Forming the bottom. Fold the corners and secure with pins. Use a ruler to draw a 6 cm line and sew it on the machine. Cut off excess fabric, leaving 1 cm.

Turn out and press side seams. Here's what happens:

We sew the valve. We fold the prepared pieces of fabric (glued) front to front. Draw a chalk line for stitching and round the corners of the valve. Sew on three sides, leaving one (27cm) completely open.

Trim off the excess, find the middle, mark with chalk: here we will put a magnetic button.

Cut the fabric to the right and left of the mark at a distance of about 5 cm. The cuts should not be larger than 0.5 cm. Insert and secure the part of the button that is without a magnet. Turn out.


Sew and iron. Next is the installation of the second part of the valve. Fold the flap onto the front of the sukmi. Mark the location for the second part of the button. We install half rings. We cut out 2 strips of leather, 2 cm wide and 8 cm long. Thread a ring into each strip and sew it to the side seams strictly in the center.

Set the bag aside. Cut out the lining: 2 rectangles 30/34cm. Cut out pockets, there will be 2 of them. For the pockets, cut out 4 rectangles of 22/17 cm from the remaining fabric.

Sew them around the perimeter, leaving the seam open. Before turning, cut off the corners. Turn it inside out and sew up the open seam. Where the top of the pocket will be, sew a line, retreating 0.5 cm from the edge. Pin the pockets to the lining pieces and sew them on. We make a compartment for a mobile phone: we stitch it, retreating 8 cm from the edge.

Next, fold the front parts of the lining. Sew side seams. Stitch the bottom. When stitching the bottom, leave a 10 cm area in the middle unstitched for turning inside out. Sew down the corners of the lining. Place the outer part of the bag in the lining, join the seams, pin, and stitch.

Turn it inside out and sew up the bottom on your hands.
 Attach the belt. All is ready.

Shopping bag pattern
A very interesting pattern for a shopping, everyday bag. It is very convenient to go to the store with such a bag. It is light and roomy. Blue color indicates striped material. I hope you find the pattern useful.

Here we found patterns for folding shopping bags. Now they are called eco-bags because they are used instead of plastic shopping bags. Eco-bags can always be washed. Because they are fabric. These are the eco-benefits. And for our convenience and order in our purse, they (eco-bags) are laid out beautifully so as not to take up space. By the way, they will fit in your pocket and will not take up much space in a woman’s purse, which is convenient for both men and women. In another way, such bags are called shoppers, which is logical - they are roomy and durable, making it convenient to go shopping with them.
Folding bag patterns
Well, of course, we have seen something like this. And they bought it. But what's the point of paying for shopping bags if the house is full of fabrics or unnecessary things that can be turned into a bag.
Just look how cute it is - you definitely can’t buy one, but you can sew it easily!
And this handbag actually hides in a cone (lower right corner), which is almost like an owlet. And this is already a delight!

Still the same design as in the first photo, but the look is different. The bag easily folds into a small wallet.

It’s also not always possible to fold the bag neatly the first time... Yes, everything is simple, as in the picture below

Pattern diagram: that’s what I’m mastering now. No, it's actually simple. Problems begin when you think about what fabrics (color, texture) to combine to make it look beautiful. I know, now you will say we need to be simpler. Yes, but I can’t do it yet...

Here is a pocket - a real one, in a frame, and the whole bag fits into it. But there is one detail: handles. You see, they are cut into a cone to make it easier to carry heavy things.
And this is how a regular bag folds: it’s also not entirely easy, I only succeeded the second time. When folded this way, the fabric of the bag does not wrinkle at all.

I also thought that eco-bags were a good idea for a small business. Mastered the technique, sell and sell. In any case, it’s honestly earned money, albeit small.
Another cute foldable bag pattern.


And all my troubles with eco-bags began with this picture, which caught my eye at the very moment when a bag made by great Chinese (sorry) seamstresses, bought a couple of months ago for 2-something dollars, began to lose seams and some details. And I sewed my bag. True, instead of an elastic band that fastens with a button, I sewed beautiful braid. And she was wrong: it took a lot of effort to fasten it. So an elastic band is the best solution. This is true.

Lovers of patchwork techniques can sew such a pocket packaging for a bag. It looks like a detachable zipper... Difficult, but interesting!

Illustration: how to fold a bag, including for photo 2 (it’s at the beginning of the post, where the owlet is). It’s simpler here - a bag like a berry, but the technique is the same.

Folding bag patterns
There are a lot of options. There is also a detachable zipper. Personally, I don’t agree with lightning. If you have no problems with them, do so. True, there are also various beautiful things like pictures and so on, but we can skip them. And the idea and execution are interesting.

For knitting lovers - a knitted eco-bag. But, as you understand, you will have to put it in a separate pocket and it will be thick, but the handbag is beautiful, and the remaining yarn can be used.
Leather accessories have always been very popular. A high-quality watch, wallet, or shoes speak about the owner’s taste and status. The most common and popular attribute is a leather bag.
Men's and women's leather bags can be casual, business, with a shoulder strap or a handle for carrying in the hands. Big and small, they always store the necessary things of their owner.
Bag models
The variety is amazing. You can choose for every taste and for any situation. They can be hard, soft, semi-soft, frame, totes, backpacks, shoppers, clutches, hobos, messengers, weekenders, baguette bags - each shape, when properly tailored and selected to suit the needs, best suits the requirements and needs of its owner.
It is worth considering that bag models need to be selected not only according to the outfit, situation or weather. Great importance The figure of the owner also plays in building the image. A large bag in the hands of a fragile lady will look advantageous only in the right ensemble.
Sewing a bag with your own hands
Leatherwork was valued in ancient times, and craftsmen were worth their weight in gold. Modern technologies have stepped far forward, and there is no need to go through long procedure preparing the material and sewing yourself. It is much easier to buy a finished product by choosing from the huge assortment that is offered to the consumer.
However, creativity often requires implementation. Therefore, you can sew a bag yourself. To work, you need to prepare tools and carefully familiarize yourself with the theory. You can start practicing by completing all of the above steps.
Material selection
The choice of material for sewing a bag is important. Leather is divided into:
- saddle cloth is thick, made from the skin of cattle;
- yuft is soft, thin skin(about 2 mm);
- crust is thick and dense leather. Its surface is smooth and has a natural texture. Well suited for making bracelets, cases or sheaths.
Different masters use different skin. Some people like deer leather, some prefer pork, some prefer crocodile. There are many varieties of material, each with its own unique properties, pros and cons.
Tools
- punch (or awl and hammer);
- needles (2 pcs., always with a wide eye and a blunt end);
- a thread;
- compass (or special gears);
- leather scissors;
- rolling and finishing tools (optional);
- vice.
This is the minimum set of materials needed to sew a bag using a simple pattern. The most simple pattern A leather bag is a long rectangle, cut in such a way that the front flap and side walls, as well as the back and front parts, form a single whole. Use these materials and you can easily create a leather crossbody bag. Patterns for leather bags always contain instructions on the number of parts needed.
Constructing a pattern
The patterns of men's leather bags are no different from women's at the initial stage. The classic one for men and women is cut out according to the same patterns, only with different sizes.
First, when starting work, you need to make sure that the leather is ready for cutting.
Spread out on smooth surface a piece of leather is positioned in such a way that the material can be used as efficiently as possible.
The pattern is transferred to the skin from the wrong side using a pencil or chalk. Dimensions finished product will correspond to A4 format, accordingly, the dimensions of the drawing should be with an allowance of +1 cm. For the convenience of transferring the drawing to the pattern, you can select the pattern model you like, print it on a sheet of the required format and transfer it to the material.
Accessories are cut out from leftover leather and additional elements- valve (its dimensions are equal to the parameters of the back wall of the bag - 210 mm by 297 mm, for convenience, take 21 cm by 30 cm). A leather shoulder bag can be made if you cut out a strap 4 cm wide and a length equal to the length of the body from waist to shoulder, multiplied by 2. You can use braid; it must be thrown over the shoulder so that its level corresponds to the future position of the bag. The length of the braid is measured with a centimeter, and the size is used to create a pattern.

Assembly of elements
When all the parts are cut out, they begin to assemble the future bag.
The first thing to do is to mark the locations of future seams. If sewing will be done manually, then a compass or a special wheel is used for marking. Often leather bag patterns contain dotted lines along which this wheel should go. Using the selected tool, the line on which the seam will be located is rolled or carefully scratched. Next, using a punch (a special toothed fork) or an awl and a hammer, holes are pierced into which the needle will be inserted.
How to sew a leather bag from ready-made parts? The parts of the bag are sewn together using a special stitch called “saddle stitch”. Unlike machine made, it is more durable and of higher quality.
The seam is formed using two needles. The thread is fixed in the needle. To do this, the tip of the needle pierces the thread in the middle, and the free tip is threaded into the resulting loop and carefully tightened.
During work, the needles are inserted towards each other. If you imagine a seam in cross-section, you get an interlacing of the letters “P”. After each stitch the thread is slightly tightened. This is done to ensure that the seam is strong, without gaps or gaps between the skin.

Bag made from an old coat
How to sew a leather bag with your own hands, patterns from what material to use? After all, there are never too many bags. Even better, good bags. Using simple leather bag patterns, you can simultaneously get an interesting design solution and a new accessory. You can use an old coat as material.

The easiest option is to cut the bag out of the sleeve.
Before starting work, you need to prepare the skin. To do this, the sleeves are first ripped off. If there is a lining, then it must be carefully torn off without cutting the seams. If the lining is intact, you can use it without cutting it. The sleeve is turned outward with the lining.
On one side, the lining and leather are carefully ripped apart, and a zipper is sewn into this place. The length of the zipper should match the length of the opening.
Now you need to cut 2 circles from the second sleeve, the diameter of which will be equal to the width of the sleeve + a 7 mm seam allowance. A strip 3 cm wide and 70 cm long is also cut out. This is the future handle of the bag.
Using a sewing machine, a leather circle is sewn on each side to the tube from the sleeve so that the handle is on top, strictly opposite the zipper. The leather for the handle is sewn in while sewing on the circles, placing it between layers of leather. This way, when you turn the bag inside out, the handle will be on the outside rather than sewn inside.
The result is an interesting tube bag, reminiscent of a baguette model.
Using various ways By cutting, finding a use for old pockets, belts, hem, you can sew any option for a laptop, a bucket bag.
Patterns of leather bags from an old coat differ only in the work with the material; the shape of the product can be any.
Bag made of patches
How to sew a leather bag from scraps of leather? It's easy to do. At the beginning of work, it is necessary to prepare the material. It is better to sew the leather pieces together using a sewing machine using a special zigzag stitch. It is durable and does not allow the edges of the leather to fray. The same seam can be repeated by hand, but it is important to monitor the thread tension, otherwise the fabric will pull to the sides and the finished bag will look untidy.

The pattern of the bag model is applied to the leather from the wrong side and outlined with chalk. A seam allowance is made - approximately 0.5 cm.
It is advisable to make a lining for a bag from scraps. The lining is cut out according to the pattern of the central part of the bag. It is not needed for handles. For the lining, durable satin is used, preferably a special durable lining fabric.
The stitched leather pieces and lining are put together and stitched again along the top seam.
Craftsmen often wonder how to sew a leather bag from parts of leather of different types. It is better to conduct such experiments after getting your hands on working with a material of the same strength and density.
Combination bags, however, are a popular and sought-after accessory.
For example, the stitched leather leather suggested above will look great with sides or handles made from leather of a different color, or from a different texture of leather (for example, a combination of ostrich leather and calf leather).

Unisex patterns
The world of leather goods is changing as quickly as the world of fashion. Bags are no longer divided so much into men's and women's, and the materials have become more diverse. Using the same patterns, you can sew a bag for both men and women.
For example, the patterns in the photo, cut on high-quality leather, will allow you to sew bags that can be used by both men and women.
To more clearly indicate that an accessory belongs to a specific gender, you can use decorative elements. To make leather handles shorter or longer, so that you can hang it on your shoulder using two handles. For men's - make one wide strap. A long shoulder handle will make the bag universal; such models are especially popular among young people and students.
In addition, such models allow you to easily vary in size. Bags based on these patterns can be easily adjusted to fit either an A5 notebook format or made more spacious so that an A3 folder fits.
To increase or decrease the pattern, it is convenient to use printed versions of the pattern. When printing, the pattern will be divided into several sheets. It will be necessary to cut it, assemble it and transfer it to life size on the skin. The second option is to draw the bag onto paper manually. In this case, it is necessary to work carefully; errors can ruin the entire work in the future.
It's easy to sew a bag with your own hands. In just a few hours you can create a fashion accessory that is comfortable and beautiful.
How many bags should you have in your wardrobe? Men will answer this question unequivocally: one or two. Women will think about it and will not be able to say the exact number.
A roomy bag, a clutch, a summer bag made of cotton fabric, a travel bag, a backpack, a bag-wallet for walking, an expensive bag from a famous designer. The list goes on and on.
Tip: Buy these fashionable accessories every new season expensive, but the products can be sewn yourself. Spend a little time making a masterpiece, and your collection will be replenished with unique and stylish handbags.
A woman's bag should not only be beautiful, but also spacious and comfortable. After all, it should fit many different little things, from cosmetics to a comb, money, some documents, a notebook, handkerchiefs and napkins.
Original DIY bags - ideas:
1. Stylish cat bag in two models
2. Felt bag - easy to sew, comfortable to wear

 Original do-it-yourself bags - no sewing
 3. Bright bag made from scraps of zippers


4. A beautiful bag made of leather scraps of different colors
 Original DIY bags - interesting ideas
 5. Summer bags - new every day

 Original do-it-yourself bags - convenient and stylish
 6. Clutches “Cute animals” made of felt
 Original DIY bags - cute clutch
 7. Shopping bag made of gray felt with an interesting pattern

 Original do-it-yourself bags - an interesting ornament
 8.Bag or sculpture? Beautiful and original


9. Fashionable bag from burlap


10. Beautiful and unusual bag made of cotton fabric


All these bags can be sewn at home yourself. A little imagination, the ability to sew and embroider, and stylish accessory ready.
Important: Moreover, it is not necessary to buy fabric and various elements to decorate the product - all this can be found at home.

Any bag usually consists of a front and a back piece, a bottom, two side pieces and handles.
Important: To sew an original accessory with your own hands, you only need to transfer the pattern to the fabric and sew all the details on a sewing machine.
How to sew travel bag with your own hands? Patterns:


You can make a bag so that the bottom and sides consist of one piece. Less manipulation with sewing machine, the accessory will be ready faster.


Three patterns of different bags: a lady's travel bag made of cotton fabric, a roomy travel bag and one with drawstrings for safe storage of contents.
 How to sew a travel bag with your own hands - three models
 Tip: You can take measurements from your old or favorite bag, transfer them to fabric, and sew a new accessory.
 How to sew a travel bag with your own hands - pattern from an old bag
 Pattern of another roomy bag.


Tip: Choose the pattern of your favorite travel bag, sew an accessory and go on a trip. This will help you save money and spend it on the trip itself, and not on purchasing items from the travel list.


Do you want to be the owner of a unique and inimitable bag in which you can put everything you need for a trip to the beach? Sew it yourself and you will get a stylish and effective accessory.
How to sew beach bag? Detailed master classes in videos, step by step instructions on sewing and just patterns, can be found in the article about creating from different materials. Fantasize, sew with your own hands and always be fashionable!


What to do if a woman wants to please herself with a new thing? Run to the store for new bag? No, sew a small crossbody bag with your own hands.
The design of this accessory is simple: two parts - front and back, a handle and fastening for it, a decorative belt.

- Cut out the details of the bag from any suitable fabric (leather, faux leather and any other dense fabric) without seam allowances
- Sew the handle, and after sewing the front and back pieces, insert the handle
- Decorate your bag with a decorative strap or other trim
- You can use a hidden magnetic button as a clasp. It would be appropriate for such a bag
You can sew a cross-body bag with an original cut according to the following pattern. This bag looks feminine and original.

The video shows how to quickly and easily sew a crossbody bag, spending only 1 hour of time.
Video: shoulder bag.flv


Leather is a durable material. Wardrobe items made from it turn out to be spectacular and beautiful.
If there is an old one in the house Leather Jacket, then you can sew a bag. If there are two jackets and they are of different colors, then you can combine the material for sewing or make the trim from brightly colored leather.
Sewing a leather bag with your own hands begins with a pattern. It can be done first on paper and then transferred to fabric, or immediately cut out all the details from leather.

 Sewing a leather bag with your own hands - pattern
 - Cut out all the parts according to the dimensions indicated in the diagram, leaving no seam allowances.
- Set up sewing machine on sewing leather and get to work
- First sew the bottom to the two main pieces
- Then sew them together and finish the top of the bag with a stitch and a large zigzag
- Sew on the handles and the bag is ready
Here is another pattern for a soft leather bag that can be sewn in 2-3 hours. It will be comfortable to carry in your hands and on your shoulder.
 Sewing a leather bag with your own hands - gray leather bag
 The trend of the season is a bag made of fur. The designer shows how you can sew such a bag with leather inserts.
Video: Predatory bag
Recently, burlap bags from famous designers have appeared on world catwalks. At first, the ladies reacted to this idea with misunderstanding, but the burlap bag quickly gained popularity.
In order not to spend a lot of money on purchasing the original, you can sew such an accessory yourself.

- Wash and iron the old bag from which the main parts will be cut
- Find an old unnecessary diary or book and peel off the cover. It will keep the shape of the future bag
- Attach the cover to the burlap and cut 2 pieces plus 7mm for seams on all sides
- Cut such details, only without seam allowances, from any lining fabric
- Sew the lining, leaving only one side unstitched
- Place the resulting lining fabric bag over the cover. Sew up the one side that is left unstitched.
- Sew burlap fasteners to the leather handles
- Using a glue gun, glue the handles using sewn fasteners to the outside of the cover, sewn into the bag. Sew them with a needle and thread so that the handles hold tightly
- Now sew the main vertical seams of the burlap parts
- Decorate your bag in the form of cut out letters, words and numbers or original prints
- Baste all bag cuts
- Place the burlap on the cover in the lining and glue all the joints of these parts. The result is a beautiful and stylish bag
In the video, the designer shows what other bags can be made from burlap. With such an accessory it will be pleasant to walk around the city or go on vacation.
Video: DIY elegant bag!
A woman cannot go out without a bag, since she needs to take many different little things with her. But it often happens that you need to leave your hands free, so a backpack bag will come in handy.
You can sew such an accessory yourself from pieces of fabric that you have in the house or from an old one. outerwear. How to sew a backpack bag?


Follow these steps:
- Cut out the parts of the backpack: outer part (2 pieces), 3 harness handles, handle design, bottom and bottom of the side, lining - 1 piece
- First sew the handles of the harness. If you sew a long zipper to the handles, you can wear the product both as a backpack and as a bag
- Now sew the bottom of the backpack - join all the parts. You need to sew “frames” to the bottom, into which handles will then be inserted.
- Sew the pockets outside and inside onto the lining fabric
- Assemble the outside of the bag by sewing in the harness handles
- Sew in the bottom of the lining fabric and connect the top to the bottom
- Insert a zipper and decorate the top of the handles
The result is a beautiful and comfortable transforming backpack. It will fit everything a woman needs.
Denim bags, photo
It's not that difficult to make a bag from old jeans or a jacket. Every woman can do this. The result is a stylish accessory that you can wear to the store, for a walk or to the beach. Clutch bags made of denim, photo 


Men also love new things, especially if their favorite things have started to show signs of wear and tear. How to sew men's bag? This question is often asked by needlewomen if they want to please their significant other with a new stylish accessory.
Sewing such a men's tablet bag is not difficult. First make a pattern on paper.

 How to sew a men's bag? Pattern
 Now follow these steps:
- Transfer the pattern from paper to fabric
- Cut the lining according to the largest piece
- Sew the lining fabric pieces
- Sew the main piece of fabric on three sides and sew on the lining
- Sew the handle if it is made of the same fabric as the bag. If the handle is made of special tape, then simply sew it to the main part of the almost finished bag
- Sew in the zipper - the bag is ready
You can decorate the product in different ways. For example, make a folding part from two parts, as in the photo, or insert a zipper with interesting sliders. It all depends on your imagination and desire.
Video: “Handmade” DIY bag (03/20/2013)