Pattern Fan or Crochet shells one of the most common patterns. There are several variations of this pattern, but in most cases it is knitted in columns with one or more crochets in one loop, after which a single crochet is knitted, into which a fan is knitted in the next rows.
Video master class on knitting a shell crochet pattern:
Description of the process of crocheting a fan pattern:
In order to start knitting, you must dial the number of loops that you need, but it must be a multiple of 6 and plus 2 loops (for lifting).
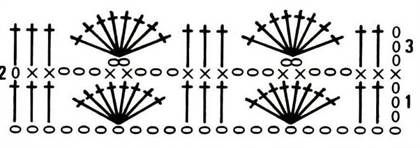
- Row 1: Knit a single crochet into the second stitch from the hook, then skip 2 stitches and knit a single crochet stitch 5 times in the next stitch. Skip the next two air loops and knit a single crochet into the third loop, then 2 air loops are skipped and the fan is knitted again. And so it fits to the end of the row.
- 2nd row: 3 lifting loops are knitted and 2 more double crochets are knitted into the very first loop, i.e. in the last single crochet. 3 lifting loops replace 1 double crochet. Next, a single crochet is knitted into the third double crochet from the fan of the previous row. A fan is knitted into a single crochet of the previous row. Knitting continues until the end of the row. The row ends with three single crochets of the previous row.
- 3rd row: 1 air lifting loop is knitted and a single crochet is knitted in the first double crochet of the previous row. A fan is knitted in a single crochet of the previous row. Knit to the end of the row. The row ends with a single crochet in the third air loop of the rise of the previous row.
There are craftswomen who choose knitting needles. And there are needlewomen who prefer a hook in their work. There are countless variations of crocheted patterns. But the simplest and most beautiful is the shell pattern. To learn how to crochet a shell pattern, read this article.
From simple to complex
To fully master the technique of performing the process, you need to start from scratch. To work, you need a skein of thread and a hook of the right size. Select the tool so that the thread fits completely into the groove. Then the product will not be loose or, on the contrary, dense. Having prepared everything you need, let's get to work.
First, let's take a look at the simplest version of the pattern. Its diagram is shown below:

To train the skill, tie a chain of air loops a few centimeters or, as in the diagram, in the amount of 32 loops. This will be the foundation. Now in the fifth loop of the base, knit a double crochet. Perform two more of the same stitches without changing the loop. Thus, the first shell was obtained.
Now make a chain stitch. At the base from the first shell, count the fourth loop. In it, tie three identical double crochets. The second shell was formed. Continue the entire row by analogy. To go to the second row, make three air lift loops. Look carefully at the diagram. Where there was an air loop in the first row, there will now be a shell and vice versa - in place of the shell there will be an air loop. If you prefer that the shells are on top of each other, then see the following diagram:
Try to complete the pattern several times and you will not notice how the pattern will knit automatically.
The next option will be more complicated - a dense ornament. Let's consider in detail the description of the work:

- tie a chain of chain stitches. Their number should be a multiple of six plus one lifting loop;
- in the second loop from the hook, knit a regular single crochet;
- skip two loops at the base and tie five double crochets in the third - the first shell is ready;
- skip two stitches again and do a single crochet again;
- knit the second shell through two loops;
- repeat the rapport to the end of the chain loop;
- go to the second row by expanding the canvas. Tie three air lifting loops and in the same loop from which the ascent began, knit two more double crochets;
- in the second row, the shells will be tied in place of the single crochet posts of the previous row. And the single crochet columns will be located above the third column of the sink from the bottom row;
- in this alternating way, all subsequent rows are performed.
If the pattern is still incomprehensible and difficult to understand for you, watch the video with an example of complicated knitting:
Multicolored seashells
In this subsection we will see how you can knit a motif using two different colored yarns. To make the drawing beautiful, choose matching shades. You can even use multiple colors, creating smooth transitions from one colors to another. This is a great idea to use leftover skeins of thread. But this way more suitable for experienced craftswomen who know how to change threads during knitting without any problems.

For now, let's take a look at a fragment of a picture with two colors. By alternating them in the process, you will get beautiful stripes or even waves.

- choose a color to start with;
- the knitting technique is no different from a dense pattern, only instead of five columns with a crochet, we suggest knitting seven columns for a change. Then in the second row, together with the lifting air loops, tie three double crochets. And the single crochet will be knitted into the fourth column of the bottom row of the shell;
- after finishing two rows, change the thread. That is, knit the third and fourth rows in a different color;
- change the thread again when you start the fifth row.
Using this pattern, knit the fabric of the required height, remembering to change the thread each time.
With the help of a crochet hook, light, airy, openwork things are created. The ornament described above is quite dense, practically does not show through, which favorably distinguishes it from most knitting techniques. Shells can be used both when creating clothes and in the manufacture of interior elements. A blanket, potholders, pillows will look good, especially if they are made using several colors. For a wardrobe, you can knit a skirt, pullover, cardigan. Here, a monochromatic knitting option will already be appropriate, but a slight gradient is allowed. A shawl made with the proposed motive will look especially charming.


So you met new technology crochet and you can safely apply it in practice. Treat yourself and your loved ones with new decor details or interesting models clothes.
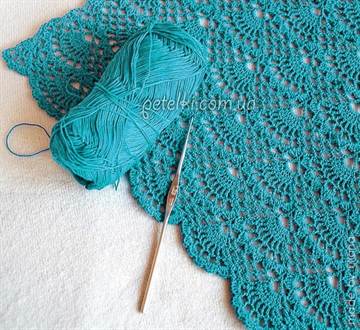
Lovers of delicate fishnet things will be pleased with our article on how to crochet a Shell pattern using a crochet hook. This method of knitting has a lot of fans, if only because, for all its delicate appearance, the product knitted with a shell is very durable. You do not have to worry that by accidentally touching the product, you will ruin it. Below you will find a knitting pattern for this pattern with detailed description, as well as photographs and video workshops for greater clarity.
By changing the thickness of the thread, as well as the way of knitting, you can easily do openwork pattern light or denser, embossed. Products with a shell can decorate not only you and your appearance but also home. You can easily tie a decorative napkin on a dresser or a light cover on a sofa in the living room.
Classic knit shell pattern
Start with air loops. There should be such a number that would be a multiple of four. The knitting of the shell begins from the fourth loop. The shell itself is four double crochets and one air loop in the middle. All columns are knitted in this very loop. After finishing the first shell, proceed to the second. To do this, skip three loops again, starting with the fourth. Make two double crochets, then a stitch and two more double crochets. By this principle, knit to the end of the row. When you finish knitting the last shell in the first row, tie three chain stitches, turn your shells so that the last one is on the right. The rest of the rows are knitted according to the same principle, but there is no need to skip the loops anymore, the shells are knitted from air loops between the double crochets. Make as many rows as you need.
Master class on knitting a shell pattern crochet in MK
You don't have to crochet tricky combinations to get the result beautiful product... Enough to show imagination, and here is the original, beautiful thing, connected with your own hands already with you.
Now you can see a master class on knitting using the shell technique.
- Cast on 40 stitches. In the second loop, bypassing the first, knit a single crochet.
- Next, tie the shell. To do this, you need to skip three loops and in the fourth in a row, knit seven single crochet stitches. Then skip three stitches again and knit seven stitches in the fourth. By the same principle, it is necessary to knit to the end of the row.
- Then attach the thread in a different color. Knit one lift stitch, turn the work over and knit the entire next row with single crochets, without missing a single loop of the previous row.
- Attach the thread of the third color, again make one chain loop and unfold your work.
- The third row will be with shells. You need to knit nine single crochet stitches, skip three stitches and knit seven more stitches. Then skip three stitches again and work seven single crochets.
- The next row should be knitted with single crochets. Tie one stitch and turn the garment over again. Change the thread and tie another row with shells.
- Continue all work on this principle until you reach the required height of the product, remembering to change the threads of different colors.

Learn to make a tight shell pattern with your own hands
Cast on air loops. This time their number should be equal to six, add another loop to them. In the second loop, tie a single crochet. Then skip two more loops and tie five double crochets. Next, skip two stitches again and tie one single crochet. Continue this way to the end of the row. After knitting the last shell, make three air loops and turn the product over. Start the second row by knitting two double crochets into the first stitch of the previous row. Further, the knitting pattern will be no different from the first row.

Tie a chain of air loops, which will be a multiple of three, add one loop. Here knitting of a shell begins with the fourth loop, you need to skip the first three. Knit three double crochets in it. Then skip three stitches again and in the fourth, work one single crochet. Next, you will need to make three stitches and tie three double crochets into the same stitch. Skip three stitches again and tie one double crochet. Repeat all the way to the end of the row. At the very end, you need to knit one single crochet.
Below you can see how delicate and light the products connected in technology can be. You can do all this with your own hands.

Related videos
And also you can watch a video in which needlewomen will show you how to knit this simple pattern correctly, and will hold master classes with you. And on one of the videos you can see and, if you wish, learn how to knit a shell with a pattern openwork scarf on warm summer or spring.
Crochet pattern "colored shells" will attract the attention of many needlewomen. The embossed surface and colored waves of the knitted fabric create a three-dimensional pattern. For this pattern, you can use multi-colored leftovers of yarn and knit bright decorative things for the home - pillows, rugs, blankets, potholders. Perhaps you already have ideas in your head for using this pattern in knitting sweaters, coats, tight skirt, or as a trim for a wavy colored edge to the hem of the sleeves and hem.
A detailed photo report on knitting a pattern with shells will help you quickly master the technique of knitting it. Since many needlewomen prefer reading patterns according to diagrams, I attach a drawn step by step diagram knitting the first shell.
The pattern repeat is 13 stitches. Type a chain of air loops for the selected number of shells, you can knit the first row with double crochets, or immediately start knitting the first row of shells.
Make one air. lifting loop and then, introducing the hook behind the back half loop, knit 5 connecting posts. ** Through one loop, knit the base of the shell with 5 double crochets. Secure the shell through one loop of the connector. column and do two more.


Now turn the work and knit in the opposite direction along the base of the shell (5 tbsp s / n) st. s / n, * embossed column(insert the hook behind the first column from the front of the pattern), st s / n *, repeat from * 4 more times. Fasten the second row of the conn. column, make 2 more connection st. along the row, turn the work and knit in the opposite direction.


3 row of shells: st s / n, * embossed column, 2 st s / n, repeat from 4 more times. Secure the first shell with st. through one loop in a row and make 5 more connections, also inserting the hook behind the back half-loops.


Start knitting the next shell, repeating from **.


After completing the row, make one air lift loop and knit back the row of st. b / n.

From now on, start working with a thread of a different color. The first shell is knitted in half. Attaching the thread to the edge, make 3 air. lifting loops and knit 2 sts / n at the same point. Secure the base of the shell with a post, inserting the hook behind the back half loop, make 2 more connections along the edge of the previous shell. Art., turn the work and knit the second row: 1 st s / n, embossed st, 1 st s / n, embossed st, 1 st s / n. Turn work, do 3 air. lifting loops and knit the 3rd row: 1 st s / n, embossed st., 2 st s / n, embossed st, 1 st s / n, secure the shell of the joint and continue knitting 6 more connections. Art, introducing the hook for the rear half-loops.


The second shell of the second row and all the following knit in the same way as in the first row, but when knitting 5 st s / n, insert the hook behind the st b / n of the last row and pull out long loops. After completing each row of shells, secure them with a joint. st around the edges and do 2 more to move to the next row. At the end of the row, knit half a shell, then do air at the top. lifting loop and knit back a row of st b / n.


Knit the third row of shells in the same way as the first. For knitting the base - 5 st s / n hook, also insert behind the st b / n of the last row and pull out long loops. In this row, the shells will start from the top of the shells of the first row and, when the two colors of the yarn alternate, they will merge vertically.
One of the most beautiful patterns in crochet is "shells" (or "fans"). It is a method of performing in one loop the base of a certain number of columns with one, two, three or more crochets.
Air loops or single crochets are usually knitted between the "shells". A canvas made in a similar technique turns out to be very beautiful - lacy, graceful and airy. In this article we will look at the features of performing such a motif as a delightful crochet shell pattern.
Crochet: shell pattern. Schemes and description
There are different variations of "seashells". We suggest you learn how to perform this beautiful element according to the following simple scheme, which includes single crochet columns and air loops.

Let's link a test sample for your reference. First, we will make a chain of air loops 10 cm long. Then we will make a yarn over the hook and insert our working tool into the seventh loop. We will knit one double crochet. We will again make a yarn over and again insert the hook into the same loop. We will knit the second double crochet. For the third time, we will make a yarn over the hook and we will finish. The first "shell" is ready. Next, we will perform one air loop (VP). Skip three base loops, and in the fourth loop we knit three more double crochets (CH). We get the second "shell". By analogy, we will complete the entire row to the end. Next, we will knit three VP lifting. We will knit the second and subsequent rows according to the presented pattern, alternating "fans" of three CH and air loops. Now you know how you can accomplish this beautiful pattern crochet. "Shells" are perfect for knitting openwork models, including shawls, children's sundresses and tunics. If you wish, you can try another modification of the pattern, for example, using this interesting scheme:

Learn to knit a beautiful shawl
Having mastered how the shell crochet pattern is made, you can try to make a warm and soft shawl. To work you need a hook number 2 and 250 g of viscose knitting threads of any color. The shawl will have a triangular shape, and its dimensions are as follows: 117 cm wide and 52 cm high. We will start knitting the product according to scheme 1.

How to crochet ("shell" pattern), we will tell further. Let's start work with " magic ring"and a chain of three air loops. In the ring we will knit two columns with two crochets (C2H), then we will make 2 VP and 3 C2H. The second row will start with three air lifting loops. Next, we will perform 2 C2H and 1 VP. Then we will knit 3 columns with with two yarns and two chain stitches. Again we knit three C2H. Finish the second row of 1 VP and three columns with two yarn. scheme number 2, using single crochet, double crochet and pico.
We knit baby (with a "shell" pattern)
In addition to the soft shawl, you can try other products. The crochet shell pattern is also great for creating a charming baby dress(age 6-12 months). To work you need 100 g of yarn (Lily from Yarnart) and a hook number 1.5. Choose the color of the knitting threads that you like. it delicate dress will consist of two parts - a yoke and a skirt. The latter is made with a "shell" pattern. First, we knit a rectangular yoke. We carry out a chain of 98 air loops and close it in a ring. Next, we knit three VP lifts and begin to draw up the first row with single crochet columns. We carry out 16 CH - one in each loop of the base. Next, we make 2 VPs to design the first corner of the yoke. We knit another 17 CH and 2 VP, making out the first sleeve. Now we begin to knit in front of the product: we perform 32 columns with one crochet in each loop of the base. We knit 2 air loops again. We pass to the second sleeve: we knit 17 CH and 2 VN. We complete the row with 15 CH and a connecting loop. We knit the second and third rows, by analogy, performing one double crochet in each base loop. In the corners of the rectangular yoke, we make the necessary increases (according to the scheme 2СН-2ВП-2СН).

How does a skirt for a baby dress fit?
So, the yoke is ready, let's go to execution fluffy skirt... We will create it using the crochet shell pattern. The scheme is as follows:

After completing the skirt, we connect the parts. If desired, we decorate the edge of the product with a crustacean step or two rows of single crochets. We decorate the finished dress with knitted flowers or a ribbon.