Do you want to do something for the New Year 2017? Then a DIY candy tree master class will come in handy. You will need very few materials, careful execution, and now you will have a sparkling Christmas tree on your holiday table.
If you have just started to get involved in needlework, then for you, as a beginner, there are step by step photo the simplest Christmas tree. To make it, prepare:

- 700 g of sweets in green packaging;
- 3 - 4 candies in a different contrasting package (in our case, yellow);
- scissors;
- scotch;
- sheet of cardboard.

1. Unfold a sheet of cardboard and draw a circle on it with a simple pencil. This can be done using a compass or an ordinary round dish. Cut out the circle.
2. Draw a triangle extending from the center to the edge of the circle. Cut it out.
3. Roll the cone, gluing the edges with tape (you can use glue). Our Christmas tree base is ready. Let's move on to her outfit.
4. Choose any sweets, the main thing is that they are bright. Start with the bottom tier, taping each candy down and standing it upright. Finish the bottom row and move up.

5. Start the next row so that the candies of this row slightly overlap the previous tier. Using the same principle, cover the entire Christmas tree. Add one candy with a contrasting wrapper to each row.
 6. The top of the Christmas tree can be decorated with a chocolate figurine or a carved star.
Champagne
In the same way, as described in the previous master class, you can make a Christmas tree, but with a base from a champagne bottle.
You will need:
- empty bottle of champagne;
- two-way cattle;
- 500 – 700 g of sweets.

- Carefully wipe the glass of the bottle with a dry cloth, otherwise the tape will not stick.
- Starting at the base, apply a strip of double-sided tape to the bottle. You can “wrap” it in a spiral, or in parallel rows. Whatever you like best.
- After gluing the tape, tear off the top layer of tape and glue the tails of the candies in a row, placing them vertically. Repeat step for each row. Try to make the top row of candies slightly overlap the bottom.
- The top of the bottle can be decorated with a flat candle or a paper star.
Video: gift champagne
If you want to give someone a bottle of champagne for New Year or you just don’t want to come to visit empty-handed, then you can decorate a bottle of champagne as a souvenir and it will look like a Christmas tree.
Watch the video for a detailed description of how to make a Christmas tree out of candies using a bottle of champagne.
Ideas for the New Year
As the base of the Christmas tree, you can use a cardboard cone, a bottle (and not necessarily champagne), a reel, or a wooden base. They are the most comfortable. As for sweets, there are so many options that at first you may even get confused. Play around with the materials and try to make the simplest Christmas tree, and then you won’t be able to stop yourself.
 DIY Christmas tree with tinsel added
  Round candies with a mesh base
  Multi-colored small candies as the basis for a Christmas tree
  Creative Christmas tree as a gift
 This DIY candy tree, a master class that anyone can master, will come in handy during the New Year holidays, when everyone wants to create something colorful and beautiful. Create your little masterpieces with pleasure, and if everything is ready, then read,
What would New Year be without sweets and candy?! We've been good all year, so on the last day of December we look forward to some sweet treats to make the coming year as sweet as these candies.
However, candies in the New Year can be used not only as a sweet treat, but also as decoration, for example, you can use them to make an original New Year tree. By the way, Christmas tree made from candies with your own hands can completely replace the usual forest beauty, and at the end of the holidays you don’t need to think about how to remove it :) In addition, a candy tree will be a wonderful themed gift for friends and family, and the fact that the gift is made with your own hands will certainly please the recipient.
When making a Christmas tree from candies, you can use sweets of your choice: these can be either chocolates or lollipops. You should not ignore soft gelatin candies: they will turn out very original Christmas tree. If you are preparing a Christmas tree as a gift for an adult, you can make it using a bottle of champagne!
However, there are plenty of ideas, all that remains is to find the time and realize your potential!
#1 New Year tree made of candies and tinsel
The simplest option for a New Year tree made from candies is to combine candies with New Year's tinsel. To make such a Christmas tree you will need candy, a thick sheet of paper, glue or tape, and tinsel.
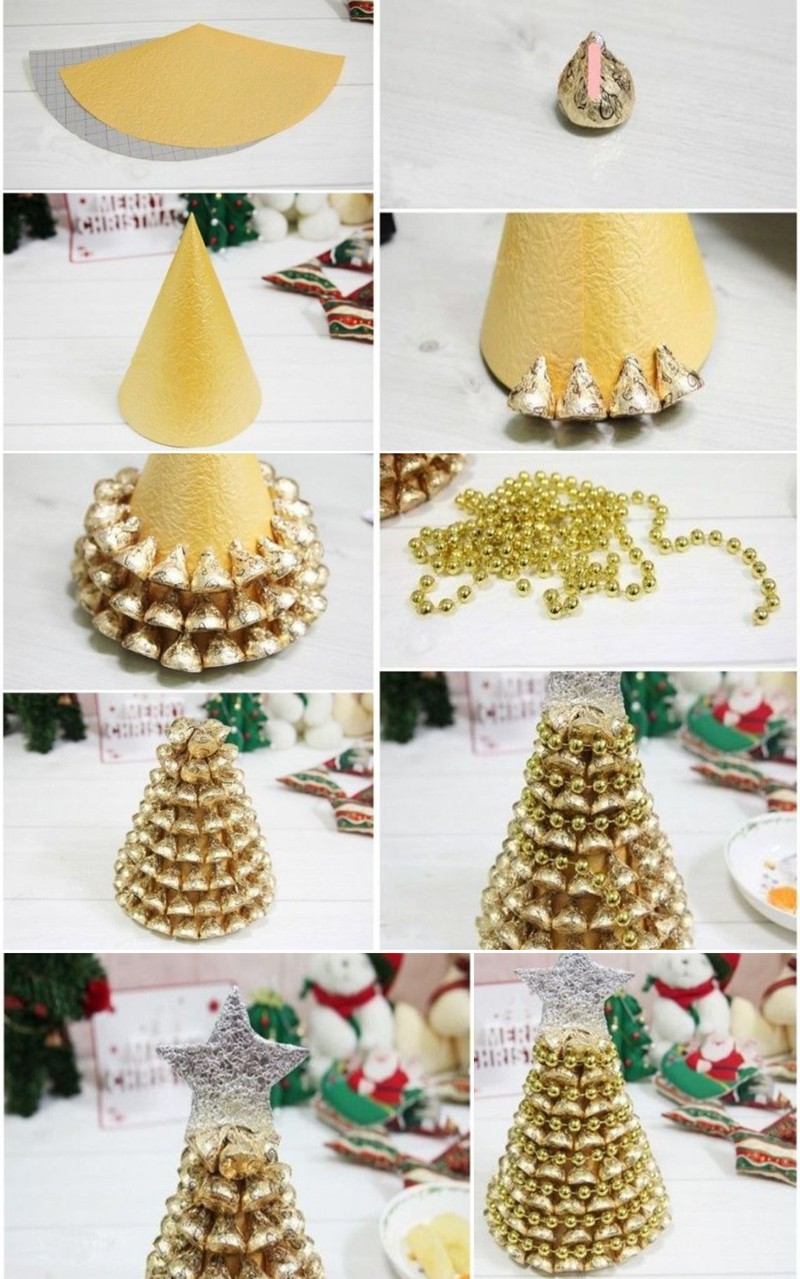
#2 Golden Christmas tree made from candies
The Christmas tree is magical and doesn’t have to be green. Although in winter time year, any tree in a green robe looks magical! But we will create our own magic - a golden Christmas tree. For this we will need: candies in gold wrapping, a thick sheet of paper, glue or tape, beads on a string for decoration.
Making this Christmas tree depends on whether you want to give it as a gift or simply use it as a decorative element. If the New Year tree is being prepared for a gift, then the bottle must be full, otherwise it won’t turn out very well... In any case, you will need: a bottle of champagne, candy, tape, ribbon for decoration.

#4 Christmas tree made of chocolates
You will need thick paper or cardboard to create the base cone, chocolates, tape or glue, and ribbon or bow for decoration.
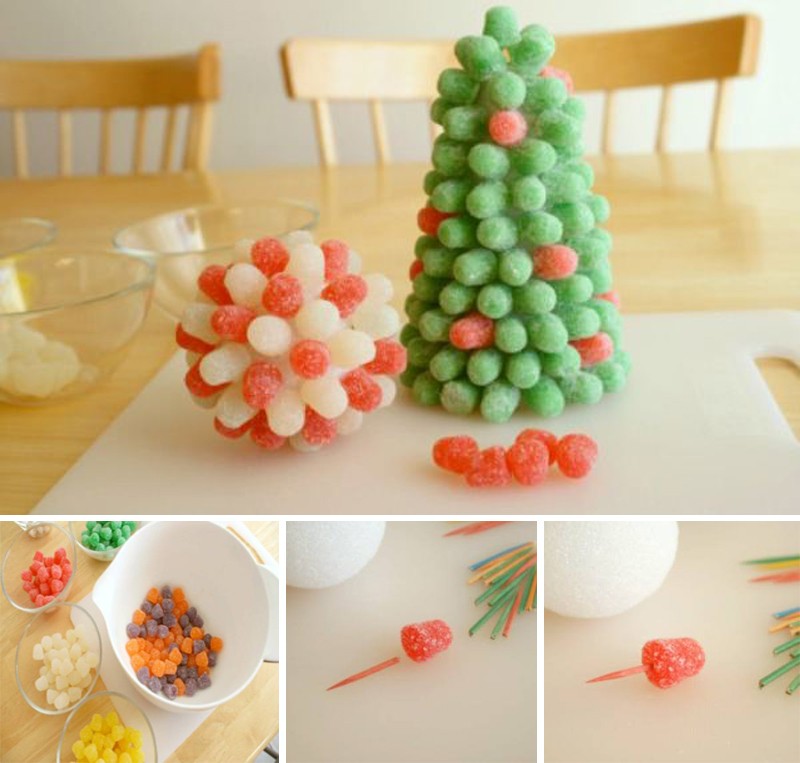
#5 Christmas tree made from gelatin candies
A Christmas tree made from soft gelatin candies will be original. You will need: foam for the base cone, gelatin candies, toothpicks.
#6 Christmas tree made from Candy Cane candies
No less interesting is the idea of creating a New Year tree from candy canes in the shape of a stick. In our country, such sweets are not usually associated with New Year holidays, but in American films you can often find them. However, the idea is quite original, so if you want, it’s worth a try. You will need: a lot of lollipop sticks or Candy Canes, a foam cone, glue or you can melt some candy and glue it on.

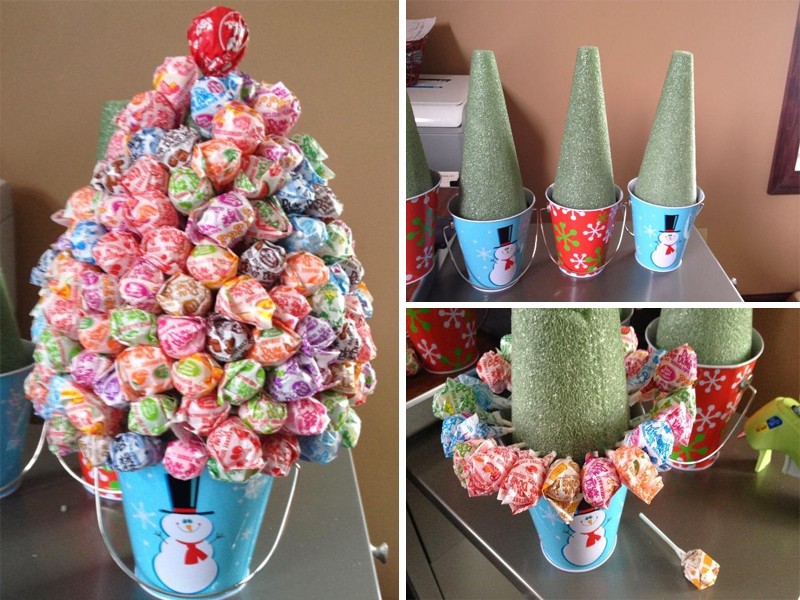
#7 Christmas tree made from lollipops
For such a Christmas tree you will need a foam cone, lollipops (for example, lollipops), and any decorative elements.
#8 Christmas tree made from candies in original packaging
You can make a Christmas tree out of candies in the most different ways, including packing candies in a box in the shape of a Christmas tree. Great decoration for the table and wonderful gift loved ones!

Now that the technology for making a Christmas tree from candies with your own hands is clear to you, all that remains is to turn on your imagination and make a unique Christmas tree that will fill the holiday with joy and add a little miracle to it.
Well, we have selected for you 10+ more ideas for New Year trees made from candies, looking at which you can be inspired to create a new masterpiece. And who knows, maybe in next year the entire Internet will be talking about your incredibly cool DIY Christmas tree.


A universal gift option for the New Year is a box of chocolates or a bottle of champagne. But in order not to be trivial and to make your gift memorable for a long time, you can present sweets and a bottle of champagne in the form of a New Year tree. Christmas tree that is decorated New Year's balls, which are candies. Or the one based on a bottle of champagne. Surely, such a gift will become one of the brightest and most memorable.


A selection of video lessons
This article will offer a selection of videos in which needlewomen will share their ideas with you.
How to make a Christmas tree from candies: master class
To work, you will need a sheet of cardboard, scissors, glue and candies; it is advisable to choose candies in a bright, beautiful wrapper and light in weight.
First of all, you need to form the base of the future Christmas tree from a sheet of cardboard; to do this, you should cut out a semicircular part and roll it into a cone. Then you can start gluing the candies, you just need to stick them in rows in a circle either using double-sided tape or glue. You can attach any New Year's toy to the top of the tree.

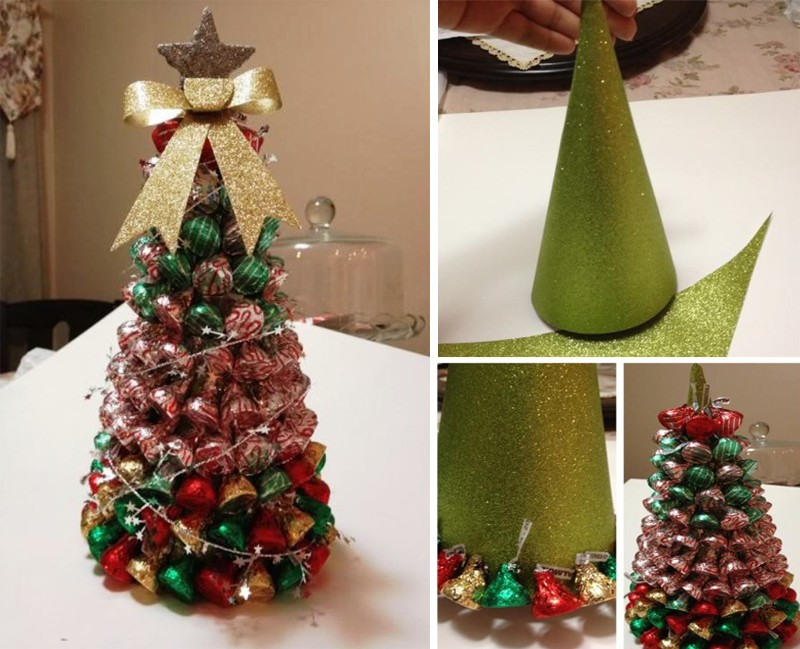
How to make a Christmas tree from candies and tinsel
The second master class will describe the process of making a Christmas tree from sweets and tinsel. To work, you will need several sheets of white or green cardboard, about a kilogram of sweets, tinsel, tape, a stapler and PVA glue.
First of all, on a sheet of green cardboard you need to draw an even circle and divide it into four parts, then you should cut out the circle itself and one part, and the remaining parts should be twisted into a cone shape, thereby creating the base of the Christmas tree. You need to make the bottom row of needles from tinsel; to do this, measure out a piece from the tinsel that is equal to the diameter of the base, and glue it to the bottom wide edge of the tree. Next, you need to make the next row of candies, which need to be glued over the tinsel with a slight overlap. The next row should again be made of tinsel, and on top again you should make a row of candies. Thus, alternating a row of tinsel and a row of candies, it is necessary to decorate the entire base of the tree.


3rd MK
In the third master class it will be explained how to make a Christmas tree from sweets and a bottle of champagne. To work, you will need several types of candies, five of which must be red so that you can form a star from them and decorate the top of the Christmas tree with it, tinsel, double-sided tape, scissors and a bottle of champagne.
A bottle will serve as the basis for the future Christmas tree, so the bottle must be covered with strips of double-sided tape, then the protective layer must be removed from the tape so that the decorations can be secured. Then you need to glue the candies tightly to each other to form a bottom row; you need to glue tinsel on top so that there are no gaps and no tape is visible. To reach the top of the tree, you need to alternate a row of candies and a row of tinsel. But it is advisable to make the top rows only from tinsel, since candies weigh down the tree. In order to attach a star to the top of the tree, you need to fasten the ends of five candy wrappers using a stapler.


Description
Christmas tree made from candies- This is a creative way to serve various sweets to the holiday table. You can give such a delicious Christmas tree to children, friends, or surprise your work colleagues with it.
As everyone knows, the main symbol of the New Year is the Christmas tree, and the holiday itself does not pass without chocolates and sweets. Therefore, why not combine these two symbols and make a luxurious and elegant New Year tree from sweets with your own hands?
It is better to take candies for such a Christmas tree wrapped in gold or silver foil.: this way the New Year's beauty will look chic and very elegant. Making a candy tree yourself is quite simple. You just need to get all the necessary equipment that we need to create a Christmas tree: double-sided thin tape, glue, thick cardboard, tinsel and others Christmas tree decorations. Prepare the colorful rain that you usually use to decorate the Christmas tree. Beads, which are now increasingly used to decorate Christmas trees and decorate rooms on the eve of the New Year, will look great. To decorate a New Year's tree from candies, you can also take various decorative elements: bows, stars or small New Year's toys.
Such a New Year tree will give a sea of positive emotions to your friends and family. It can be an alternative to regular forest pine or spruce. After all, many refuse to install natural or artificial christmas trees, since their decoration and subsequent dismantling takes a lot of time. And such a Christmas tree made from candies, made with your own hands, will create Christmas mood, and will be a very cute symbol of the upcoming holiday.
So, stock up on various sweets, lollipops, marmalade and start creating a delicious New Year's masterpiece. Our step-by-step recipe will tell you how to decorate a Christmas tree with candies and what to use as a base. Even the smallest details are not missed, since each stage is accompanied by a photo.
You can involve your kids in creating a sweet Christmas tree. Believe me, it will be very interesting for them to dress her up with chocolates, because they can eat them at any time while mom’s back is turned.
Ingredients
Cooking steps
Take a piece of thick cardboard and cut the blank in the shape of a semicircle, as shown in the photo. Carefully roll the cardboard into a cone and seal the edges with glue. Wait until the cardboard is completely dry, otherwise, during the process of “decorating” the New Year tree, it may come apart under the weight of the candies.

Prepare pieces of thin double-sided tape. There should be as many of them as you decided to put candies on the Christmas tree. Place tape in the center of each candy. Determine for yourself how the candy will stick to the tree so that it looks as bright as possible - and stick strips of tape on the side where it is attached to the cardboard.

After all the candies are prepared, start decorating the New Year's beauty. Start with the base of the cone. Gradually, row by row, “seat” the sweets in a circle, moving upward.

You can use stars as a top or glue the most beautiful candy.

Now you can decorate our New Year tree made of candies with rain, beads, and sequins. In some places you can add a few small ones Christmas decorations. If you have small lanterns, you can put them on the tree.

Finally, you can add bows from candy to your Christmas tree. They are very easy to make yourself. You need to take several wide ribbons of any color and several narrow golden ribbons. Tie a small compact bow from wide ribbons, carefully straightening it. In the meantime, make small bow from a gold ribbon. It can be glued or sewn to the main one. Now the finished bow can be solemnly placed on the top of the New Year tree.

You can add a few branches of natural spruce in some places of your chocolate beauty - and it will look very natural and natural. Now your candy tree is ready! Place snowmen, Santa Claus and others next to her New Year's characters. This New Year will be remembered for a long time because festive table will be decorated with designer christmas tree from candies! Happy holidays to you!

Bon appetit!
The Christmas trees turn out very well beautiful, stylish and of course very tasty! Making them is not at all difficult, but it will be necessary patience, work And accuracy! You can involve in the process children– they will be delighted!
I have Christmas trees average size – 35 cm in height, not counting the spire. You can change the size of the Christmas tree, candies and decor at your discretion, and I will only share two basic principles for making them. So let's get started...
You will need:

Basics:
Whatman paper – 1 pc.
Simple pencil + eraser
Glue gun (or polymer glue)
For the ROYAL TREE:
Candies in gold wrapper « Autumn Waltz» - approximately 1.4 kg
Star tip 10 cm high (mine is Fuchsia)
Gold acrylic spray paint (or in a jar + brush)
Christmas tree beads 3 m long (I have fuchsia colors)
For the GREEN Christmas tree:
Candies in green wrapper – approximately 900 g.
Star tip 10 cm high (mine is Purple)
Tinsel with medium pile, 2 m long.
PROCESS:
THE BASIS:
1. Let's make it from whatman paper base for the future Christmas tree - cone and bottom (for greater stability). We cut the standard Whatman paper into 2 parts: set one of them aside - we won’t need it anymore. On the remaining part of the Whatman paper, using a ruler (or a compass if the Christmas tree is small), draw half a circle with a radius equal to the height of the Christmas tree. Those. I have a tree that is tall, so I took the radius 35 cm. Next, we cut out our workpiece and cut it in half - we will make 2 cones from it at once. Glue the cut parts together to form a cone. You can fasten it with a stapler from below for greater reliability. I use a hot gun because it's quick, easy, and fairly straightforward. If you use polymer or any other glue, you will have to briefly squeeze the surfaces to be glued and wait until they set.

2. From scraps of whatman paper we make the bottom for the cones. To do this, draw a circle around the resulting cone or draw a circle with a compass (measuring the radius of the cone). Then we draw another circle, retreating approximately 1.5 cm from the boundaries of the first circle. We cut along the larger circumference and cut these 1.5 cm with a thick fringe. We bend fringe and glue the bottom into the cone so that the folded fringe is inside cone

That's it - our preparation is ready. Now we choose the Christmas tree we like and start making it.

ROYAL TREE:
1. Color the cone in Golden color using acrylic spray paint. It's best to do this on the street, for example on the balcony. Before spraying the paint can, you must carefully shake. It is better to place newspaper under the cone so as not to stain everything around it. Spray the paint evenly onto the cone from a distance of approximately 15 cm (see instructions) and let dry out. If there is no aerosol, you can apply gold with a brush. acrylic paint, gouache, etc. or decorate the cone using wrapping paper, fabrics, ribbons, etc.

2. We begin to stick candies onto the cone in a circle using a glue gun. If the candies are heavy, then tape, PVA glue, etc. They won’t be able to do it here - you need strong, fast-acting glue.

3. We continue to peck the candies onto the cone in rows almost until the very end (I left about 5 cm for the pin).

4. Glue the tip to the top of the tree. Since I have a tip on a long stem, I pasted another row of candies on top of it.

5. The Christmas tree is almost ready, all that remains is to decorate it. Carefully glue Christmas tree beads on top of each row of candies, close each row into a ring, pruning beads (That is, we do not lay out the beads in a spiral to make it neater).
