Eggs painted in one color are called painted eggs, and eggs painted with ornaments or plot patterns are called pysanky. Classic pysanka is a complex way of painting Easter eggs, which uses wax, steel feathers or hooks, and special paints. But along with traditional methods of coloring, there are a large number of simpler and more original methods for painting an egg. Even kids can paint Easter eggs with watercolors, gouache or markers. You can also use watercolor pencils, corrector, felt-tip pens, gel pens and other standard writing instruments. Painting and painting eggs for the main Christian holiday, Easter, is a long-standing tradition. One of the legend versions says that when Saint Mary Magdalene came to Emperor Tiberius and told about the Resurrection of Jesus Christ, the emperor did not believe it and said that it was as impossible as the fact that a chicken egg would turn red. At the same moment, the chicken egg he was holding in his hands turned red, confirming the news of Mary Magdalene. Other versions date the origin of the tradition back to pre-Christian times.
Painting Easter eggs with watercolors
An easy way to make unique and colorful Easter eggs with your own hands is to paint Easter eggs with watercolors, combined with watercolor pencils. Keep in mind that this is not a permanent dye, but it is an easy, affordable and fun decorating method, and you can create a real watercolor painting effect right on the shell.

The saturation of the pattern depends on the degree of dilution of the paint with water. You can first cover the entire surface of the egg with a light layer of watercolor, and then, while the paint is still wet, add more concentrated and saturated spots.

The core of watercolor pencils consists of pressed watercolors, which allows them to be dissolved with water. In other words, we draw as if with colored pencils, and then we go over the image with a damp brush or cotton wool and get a watercolor drawing. In this case, you can use a watercolor pencil to draw on the still wet surface of the egg. The effect is as if the pencil is melting. As a result, soft and slightly blurred lines perfectly depict details.


Painting Easter eggs with gouache
But this wonderful painting of Easter eggs can be done with gouache, acrylic paint and permanent markers!


Painting Easter eggs with a marker
Stylish black and white Easter eggs - forget about paints and different materials! Just a black permanent marker and your imagination!


Painting Easter eggs with a gel pen
Fine drawing with gel pen:

Pantone color palette on eggs
Graphic designers won't be able to resist these eggs. Instructions.
Black and white Easter eggs
 Easter eggs do not have to be decorated in bright colors. Black and white drawings that are easy to depict also look interesting. Instructions.
Easter eggs dyed with silk tie
 Old 100% silk ties, scarves or blouses can also be used to color boiled eggs. Non-toxic and original! Instructions.
Super Mario Brothers
 A great Easter theme for old-school gamers. Instructions.
Chalkboard on eggs
This is a version of a miniature chalkboard. These eggs can be personalized or you can write Easter greetings on them using chalk. Instructions.
Eggs with temporary tattoos
 Source: brit.co
An affordable and simple idea for creating unique designs on eggs. Instructions.
Washi Tape Design
If you don't want to get dirty with paints, then this idea is for you. You will need some washi tape (decorative Japanese tape made from natural fibers) and scissors. Instructions.
These stylish eggs are tempting to be given French names, like Pierre or Jean-Claude. Instructions.
Dinosaur eggs
Another simple coloring technique that produces impressive results. It is enough to immerse the eggs in the dye overnight for the color pigments to seep through the skin and create an amazing effect. Instructions.
Painting eggs with paper towels
Soak paper towels in your favorite food coloring and then wrap them around the eggs. After a few hours, the colors along with the pattern of the towels will be redrawn. Instructions.
Easter eggs garden
 To make Easter eggs look like a garden, you will need dye and a few strips of origami paper. Instructions.
Easter eggs with old fashioned silhouettes
 With minimal effort you can make eggs look so elegant and adorable. Instructions.
Golden Globe
 You can decorate eggs with gold leaf in different ways; we liked the world map. Instructions.
Easter eggs with thumbprints
 Both adults and children can take part in the implementation of this charming idea. Add a few touches and your prints can be anything you want! Instructions.
Watercolor Easter eggs
 To make an Easter masterpiece, just dip your brush into the paint and press it onto the egg. Instructions.
Doctor Who themed Easter eggs
 For those who like the idea of time travel and for fans of the cult series. Instructions.
Decorations made from paper napkins
 No time or artistic ability? Take advantage of this idea! Just choose paper napkins with a nice design and voila! Instructions.
Lego mini
 Great idea for Lego fans. Instructions.
Glow in the dark Easter eggs
 Perhaps the most amazing, almost cosmic eggs! Instructions.
Easter eggs painted with fabric
 Wrapping eggs in textured cloth before dyeing them will leave an intricate pattern on the skin that looks like painstaking hand-painting. Instructions.
Embroidered Easter eggs
 Let's not lie, embroidering on eggs is not an easy task, but when you do it, you will receive a one-of-a-kind Easter decor item that you can use year after year. Instructions.
Ombre coloring
 Ombre means “shading” in French. This coloring method involves applying several shades of color with smooth transitions and gives a fabulous result. Instructions.
Coloring with onion peels and plant leaves
 Cute natural patterns are obtained using a completely non-toxic method. You will need sprigs of herbs, onion peels and old tights. Instructions
One of the largest and most important holidays for Christians is approaching - Easter. It represents not only rebirth and the beginning of a new life, but also spring and the awakening of nature from hibernation. An integral sacred attribute of Easter are eggs, which are often covered with elaborate patterns and images. There are different techniques and varieties of painting eggs for Easter. Let's take a closer look at each of them.
Easter egg painting techniques
Easter eggs symbolize rebirth and the creation of new life. They are covered with special sacred signs to attract prosperity to your home for the next year.
Previously, many different rituals were associated with Easter eggs, most of which are completely forgotten today. For example, young girls took eggs skillfully painted with certain symbols and images, danced around a fire, and then beat them together in a dance. Then they were buried in the ground, thereby attracting the goddess of fertility.
Today it is customary to distinguish the following techniques for painting Easter eggs:

The meaning of sacred symbols in painting
Traditionally, various sacred symbols and images of animals are used in painting Easter eggs. Each of them has a specific meaning.


Let's look at the meanings of the symbols most used in painting:

Quite often, in addition to patterns and images, Easter eggs are inscribed with the following inscription: “Christ is Risen!” or simply "HV".


How can you paint eggs for Easter?
Today there are 4 main types of painting eggs for Easter. Among them:
- Pysanka is one of the most complex paintings, carried out using hot wax.
- Krashanka - dyeing an egg one color.
- Drape - applying a design by scratching it on the pre-painted surface of the egg.
- Krapanka - painting, just like for pysanka, is carried out using paint and hot wax. However, in this case, wax covers those areas that cannot be painted.
 Pysanka
  Krapanka
  Drapanka
  Krashanka
In addition, there are many other types of Easter egg painting. Let's look at the most interesting of them:

Pysanka: features and technique
The oldest tradition of ritual painting is pysanka. It involves the application of sacred patterns and images using hot wax, paints and a special tool.
The technique for painting Easter eggs has the following sequence:

As a rule, a similar painting is applied to a raw chicken egg. You can find interesting patterns for painting Easter eggs on specialized websites on the Internet.
Slavic pysanka: how to beautifully paint an egg - video
Krashanki: implementation features
This is the easiest and fastest way to decorate Easter eggs. Most often they are painted red, which is a symbol of love, eternal life, solar warmth, fertility and beauty. Coloring is carried out using special paints or natural dyes.
Natural paints consist entirely of natural ingredients and do not contain harmful chemical elements. In addition, they do not spread or smear when applying a pattern or design to the surface of the shell, which cannot be said about artificial dyes.
Let's look at how you can get a certain color using natural dyes:

Please note that natural dyes, unlike artificial ones, have a lower degree of durability. Over time, their color becomes duller and then almost completely disappears. Therefore, such dyes are used exclusively for natural eggs, which are intended for the festive Easter table.
Drapes: features and technique
This is one of the types of Easter painting that is used to decorate natural or artificial Easter eggs. Drawings and patterns are applied using engraving techniques. With proper skill, they turn out beautiful and neat.
The technology for making draperies is interesting primarily because it does not require special tools or a set of paints. For it, you can choose a dark-colored egg and tint it with a darker dye (natural or artificial). The ornament is applied with a simple pencil, and then scratched on the surface of the shell using a regular sewing needle, knife or awl.

To make drapanki, you can use a goose, chicken or duck egg. The strongest are goose ones. Therefore, they are often preferred for performing engraving techniques.
Before coloring, wash a fresh egg well in warm water with the addition of a small amount of regular kitchen salt. Then it is wiped with a soft cloth and the contents are blown out.
To blow out the contents, you need to make 2 holes in the shell on opposite sides. The hole diameter is about 3 mm. Then, holding the egg over the glass, we blow into one of its holes, as a result of which its contents flow out through the other. Before painting, the holes are well covered with paraffin or wax to prevent paint from getting inside.
Decorating eggs using the drapanka technique - video
Specks: features and technique of execution
Compared to Easter eggs, the technique of making speckles is quite simple, although it is performed using hot wax and a pisachka with a sharp metal tip. To make a speck, the following procedure should be followed:

Some interesting ideas on how to color eggs
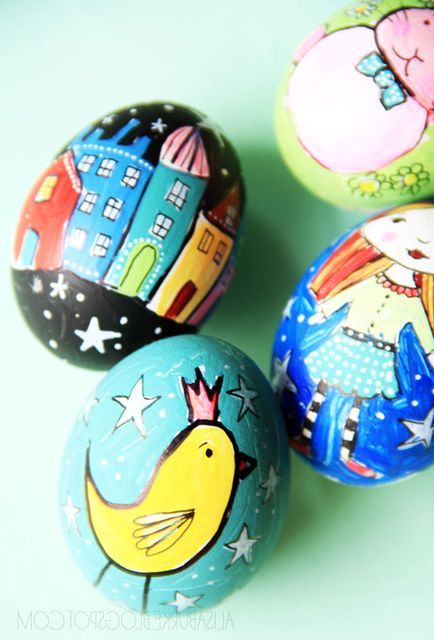
You can safely experiment with painting Easter eggs and fully express your imagination. It's your creativity, so you don't have to stick to traditional options.

Easter eggs master class
Painting Easter eggs - eight simple ways - I present to your attention ideas for painting Easter eggs from craftswoman Alice Burke
Alice Burke is a freelance mixed media artist | She explores various new materials to use in her works, happily breaks the rules and breaks the patterns accepted in art | She draws inspiration from street art, graffiti, art history and fashion | You can often see her rummaging through a trash can in the hope of finding something unique that can later be used to create a work of art | On the eve of Easter, she took several photos of lessons on decorating Easter eggs
This is what she writes in the preface to her master class: “Who told you that in order to decorate eggs, you need to mess around with dirty hot dyes? It's not like that at all! Watch how I painted a dozen eggs using materials found in my immediate environment.”

Idea No. 1. Take the eggs and color them with bright acrylic paint or food coloring. Then take a stroke corrector pen and draw simple patterns across the entire surface of the shell.

Idea No. 2,3. Use cotton swabs and use them to apply different patterns.

For example, create a pattern like this by dipping a cotton swab into paint and applying thick or translucent strokes.

Or make polka dot eggs using cotton swabs as pokers to apply the design.

Idea No. 4. Bubble wrap is another great material for creating interesting surfaces.

Just take a small piece of this film and spread some paint on it, then roll the egg over it.

Voila, you have an interesting egg with speckles or polka dots.

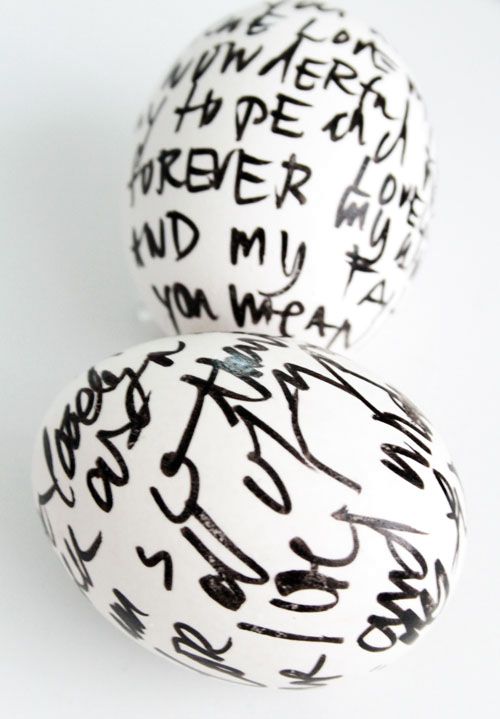
Idea No. 5. Creating inscriptions with a black or colored marker directly on the shell is perhaps the most easily implemented idea for decorating any surface.

You can write anything from wise sayings and prayers to funny wishes and meaningless doodles.

Idea #6 Colored handwriting and scribbles applied with multi-colored markers or felt-tip pens can also create a very bright and unique pattern on the surface of an Easter souvenir.

Idea No. 7 Well, and finally, a simple gel pen, Alice claims that with the help of this simple tool you can uniquely paint Easter eggs.

Look at the very simple feathers drawn, and what a cute pattern it turned out to be.

DIY Easter eggs
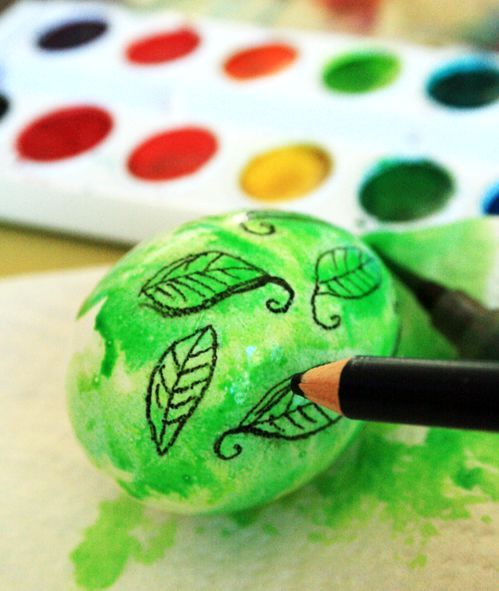
Here another great idea from the same craftswoman. This master class shows an easy way to create unique and colorful Easter eggs - using watercolors. Keep in mind that the pattern applied with such paint is not waterproof and products painted using this technique easily lose the applied pattern at the slightest contact with water. But painting eggs with watercolors is such a fun activity for children that you shouldn’t pay attention to this drawback.

To paint eggs using this technique you will need:
- watercolor paints,
- brushes,
- boiled eggs,
- watercolor pencils.

Step 1. Wet the brush with water, dip it in watercolor paint and apply paint to the entire surface of the souvenir, do not try to achieve uniform coloring, just paint the entire shell.

Step 2. Without waiting for the shell to dry completely, apply bright color spots of the same shade as the background directly onto the damp surface.

Step 3. Take watercolor pencils. The craftswoman writes: If you have never used watercolor pencils (or water-soluble pencils), they are simply wonderful. They are similar to ordinary colored pencils, but after you finish your drawing, you can draw with a wet brush and the image will become blurry and have a special charm, you will achieve the same effect if you draw on a damp surface.

Step 4. Alice used her watercolor pencils and worked on a wet surface, this is how she talks about her feelings: “When you draw on a wet shell, you feel like the pencil literally melts and bright and at the same time soft lines of the details of the drawing are born under it. »

Step 5. Add colored doodles all over the surface and dampen them.

Step 6. Let the painted items dry.

Just admire how beautiful the result is; if you want to consolidate the result, after drying completely, spray the shell with hairspray, and then cover it with a thin layer of acrylic varnish.


Decorate your gifts with inspiration, give with pleasure!
Translation by Oksana Korshunova especially for the site: Good IDEA
====================================================
In addition to the traditional Easter cake, the symbols of the Easter table are, of course, eggs painted for the holiday. You can decorate Easter eggs in an original way using simple painting techniques that are accessible not only to adults, but also to children. We are happy to share the secrets of our craft with our readers.

In order to paint Easter eggs, it is not at all necessary to be a master of a brush. In addition to traditional painting with an artistic brush, there are simpler techniques, some of which do not require this tool at all. Let's look at the most popular of them.

Bonded painting
To paint Easter eggs using this technique you will need:
- cotton swabs (pokes);
- acrylic paints;
- brushes;
- sponge;
- cotton pads;
- sunflower oil or furniture varnish.

Progress:
1. Boil an egg hard-boiled, dry and cool it. If you want to make a real Easter souvenir, carefully remove the contents of a raw egg through small holes in the bottom and top and paint the dried shell.
2. Using a foam sponge, cover the entire surface of the egg with white acrylic paint. Dry for a few minutes. If the coating is not thick enough, apply another layer.
3. Start painting the Easter egg. We suggest you decorate the shell with bunches of rowan berries. Dip a poke (cotton swab) into red paint and, applying it with perpendicular movements to the shell, draw 10-15 large berries forming a bunch.
4. The second element of our Easter egg painting will be rowan leaves. First, using a cotton swab, draw lines with green paint - the bases of the leaves. To enliven the painting, apply a more saturated color stroke with a thin brush to each green line.
5. Yellow strokes made on the leaves with a thin brush will further enliven the painting and make it more voluminous.
6. Draw highlights on the berries and leaves by applying a few white strokes using a brush or cotton swab.
7. To create contrast, add a few black dots to the base of the berries.
8. After the painting on the Easter egg has dried, coat it with furniture varnish. A boiled egg can be treated with vegetable oil using a cotton pad to make it shine.

Easter egg painting with wax
Easter eggs painted with wax are called pysanky. This technique is traditionally popular in Ukraine and allows you to create both simple souvenirs and genuine artistic masterpieces.
To paint eggs using wax technique you will need:
- a raw egg;
- pisachok - a device for applying hot wax to the shell. You can make your own pisachok by twisting a small piece of foil into a funnel and securing it to a wooden stick. Wax is placed in foil, heated over a flame to a liquid state and applied to the shell through a hole in the funnel;
- candle;
- vinegar;
- cotton pads.
Progress:
1. From a raw egg at room temperature (not cold!) Remove the contents through small holes at the bottom and top. Wipe the shell with a cotton pad soaked in vinegar.
2. Prepare egg dye - it can be natural or artificial dye.
4. Immerse the scribbler in the melted wax and heat the contents of the funnel over the flame again.
5. Apply the wax design by rotating the egg, but without moving the scribbler.
6. After the wax has hardened, dip the egg into the dye and let the paint dry.
7. While heating the wax painting over a candle flame, gradually remove the wax trace from the surface of the shell with a woolen cloth. The areas where the wax was applied will remain unpainted, and you will have a light design on a colored background.

Working with a pissy

The traditional color of Easter eggs is red


The Easter egg is a model of the world, so eggs are often painted with belts
(sky, earth and underworld) and draw animals and plants on them

The painting includes birds, flowers and patterns with waves.

Variety of colors and styles

This is what the Lusatian wax painting of Easter eggs looks like
Easter egg painting with engraving
Easter eggs painted using this original technique are called “shkryabanks”. To create a painting-engraving you will need:
- chicken, duck or ostrich egg, cleared of contents;
- a sharp and thin tool for engraving, for example, a stationery knife;
- paint for Easter eggs.
Progress:
1. Dye the eggs in your chosen color using natural or artificial dye.
2. Dry the shell for 24 hours so that the dye hardens well.
3. Using a sharp tool, “scrape” the selected ornament onto the eggshell (you can use a stencil).


Modern scrap banks

Even a simple scraper can be performed masterfully
Ornaments for painting eggs
Browse our selection of Easter egg designs to see if one of them will inspire you to experiment.

A simple pattern for stanchion painting and painting with a traditional solstice

Traditional painting

Ornament "Intercessor"


By the way, you can decorate not only ordinary chicken eggs, but also wooden models - they definitely won’t crack, and a particularly beautiful design can be preserved for years.
If your family has a tradition of exchanging Easter gifts, make beaded Easter eggs.


Patterns on Easter eggs can be obtained in a variety of ways, involving their creation during and after dyeing. We will consider both options. The easiest and most common way is to buy pictures of patterns on Easter eggs and stick them according to the instructions (). However, in this case, you will be limited to those designs that the manufacturer offers you. To create truly unique and original patterns, try creating them on Easter eggs using natural products - lemon juice, table vinegar and regular wax.
Drawing patterns with lemon juice
What you will need:
- Chicken eggs - 5-7 pcs
- Lemon - ½ piece
- Cotton buds
- Felt pen (an old one that no longer writes)
- Table vinegar
Step 1

Squeeze lemon juice from half a lemon onto a saucer. You will use lemon juice to create a design on the already colored egg. If earlier we considered methods when a pattern on the surface is created by coloring an egg, now we will work with a shell coated with dye () and discolor it in the right places to create a pattern.
Step 2

Take a chicken egg in your left hand, a cotton swab in your right hand. Soak a cotton swab in lemon juice and start creating a design. First, blot the surface of the shell in one place. You will end up with a large speck with blurry edges. Make another similar spot diagonally.
Step 3

Conditionally draw a line diagonally and draw another point. In this way you can create a polka dot pattern, as shown in the photo. Cotton swabs are very convenient for drawing such polka dots, as well as wavy lines and flowers.
Step 4

A more detailed, for example, geometric pattern, can be created using a felt-tip pen. Also dip its rod in lemon juice and draw the desired pattern. You can combine both methods to create flowers: draw the central parts with a cotton swab, and work out the details with a felt-tip pen. Check out photos of the Easter egg patterns you can create. Beautiful and, most importantly, original!
Notes
If desired, lemon juice can be replaced with table vinegar, which will also effectively dissolve the paint. Another practical tip when working with lemon juice is that if you are drawing outlines with a felt-tip pen, then cotton swabs can be used to remove excess moisture from the surface.
Creating a drawing with wax

What you will need:
- Chicken eggs - 5-7 pcs
- Wax candle or leftover wax
- Wax melting funnel
- Metal container
- Simple pencil
- Vinegar
Step 1

Light the candle and melt the wax. Hold the funnel over the heat until the wax becomes liquid. After this it will be easy to use to create patterns.
Step 2

Before making a pattern on Easter eggs, prepare the surface of the shell for work by cleaning it from all contaminants. To do this, rinse them well, wipe with vinegar, and dry. You can use damp towels. Apply wax to the cleaned shell.
Step 3

At this time, prepare the onion skins and cook over moderate heat. It will take at least 30 minutes or more. It is assumed that by the time coloring begins, the designs on the eggs will already be ready.
Step 4

Handle the wax carefully. Avoid contact with the skin of your hands to avoid burns. When creating a drawing, the work surface on the table should be spacious enough to place your elbows on the table. Place the funnel with wax at a distance of at least 20-25 cm from you.
Step 5

To simplify the task, you can first draw the outline of the pattern with a simple pencil, and then simply repeat it with wax. For more experienced craftsmen this will not be necessary. You can immediately create patterns with wax, for example, imitation of various plants, flower petals, or simply a geometric pattern.
Step 6

Wait for the wax drawing to cool slightly. After this, dip the eggs in the onion peel broth and cook for at least 10 minutes. Once the eggs are ready and have the desired shade, remove them with a spoon and place them on a paper towel to dry. If you want to get a more saturated color and, accordingly, a contrast between the pattern and the background color, you can leave the eggs in the onion broth overnight and dry them in the morning.
Notes
A big plus of working with wax is the ability to create unique designs of any complexity. If you are working with wax for the first time, you can do without a funnel for melting the wax. Melt a wax candle in a deep container, and use a wooden stick or a regular match to create a design. DIY Easter egg patterns will make your Easter gifts unique! Happy holiday of the bright Resurrection of Christ!