Why buy a prefabricated goblet when it would be more fun to make your own goblet? The basis of a homemade cup can be a paper cup or even a glass goblet with a stem. Such a cup is perfect for celebrating an event or making an interesting gift for someone. Making your own unique cup on your own would be a great DIY project. At the same time, for work, you can take those improvised materials that you already have at home.
Steps
Making a paper cup
- Cardboard can be taken from cardboard box or from packaging of breakfast cereals or other products.
-
Draw on paper the outlines of the goblet handle. Take a piece of paper and draw a goblet handle on it. Make sure that it is approximately the same height as the paper cup. The specific shape of the handle can be whatever you want. The decision is yours alone.
Cut out the handle and base of the goblet. Take scissors and cut out the handle of the goblet from paper. You will also need a base for the goblet, so draw a square or circle on paper and cut that out as well.
- The size of the base is up to you, but remember that it should be slightly larger than the diameter of the top of the paper cup. So the cup can stand securely on the base and not fall.
-
Transfer the outlines to the cardboard paper parts handles and bases, and then cut them out. Taking the paper blanks of the handle and base that you just made, transfer their outlines to the cardboard. You will need to trace the handle blank twice on the cardboard to make two such parts from cardboard. Next, take your scissors and cut out both cardboard handles and the base.
Paint the details of the cup. Get your paint ready. You need to paint the outside of the toilet paper tube, and also paint the paper cup inside and out (you don't have to paint the bottom). The handles and base of the goblet should also be painted.
- The decision on the choice of paint is up to you, the main thing is that all the details are the same in color.
-
Decorate a paper cup and toilet paper tube. At your discretion, paint with pencils or paints, or otherwise decorate the previously painted paper cup and toilet paper tube. Here you can draw stars or sign the name of the cup itself with a marker.
- You can also decorate the cup in other ways, including sticking glitter or plastic stars on it. Let your imagination run wild and enjoy your creative work.
-
Glue the handles to the goblet. Tuck a small piece of paper under each end of both handles. Do it in such a way that these handles can be glued to the paper cup. Then glue the handles on the sides of the glass.
- If the ends of the handles do not correspond to the angle of inclination of the walls of the paper cup, they can be pre-cut.
-
Glue the rest of the cup pieces. Glue a toilet paper tube with one end to the base of the cup. Then glue it with the other end to the bottom of the paper cup.
To make a cup from a paper cup, you need to take paper, a pencil or pen, cardboard, a paper cup, a tube from a roll toilet paper, paints and brush, marker, PVA glue and scissors.
Making a goblet from a glass
- Plasticine can be taken of any brand. The main thing is that it freezes in the air.
-
Make the handles of the goblet from hardening plasticine. Blind two handles for the goblet from plasticine. Lay the handles on top of each other to check that they are the same size and shape. If necessary, shorten and correct the parts to make them exactly the same.
Wait for the plasticine handles to dry. It will take about 24 hours until the plasticine completely hardens. So wait one day before proceeding.
Glue the handles to the glass. Use a hot glue gun to glue the handles to your wine or champagne glass. Let the hot glue dry for a few minutes before continuing.
Paint the cup first with a primer and then with paint. Prepare the goblet for staining by applying an aerosol primer. Then paint the goblet with spray paint.
Decorate the cup. Once the paint is dry, you can decorate the goblet however you like. Take advantage permanent marker or acrylic paint to sign the name of the goblet, or stick small decorations on the goblet.
Gather the required materials. To convert a glass into a goblet, you will need a wine or champagne glass with a stem, hardening plasticine, a hot glue gun, spray paint, and spray paint primer.
Renovation of the old cup
-
Find an old goblet. If you have an old cup lying around somewhere, try to find it. An old goblet, which is lying around somewhere useless and takes up extra space, can be given a second life if it is painted and skillful hands are applied to work.
- Before you do anything with the old cup, make sure that no one in the family objects to it.
Gather the required materials. You will need spray paint, craft decorations, spray glue (optional), plain glue, scissors, markers, and paper.
A simple but very effective craft will be a wonderful gift for your beloved men - dads, husbands, grandfathers, who undoubtedly deserve a prize. A golden cup can be created from simple and affordable materials even with kids, and it looks very original.
Cup making materials
To do this for dad memorable gift with your own hands, you need to prepare: 
- cardboard (you can use corrugated cardboard, a shoe box);
- pasta or cereals of various shapes to create the texture of the cup;
- small decorative elements (stars, beads, bolts, etc.);
- gold paint in an aerosol;
- pencil;
- scissors;
- glue gun (or PVA glue).
Step 1. Making the cardboard base of the cup
On a sheet of cardboard we draw the contours of the future cup. Sheet size depends on desired size finished product. You also need to draw two small trapeziums that will serve as stands for the cardboard base. 
Next, we cut out all the details we need. 
And at the base of the cup we make small vertical slots-grooves, into which we will then insert trapezoid-stands. 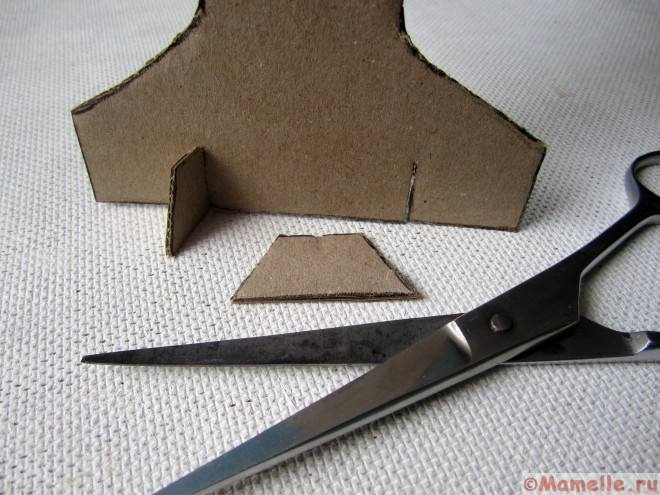
Step 2. Give the Cup Volume
So that the gift cup is not just flat, and to add a creative personality to it, we proceed to pasting the base with improvised materials: pasta, cereals, beads, etc. This can be done both with hot glue and PVA glue (in larger quantities, of course); in a certain order or randomly. In the center, it is worth allocating a place (frame) for placing a photo.
 When all the main volumetric elements of the cup are fixed, we proceed to its “gilding”. Adults should do this item on their own in a well-ventilated area so that the child does not have to breathe paint fumes.
Step 3. Decorating - finishing touches
When the paint dries and the smell fades, you can add the finishing touches: arrange a place for a photo (or insert a photo), sign a goblet: best dad, Super daddy, etc., add decorative little things in other colors and fix the “legs”-stands.  Now precious gift dear and beloved dad is completely ready! It will certainly please its owner and will become a worthy decoration of the desktop of the most successful and happy person- Dads.
We’re doing needlework again))) ... I’m just a little fed up with knitting and I want to relax, and rest, as you know, is a change in occupation))) ... Today we will do a craft with you - a cup from a bottle or a vase, as you like. A cup from a bottle is the simplest thing ... and it is done “for one, two, three ...” in general, you probably noticed that I try not to complicate life for myself or for you and everything that is done on the blog “We create - we are not lazy! )))” is extremely simple)))
For work we need:
- Empty clean plastic bottle
- old unwanted CD or DVD
- Glue, it is better if it is a glue gun, but you can get by with some kind of quick-fix super-glue, but when using it, you will have to clean the surface to be glued
- Paint ... I have everything from the same can (you can replace any other by adding PVA glue there)
Shall we start?)))
How to make a goblet from a bottle
ONCE:
- We take a suitable plastic bottle from under water, lemonade or something else and cut it in half with scissors across (do not forget to remove the cap before that))) I originally had a bottle with embossed stripes, so I cut everything out on them, or you can just leave a smooth edge ... This is the cup itself.
TWO:
- now we twist the cork on the bottle, take the prepared disk and glue the cup to the center of the disk with a glue gun. If you use glue, then it would be more rational to glue the cork to the disc first, and then screw the bottle part of the goblet there ...

THREE:
- In general, the cup is already ready))) It remains to decorate it))) For the first time, I will not bother much with different primers and putties and just cover it with spray paint ... The only thing you should pay attention to here is the layer thickness painting, it is better to make a couple of thin layers so that the paint is not glassy and does not form ugly smudges
And here is a vase or goblet from a simple plastic bottle I got it)))
I didn’t manage to avoid smudges ... especially a lot of paint got on the cup support (disc), but we’ll look at everything positively ... the paint, when interacting with the disc coating, became covered with cracks, i.e. craquelure formed))) for those who don’t know ... craquelure - this is a crack in the paint or varnish in the WORKS!!! art))), now a very popular concept among decoupage artists, they mix various chemical. reagents (varnishes) just for creating cracks on the surface, in order to give my works a certain touch of antiquity ... but everything came out by itself, without any physical and material costs - isn't that great?!!!)))
For more ideas on this topic, see the article
And don't forget to leave your comment. Your opinion matters to me!
If you liked the article, then share this information with your friends by pressing the buttons of social networks! Only, a huge request! - do not copy the entire material, please use the social buttons! Do not be shy! I'll help you as much as I can :) I had an idea - Share it! Find errors - write, correct! There was a desire to somehow help the blog - I will only be glad! Hosting costs money, and materials are not cheap these days... So, if possible, help financially)))
Cups are made from various materials– metal, glass, wood, etc. But you can make them from what is always at hand. For example, with the help of a plastic bottle and the papier-mâché technique familiar from childhood.
You will need
- plastic bottle
- cardboard
- paper or newspaper
- PVA glue
- acrylic paint
Instruction
- Take a plastic bottle and cut off about a third of the top from it.
From ordinary cardboard cut a circle with a diameter of 6-7 cm and attach it to the neck of the bottle with masking tape. - Apply pieces of paper or newspapers to the workpiece in several layers, lubricating them with PVA glue or some other glue options (note their recipes, as well as other papier-mâché techniques can be found on the Internet). So that the mass does not stick to your hands, periodically moisten them with water.
Wait for the mass to dry completely. - Align the product by carefully trimming the edges and sanding it with sandpaper.
Prime the product by applying the primer in thin layers. Wait for each layer to dry before applying the next. - Finish with metallic acrylic paint.
Decorate cup rhinestones, beads or other decorative elements, depending on your imagination. Attach them with super glue.