Extremely small sizes DNA not allowed to see her. That is why for some it appears as a purely abstract concept, and not as a truly existing molecule. Better understanding DNA Assembling a physical model of it yourself can help.
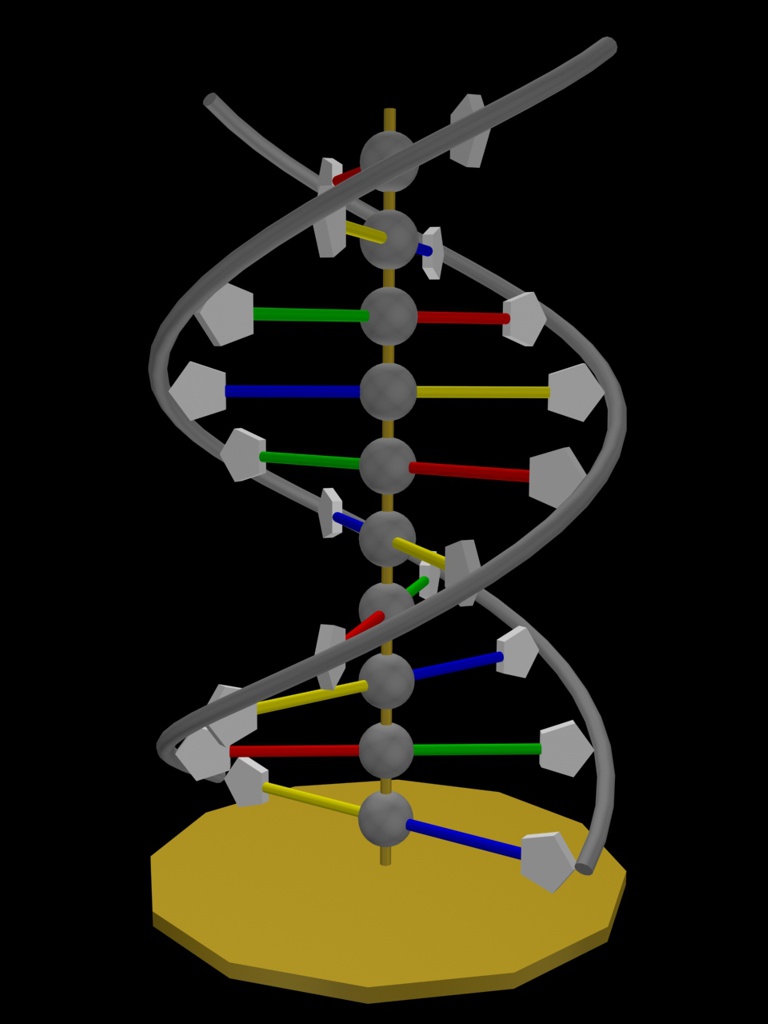
Children's construction sets are great for building molecular models, including DNA. One of the authors of this book (Arthur Wiggins) used the K"NEX construction kit to assemble a DNA model, which in Fig. 1.4 is held in the hands of the children who helped him in this matter.
This model is assembled based on the K"NEX 32 Model Building Set in a Blue Value Tub (34006), which can be purchased for $30 or $40 (see below). www.knex.com).
Rice. 1.4. DNA model held by Ray, Melissa and Tim Noe (grandsons of A.W. Wiggins)
A guide to assembling a DNA molecule can be found on the World Wide Web. http://c3.biomath.mssm.edu/knex/dna.models.knex.html
Upon completion of the work, you will receive a part of the DNA molecule containing 48 base pairs. It will be about 1 m in length.
The resulting model is slightly different from real DNA. In the model, each blue rod is at an angle of 20° to the previous rod, whereas the hydrogen bonds in real DNA are parallel within 6°. However, the model shows separate helix turns, major and minor grooves, and Watson-Crick A-T and C-G base pairs.
When assembling this model, you will be able to see the action of the lac operon to split two strands of DNA during replication and the work of restriction enzymes that cut DNA in certain places due to the “fit” of these enzymes to the molecules.
Codons
Almost all life forms on Earth use the same genetic code, the key to which is codons. If the nucleotide bases in DNA are represented as letters of the genetic code, then the codons will be words, and the gene will be a sequence of codons that form a sentence. According to the basic premise (central dogma) of gene expression (gene expression), the message from DNA is recorded on mRNA (messenger RNA), which is then transferred to proteins.
To understand how codons work, let’s consider it in detail.
♦ The sequence of nucleotide bases contained in DNA is determined by the alternation of adenine, thymine, cytosine and guanine, usually designated by the letters A, T, C and G.
♦ mRNA rewrites the nucleotide bases of DNA in the same order on the ribosome, only replacing thymine with uracil. In the ribosome, proteins are assembled by stringing amino acids on top of each other (see: List of ideas, 5. Amino acids). The order of amino acids in a protein is determined by tRNA (transfer RNA), which conveys the original order of nucleotide bases in DNA.
But how do four nucleotide bases determine which of the 20 amino acids to take when building a protein?
♦ If each nucleotide base specified one amino acid, only four amino acids could be assembled.
♦ If two nucleotide bases together defined one amino acid, there would be 4 2 = 16 amino acids.
♦ If three nucleotide bases together made up one amino acid, you could get 4 3 = 64 amino acids, which is more than enough. Thus, the codon must be a triplet - three bases going together.
The ternary nature of the codon was experimentally confirmed in 1961 thanks to the work of Francis Crick.
The question of which triplets of nucleotide bases determine amino acids was clarified in 1961 by the American biochemist Marshall Nirenberg, who established that UUU encodes the amino acid phenylalanine.
Subsequent experiments by Nirenberg and other scientists by 1966 helped establish a complete correspondence between codons and amino acids.
The tables show three-letter codons and the corresponding amino acids attached to the protein molecule being built by RNA, as well as the nucleotide bases of RNA (U, C, A and G), and not DNA (T, C, A and G). Initiating [AUG or GUG] and terminating [abbr. term; these are UAA (ochre-codon), UAG (amber-codon) and UGA (opal-codon)] [broadcast] Codons indicate the start and end of RNA transcription.
| U | C | A | G | ||
| U | UUU = fen UUC = fen UUA = lei UUG = lei | UCA = ser UCC = ser UCA = ser UCG = ser | UAU = shooting range UAC = shooting range UAA = stop UAG = stop | UGU = cis UGC = cis UGA = stop UGC = trp | U C A G |
| C | TsUU = lei TsUTs = lei TsUA = lei TsUG = lei | TsTsU = about TsTs = about TsTsA = about TsTsG = about | TsAu = xys TsAts = xys TsA = gln TsAG = gln | CGU = arg CGC = arg CGA = arg CGG = arg | U C A G |
| A | AUU = ile AUC = ile AUA = ile AUG = met | ACU = tre ACC = tre ACA = tre ACG = tre | AAU = asn AAC = asn AAA = lys AAG = lys | AGU = ser AGC = ser AGA = arg AGG = arg | U C A G |
| G | ГУУ = shaft ГУЦ = shaft ГУА = shaft ГУГ = shaft | GCU = ala GCC = ala GCA = ala GCH = ala | GAU - asp GAC = asp GAA = gl GAG = glu | GGU = gli GCC = gli GGA = gli YGG - gli | U C A G |
Note that most amino acids are specified by more than one codon. This redundancy often means that the same amino acid is specified no matter what the third nitrogenous base is in the codon. Since it is the third position that is often misread, this redundancy minimizes the consequences of reading errors.
| START | AUG, | GUG | Lei | UUA, | UUG, | ||
| TsUU, | TsUC, | ||||||
| CUA, | TSUG | ||||||
| Ala | GCU, GCC, | GCA, GCH | Liz | AAA, | AAG | ||
| April | TsGU, TsGTS, | TsGA, TsGG, | Meth | AUG | |||
| AGA, AGG | |||||||
| Asn | AAU, AAC | Hairdryer | UUU, | UUC | |||
| Asp | GAU, GAC | About | CCU, | TCC, | CCA, | tsg | |
| Cis | USU, UGC | Ser | UCU, | UCC, | UCA, | UCG, | |
| ASU, | AGC | ||||||
| Gln | TsAA, TsAG | Tre | ACU, | ACC, | ACA, | ACG | |
| Glu | GAA, GAG | Three | UGG | ||||
| Gli | GSU, GGC, | YGA, YYY | Type | UAU, | UAC | ||
| Xiz | TsAU, TsATs | Shaft | GUU, | GUTs, | GUA, | GU1 | |
| Ile | AUU, AUC, | AUA | STOP | UAG, | UGA, | UAA |
Many people probably know how easy it is to replicate part of their own DNA. The process is essentially simple. But then there are so many enthusiastic lisps from the series “oh, how he/she looks like dad/mom!” However, the task becomes much more complicated when you need to create some kind of abstract DNA model on your desk from scrap materials.
Why did I need this, you ask? Very simple. My daughter has a subject at school similar to “biology” in Russian schools. Accordingly, the students were assigned a home project, which included not only gaining theoretical knowledge about the structure of DNA, but also creating a model of it. With this model, you then need to speak in front of the teacher and the class, telling what is in it and how.
In general, this will not be exactly “my” post. It is rather dedicated to his daughter. Although I took some part in the process, this participation was mainly limited to consulting... However, what if someone is interested, or what if someone’s child at school is asked to do a similar thing. So the guide is ready.
According to the conditions of the problem, the model must satisfy certain requirements. It is interesting that the student himself can choose which conditions he will fulfill. Each point of the presentation “weighs” a certain number of credit points. Accordingly, you can follow the simple path and score a certain minimum passing score or try to implement the “maximum program”.
Initial problem statement:
Also, as follows from the problem, this does not necessarily have to be a model. This could be anything from a story book to a puzzle. The main thing is that it has some physical representation. It is separately noted that if a student decides to make a model, then it is prohibited to use a ready-made store kit. Something like this, for example.
My daughter decided to make a model and try to score the maximum number of points. OK.
We started with a computer model... I'm actually not a real welder. Well, that is, in general terms I know what DNA is, what it consists of and how it is usually depicted. No more. Therefore, from the very first steps, the daughter took the initiative. She was able to explain to me what is made of what and what is attached to what.
It turned out something like this:
When it became clear. What parts we need, we went shopping. You will need: foam balls of two sizes, wooden rods, paint, glue and a piece of MDF for the stand.

Oh yes... You will also definitely need a Dog:

To be honest, I myself don’t really understand why the hell the Dog is needed, but he himself had enough confidence in this for all of us. In fact, he was just getting in the way... But maybe I just misunderstood something.
Styrofoam balls were purchased at the dollar store. In the “everything for parties” section. I don't even want to try to figure out how foam balls could be used in the context of a party. But it’s good that they were found. This was our most problematic moment. It was necessary to find balls that would be easy to process. For example, glass beads won’t work – you’ll get tired of drilling. Wooden... In principle, they would fit. For me. But my daughter had to do the work, and I doubted that she would be able to evenly pierce a wooden ball with a hand drill just like that. Half of them will be constipated out of habit. And they are quite expensive. A softer and cheaper material was needed. The foam fit just perfectly.
Wooden slats were purchased at a building materials store. These rods are thinner counterparts to those that I used to decorate the bed and nightstands. There were no problems with this. They are always available in a wide variety in all construction stores.
Paints/glue – trivial. We took regular aerosol paint. First we tried it on one of the balls - the paint did not eat the foam. Accordingly, we bought the required number of flowers. Glue is regular PVA.
I already had a piece of MDF panel for the stand in my stash. You can start working.
First the stand. My daughter listened to my advice and printed out a template, which she glued onto a piece of MDF:

Her option was to find a saucer of a suitable diameter and draw a circle around it. But I was able to convince her that this path is not the path of the samurai. Who else but me should know that in our household we don’t have saucers of a suitable diameter with a smooth edge - they all have a wavy edge. We've already swam - we know :-)


Surprisingly it cut smoothly. I even freaked out a little...
She removed minor irregularities along the edge using a sander:

To give the stand an aesthetic appearance, its edge was processed using a milling cutter:

The result is a disk like this:

Well, the hole in the center into which the model will be inserted:

Next came the boring operation itself. It was necessary to take a foam ball and drill two through holes in it crosswise. Through the first hole, such a ball is placed on a common axis, into another hole, transverse sticks are stuck at both ends. Ten of these balls had to be made:

It was the hardest for me. You can’t imagine what torture it is to stand and watch. Instead of grabbing a Dremel yourself and quickly drilling everything in a couple of minutes. My daughter finished it in about half an hour... The leisurely methodical manner with which she did all this simply killed me :-)
She called the result a shish kebab:

Now we had to stuff cross sticks into the kebab. They were all cut from the same wooden rod as the central axis:

Again, she wanted to cut the sticks with a hacksaw, but I managed to convince her that a cutting disc and a Dremel were much faster.
Next step: take the received sticks:

... and stuff them into the kebab obtained earlier:

This was necessary in order to glue the central balls (by the way, this is not some bullshit, but real hydrogen bonds) to a common stick. In the photo you can see that another template is attached to the base on which segments are marked. The crossbars are stuck into the ball, glue is applied to the central axis, the ball is set at the desired height and rotated along the desired sector of the marking. Those. At this stage, the crossbars help position the central ball with the desired rotation angle. Repeat ten times:

After this, the cross members can be removed and the parts can be sent for painting:

Once everything was dry, we began the final assembly.
Each transverse stick had a deoxyribose attached to it... I think... Deoxyribose in the original. His dog knows what it is... It doesn’t matter. The main thing is that the daughter knows what it is. It’s up to her to push the present in front of the teacher, not me :-)
These balls themselves should be white, so there was no need to paint them:

The long and painstaking process of assembling the model:

All that remains is to add phosphate chains. As far as we understand, they are usually depicted in the form of that very recognizable double helix.
Two ribbons were cut out of thick thick silver paper:

These strips are glued to the tops of the outermost balls on the model. Like this:

At this stage I became personally involved for the first time. Two hands were not enough. It is necessary for one person to hold and guide the strips, and the second to apply glue and press.
At the very least, we managed this procedure, eventually obtaining the desired model:

According to the conditions of the task, it was also necessary to designate all the spare parts. We decided to limit ourselves to sticking the legend to the stand. As luck would have it, the printer ran out of color ink. Therefore, I had to print a b/w version and color it with felt-tip pens:

The lamination also didn't work the first time. The unit chewed two labels before making the third one normally:

I don't know what was the matter. I’ve already used this unit a hundred times and he’s never chewed anything before... One way or another, we got our label:

The model is ready:

Now my daughter needs to memorize the oral part of the presentation. But I can’t help her with this anymore. I hope she can handle it herself. She has another week to cram the theoretical part. I’ll write later how I got on with the project..
Many people probably know how easy it is to replicate part of their own DNA. The process is essentially simple. But then there are so many enthusiastic lisps from the series “oh, how he/she looks like dad/mom!” However, the task becomes much more complicated when you need to create some kind of abstract DNA model on your desk from scrap materials.
Why did I need this, you ask? Very simple. My daughter has a subject at school similar to “biology” in Russian schools. Accordingly, the students were assigned a home project, which included not only gaining theoretical knowledge about the structure of DNA, but also creating a model of it. With this model, you then need to speak in front of the teacher and the class, telling what is in it and how.
In general, this will not be exactly “my” post. It is rather dedicated to his daughter. Although I took some part in the process, this participation was mainly limited to consulting... However, what if someone is interested, or what if someone’s child at school is asked to do a similar thing. So the guide is ready.
According to the conditions of the problem, the model must satisfy certain requirements. It is interesting that the student himself can choose which conditions he will fulfill. Each point of the presentation “weighs” a certain number of credit points. Accordingly, you can follow the simple path and score a certain minimum passing score or try to implement the “maximum program”.
Initial problem statement:
Also, as follows from the problem, this does not necessarily have to be a model. This could be anything from a story book to a puzzle. The main thing is that it has some physical representation. It is separately noted that if a student decides to make a model, then it is prohibited to use a ready-made store kit. Something like this, for example.
My daughter decided to make a model and try to score the maximum number of points. OK.
We started with a computer model... I'm actually not a real welder. Well, that is, in general terms I know what DNA is, what it consists of and how it is usually depicted. No more. Therefore, from the very first steps, the daughter took the initiative. She was able to explain to me what is made of what and what is attached to what.
It turned out something like this:
When it became clear. What parts we need, we went shopping. You will need: foam balls of two sizes, wooden rods, paint, glue and a piece of MDF for the stand.
Oh yes... You will also definitely need a Dog:
To be honest, I myself don’t really understand why the hell the Dog is needed, but he himself had enough confidence in this for all of us. In fact, he was just getting in the way... But maybe I just misunderstood something.
Styrofoam balls were purchased at the dollar store. In the “everything for parties” section. I don't even want to try to figure out how foam balls could be used in the context of a party. But it’s good that they were found. This was our most problematic moment. It was necessary to find balls that would be easy to process. For example, glass beads won’t work – you’ll get tired of drilling. Wooden... In principle, they would fit. For me. But my daughter had to do the work, and I doubted that she would be able to evenly pierce a wooden ball with a hand drill just like that. Half of them will be constipated out of habit. And they are quite expensive. A softer and cheaper material was needed. The foam fit just perfectly.
Wooden slats were purchased at a building materials store. These rods are thinner counterparts to those that I used to decorate the bed and nightstands. There were no problems with this. They are always available in a wide variety in all construction stores.
Paints/glue – trivial. We took regular aerosol paint. First we tried it on one of the balls - the paint did not eat the foam. Accordingly, we bought the required number of flowers. Glue is regular PVA.
I already had a piece of MDF panel for the stand in my stash. You can start working.
First the stand. My daughter listened to my advice and printed out a template, which she glued onto a piece of MDF:
Her option was to find a saucer of a suitable diameter and draw a circle around it. But I was able to convince her that this path is not the path of the samurai. Who else but me should know that in our household we don’t have saucers of a suitable diameter with a smooth edge - they all have a wavy edge. We've already swam - we know :-)
Surprisingly it cut smoothly. I even freaked out a little...
She removed minor irregularities along the edge using a sander:
To give the stand an aesthetic appearance, its edge was processed using a milling cutter:
The result is a disk like this:
Well, the hole in the center into which the model will be inserted:
Next came the boring operation itself. It was necessary to take a foam ball and drill two through holes in it crosswise. Through the first hole, such a ball is placed on a common axis, into another hole, transverse sticks are stuck at both ends. Ten of these balls had to be made:
It was the hardest for me. You can’t imagine what torture it is to stand and watch. Instead of grabbing a Dremel yourself and quickly drilling everything in a couple of minutes. My daughter finished it in about half an hour... The leisurely methodical manner with which she did all this simply killed me :-)
She called the result a shish kebab:
Now we had to stuff cross sticks into the kebab. They were all cut from the same wooden rod as the central axis:
Again, she wanted to cut the sticks with a hacksaw, but I managed to convince her that a cutting disc and a Dremel were much faster.
Next step: take the received sticks:
... and stuff them into the kebab obtained earlier:
This was necessary in order to glue the central balls (by the way, this is not some bullshit, but real hydrogen bonds) to a common stick. In the photo you can see that another template is attached to the base on which segments are marked. The crossbars are stuck into the ball, glue is applied to the central axis, the ball is set at the desired height and rotated along the desired sector of the marking. Those. At this stage, the crossbars help position the central ball with the desired rotation angle. Repeat ten times:
After this, the cross members can be removed and the parts can be sent for painting:
Once everything was dry, we began the final assembly.
Each transverse stick had a deoxyribose attached to it... I think... Deoxyribose in the original. His dog knows what it is... It doesn’t matter. The main thing is that the daughter knows what it is. It’s up to her to push the present in front of the teacher, not me :-)
These balls themselves should be white, so there was no need to paint them:
The long and painstaking process of assembling the model:
All that remains is to add phosphate chains. As far as we understand, they are usually depicted in the form of that very recognizable double helix.
Two ribbons were cut out of thick thick silver paper:
These strips are glued to the tops of the outermost balls on the model. Like this:
At this stage I became personally involved for the first time. Two hands were not enough. It is necessary for one person to hold and guide the strips, and the second to apply glue and press.
At the very least, we managed this procedure, eventually obtaining the desired model:
According to the conditions of the task, it was also necessary to designate all the spare parts. We decided to limit ourselves to sticking the legend to the stand. As luck would have it, the printer ran out of color ink. Therefore, I had to print a b/w version and color it with felt-tip pens:
The lamination also didn't work the first time. The unit chewed two labels before making the third one normally:
I don't know what was the matter. I’ve already used this unit a hundred times and he’s never chewed anything before... One way or another, we got our label:
The model is ready:
Now my daughter needs to memorize the oral part of the presentation. But I can’t help her with this anymore. I hope she can handle it herself. She has another week to cram the theoretical part. I’ll write later how I got on with the project..
Choose a type of candy. To make side strands of sugar and phosphate groups, use hollow strips of black and red licorice. For nitrogenous bases, use gummy bears in four different colors.
- Whatever candy you use, it should be soft enough to be pierced with a toothpick.
- If you have colored marshmallows on hand, they are a great alternative to gummy bears.
Prepare the remaining materials. Take the string and toothpicks that you use to create the model. The rope will need to be cut into pieces about 30 centimeters long, but you can make them longer or shorter - depending on the length of the DNA model you choose.
- To create a double helix, use two pieces of string that are the same length.
- Make sure you have at least 10-12 toothpicks, although you may need a little more or less - again depending on the size of your model.
Chop the licorice. You will hang the licorice, alternating its color, the length of the pieces should be 2.5 centimeters.
Sort the gummy bears into pairs. In the DNA strand, cytosine and guanine (C and G), as well as thymine and adenine (T and A), are located in pairs. Choose four different colored gummy bears to represent different nitrogenous bases.
- It doesn’t matter in what sequence the pair C-G or G-C is located, the main thing is that the pair contains exactly these bases.
- Don't pair with mismatched colors. For example, you cannot combine T-G or A-C.
- The choice of colors can be completely arbitrary, it completely depends on personal preferences.
Hang the licorice. Take two pieces of string and tie each at the bottom to prevent the licorice from slipping off. Then string pieces of licorice of alternating colors onto the string through the central voids.
- The two colors of licorice symbolize sugar and phosphate, which form the strands of the double helix.
- Choose one color to be sugar, your gummy bears will attach to that color of licorice.
- Make sure the licorice pieces are in the same order on both strands. If you put them side by side, the colors on both threads should match.
- Tie another knot at both ends of the rope immediately after you finish stringing the licorice.
Attach the gummy bears using toothpicks. Once you have paired all the bears, creating groups C-G and T-A, use a toothpick and attach one bear from each group to both ends of the toothpicks.
- Push the gummy bears onto the toothpick so that at least half an inch of the pointy part of the toothpick sticks out.
- You may end up with more of some pairs than others. The number of pairs in actual DNA determines the differences and changes in the genes they form.
Today we will conduct a lesson not only in modeling, but also in chemistry, and we will make models of molecules from plasticine. Plasticine balls can be represented as atoms, and ordinary matches or toothpicks will help to show structural connections. This method can be used by teachers when explaining new material in chemistry, by parents when checking and studying homework, and by children themselves who are interested in the subject. There is probably no easier and more accessible way to create visual material for mental visualization of micro-objects.
Here are representatives from the world of organic and inorganic chemistry as examples. By analogy with them, other structures can be made, the main thing is to understand all this diversity.
Materials for work:
- plasticine of two or more colors;
- structural formulas of molecules from the textbook (if necessary);
- matches or toothpicks.
1. Prepare plasticine for modeling spherical atoms from which molecules will be formed, as well as matches to represent the bonds between them. Naturally, it is better to show atoms of different types in a different color, so that it is clearer to imagine a specific object of the microworld.
2. To make balls, pinch off the required number of portions of plasticine, knead in your hands and roll into shapes in your palms. To sculpt organic hydrocarbon molecules, you can use larger red balls - this will be carbon, and smaller blue balls - hydrogen.

3. To form a methane molecule, insert four matches into the red ball so that they point towards the vertices of the tetrahedron.

4. Place blue balls on the free ends of the matches. The natural gas molecule is ready.

5. Prepare two identical molecules to explain to your child how the molecule of the next hydrocarbon, ethane, can be obtained.

6. Connect the two models by removing one match and two blue balls. Ethan is ready.

7. Next, continue the exciting activity and explain how a multiple bond is formed. Remove the two blue balls and make the bond between the carbons double. In a similar way, you can mold all the hydrocarbon molecules necessary for the lesson.

8. The same method is suitable for sculpting molecules of the inorganic world. The same plasticine balls will help you realize your plans.

9. Take the central carbon atom - the red ball. Insert two matches into it, defining the linear shape of the molecule; attach two blue balls, which in this case represent oxygen atoms, to the free ends of the matches. Thus, we have a carbon dioxide molecule of linear structure.

10. Water is a polar liquid, and its molecules are angular formations. They consist of one oxygen atom and two hydrogen atoms. The angular structure is determined by the lone pair of electrons on the central atom. It can also be depicted as two green dots.

These are the kind of exciting creative lessons you should definitely practice with your children. Students of any age will become interested in chemistry and will understand the subject better if, during the learning process, they are provided with a visual aid made by themselves.
